Small chunk of Ash. Starting a new rabbit hole with dye's!


I made more close-ups from the pictures, I don't know what tree this is, all kinds of leafs around like Oak leaves
Then the two other pieces are here, the one on the right could be OAK ??, but I don't know.
Now I have no idea what it is. Guesses? Ignore the two on the right in the first picture. With that hole down through the center it isn't osage orange.

 See through view
When I get a hollow log I think hollow form with two windows or a sphere with a window


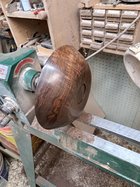
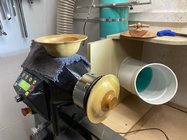
 The first picture at the metal lathe with the thread pitch set at 8 TPI and the router set to cut 95 thou is cutting the threads. The second picture shows the compound slide set at 29 degrees and set at 95Thou to cut the thread in one pass. To stop the thread cutting I back out the router and simultaneously disengage the threading feed then manually move the cross slide back. To cut a new thread I reset the compound to 95 thou and reengage the feed. The 3rd picture is back on the wood lathe sanding the thread and parting off the bolt

")


A friend showed me a picture of this cool bowl that he saw at a fair, said it won some award. I said wait, you saw this in person? I’ve been following the forum thread where that bowl was being made!Gabriel, hahaha. I can respect that. One of my favorite cereals. Yum!
Here is an update. Finished all of the burning, aside from around the foot, which is the final step. I had planned on painting the squares, but my wife was pretty adamant that I didn’t. So….no paint! Err, maybe a tiny, tiny bit. But that gave me a challenge, because I still wanted the squares to glow. So, back to the woodburner and I’m adding a glowing gradient via shaded burning. Should be cool, hopefully! And, but not painting I get to move on to the next project that much sooner lol.
View attachment 56954
View attachment 56955
Ha! Oh that’s so funny. The Hamilton County Fair had a bunch of different competition categories this year. I dropped off the bowl on Wednesday and am picking it up tomorrow evening. Hadn’t heard anything about how it did. Pretty cool to find out here—thanks for the heads up!! You’ve seen the final version before any here has thenA friend showed me a picture of this cool bowl that he saw at a fair, said it won some award. I said wait, you saw this in person? I’ve been following the forum thread where that bowl was being made!
Excellent work!


Cool pole lathe Sarah! Did you build it? That’s a thing in my list. Some day.

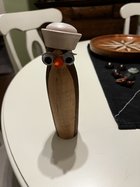
I picked up a few pieces of Black Locust from a friend yesterday. Nice calabash, I am interested in how the ammonia fuming turns out.Itty bitty Black Locust end grain calabash. These little ones are fun to make. Just finished it up, and letting it ammonia fume overnight. Hemp oil tomorrow, and in a few days will mail it out as a thanks to the friend that gave me the wood.


I agree. Doesn't look like any butternut I've ever turned.Kent, are you sure that bottom yellow piece is butternut? Only had a few pieces of it, and it was all tan/brown, not yellow...
robo hippy
Yes, I built it. Designed the whole thing to fit in the backseat of my compact car. It’s super fun.Cool pole lathe Sarah! Did you build it? That’s a thing in my list. Some day.
That looks more like Mulberry,I agree. Doesn't look like any butternut I've ever turned.


Kent, are you sure that bottom yellow piece is butternut? Only had a few pieces of it, and it was all tan/brown, not yellow...
robo hippy


It looks similar to ash but the texture isn't quite right.No, I'm not. That shot on the lathe was just after I put on finish so it's not quite that yellow. Here's another picture.
View attachment 57390
Here are some pieces from the same tree.
View attachment 57391
I was using an app to ID trees that I later realized gets a lot of things wrong. Plus this tree was dead so no leaves to use for ID. It's fairly soft wood.
@Kent Reisdorph the rim of that Cedar is awesome.

It looks similar to ash but the texture isn't quite right.
.jpg")
Good Lord I love walnut-beautiful bowl!My contribution for the thread... Someone at the Church Bazaar we were vendoring at offered me a couple large pieces of leftover walnut slabs that had been sitting around taking up space in his shop for a few years.. I cut out a nice figured piece from what looked to be the end that had some crotch figure and made him a bowl out of it...(Planning to give it to him as a surprise next time I see him... he already bought one of my larger bowls at the bazaar.) Then I managed to find another section crack-free, and got a 11.5 inch piece rounded out of it and started another bowl - Also was my first time trying out Ack's (Who happens to actually be sorta local, 10 miles east of us on U.S. 6) and quite surprised with how well it worked - Just some sanding paste and carnauba wax after sanding 120-180-240-320 ... Still on the lathe and I hope to get it mounted to the recess I cut and finish the inside maybe tomorrow.


I have seen bumped out rings like that before, and they were from fence wire.... Hope you don't run into any...
robo hippy
Marc-I've got a nice ash bowl I plan to use India Ink on. Thanks for the tutorial here! I will probably also finish over that with multiple coats of TruOil, and buff with silver embellishing wax, as I'm going for a kind of radical design that looks stunning in my head. We'll see...Update on my Ash bowl with the unfortunate stain. I know this is something that ash does, but in this case is unattractive.
View attachment 57396
So, I coated it with India ink, right from the bottle. Didn’t do it right, though. I applied it like it was an oil finish, rubbed it with a small pad. That cause way too much ink, and it dries quickly and became uneven. What was I thinking?! So, I thinned the ink with alcohol and tried adding some wet and rubbing in, which evened things somewhat. Not enough, though, but did rub to a very nice gloss. I need to study and work on using shellac for the high gloss thing, but not today.
View attachment 57397
I removed all of the ink that I could with plenty of alcohol and was liking the look except from the areas that I had to really scrub.
I brushed on a thin layer of ink, once again. Let dry and wiped down with alcohol. Buffed lightly and started a top seal with trued and true. I‘ll do proper studio photos and post to our gallery, but this is the look I ended up with. I’m enjoying the early wood/late wood contrast.
View attachment 57398View attachment 57399
Finished it today,Good Lord I love walnut-beautiful bowl!


Don't complain Marc, it is still a beautiful bowl, engrain always (almost) will take more of anything than side grain, trying to take some off is pretty hard, as it will just go deeper into the wood, especially in open grain or the open early wood as in Ash.Update on my Ash bowl with the unfortunate stain. I know this is something that ash does, but in this case is unattractive.
View attachment 57396
So, I coated it with India ink, right from the bottle. Didn’t do it right, though. I applied it like it was an oil finish, rubbed it with a small pad. That cause way too much ink, and it dries quickly and became uneven. What was I thinking?! So, I thinned the ink with alcohol and tried adding some wet and rubbing in, which evened things somewhat. Not enough, though, but did rub to a very nice gloss. I need to study and work on using shellac for the high gloss thing, but not today.
View attachment 57397
I removed all of the ink that I could with plenty of alcohol and was liking the look except from the areas that I had to really scrub.
I brushed on a thin layer of ink, once again. Let dry and wiped down with alcohol. Buffed lightly and started a top seal with trued and true. I‘ll do proper studio photos and post to our gallery, but this is the look I ended up with. I’m enjoying the early wood/late wood contrast.
View attachment 57398View attachment 57399