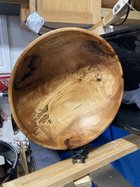
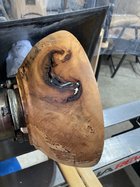
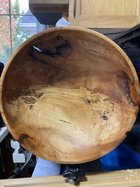
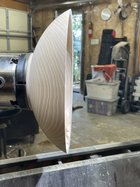
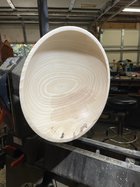
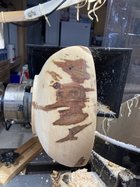
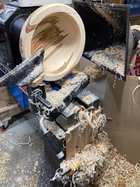
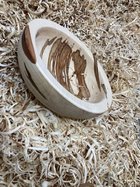
A quicker way to finish the base is to turn the nubin down to a cone shape maybe to 1/8th" diameter at the finished base then off the lathe with a bench chisel cut and trim the remains off.Got back in the shop this evening and finished turning and sanding this Black Oak bowl. I bought some jumbo jaws a while back, but this was the first opportunity to use them. They are brilliant. That said, my bowl is near vertical (but not quite) at the rim, so once tailstock support was removed the bumpers could only do so much. So, I taped the bowl in place and turned away the remaining interior of a small foot.
This is the first time I’ve turned a bowl of this form, and I’m fairly pleased. More to come!
View attachment 56729
View attachment 56730
View attachment 56731

-
March 2026 Turning Challenge: Olla! (click here for details) -
Congratulations to David Wyke, People's Choice in the February 2026 Turning Challenge (click here for details) -
Congratulations to Tim Connell for "Black Locust Basket Illusion Series #4" being selected as Turning of the Week for March 16, 2026 (click here for details) -
Welcome new registering member. Your username must be your real First and Last name (for example: John Doe). "Screen names" and "handles" are not allowed and your registration will be deleted if you don't use your real name. Also, do not use all caps nor all lower case.
You are using an out of date browser. It may not display this or other websites correctly.
You should upgrade or use an alternative browser.
You should upgrade or use an alternative browser.
What’s on your lathe?
- Thread starter Rusty Nesmith
- Start date
Thanks Don, for sure. That’s what I usually do, but for this one I needed to hollow out the foot about a centimeter deep, and I didn’t have the clearance with my tailstock in place (at least not with any tool that I currently own). I have thought about reshaping a scraper specifically for this purpose though.
Making pendants for Christmas gifts (my favorite bartenders get one) using my Joyner Off Center jig.
Using left over purple heart wood that was 5/8" thick that I ripped in half.
This one is probably favorite one I made in the last few days.
I call it "I am smiling"

Using left over purple heart wood that was 5/8" thick that I ripped in half.
This one is probably favorite one I made in the last few days.
I call it "I am smiling"
A couple of progress pics. This bowl is a small step up from my Luminous Biscuits bowl that I posted a while ago. I learned some things along the way during that piece’s construction, and I’m learning more things. So far, I’ve laid out the pattern on the exterior, and also rough cut the rim of the bowl using a small saw. Next step is to finish shaping the rim via a carving knife and riffler files.


Last edited:
Hi Michael:
Looks perfect for a soup bowl - already trimmed by crackers. Triscuit or Wheat Thins this time? Waiting anxiously for the final result!
Cheers,
Barry W. Larson
Calgary, Alberta, Canada eh!
Looks perfect for a soup bowl - already trimmed by crackers. Triscuit or Wheat Thins this time? Waiting anxiously for the final result!
Cheers,
Barry W. Larson
Calgary, Alberta, Canada eh!
Barry, that cracked me up. Gosh, can you imagine a soup bowl that automatically generated crackers. What a fantasy! I’d say these are more on the line of mini wheat thins. Kid sized haha
Mike, I got some used synthetic wine bottle corks from a friend. Mounted them in lathe and drilled holes in them for the longer metric bolts, just another option, I think they were something like 1 3/4" long.Got back in the shop this evening and finished turning and sanding this Black Oak bowl. I bought some jumbo jaws a while back, but this was the first opportunity to use them. They are brilliant. That said, my bowl is near vertical (but not quite) at the rim, so once tailstock support was removed the bumpers could only do so much. So, I taped the bowl in place and turned away the remaining interior of a small foot.
This is the first time I’ve turned a bowl of this form, and I’m fairly pleased. More to come!
View attachment 56729
View attachment 56730
View attachment 56731
Tom Gall
TOTW Team
Nice bowl, Michael. Might be time to splurge on a vacuum chuck.Got back in the shop this evening and finished turning and sanding this Black Oak bowl. I bought some jumbo jaws a while back, but this was the first opportunity to use them. They are brilliant. That said, my bowl is near vertical (but not quite) at the rim, so once tailstock support was removed the bumpers could only do so much. So, I taped the bowl in place and turned away the remaining interior of a small foot.
This is the first time I’ve turned a bowl of this form, and I’m fairly pleased. More to come!
View attachment 56729
View attachment 56730
View attachment 56731
 Before I set up a vacuum system (1994) I used tape to hold the bowl as well. Mounted a disc of wood (sometimes covered with rigid foam insulation) and cut a groove for the rim of the bowl and taped it down.
Never a fan of the Cole/jumbo jaws - too fiddly and unreliable. This topic has been discussed several times in the past. I like flat jaws - so I converted them to a large set of jumbo jaws. Here's a link from the past.
Cole jaws tip
Here is a quick tip on using cole jaws (or mega remounting bowl jaws as Record Power calls them) with angular buffer stops. These stops have a four different profiles which are hard to see how each is marked without extremely good light. Take a felt tip pen and highlight the text on one side...
Working in a commission piece. Segmented cherry with a chevron feature ring. Will also have a secondary feature ring near the top. Near the capacity of my 12" lathe. There is a large waste block glued to the segmemted floating base. Will be turned down to around 1/2" or so wall thickness. 
rough turned this today. Now in a paper bag

and here’s what happens when you forget you had a mortise and not a tenon. Already plugged. Another valuable lesson added to the myriad others.

and here’s what happens when you forget you had a mortise and not a tenon. Already plugged. Another valuable lesson added to the myriad others.
@Vincent Vogel that is a great idea! Thanks.
@Tom Gall thanks! And you are right there. Next big thing on my list is a long overdue bandsaw. Vacuum chucking setup is after that. I’ve had your universal board in mind for a while. That link was a good read. I really like the pvc foam addition to the jumbo jaws. Looks a lot better than individual bumpers. And, whatever happened to that amazing bowl in the pics you said you never finished? Looks really nice.
In any case, here is another update on the bowl. I finished refining the rim. It’s not perfect, but the burning will mask any imperfections. I am also adding a single layer of squares on the bowl’s interior. The layout was challenging, and the burning/painting will be more so. Looking forward to the challenge!


That said, I find myself at a stopping point because both of my spear point woodburning tips are currently out of commission. Need to remedy that ASAP. Kind of works out though, as I have a couple of other more time sensitive projects to finish. The list never stops growing!
@Paul May that’s a nice bowl. Very convincing 3D illusion from your chevron pattern. Looking forward to see the final piece.
@Tom Gall thanks! And you are right there. Next big thing on my list is a long overdue bandsaw. Vacuum chucking setup is after that. I’ve had your universal board in mind for a while. That link was a good read. I really like the pvc foam addition to the jumbo jaws. Looks a lot better than individual bumpers. And, whatever happened to that amazing bowl in the pics you said you never finished? Looks really nice.
In any case, here is another update on the bowl. I finished refining the rim. It’s not perfect, but the burning will mask any imperfections. I am also adding a single layer of squares on the bowl’s interior. The layout was challenging, and the burning/painting will be more so. Looking forward to the challenge!
That said, I find myself at a stopping point because both of my spear point woodburning tips are currently out of commission. Need to remedy that ASAP. Kind of works out though, as I have a couple of other more time sensitive projects to finish. The list never stops growing!
@Paul May that’s a nice bowl. Very convincing 3D illusion from your chevron pattern. Looking forward to see the final piece.
Last edited:
Working on another winged emerging bowl, trying for a higher rim on top this time.

Hey Michael. Don't you have rock formations like that in Tennessee? I seem to remember seeing that somewhere in an article. Can't wait to see the result.@Vincent Vogel that is a great idea! Thanks.
@Tom Gall thanks! And you are right there. Next big thing on my list is a long overdue bandsaw. Vacuum chucking setup is after that. I’ve had your universal board in mind for a while. That link was a good read. I really like the pvc foam addition to the jumbo jaws. Looks a lot better than individual bumpers. And, whatever happened to that amazing bowl in the pics you said you never finished? Looks really nice.
In any case, here is another update on the bowl. I finished refining the rim. It’s not perfect, but the burning will mask any imperfections. I am also adding a single layer of squares on the bowl’s interior. The layout was challenging, and the burning/painting will be more so. Looking forward to the challenge!
View attachment 56776
View attachment 56777
That said, I find myself at a stopping point because both of my spear point woodburning tips are currently out of commission. Need to remedy that ASAP. Kind of works out though, as I have a couple of other more time sensitive projects to finish. The list never stops growing!
@Paul May that’s a nice bowl. Very convincing 3D illusion from your chevron pattern. Looking forward to see the final piece.
Hey Paul. Funny you should mention that. Yes, sort of. Tennessee and it’s neighboring states have quite a bit of karst topography, primarily dominated with limestone. You can find many places where rock fractures quite geometrically (you can also see this with sandstone as well, for example of the Cumberland Plateau). I’ve had this small piece of limestone for about 15 years, just collecting dust. A small piece break off years ago and I tried to use it for a project but ended up ruining the fragment.Hey Michael. Don't you have rock formations like that in Tennessee? I seem to remember seeing that somewhere in an article. Can't wait to see the result.

I’m closing in on this Ash bowl, 13 inches across. I especially like the clear bright color and quiet grain. The small bark inclusion and single worm tunnel are fine, too.
But there’s that stain. The ‘stain’ went through the log. Heartwood that’s off center, or ?? I feel I need to do something with it, don’t think I can put it up for sale as is.
Opinions, insights and suggestions welcome!
But there’s that stain. The ‘stain’ went through the log. Heartwood that’s off center, or ?? I feel I need to do something with it, don’t think I can put it up for sale as is.
Opinions, insights and suggestions welcome!
Attachments
Tom Gall
TOTW Team
@Michael Anderson "And, whatever happened to that amazing bowl in the pics you said you never finished? Looks really nice."
Still not finished ... I screwed up! The butternut bowl was first turned 18-20 yrs. ago and I finished the interior at that time (probably Waterlox). Several years ago I finished carving and sanding the exterior. Without thinking, I applied an oil finish (not Waterlox) ... the color difference was like day & night. Unhappy!!! Will have come up with a fix - might have to resort to coloring ... just not sure how that will look over the oil finish.
Still not finished ... I screwed up! The butternut bowl was first turned 18-20 yrs. ago and I finished the interior at that time (probably Waterlox). Several years ago I finished carving and sanding the exterior. Without thinking, I applied an oil finish (not Waterlox) ... the color difference was like day & night. Unhappy!!! Will have come up with a fix - might have to resort to coloring
... just not sure how that will look over the oil finish.Piece of redwood from a sink cutout in a new counter at the nonprofit outside San Francisco where my son works. Brought it back from a visit there recently.
Cut the blank this morning, turned it, carnauba waxed it to keep it close to natural color, boxed, and mailed it back this afternoon


Cut the blank this morning, turned it, carnauba waxed it to keep it close to natural color, boxed, and mailed it back this afternoon
@Marc Banka Thats a beautiful Ash bowl. I like the clear grain as well. I wondered about the stain, so I did some digging. Apparently Ash can oxidize if the cut log sits during the warmer season. Here is a relevant article:
 www.inwoodlands.org
@Tom Gall ahhhh I see. That’s tough!! Especially for all of the work you put in. I wonder if you could remove the oil with VM&P naphtha? Could be worth a try. Wouldn’t hurt at least!
Indiana Woodland Steward - Effect of EAB on Ash Wood Quality, Qualitative Obs
@Tom Gall ahhhh I see. That’s tough!! Especially for all of the work you put in. I wonder if you could remove the oil with VM&P naphtha? Could be worth a try. Wouldn’t hurt at least!
- Joined
- Feb 28, 2021
- Messages
- 1,808
- Likes
- 1,622
- Location
- Roulette, PA
- Website
- www.reallyruralwoodworks.com
If you mean that large brown-ish blotchy patch in the bowl, it looks to me pretty normal for Ash - Most of my ash bowls to date have some degree of that coloring to it in places..I’m closing in on this Ash bowl, 13 inches across. I especially like the clear bright color and quiet grain. The small bark inclusion and single worm tunnel are fine, too.
But there’s that stain. The ‘stain’ went through the log. Heartwood that’s off center, or ?? I feel I need to do something with it, don’t think I can put it up for sale as is.
Opinions, insights and suggestions welcome!
love the thin rim and shape of bowl.
Michael I have been using the Jumbo jaws for a long time, looking at yours, they seem to have old buttons, I replaced and bought an extra set as well after many years and hard uses, as they started to crumble and split I got new sets of buttons and also a smaller Jumbo jaw set for my midi lathe.Got back in the shop this evening and finished turning and sanding this Black Oak bowl. I bought some jumbo jaws a while back, but this was the first opportunity to use them. They are brilliant. That said, my bowl is near vertical (but not quite) at the rim, so once tailstock support was removed the bumpers could only do so much. So, I taped the bowl in place and turned away the remaining interior of a small foot.
This is the first time I’ve turned a bowl of this form, and I’m fairly pleased. More to come!
View attachment 56729
View attachment 56730
View attachment 56731
Seems like most are not familiar with the Oneway Jumbo jaws and Mega Jumbo jaws, as these buttons are basically tapered steel pieces with a rubber sleeve around them, so you can stack these 2 or even 3 high and still have a solid holding piece, I only have used them 2 high.
The plastic and square buttons are not as well holding and will give, where the Oneway buttons will stay solid with only the rubber sleeve giving a little.
I have used a bungie cord ones tho hold a large bowl that I did not trust to stay, but have learned that using the gouges cutting in the direction of the headstock the pieces are safe to be turned (I have no tailstock on my outboard large lathe setup) and I very often return the bowls while held with the buttons (carefully and light cuts will do it) anything over 11" I have to use my large lathe.
The other thing is having the bowl wall flaring in or out just a little when rough turning the pieces and using all the buttons you can get on the jaws (8 or even 12)
I hope you can use the ideas I have found to help me over the years, ;-))
Here is a bowl with a high curved rim, and I used stacked buttons to hold and finish turn the foot/bottom.

This bowl was held on the inside and I am returning the outside that way plus a way to hold it in a chuck for the inside turning.

Here are a couple of old and dried Apple bowls that are oval and have warped rims, and some without a tenon or recess, I use buttons in the threaded holes and place 4 more in the slots to hold the bowl, then I have small wedges under the rim to prevent the piece from wobbling and held in place with paper tape.

As for holding really abstract shapes, I turned 3 shallow bowls in the topside (no picture holding it) and then turned the Botton so I had two ridges to elevate the piece .

Last edited:
Nova makes these squarish holders and the four sides have different grips. They are good for the arsenal. There are all kinds of options. I find Cole jaws pretty versatile.

Mark the coloration is typical for White Ash, especially when the tree gets bigger and older, here is a picture of a large White Ash I just cut and hauled home.I’m closing in on this Ash bowl, 13 inches across. I especially like the clear bright color and quiet grain. The small bark inclusion and single worm tunnel are fine, too.
But there’s that stain. The ‘stain’ went through the log. Heartwood that’s off center, or ?? I feel I need to do something with it, don’t think I can put it up for sale as is.
Opinions, insights and suggestions welcome!

Here is a bowl from a different Ash.

Thanks a lot of the information @Leo Van Der Loo . Very valuable! I especially like your use of the jaws holding irregular shapes. Very clever! I will definitely be replacing my buttons ASAP.
Managed to find a small spear tip, so I don’t have to wait for my other woodburning pens to be repaired. That said, it’s a tiny tip, so it is a bit rowdier than I would like for long lines. But it gets the job done. Spent a few late night hours last night burning my pattern and filling in some of the squares. Burning the inside layer was challenging, but not too bad. Just took a steady hand. Still much more work to do though!


Last edited:
Michael:
Now I'm getting a breakfast as opposed to a lunch vibe.... Chocolate Shreddies rather than soup and crackers... ! Kidding aside, looking really good! I need to look into burning tools as I'm really liking the results you are presenting. Keep those of us following along from home posted as the piece progresses.
Cheers.
Barry
Haha, chocolate shreddies! Love it. Oak (especially Red Oaks) can be pretty challenging to burn evenly because of the large pores and the dramatic difference between early and late growth. Sometimes the tip want to plunge almost all the way though, and the rays cause it to go off course rather easily. That said, the grain really shows through the burn pattern (which I love!). The effort is well worth it, imo.
sign the bottom, Michael. Came out beautiful!
Oh yeah, will definitely sign it when it’s done. A lot of steps left though. And thank you Alan!sign the bottom, Michael. Came out beautiful!
")
@Leo Van Der Loo , thanks for the photos. Of interest is that the stained wood begins quite near the outside of the log. After reading the article @Michael Anderson shared, (thank you!) I’m comfortable attributing my stain to EAB attack, which is probably why this tree was brought down. My usual is to rough turn very shortly after the tree is felled, ie. no sitting on a stack, so wouldn’t think, nor does it look like the stains from improper storage.
Noteworthy for me in the article is this statement, “ Mixing of the white sapwood with the brown and often variegated heartwood creates contrast and can lead to questions from the consumer.” This is where I’m at. If this were to be for utility, a daily user, I wouldn’t worry. But, I have higher expectations for a gallery piece. I feel that in this setting it will be seen as a defect. Of course this might be me projecting my own OCD.
My plan at present is to make it black, very black. India ink, right out of the bottle. Then a few coats of tried and true varnish for a bit of gloss and protection. I feel that with the nice curve, simple and light, the black will be chic and crisp.
I‘ll post again after it’s finished.
p.s. Once accounting for the bark inclusion my stain is near the outside and right adjacent to the beetle tunnel.
I only got one ash tree that had the brown/olive heart in it. That color causes bowls to sell instantly. Just one of those colors.... I think ash can be prone to ring shake, and Marc, that line near the top looks like shake. I had one bowl for years and it eventually cracked, and after I could plainly see the ring shake that caused it....
robo hippy
robo hippy
That White Ash is from way before the Emerald Ash Borer, it has more to do with taking up what is in the soil it grows in.@Leo Van Der Loo , thanks for the photos. Of interest is that the stained wood begins quite near the outside of the log. After reading the article @Michael Anderson shared, (thank you!) I’m comfortable attributing my stain to EAB attack, which is probably why this tree was brought down. My usual is to rough turn very shortly after the tree is felled, ie. no sitting on a stack, so wouldn’t think, nor does it look like the stains from improper storage.
Noteworthy for me in the article is this statement, “ Mixing of the white sapwood with the brown and often variegated heartwood creates contrast and can lead to questions from the consumer.” This is where I’m at. If this were to be for utility, a daily user, I wouldn’t worry. But, I have higher expectations for a gallery piece. I feel that in this setting it will be seen as a defect. Of course this might be me projecting my own OCD.
My plan at present is to make it black, very black. India ink, right out of the bottle. Then a few coats of tried and true varnish for a bit of gloss and protection. I feel that with the nice curve, simple and light, the black will be chic and crisp.
I‘ll post again after it’s finished.
p.s. Once accounting for the bark inclusion my stain is near the outside and right adjacent to the beetle tunnel.View attachment 56860
As you can see these bowls here are all clear white grain, I was told by local sawyers that Ash on the east side of the city I was living in would be clear, and on the west side of town, it would have the brown coloration.
As for being down, that large Ash had been down for less than 2 days on a dry slope where I cut it up and rolled these pieces up before loading them in my Expedition, (hard work)

No slots these, which make it much more versatile, looks also a quite a light construction, I rather see and use the Oneway Jumbo jaws and Mega Jumbo jaws with it's steel center buttonsNova makes these squarish holders and the four sides have different grips. They are good for the arsenal. There are all kinds of options. I find Cole jaws pretty versatile.
View attachment 56824
In Kansas we call it mineralized, where it grows can effect color. But not always.That White Ash is from way before the Emerald Ash Borer, it has more to do with taking up what is in the soil it grows in.
As you can see these bowls here are all clear white grain, I was told by local sawyers that Ash on the east side of the city I was living in would be clear, and on the west side of town, it would have the brown coloration.
As for being down, that large Ash had been down for less than 2 days on a dry slope where I cut it up and rolled these pieces up before loading them in my Expedition, (hard work)
View attachment 56875
Just my personal opinion but I like the first picture best without any fill in the squaresManaged to find a small spear tip, so I don’t have to wait for my other woodburning pens to be repaired. That said, it’s a tiny tip, so it is a bit rowdier than I would like for long lines. But it gets the job done. Spent a few late night hours last night burning my pattern and filling in some of the squares. Burning the inside layer was challenging, but not too bad. Just took a steady hand. Still much more work to do though!
View attachment 56836
View attachment 56837
View attachment 56838
Leo quite a stash of ash! What do you use on the knots for storing and drying after roughing?
That’s fair, and I understand. I have been mulling around an idea for a while that’s similar. I need to dial in my burning a bit first, and find the right wood.Just my personal opinion but I like the first picture best without any fill in the squares
That will look excellent, especially with the grain. Looking forward to the final piece.My plan at present is to make it black, very black. India ink, right out of the bottle. Then a few coats of tried and true varnish for a bit of gloss and protection. I feel that with the nice curve, simple and light, the black will be chic and crisp.