I find the "random chunk of wood on the shop floor" turnings are some of the most interesting turnings I do.

-
April 2026 Turning Challenge: Salad Bowl! (click here for details) -
Congratulations to David Bartell, People's Choice in the March 2026 Turning Challenge (click here for details) -
Congratulations to Gianni Di Gregorio for "Simple Piercing" being selected as Turning of the Week for April 20, 2026 (click here for details) -
Welcome new registering member. Your username must be your real First and Last name (for example: John Doe). "Screen names" and "handles" are not allowed and your registration will be deleted if you don't use your real name. Also, do not use all caps nor all lower case.
You are using an out of date browser. It may not display this or other websites correctly.
You should upgrade or use an alternative browser.
You should upgrade or use an alternative browser.
What’s on your lathe?
- Thread starter Rusty Nesmith
- Start date
Beech?
")
On my lathe right now is a piece of mystery wood given to me by my doctor, who got it from a friend who makes custom (high dollar) staircases. It's extremely heavy and dense and looks to be either some rosewood variant or bubinga. I'm making a tool handle as a test piece to try out some twist lock tool inserts that I made on my metal lathe. It may turn out to be too heavy to be practical, or the extra weight might help to steady my increasingly weak and arthritic hands. Time will tell.
Tried a piece of the ash log that's been drying in the shop for the last 6 months. Brought it over to the band saw and diced it up on the diagonal.


After a few hours turning the inside and sanding my hands off I broke out the torch again. I like the angles on it. Came out ok.

After a few hours turning the inside and sanding my hands off I broke out the torch again. I like the angles on it. Came out ok.
In between coats of finish I grabbed some Walnut and Maple and made some more mushrooms for the craft fair.

Unknown chunk of wood. Lousy lighting on pix makes it look like an uneven finish. Shape reminds me of a witch cauldron but Halloween is near.


 The first one is an end grain bowl about 6" dia x 4" made from a cut off 6 x 6 in eastern white pine. The goblet is about 4.5" diameter and about 5" tall with a wall thickness of less then 1/16th". The third picture has the ring tool that was used to turn the inside of the bowl and the burred undercutting tool used to under cut the base of the goblet.
Working on my swap piece 

Piece of highly figured something and a piece of Walnut to top it off.
Posted finished pick in gallery. Forgot to get before pics.
Posted finished pick in gallery. Forgot to get before pics.
 Lidded bowl -- took a great class at John C. Campbell folk school.
some mulberry. Turns really nice, especially after struggling with NIP tear out. 


Looks good for a first try! I have done a couple and they are hard. I mean really hard.... Here is the one I made if you need to see one completed. This one was created after about a dozen failuresA first attempt at an inside out ornament. I'm demonstrating the process for our club in about 6 weeks.
https://www.aawforum.org/community/media/urchin-window-ornament.21105/
My first try at an emerging winged bowl, spalted pecan. So far easier than anticipated.

There are very few of them that I like, but I do like yours. They are hard to visualize and trying to get it round really doesn't work because there are always the flat window sides. Well done!Looks good for a first try! I have done a couple and they are hard. I mean really hard.... Here is the one I made if you need to see one completed. This one was created after about a dozen failures
https://www.aawforum.org/community/media/urchin-window-ornament.21105/
Spalted sugarberry again.

Yes it is hard to get a smooth curve without having points or flat areas along the ornaments side. I find it can be done with a French or curved scraper which helps in creating a smooth curve and transition. I use a D-Way Boxmaster doubled ended negative rake scraper, but any curved scraper should work. Also make a few with CA glue to practice on. You will be able to see the mistakes or corrections before you glue a final one with Titebond.There are very few of them that I like, but I do like yours. They are hard to visualize and trying to get it round really doesn't work because there are always the flat window sides. Well done!
Tom Gall
TOTW Team
Another option is to leave the outside square - except for the upper & lower finials/icicles. The interior pattern is a reverse turning of the design you want when reversed and glued. Probably best to draw it out and take measurements. Some simple examples include: Christmas tree, bell, snowman, heart, etc. I have a friend that made these decades ago. Some were multiples which produced a different pattern on each face. And some were multiples glued together to get 8 different patterns around the piece, as I recall. Couldn't find any photos - sorry!There are very few of them that I like, but I do like yours. They are hard to visualize and trying to get it round really doesn't work because there are always the flat window sides. Well done!
Just experiment & play before your demo.
Grabbed a chunk of Maple and Apple and made two pens. Grabbed a piece of Ash and started my next idea.


Walnut bowls that I roughed out a few months ago. Lots of interesting color patterns, none of which seem to relate to heartwood/sapwood, or to any kind of spalting.

This is today’s lot, before hollowing. All from the same walnut orchard except for the elm lidded box (still needs a knob), the little elm bowl next to it, and another of the small ones which is spalted tan oak.

This is today’s lot, before hollowing. All from the same walnut orchard except for the elm lidded box (still needs a knob), the little elm bowl next to it, and another of the small ones which is spalted tan oak.
My first semi-serious attempt at a bowl. Kind of a process piece for a spindle turner trying something new; I expected it to blow up, but it didn't. Not big, but I like it. About 3.5 by 3.5, out of the firewood pile.

very nice shape and work! Congrats.
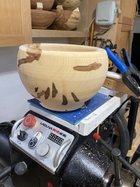
Black Oak rice bowl(ish) form. Destined for some burning and painting. Will be 6.5”d x 4”h when finished. Should be fun!

Last edited:
Nice little bowl Michael. it does not really need any work to it, but enjoy what you do, and show it !!Black Oak rice bowl(ish) form. Destined for some burning and painting. Will be 6.5”d x 4”h when finished. Should be fun!
View attachment 56701
Thank you Leo! You know me, can’t leave well enough alone. Hehe. Just kidding. I’ve been doing a lot of pure turning lately, and I feel like my paints are getting jealous.Nice little bowl Michael. it does not really need any work to it, but enjoy what you do, and show it !!

Hi Michael:
I agree with Leo that your bowl looks excellent as presented. However, I cannot wait to see what you do to augment the form. (Hint: I'm always looking for inspiration and things to try!)
Cheers.
Barry W. Larson
Calgary, Alberta, Canada eh!
I agree with Leo that your bowl looks excellent as presented. However, I cannot wait to see what you do to augment the form. (Hint: I'm always looking for inspiration and things to try!)
Cheers.
Barry W. Larson
Calgary, Alberta, Canada eh!
Ayyy, cheers Barry! Work has really been putting a dent on my fun time lately, but I’ve had this idea floating around in my head for a while. Here’s hoping it turns out alright!Hi Michael:
I agree with Leo that your bowl looks excellent as presented. However, I cannot wait to see what you do to augment the form. (Hint: I'm always looking for inspiration and things to try!)
Cheers.
Barry W. Larson
Calgary, Alberta, Canada eh!
Chunk of apple on the lathe today. Waiting for my cheap photo booth setup to come in on Friday before I take any more finished pics.


I was cutting some small trees off of the edge of my driveway and this white oak (burr oak I think) looked like it contained a Goblet form in the flair near the ground.


 The driveway was cut into my property in 2003 so that scar seen in photos 1 & 3 likely happened during the clearing process. The form will have a wall thickness of about 1/8th" and the stem has yet to be cut down to size
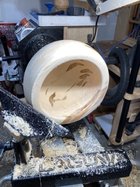
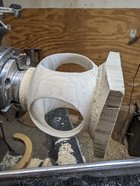
The driveway was cut into my property in 2003 so that scar seen in photos 1 & 3 likely happened during the clearing process. The form will have a wall thickness of about 1/8th" and the stem has yet to be cut down to sizeGot back in the shop this evening and finished turning and sanding this Black Oak bowl. I bought some jumbo jaws a while back, but this was the first opportunity to use them. They are brilliant. That said, my bowl is near vertical (but not quite) at the rim, so once tailstock support was removed the bumpers could only do so much. So, I taped the bowl in place and turned away the remaining interior of a small foot.
This is the first time I’ve turned a bowl of this form, and I’m fairly pleased. More to come!


This is the first time I’ve turned a bowl of this form, and I’m fairly pleased. More to come!
great job. Sometimes the bowl stays on better when you instead use expansion mode with your Cole jaws. Tailstock support is very helpful. I got cocky once, took it off, and lost the bowl. Also run under 800 rpm or so. And they make a variety of holder shapes (what are those things called) that sometimes work better.my bowl is near vertical
Ha! Great minds think alike! Some idiot I know{me} turned the foot off of his project before finishing the inside! Didn't have any jaws that would hold so had to improvise. Got the job done.

Odie
Panning for Montana gold, with Betsy, the mule!
Applied D.O. last evening to a small African Gabon Ebony bowl. Has a couple hairline checks visible in photo.
Also, brought to round an Australian Bimblebox burl bowl. Some of you may remember this one, as there was a thread discussing it. When I initially roughed it out, a very big void appeared that was a complete surprise to me. I've decided to finish it up and keep that void.....we'll see how it turns out.....fingers crossed on this one! Bottom of bowl will have to be extra thick, so as not to punch through on both sides. As usual with many of these exotic woods, I'll have to deal with other scattered cracks, bark inclusions, and voids in this one. Comments welcome.
-o-


Also, brought to round an Australian Bimblebox burl bowl. Some of you may remember this one, as there was a thread discussing it. When I initially roughed it out, a very big void appeared that was a complete surprise to me.
I've decided to finish it up and keep that void.....we'll see how it turns out.....fingers crossed on this one! Bottom of bowl will have to be extra thick, so as not to punch through on both sides. As usual with many of these exotic woods, I'll have to deal with other scattered cracks, bark inclusions, and voids in this one. Comments welcome.-o-
Last edited:
Thanks Alan. I thought about expansion mode. Whenever I use this on a closed form bowl, that will be the method for sure. This bowl wouldn’t have much purchase though—and to be honest I think the rubber needs replacing ASAP. The surface near the rim was marred a little but that’s okay given the upcoming embellishments. I do need to look into some replacements. I like the squares that I occasionally see that have different angles on each side. And oh yeah, I kept it pretty slow, maybe 450 was the max speed I went.great job. Sometimes the bowl stays on better when you instead use expansion mode with your Cole jaws. Tailstock support is very helpful. I got cocky once, took it off, and lost the bowl. Also run under 800 rpm or so. And they make a variety of holder shapes (what are those things called) that sometimes work better.
Odie
Panning for Montana gold, with Betsy, the mule!
Thanks Alan. I thought about expansion mode. Whenever I use this on a closed form bowl, that will be the method for sure. This bowl wouldn’t have much purchase though—and to be honest I think the rubber needs replacing ASAP. The surface near the rim was marred a little but that’s okay given the upcoming embellishments. I do need to look into some replacements. I like the squares that I occasionally see that have different angles on each side. And oh yeah, I kept it pretty slow, maybe 450 was the max speed I went.
Michael....... You can also get longer screws, and stack the rubber grippers. Washers, nuts and other things can be used to fill in the space, and raise the height of the rubber grippers. This is metric threads, but easily obtainable with different lengths from an industrial supply.
Beware of the expansion mode not to use too much pressure. I've cracked a couple of bowls in the past using expansion mode. That bowl wall of yours looks fairly thin, so you can't use a lot of pressure with that one....
As it is, your bowl will be difficult to gain purchase from the rubber grippers while using the contraction mode.....because if you tighten slightly too much, the bowl itself will raise up from a solid mate to the mega jumbo jaws. When that happens, the bowl will try to vibrate as you turn......not good for getting the best possible refined cut.....
You can also create a special gripping surface like the interior of this bowl, turned for the specific purpose of nice solid grip from the rubber grippers using the expansion mode. This surface will eventually be turned away on the final shape of the bowl......it's only there for a solid grip, and the good refined cut that is possible by including it. The shape of this rim is also a good one for using the rubber grippers in the contraction mode.....when you grip right on the corner about 1/2" up from the top of the rim.
-o-
Last edited:
@odie thanks for all of the tips!! Good stuff. I do tend to be leery with anything expanding, especially oak. Good call about longer screws and adding spacers, too.
I did notice that the surface tried to raise from the plates when I contracted too tightly. That’s the primary reason I added the tape after I removed my tailstock, so I could use JUST enough pressure on the grippers And then, took very light cuts, of course.
I did notice that the surface tried to raise from the plates when I contracted too tightly. That’s the primary reason I added the tape after I removed my tailstock, so I could use JUST enough pressure on the grippers And then, took very light cuts, of course.
A few weeks back I got quite the score on some very large persimmon. The tree was 24" at the base! I have never heard of one even close to this size. My understanding is that persimmon is american ebony, it's actually a species of ebony. 

Got a chance to turn some of it. Much of the wood looks very blond when it's cut and then when the surface dries some it seems to darken and oxidize into a completely different animal. I have never seen another wood do this. It will be interesting to see how it finishes once it's dry. I guess it's prone to cracking but it turns beautifully.
Got a chance to turn some of it. Much of the wood looks very blond when it's cut and then when the surface dries some it seems to darken and oxidize into a completely different animal. I have never seen another wood do this. It will be interesting to see how it finishes once it's dry. I guess it's prone to cracking but it turns beautifully.
Dave Landers
Beta Tester
@Michael Anderson get yourself some strapping tape - that's the stuff with embedded strings. Probably doesn't matter for gently removing a nub, but when it matters, It'll hold a lot better than painters tape.
Noted—thanks Dave! That’s a much better product for this purpose. Will buy some.@Michael Anderson get yourself some strapping tape - that's the stuff with embedded strings. Probably doesn't matter for gently removing a nub, but when it matters, It'll hold a lot better than painters tape.