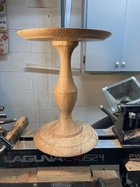
• Beware of Counterfeit Woodturning Tools (click here for details)
  • Johnathan Silwones is starting a new AAW chapter, Southern Alleghenies Woodturners, in Johnstown, PA. (click here for details)
  • Congratulations to William Rogers for "Ambrosia Maple Platter" being selected as Turning of the Week for September 16, 2024 (click here for details)
  • Welcome new registering member. Your username must be your real First and Last name (for example: John Doe). "Screen names" and "handles" are not allowed and your registration will be deleted if you don't use your real name. Also, do not use all caps nor all lower case.

What’s on your lathe?

Joined
Jan 23, 2023
Messages
172
Likes
233
Location
Calgary, AL
End table red oak, 19" top 16" base, 24" tall
Hi Vince:
Well executed piece. Gives me some inspiration for using a round piece of oak (red oak as well, I think) that I was given years ago and couldn't bear to throw out. I like the pedestal - not too ornate, but it has a pleasing shape - well to my eye anyway. Well done!
Barry W. Larson
Calgary, Alberta, Canada eh!
 
Joined
Oct 13, 2016
Messages
1,123
Likes
1,685
Location
Rainy River District Ontario Canada
Almost forgot that Black Ash bowl with the big worm hole, it was a difficult piece to turn, kept plucking pieces out and would not cut clean no matter which tool I used.

So after all the tries and the then best result was cleaned with a scraper and sanding, I hope to never get another piece that is such a difficult wood to turn.

Actually it is not the Black Ash wood, as I have turned it before and there was no problem with those, just this one.

Black Ash with hole.jpg
Black Ash bowl plug shown inside.jpg
Black Ash with plugged hole.jpg
Black Ash bowl bottom.jpg
 
Joined
Dec 29, 2022
Messages
931
Likes
1,019
Location
West Central, IL
Leo's worm hole looks interesting at least.
This one is just a mess. It doesn't look good enough to leave as is, the detail makes it pretty hard to use a liquid epoxy so putty it is because there is another spot 180 degrees that has more of an ingrown knot with a hole that will require liquid.

Anyone used that 3m wood filler that looks like some kind of Bondo?

I'd use Lilliput but the colors wouldn't look right with it except black maybe or white with some streaks in it but I read somewhere that lilliput doesn't tint well.

Other suggestions? Thought about thickening up regular epoxy to a putty with cabosil but I didn't have good luck the last time I tried that.

And when I turn the inside it's going to show as well whatever I put in there.
 

Attachments

  • IMG_20230926_225349116_HDR.jpg
    IMG_20230926_225349116_HDR.jpg
    226 KB · Views: 22
Joined
Oct 13, 2016
Messages
1,123
Likes
1,685
Location
Rainy River District Ontario Canada
Leo's worm hole looks interesting at least.
This one is just a mess. It doesn't look good enough to leave as is, the detail makes it pretty hard to use a liquid epoxy so putty it is because there is another spot 180 degrees that has more of an ingrown knot with a hole that will require liquid.

Anyone used that 3m wood filler that looks like some kind of Bondo?

I'd use Lilliput but the colors wouldn't look right with it except black maybe or white with some streaks in it but I read somewhere that lilliput doesn't tint well.

Other suggestions? Thought about thickening up regular epoxy to a putty with cabosil but I didn't have good luck the last time I tried that.

And when I turn the inside it's going to show as well whatever I put in there.
Sam I would probably take some of the same wood and make a near fitting plug, fill in around with coffee grind and CA, which make it look like bark inclusion, just an ID

holesto fill.jpg
 
Joined
Dec 29, 2022
Messages
931
Likes
1,019
Location
West Central, IL
Sam I would probably take some of the same wood and make a near fitting plug, fill in around with coffee grind and CA, which make it look like bark inclusion, just an ID

View attachment 56029

Unfortunately, I don't have any boxelder laying around. This was a rough turned bowl so best I could do is some shavings. Maybe pack it full of shavings and let some color of epoxy settle into it? With a hot glue dam around it to raise it up to the height of that radius in the middle of the hole?
 
Joined
Aug 16, 2022
Messages
339
Likes
791
Location
Butler, PA
Outstanding form! Really like that column. How did you attach the spindle to the table top and the base?
Thanks Monty, I haven't attached anything yet since I have to make another one that's identical for my best customer (wife). I'm going to use epoxy and screws up through the bottom for the base and epoxy/finish nails put in at an angle from the bottom side for attaching the top. It took quite a bit of wood to make this, one whole slab 2" thick x 20" wide x 8' long to make one. It took quite a bit of playing around to get the design right. I made a drawing first and modified it from there until it looked right.
 
Joined
Aug 16, 2022
Messages
339
Likes
791
Location
Butler, PA
Hi Vince:
Well executed piece. Gives me some inspiration for using a round piece of oak (red oak as well, I think) that I was given years ago and couldn't bear to throw out. I like the pedestal - not too ornate, but it has a pleasing shape - well to my eye anyway. Well done!
Barry W. Larson
Calgary, Alberta, Canada eh!
Thanks Barry, wife and I like simple things, sometimes less is more. Get your slab out and go for it.
 
Joined
Feb 28, 2021
Messages
1,343
Likes
1,191
Location
Roulette, PA
Website
www.reallyruralwoodworks.com
Unfortunately, I don't have any boxelder laying around. This was a rough turned bowl so best I could do is some shavings. Maybe pack it full of shavings and let some color of epoxy settle into it? With a hot glue dam around it to raise it up to the height of that radius in the middle of the hole?
if I didn't have any branches of same wood, I'd treat it as a dense knot and use pretty much any small branch wood I had laying around (as long as its growth rings were not too much of a contrast) Maple, Lilac, Rhododendron, what have you.... Worst case, run to hardware store and buy some wood dowels in approximate sizes needed, drill out to whatever size and drive the plug in with glue/epoxy/whatever mixed with dry coffee grounds or fine dark sawdust - just a thought..
 
Joined
Feb 16, 2021
Messages
1,101
Likes
1,593
Location
Parkersburg, West Virginia
My wife wanted a pumpkin to hold mason jar style candles. I had a big chunk of walnut laying around. I turned it pumpkin shape. Then installed an indexing tool I made. Marked it out for 20 equal lines. Then carved them out with an angle grinder with an 80 grit flapper wheel. She was originally going to paint it but said she likes it better natural. I forgot to add that I hollowed it to 3/8” thick.IMG_0657.jpeg
 
Joined
Jan 23, 2023
Messages
172
Likes
233
Location
Calgary, AL
My wife wanted a pumpkin to hold mason jar style candles. I had a big chunk of walnut laying around. I turned it pumpkin shape. Then installed an indexing tool I made. Marked it out for 20 equal lines. Then carved them out with an angle grinder with an 80 grit flapper wheel. She was originally going to paint it but said she likes it better natural. I forgot to add that I hollowed it to 3/8” thick.View attachment 56039
 
Joined
Oct 13, 2016
Messages
1,123
Likes
1,685
Location
Rainy River District Ontario Canada
Unfortunately, I don't have any boxelder laying around. This was a rough turned bowl so best I could do is some shavings. Maybe pack it full of shavings and let some color of epoxy settle into it? With a hot glue dam around it to raise it up to the height of that radius in the middle of the hole?
Sam I have also used ground bark to fill with, an CA to keep it in, I tried and do not like Epoxy mix, there is really only a limited amount you can mix in or the epoxy won't work.

So that is why I use the filling material to pack tight into the opening, then use CA to fill the gaps in the packed material 1thumb.gif
 
Joined
Jan 6, 2013
Messages
194
Likes
761
Location
Delaware
Yes on the first guess.
The upright bracket is holding a block of wood with a pencil run through it to mark the potential slot paths. By advancing the index ring and also the chain over toothed gears of different sizes I work out amplitude, frequency, and location of the waveforms on the piece. Once I get the spacing right the pencil block comes out, the router goes in, and the slots get cut.

IMG_6977.jpeg
 
Joined
Jan 23, 2023
Messages
172
Likes
233
Location
Calgary, AL
Yes on the first guess.
The upright bracket is holding a block of wood with a pencil run through it to mark the potential slot paths. By advancing the index ring and also the chain over toothed gears of different sizes I work out amplitude, frequency, and location of the waveforms on the piece. Once I get the spacing right the pencil block comes out, the router goes in, and the slots get cut.

View attachment 56056
Thanks Pat! Neat looking device. That took some engineering to work out!

Barry
 
Joined
Mar 1, 2006
Messages
155
Likes
82
Location
Arkansas City, KS
Yes on the first guess.
The upright bracket is holding a block of wood with a pencil run through it to mark the potential slot paths. By advancing the index ring and also the chain over toothed gears of different sizes I work out amplitude, frequency, and location of the waveforms on the piece. Once I get the spacing right the pencil block comes out, the router goes in, and the slots get cut.

View attachment 56056
Looks a lot like the Harvey Fein set up. Just not as complicated.
 
Joined
Apr 30, 2022
Messages
625
Likes
2,995
Location
Beavercreek, OH
Website
www.ovwg.org
Ready for the OVWG Symposium!! Top photo is my work I am donating to the Silent Auction and bottom photo is my brother's work he is donating. Two BOC Boxes along with two lidded boxes, two basket illusions, two pieces of wood and two Instant Gallery pieces all making the trip south in a few weeks!!
IMG_20230928_104137.jpgIMG_20230928_104152.jpg
 

odie

TOTW Team
Joined
Dec 22, 2006
Messages
7,227
Likes
10,979
Location
Panning for Montana gold, with Betsy, the mule!
This California Oak burl bowl has been on the lathe for the past 4 days, and has been giving me a lot of trouble getting nice clean cuts..... This is because of the erratic and intense burl figure, and complicated shape. Lots of voids and bark inclusions to deal with, too. It did require some extra sanding in the interior, where a patch of burl end grain was right in the bottom, and not cooperating. All the rules for getting good clean cuts were tossed out the window on this one! It all turned out OK, though! :)

-o-

20230927_223022.jpg 20230927_223040.jpg 20230927_223104.jpg
 
Last edited:
Joined
Oct 15, 2015
Messages
194
Likes
461
Location
Smithville, MO
Odie, I notice you use a sacrificial glue block on the bottom of your bowls. Do you use this same technique on green wood by using gorilla glue or something compatable with damp wood?
 

odie

TOTW Team
Joined
Dec 22, 2006
Messages
7,227
Likes
10,979
Location
Panning for Montana gold, with Betsy, the mule!
Odie, I notice you use a sacrificial glue block on the bottom of your bowls. Do you use this same technique on green wood by using gorilla glue or something compatible with damp wood?

No, I don't Don......I use a chuck to do the first turn roughouts on twice turned bowls....

-o-
 

Jim McLain

Artist
Joined
Apr 7, 2011
Messages
264
Likes
1,850
Location
Socorro, New Mexico
Website
www.lucadecor.com
Not on my lathe yet but got these two pieces of cottonwood burl that have been drying in my yard all summer ready to go. I won’t turn cottonwood green, can’t take the small. The small one is 12 1/2 x 7. I see large hollow forms in them but would also make nice open bowls.
 

Attachments

  • IMG_1188.jpeg
    IMG_1188.jpeg
    125.8 KB · Views: 15
Joined
Dec 28, 2019
Messages
506
Likes
577
Location
Tallahassee, FL
Charles, I've been turning many years but catches, big or small, always takes my breath away. Were you able to finish turning the remainder of the piece?
Not yet. It's suppose to be a stein I'm working on for my niece. I had to removed 3 layers of wood. I'm going to glue up and attach some replacement wood but first I'm going to make sure what I have is true, it seems a little wonky when I spin it on the lathe.
 
Joined
Jan 23, 2020
Messages
691
Likes
964
Location
Shingletown CA
I like to torture myself turning ancient, super dry redwood burl. After I took this, I had to resand the finish off and start over. Water base or alcohol base finishes do not work well on redwood. I ended up using my arch nemisis...wipe on poly. The shame!
 

Attachments

  • IMG_9694.JPG
    IMG_9694.JPG
    890.6 KB · Views: 18
  • IMG_9696.JPG
    IMG_9696.JPG
    640.4 KB · Views: 17
Back
Top