
-
February 2026 Turning Challenge: Cookie Jar! (click here for details) -
Congratulations to Chad Eames for "Red Tines" being selected as Turning of the Week for February 23, 2026 (click here for details) -
Welcome new registering member. Your username must be your real First and Last name (for example: John Doe). "Screen names" and "handles" are not allowed and your registration will be deleted if you don't use your real name. Also, do not use all caps nor all lower case.
You are using an out of date browser. It may not display this or other websites correctly.
You should upgrade or use an alternative browser.
You should upgrade or use an alternative browser.
What’s on your lathe?
- Thread starter Rusty Nesmith
- Start date
I would core it for sure.First attempt at a burly. Deciding if I should attempt to take a core before finishing inside.
Odie
Panning for Montana gold, with Betsy, the mule!
Been setting up my new Yuba cargo bicycle lately.....a couple days ago, I installed a trailer to haul my dogs in. Also doing a lot of summertime things, including riding the Harley......
Been ignoring my 1928 Model A Ford pickup truck lately.....
Still working in the shop almost daily, and when winter hits, I'll be back full time in the shop again.....")
Generally enjoying the summertime good life!
Curly Maple....sometimes also known as fiddleback, tiger, or flame figuring.....
-o-
.JPG")
.JPG")
Been ignoring my 1928 Model A Ford pickup truck lately.....
Still working in the shop almost daily, and when winter hits, I'll be back full time in the shop again.....
Generally enjoying the summertime good life!
Curly Maple....sometimes also known as fiddleback, tiger, or flame figuring.....
-o-
Love it!Here’s the conclusion of the little bowl re-work from post #885 a little while back. I used a rotary tool and a fine ball burr to deepen the flutes so I could add some fine pyro texture to the high spots and still retain a nice grooves texture. I also textured the rim in a very random way and added pyro texture to the high spots. Smoothed the flutes and grooves with a fine round riffler. I also decided to round the bottom, but left a small concave spot so the bowl would sit level. It’s not perfect, but I think the piece was transformed from something clunky to something pretty pleasant. Onward!
View attachment 53586
View attachment 53587
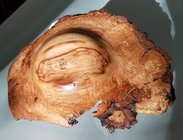
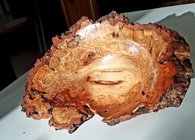
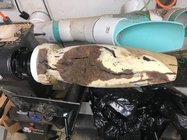
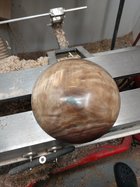
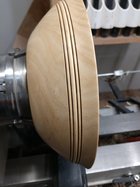
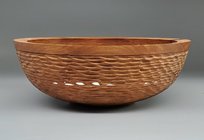
Just off the lathe this morning. The walnut tree was cut live in September of 2022 and the majority of the turnings made from it were finished during the winter while they were fresh green therefore the bark was tight and the sap wood had not begun to darken. This bowl was taken from a section of the main trunk about 4' long with two large branches that had been cut off and the whole piece was split down the middle on my Woodmizer band mill. The blank was cut (2 days ago) from the area between the 2 branches and during the initial turning the bark was coming loose so I stripped it all off. The photos detail some of the final inside cuts and the removal of the tenon.

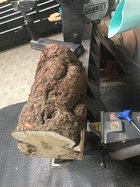
The 3 tools pictured are all hand held so that they can be presented at the best cutting angle which is about as they are shown. The first tool (right to left) is home made with a cupped carbide insert, the 2nd is a standard OneWay Termite tool and the 3rd is a custom burred shear scraper mounted on a 3/4" bar & my Stewart Arm Brace handle.


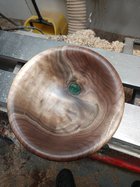
This is bowl mounted on a friction drive (a big piece of low quality basswood on a faceplate) and note when I made the tenon I made Shure that the that the cup center was marked. The 3rd pic is the tenon removed but the nubin will stay in place for final truing the foot.
The 3 tools pictured are all hand held so that they can be presented at the best cutting angle which is about as they are shown. The first tool (right to left) is home made with a cupped carbide insert, the 2nd is a standard OneWay Termite tool and the 3rd is a custom burred shear scraper mounted on a 3/4" bar & my Stewart Arm Brace handle.
This is bowl mounted on a friction drive (a big piece of low quality basswood on a faceplate) and note when I made the tenon I made Shure that the that the cup center was marked. The 3rd pic is the tenon removed but the nubin will stay in place for final truing the foot.
Yesterday was a rough day, the rough part were the wasps in the wood pile! 


Not on the lathe, but close by and related. I just finished piping in a new dust collection leg and drop for a floor sweep to make clean-up a bit easier. I have a take-off for a fine dust collection hood just above the floor sweep. Still have to work on that part a bit. Piped with Nordfab Quick connect pipe - great product and easy to install solo. It is a bit pricy, but given the ease of changing the ducting, worth it IMHO! Next up some curtains to contain the chips to the lathe area, and a ceiling filter to collect least some of the fine dust the hood misses.
Cheers.
Barry W. Larson
Calgary, Alberta, Canada eh!
Cheers.
Barry W. Larson
Calgary, Alberta, Canada eh!
Attachments
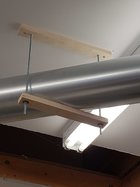
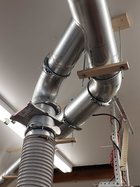
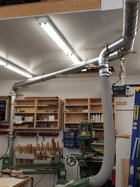
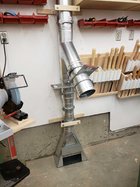
WOW! Your shop is really nice and clean. The piping looks great.Not on the lathe, but close by and related. I just finished piping in a new dust collection leg and drop for a floor sweep to make clean-up a bit easier. I have a take-off for a fine dust collection hood just above the floor sweep. Still have to work on that part a bit. Piped with Nordfab Quick connect pipe - great product and easy to install solo. It is a bit pricy, but given the ease of changing the ducting, worth it IMHO! Next up some curtains to contain the chips to the lathe area, and a ceiling filter to collect least some of the fine dust the hood misses.
Cheers.
Barry W. Larson
Calgary, Alberta, Canada eh!
Last week I heard the wonderful sound of a chainsaw in my neighbors yard. Which led to a few days of processing and roughing out about 50 cherry bowl blanks. Now back to finish turning some of my dry blanks that I have been stockpiling before going back to my teaching job.


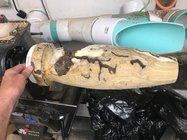
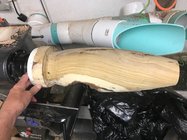
I'm finally able to try some of the redbud from a 50yr old tree my aunt had me cut down. The tree was burled up on the outside but mostly hollow. I was still able to get 6" of useable width to make an 18" vase. I will start hollowing it later today. There won't be a lot holding it together so we will see how that goes.
This piece of wood gave me a reminder of how quickly things can go south even when you are being careful. I had it between centers getting it round. It began shaking violently and I got the lathe turned off without the piece coming off. There was a void under the tailstock end that didn't exit to the outside. No way to know it was there. The tailstock had punched thru the 1/4'' of wood and how it managed to stay on the lathe is a miracle. I use a forester bit on the headstock end and go in 1/2" so the spur drive sets in a depression. I think this is what kept the piece on the lathe instead of the floor.
This piece of wood gave me a reminder of how quickly things can go south even when you are being careful. I had it between centers getting it round. It began shaking violently and I got the lathe turned off without the piece coming off. There was a void under the tailstock end that didn't exit to the outside. No way to know it was there. The tailstock had punched thru the 1/4'' of wood and how it managed to stay on the lathe is a miracle. I use a forester bit on the headstock end and go in 1/2" so the spur drive sets in a depression. I think this is what kept the piece on the lathe instead of the floor.
Attachments
All those cherry blanks look great. I am jealous.
Looks great!My version of a wobble bowl. The one where I shouldn't have picked at the knot.
I like fill on the "knot-hole" it seems to add something - a certain "je ne sais quoi" to the bowl. Sort of like an emerald peeking out of its host shale....My version of a wobble bowl. The one where I shouldn't have picked at the knot.
Cheers.
Barry W. Larson
Calgary, Alberta, Canada eh!
Handle making mode. I bought a 3/4” bottom bowl gouge in Louisville and just got around to turning a beast of a handle. Just a tad under 24” long. Woodcraft had a 60% off sale on Canarywood, so I got this 2”x2”x24” blank for around $10. Couldn’t pass it up.

First time turning a bowl in a month and a half. Definitely had to knock off the rust. Black Oak calabash.

Last edited:
I really like the slight outward sweep near the lip of that bowlFirst time turning a bowl in a month and a half. Definitely had to knock off the rust. Black Oak calabash.
View attachment 54520
Thanks Kent!I really like the slight outward sweep near the lip of that bowl
Something you may want to experiment with. Powdered aniline dyes for oil based finishes. I use lacquer thinner and naptha to dissolve the powder, then mix directly with poly or oil finishes.the ink is shellac base, so quickly seals the surface. I want something to go deeper to penetrate for a more durable finish.
Its all just one big experiment!
W. D. Lockwood Dyes | 1 Oz Packets in All Colors
We carry the full line of W. D. Lockwood Dyes, the finest wood dyes available. The company has been setting the standard for coloring and staining wood since
Was asked for one of these. Forgot to grab a pic of making the nose.


Very cute!Was asked for one of these. Forgot to grab a pic of making the nose.
Was working on a thin Black Cherry calabash, and misjudged the bottom thickness. Didn’t go through, but might as well have. Can’t win ‘em all. Wonder if I can save it with some embellishment? Kidding, kidding…

Edit: always fun to break these open and check out the walls to get a full value learning experience. This bowl was a little bit squattier (flat-bottomed) than it should have been, so I'm not too worked up about it. Nevertheless, I should have been a bit more careful with checking the bottom. Like Will below, I just got caught up with the gouge.

Edit: always fun to break these open and check out the walls to get a full value learning experience. This bowl was a little bit squattier (flat-bottomed) than it should have been, so I'm not too worked up about it. Nevertheless, I should have been a bit more careful with checking the bottom. Like Will below, I just got caught up with the gouge.
Last edited:
Mom said there would be days like this. Cut it out and glue in more wood. Turn it into a nice contrasting base.Was working on a thin Black Cherry calabash, and misjudged the bottom thickness. Didn’t go through, but might as well have. Can’t win ‘em all. Wonder if I can save it with some embellishment? Kidding, kidding…
View attachment 54540
I’m just going to let it go. Fancy firewood for when the weather gets a bit coolerMom said there would be days like this. Cut it out and glue in more wood. Turn it into a nice contrasting base.
It was sort of an experimental one anyway (consoling myself!). I fumed it with ammonia for a couple of hours and got these cool stripes (oiled because I was curious).

Last edited:
I've been wanting to try Aqua Fortis on one but haven't gotten around to it.I’m just going to let it go. Fancy firewood for when the weather gets a bit cooler
It was sort of an experimental one anyway (consoling myself!). I fumed it with ammonia for a couple of hours and got these cool stripes (oiled because I was curious).
View attachment 54541
You just sent me down a rabbit hole. I wasn’t familiar with aqua fortis. Some rich colors you can achieve on cherry! I guess it’s a pretty popular technique in the gun stock world?I've been wanting to try Aqua Fortis on one but haven't gotten around to it.
It was popular in the 1700's It is made from steel dissolved in nitric acid. The dissolved solids embed themselves in the grain where it's open resulting in a darker color. Turns the wood green. The color is achieved by "blooming" with heat. I used a heat gun for this. This example has two coats of AF before blooming.You just sent me down a rabbit hole. I wasn’t familiar with aqua fortis. Some rich colors you can achieve on cherry! I guess it’s a pretty popular technique in the gun stock world?
Photos of .54 caliber 1760 era Flintlock that I built. Metals were completely hand-finished with files, and stone polished. Wood was fitted by hand with chisels then wet sanded to 4000. Finished with AF and Tried and True oil. Steel blued with Oxpho-Blue. I have about 125 hours in this project.


Aqua fortis is especially effective on curly maple -- originally used on the gunstocks of long rifles. John Keeton introduced me to aqua fortis. I've taught turning classes at the Folk School for some years. He used to build long rifles and used aqua fortis. On curly maple it makes the curl spectacular. We've used it in some of the classes when some curly maple has been available.You just sent me down a rabbit hole. I wasn’t familiar with aqua fortis. Some rich colors you can achieve on cherry! I guess it’s a pretty popular technique in the gun stock world?
The heat treatment is crucial. Before you get the beautiful browns and golds, it goes through some really hideous shades of pink and green. My reaction is generally "OH NO -- what have I done????" Then more heat makes things great.It was popular in the 1700's It is made from steel dissolved in nitric acid. The dissolved solids embed themselves in the grain where it's open resulting in a darker color. Turns the wood green. The color is achieved by "blooming" with heat. I used a heat gun for this. This example has two coats of AF before blooming.
Thanks for the info Monty and Bob, that’s really interesting. I like that kind of stuff, so I’m definitely putting it in the Rolodex.
Monty. that flint lock is incredible! The effort was certainly worth it. What a cool project, and a whole separate skillset. Have you built other rifles or was this just a one-off?
Monty. that flint lock is incredible! The effort was certainly worth it. What a cool project, and a whole separate skillset. Have you built other rifles or was this just a one-off?
I would pour in a layer of alumilite and turn it back down to a good thickness.Was working on a thin Black Cherry calabash, and misjudged the bottom thickness. Didn’t go through, but might as well have. Can’t win ‘em all. Wonder if I can save it with some embellishment? Kidding, kidding…
View attachment 54540
I just did the same thing on a white oak bowl, I tried to fix it but was too thin so I used it for experimenting with burning the grain and fuming. It makes for good practice pieces for finish and embellishmentWas working on a thin Black Cherry calabash, and misjudged the bottom thickness. Didn’t go through, but might as well have. Can’t win ‘em all. Wonder if I can save it with some embellishment? Kidding, kidding…
View attachment 54540
Thanks for the suggestion, Gary. I'm just going to set it aside and keep it for practice, etc... (like Vince mentioned)
I blew through the side of this one while gleefully enjoying how wonderfully my gouge was cutting!?! I unfortunately had spent far too many hours hand carving the outside. I amazingly didn't get very upset as I knew it was not fixable and just one of life's moments out of my control. (This time!)
I keep it on my shelf as a gentle reminder
I keep it on my shelf as a gentle reminder
Attachments
Oh no! Amazing how you can just zone out and then....whoops! Lol. That's a bummer you had a lot of time invested already, but like you said, not worth getting too worked up about. There's always the next oneI blew through the side of this one while gleefully enjoying how wonderfully my gouge was cutting!?! I unfortunately had spent far too many hours hand carving the outside. I amazingly didn't get very upset as I knew it was not fixable and just one of life's moments out of my control. (This time!)
I keep it on my shelf as a gentle reminder
Dave Landers
Beta Tester
This is the way.I’m just going to let it go.
IMO trying to "fix" a mistake like this almost always looks like you tried to fix a mistake.
The term you need for this situation is "artisanal firewood"Fancy firewood for when the weather gets a bit cooler
- Joined
- Apr 27, 2004
- Messages
- 9,324
- Likes
- 6,130
- Location
- Lakeland, Florida
- Website
- www.hockenberywoodturning.com
It’s usually easier and more rewarding to make another rather than fix a big errorI’m just going to let it go. Fancy firewood for when the weather gets a bit coole
You could do another exploding bowl
Calipers are a tool I use. I can still get too thin but not unexpectedly.
Michael, you display the appropriate attitude toward the learning process. Those of us who are learning turning skills often learn by observing what we did differently than we did previously when we have successful experiments as well as by observing what we did wrong when things don't go well. If we are able to accept our less than successful projects, and try again rather than be defeated, because we spent a lot of time and effort on something that didn't meet our goals , we will improve our skills. And as we observe improvements, we also enjoy the process. I look forward to seeing your next attempt because you are not afraid to push the envelope. When you succeed the pieces are very artistic. I am inspired by both pics of your turnings and by your thoughts on various threads.Can’t win ‘em all.