• Beware of Counterfeit Woodturning Tools (click here for details)
  • Johnathan Silwones is starting a new AAW chapter, Southern Alleghenies Woodturners, in Johnstown, PA. (click here for details)
  • Congratulations to Jim Hills for "Journey II" being selected as Turning of the Week for May 6th, 2024 (click here for details)
  • Welcome new registering member. Your username must be your real First and Last name (for example: John Doe). "Screen names" and "handles" are not allowed and your registration will be deleted if you don't use your real name. Also, do not use all caps nor all lower case.

Russ Braun's Segmenting Project

Joined
Nov 18, 2012
Messages
664
Likes
1,884
Location
Torrance, CA
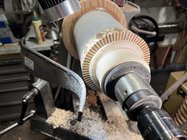
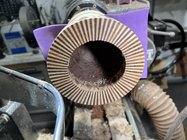
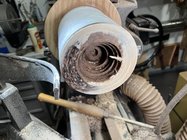
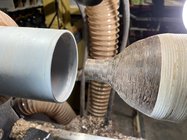
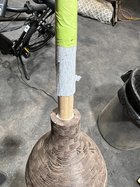
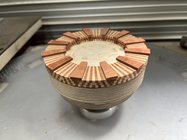
Feature ring complete, still mounted to the face plate/ waste block, I glued the base and feature ring together. This is a big vacuum Chuck, the base is barely exposed. Here is what the two parts look like glued together. I’m glad the inside is not visible. I really screwed myself gluing them up this way, no real way to do the final turning except the vacuum Chuck. Look how much this Chuck covers the vessel. I have a couple of smaller ones….I might try making an adapter……hmmmm!!

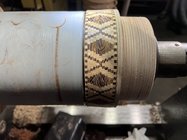
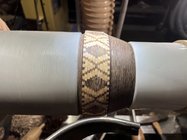
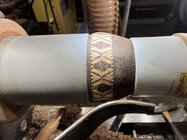
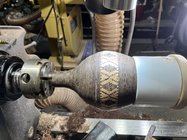
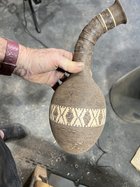
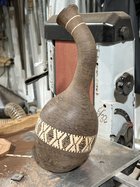
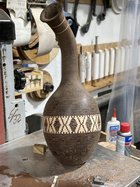
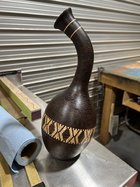
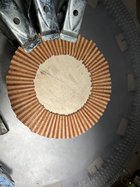
The feature ring plan had a flaw in it. I wanted to set the solid diamonds on a single Wenge segment, that would have screwed up the X’s. I like it this way. The feature ring has enough girth to get a nice blending curve; I think the top will be about the same. I will know more tomorrow.
 

Attachments

  • IMG_1724.jpeg
    IMG_1724.jpeg
    396.7 KB · Views: 18
  • IMG_1725.jpeg
    IMG_1725.jpeg
    432.5 KB · Views: 18
  • IMG_1726.jpeg
    IMG_1726.jpeg
    489.3 KB · Views: 18
Joined
Nov 18, 2012
Messages
664
Likes
1,884
Location
Torrance, CA
Time to get away from the current way of mounting these parts to the lathe. Here, the base w/ feature ring is parted off the waste block using my vacuum Chuck. I flattened the feature ring before cleaning up the inside as I am always concerned about moving the vessel while hogging out the interior. I mimicked the wall thickness of the base (picture posted in #160). Again, the idea is to create the outside form and then return to the inside to create a more uniform wall thickness.
 

Attachments

  • IMG_1725.jpeg
    IMG_1725.jpeg
    432.5 KB · Views: 9
  • IMG_1728.jpeg
    IMG_1728.jpeg
    442.6 KB · Views: 9
Joined
Nov 18, 2012
Messages
664
Likes
1,884
Location
Torrance, CA
I blended the feature ring to both halves while dry fitting the halves. The tailstock has a second chuck just to help hold it…no vacuum on that one. I pulled everything apart and looked at the form….not too bad on the general shape; I’m not going to radically change anything. I have no picture as I only have two hands…..Amazon is not carrying third hands at this time, lol!
 

Attachments

  • IMG_1731.jpeg
    IMG_1731.jpeg
    277.6 KB · Views: 12
  • IMG_1732.jpeg
    IMG_1732.jpeg
    363.1 KB · Views: 12
Joined
Nov 18, 2012
Messages
664
Likes
1,884
Location
Torrance, CA
I need a way to fit these parts together (dry fit), expose almost the entire vessel, have a way to drive it on the lathe and tune up the shape. I thought about the dowel again. If I stick it into the throat….I get a segment toilet plunger, lol! I glue it in place, cut it off and now I can mount this in a Chuck.
 

Attachments

  • IMG_1733.jpeg
    IMG_1733.jpeg
    404.6 KB · Views: 18
  • IMG_1734.jpeg
    IMG_1734.jpeg
    566.5 KB · Views: 18
Joined
Nov 18, 2012
Messages
664
Likes
1,884
Location
Torrance, CA
I think I can work with this. It might be challenging to re-turn the inside but I will give it a shot. Letting it dry real good. This dowel will help hold the curved throat to the vessel when the final assembly happens.
 

Attachments

  • IMG_1735.jpeg
    IMG_1735.jpeg
    452.7 KB · Views: 20
Joined
Dec 9, 2022
Messages
104
Likes
178
Location
Springfield, OH
I loaded this base into my largest vacuum Chuck, then hollowed out the bottom…..I left the walls pretty thick. I want to flatten part of this base so the piece tilts. I think the added weight at the bottom won’t hurt anything. I love this Wenge grain…..Wenge camo!
I'm looking forward to seeing how the Wenge looks from outside!
 
Joined
Nov 18, 2012
Messages
664
Likes
1,884
Location
Torrance, CA
My initial thought is the neck has too much girth for the body. It’s not far off but a touch too large for my eye. I sanded to 150g and went back to the rasp to thin it more, I should have gone more….if’a, could’a, would’a!! I’m not going backwards now!!
 
Joined
Apr 30, 2022
Messages
475
Likes
2,331
Location
Beavercreek, OH
Website
www.ovwg.org
This is off the charts Russ! The amount of time it took to complete and the perfection of the segments is truly why you are one of the best! You need to do more of these follow along projects in the future.
 
Joined
Nov 18, 2012
Messages
664
Likes
1,884
Location
Torrance, CA
By the way, I named this piece “Shooting the Breeze” in honor of the wordy follow along project, lol!! This form has always reminded me of leaning into the wind.
 

Michael Anderson

Super Moderator
Staff member
TOTW Team
Joined
Aug 22, 2022
Messages
1,388
Likes
4,054
Location
Chattanooga, TN
An absolute stunner, Russ! Thank you for doing a follow-along as well. You set a pretty darn high bar. I bet a lot of people learned a lot of things. Super inspiring.
 
Joined
Aug 16, 2022
Messages
281
Likes
638
Location
Butler, PA
Very nice Russ. It boggles my mind when I see these feature rings and patterns you guys do. I've only made a couple of segmented bowls and it was quite the experience. The biggest thing I see is the sled you have is a great advantage for accuracy. When you run your pieces through the drum sander do you have to be careful of snipe as with a thickness planer ?
 
Joined
Nov 18, 2012
Messages
664
Likes
1,884
Location
Torrance, CA
An absolute stunner, Russ! Thank you for doing a follow-along as well. You set a pretty darn high bar. I bet a lot of people learned a lot of things. Super inspiring.
Thanks Michael! I predicted silly, fun, somewhat informative and entertaining; I certainly enjoyed the journey!

It would be nice to see this process take hold in the forum. Normal people trying their best doing something a bit different.

Engaging people and getting them to comment will become “old hat”, at least for the people who normally engage, sooner than later!

Vincent has already started his!! There’s no reason for this type of “follow along” not to be ongoing at all times with our membership count!
 
Joined
Nov 18, 2012
Messages
664
Likes
1,884
Location
Torrance, CA
Very nice Russ. It boggles my mind when I see these feature rings and patterns you guys do. I've only made a couple of segmented bowls and it was quite the experience. The biggest thing I see is the sled you have is a great advantage for accuracy. When you run your pieces through the drum sander do you have to be careful of snipe as with a thickness planer ?
Vincent, I am always on the look out for snipe. My goal with the Drumsander is to get identical sized pieces with at least one flat, snipe free side. Once the ring is glued on to the vessel, the exposed side gets flattened while spinning on the lathe. Even those .125” thick segments get flattened. It feels good to take a sharp bowl gouge and trim the tiniest hair off a ring; it feels like expert woodturning (to me, lol). To finish it off, I add pencil lines to the ring and then sand them off With a sandpaper covered board. On large rings, I will take them to a 24” sq piece of sandpaper covered plywood, flip them over and rub them until the pencil lines are gone.

Things I know but don’t practice enough: 1) Double stick taping rings to a carriage board helps eliminate snipe. One easy step that I avoid. 2) Running a companion board through the sander on each side of the rings really helps eliminate the snip. I could use a third hand for that process, lol!!
 
Joined
Oct 15, 2018
Messages
4
Likes
276
Location
Las Vegas, NV
The piece that you have created is stunning! Thanks for the eye candy! Also, thank you so much for taking the time to take us all along for the ride. It is always educational to see the process. I can't wait to see how the second one turns out.
 
Joined
Jan 9, 2021
Messages
24
Likes
21
Location
Strathmore, AB
Pretty simple, make sure the ring hits the table and keep it from spinning. Cuts without issues. I carefully catch the cutoff as it exits the saw.
I like using the fence as the thickness stop. I've always just positioned (and then repositioned) my sled. Going to try this method on the next split ring project. Thanks Russ.
 
Joined
Nov 18, 2012
Messages
664
Likes
1,884
Location
Torrance, CA
The piece that you have created is stunning! Thanks for the eye candy! Also, thank you so much for taking the time to take us all along for the ride. It is always educational to see the process. I can't wait to see how the second one turns out.
Bryan,
I see a form change in the second piece; back in two weeks and then back at the piece, stay tuned! Thanks for the nice shout out! As far as sharing, that feels better than finishing the piece! Hopefully, it will inspire you to find the same sharing joy; there is always room for more follow along projects on both this site and SWT site. I am not sure you are over there yet, I see you are enjoying the segmenting fun at the lathe; pull someone else out of the shadows and get them into the segmenting light!!
Russ
 
Joined
Nov 18, 2012
Messages
664
Likes
1,884
Location
Torrance, CA
I like using the fence as the thickness stop. I've always just positioned (and then repositioned) my sled. Going to try this method on the next split ring project. Thanks Russ.
You are going to like this process Doug; assembly line work has it's plus side and this is one of them......arguably!!
 
Joined
Nov 18, 2012
Messages
664
Likes
1,884
Location
Torrance, CA
Ok, back to the red vessel. Here I am starting my feature ring. This is a good time to talk about cumulative error and the limitations of our tools. If you look at the outside edge of pic two, you can see it is uneven at best. The joints are very tight but the outer edge is off. If I had tried to maintain an outer edge alignment, there would be gaps in between the segments. This is 144 segments, 288 cuts to create these segments. I took a moment to measure a stack of segments with my micrometer. The stack is about 1-1/4” tall and contains 8 segments. The difference from top to bottom is .004”. This means my saw is out of square half of that; two cuts to make a stack. .002 is nothing in 1-1/4” until you get into the high segment count world. If all of the plus .004 segments get into the same group of three, they stick out significantly from the middle sections. The point is, all our tools have tolerances and they can come into play. It’s important to accommodate these tolerances with say this uneven edge of a ring.
 

Attachments

  • IMG_2061.jpeg
    IMG_2061.jpeg
    340.9 KB · Views: 17
  • IMG_2062.jpeg
    IMG_2062.jpeg
    447.4 KB · Views: 17
Joined
Nov 18, 2012
Messages
664
Likes
1,884
Location
Torrance, CA
Everything we use that’s been created by our tools are full of errors, perhaps small, sometimes not. My Pete Marken sleds will have errors as will my Tom Lohman jig. Be aware of them and figure out how to offset them as the accumulate. I make my segment width extra wide to make up for cumulative error and user sloppiness!!
 
Joined
Nov 18, 2012
Messages
664
Likes
1,884
Location
Torrance, CA
This vessel has to be different than the Wenge vessel. It’s time to start winging it! I’m going to use the large segments in the feature ring (FR) similar to the Wenge vessel, I’m going to get rid of the X. The FR needs to be built symmetrically around the large segments. There needs to be a maple segment bordering the large segments so it is creating other alignment issues. I could draw it out, how much fun would that be? The first ring required a double maple segment in the center of the large segments, this current ring requires a double Bloodwood segment at the center. This should be interesting; since the FR will be symmetrical top to bottom re large segments, this new layout should have symmetry as well….woohoo! There will be a change in form as well once outside form is created.
 

Attachments

  • IMG_2064.jpeg
    IMG_2064.jpeg
    293.3 KB · Views: 16
  • IMG_2065.jpeg
    IMG_2065.jpeg
    564.8 KB · Views: 16
Back
Top