• Beware of Counterfeit Woodturning Tools (click here for details)
  • Johnathan Silwones is starting a new AAW chapter, Southern Alleghenies Woodturners, in Johnstown, PA. (click here for details)
  • Congratulations to Jim Hills for "Journey II" being selected as Turning of the Week for May 6th, 2024 (click here for details)
  • Welcome new registering member. Your username must be your real First and Last name (for example: John Doe). "Screen names" and "handles" are not allowed and your registration will be deleted if you don't use your real name. Also, do not use all caps nor all lower case.

Russ Braun's Segmenting Project

Joined
Dec 9, 2022
Messages
104
Likes
178
Location
Springfield, OH
All the rings are glued up, some of the Wenge rings have a bad joint! I think I tried to squeeze one more segment out of my stock; the short piece of stock might have moved during the cut. I fixed a few and have an idea on some others. These rings went through the drum sander, ready to be split.
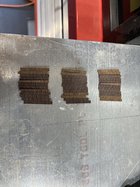
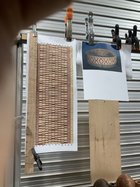
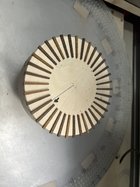
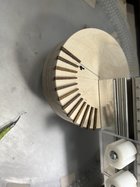
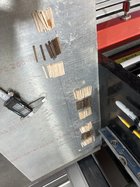
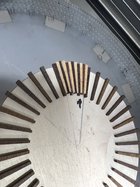
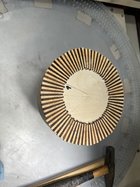
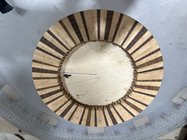
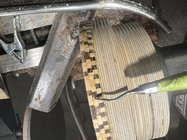
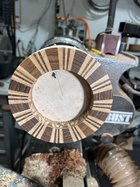
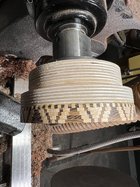
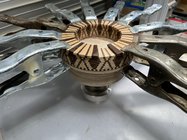
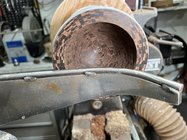
I've had the same problem creating a bad joint when I try to get one more segment out of a stick. A cure seems to be adding an extra 4" to each stick.
 
Last edited:

Bill Boehme

Administrator
Staff member
Beta Tester
TOTW Team
Joined
Jan 27, 2005
Messages
12,903
Likes
5,194
Location
Dalworthington Gardens, TX
Website
pbase.com
OK, just noticed that only admins could see the image in my previous post. It's fixed now. This was from several years ago when I had to reverse a platter numerous times. I wasn't happy with the lack of precise repeatability in alignment so one of my ideas was to put a chuck on each side and leave them there as long as needed. Two observations:
  • Two chucks plus an adapter and live center made the platter rather heavy and a large moment of inertia
  • The lathe needs excellent headstock/tailstock alignment. Fortunately, my Jet Mini has surprisingly good alignment.

_mg_8146small-jpg.4999
 
Joined
Nov 18, 2012
Messages
664
Likes
1,884
Location
Torrance, CA
A quick update, I’ve got 26 rings glued up on the waste blocks, one has 6 stacked. May I can finish today. Clamps are becoming an issue as most of my C clamps are now too small. I never seem to have enough clamps.
 
Joined
Nov 18, 2012
Messages
664
Likes
1,884
Location
Torrance, CA
I’ve added a ring without a center hole in each vessel just in case I need to us the vacuum Chuck. I do want to hollow these out but only after the exterior form is tuned up.

Braun15.jpg
 
Joined
Nov 18, 2012
Messages
664
Likes
1,884
Location
Torrance, CA
Bottoms cleaned up and ready for final exterior form tune up. Big issue now is…..feature rings. I’ve got another 1000 or so segments to add to each piece!! Time to sheet or get off the pot. Of course I could leave these alone and join them together but what kind of fun would that be, haha!!

Braun20.jpgWWWWBraun21.jpg
 
Joined
Nov 18, 2012
Messages
664
Likes
1,884
Location
Torrance, CA
Ok, here we go. Three rows of 12 Wenge segments, my face plate mounted on my Tom Lohman build jig…..(thank you Mr Lohman!!) and my BabyBot glue bottle (for Gene, lol)!
 

Attachments

  • IMG_1694.jpeg
    IMG_1694.jpeg
    564.3 KB · Views: 25
  • IMG_1695.jpeg
    IMG_1695.jpeg
    325.5 KB · Views: 26
  • IMG_1696.jpeg
    IMG_1696.jpeg
    240.8 KB · Views: 26
Joined
Nov 18, 2012
Messages
664
Likes
1,884
Location
Torrance, CA
Here is my SegmentPro work up for the feature ring. The picture helps understand what I’m looking for, the long print out is my pattern guide. I’ve clamped a slat on the drawing that shows every fourth segment. Since the pattern is bricklaid, I’ve mark red and green lines for my own clarity. This pattern (like many of mine) repeat every 12 segments. I can go into more details about this if anyone has questions.
 

Attachments

  • IMG_0336.jpeg
    IMG_0336.jpeg
    476.8 KB · Views: 38
Joined
Nov 18, 2012
Messages
664
Likes
1,884
Location
Torrance, CA
Here, the jig is being used to set every fourth segment according to the pattern. This row, every fourth happens to be all Wenge. Pic one is a progress pic, pic 2 is completed. The Lohman jig is not used again until the next ring.
 

Attachments

  • IMG_1698.jpeg
    IMG_1698.jpeg
    286.8 KB · Views: 26
  • IMG_1697.jpeg
    IMG_1697.jpeg
    272 KB · Views: 27
Joined
Nov 18, 2012
Messages
664
Likes
1,884
Location
Torrance, CA
Next step is fill in the balance of the 144 segments, hand glued one at a time. This pattern is simple every other segment is the same. There are three groups of maple, Wenge, maple….12 segments in each group. When patterns get complex, this is how I try to keep order. The worst thing is to discover an out of place segment three rows down; one needs a system to keep that from happening and a fix for when it does…..and it will happen, lol!!
 

Attachments

  • IMG_1699.jpeg
    IMG_1699.jpeg
    531.9 KB · Views: 22
  • IMG_1700.jpeg
    IMG_1700.jpeg
    437.4 KB · Views: 23
  • IMG_1701.jpeg
    IMG_1701.jpeg
    353.2 KB · Views: 22
Joined
Nov 18, 2012
Messages
664
Likes
1,884
Location
Torrance, CA
I will flatten this ring and then start the next one right on top of this one. This glue up took about 75 mins; my max is about 3-4 a day. I have a few days of “like watching paint dry” work to do….going offline again….two feature rings…what was I thinking, haha!!
 
Joined
Nov 18, 2012
Messages
664
Likes
1,884
Location
Torrance, CA
I do have to show you a first for me. I have changed the size of my segments in one of these high count rings. Hmmm, could more be coming? I like this rasp, it’s working nicely!! You don’t see this in the SegmentPro layout; this is called winging it, haha!
 

Attachments

  • IMG_1703.jpeg
    IMG_1703.jpeg
    800.9 KB · Views: 25
  • IMG_1704.jpeg
    IMG_1704.jpeg
    339.2 KB · Views: 26
Joined
Apr 30, 2022
Messages
475
Likes
2,331
Location
Beavercreek, OH
Website
www.ovwg.org
Here is my SegmentPro work up for the feature ring. The picture helps understand what I’m looking for, the long print out is my pattern guide. I’ve clamped a slat on the drawing that shows every fourth segment. Since the pattern is bricklaid, I’ve mark red and green lines for my own clarity. This pattern (like many of mine) repeat every 12 segments. I can go into more details about this if anyone has questions.
This is incredible Russ! I just started my segmented Beads of Courage box and have all of the rings cut and glued. Of course yours is WAY more complex then I have ever tried! I do have a question though, how do you transfer your feature ring from LaminatePro to WoodturnerPro? Also how do you print the 3D circle photo on the right of your photo? Do you use SegmentPro instead of LaminatePro??
 

Michael Anderson

Super Moderator
Staff member
TOTW Team
Joined
Aug 22, 2022
Messages
1,388
Likes
4,054
Location
Chattanooga, TN
I'm gonna have to check out those Kutzall rasps! That Lohman jig looks interesting. Might be a dumb question and I think I know the answer, but do you attach the interrupted segments to your flat base at all, or are they just sitting there waiting for the other segments to be added?
 
Joined
Nov 18, 2012
Messages
664
Likes
1,884
Location
Torrance, CA
This is incredible Russ! I just started my segmented Beads of Courage box and have all of the rings cut and glued. Of course yours is WAY more complex then I have ever tried! I do have a question though, how do you transfer your feature ring from LaminatePro to WoodturnerPro? Also how do you print the 3D circle photo on the right of your photo? Do you use SegmentPro instead of LaminatePro??
Great question Gabriel!

I am only using SegmentPro. The feature ring is basically a short vessel w/ straight sides. While I proudly own all of Lloyd’s programs, SegmentPro is the only one I have opened. I found what I needed in this program and never left. As usual, I just scratch the surface of most program’s capabilities!

Everything I print out of SegmentPro are screen shots. For my pattern on the longer paper, that is two screen shots, trimmed with scissors and scotch taped together.
Now there might be an easier way to do this but my “old school” mind has issues wrapping my head around the nuances of modern digital life!
Actually, this solution comes straight from Lloyd. If you have questions about his Suite of Software, his own forum has great FYIs and he is absolutely approachable for more detailed inquiries!
 
Joined
Nov 18, 2012
Messages
664
Likes
1,884
Location
Torrance, CA
I'm gonna have to check out those Kutzall rasps! That Lohman jig looks interesting. Might be a dumb question and I think I know the answer, but do you attach the interrupted segments to your flat base at all, or are they just sitting there waiting for the other segments to be added?
Everything you see is glued Michael.

These 36 segments set the pattern so they need to be glued in place. The BabyBot glue bottle is great for applying the tiniest bead of glue to these initial segments. One quickly learns that you need to deal with glue squeeze out on these pieces so less is better. My goal is to put the bead on only half of the segment on the side away from the jig.

Titebond original glue sets pretty quick in these small amounts. I clean the squeeze out on the side opposite the jig right as it is placed. I will go back and clean up the other side after gluing a quarter of the rings up. Those first segments are set by then; I just support them with a finger and use a dental tool for the clean up. Because so much glue is used when hand placing the three intermediate segments, short gluing the initial 36 segments is not a concern.
 

Michael Anderson

Super Moderator
Staff member
TOTW Team
Joined
Aug 22, 2022
Messages
1,388
Likes
4,054
Location
Chattanooga, TN
Ohh okay, cool! I was wrong then and assumed they were just sitting there. That was stressful to me haha. So then you just use the jig to set the segments for the next ring on top of the previous one. Once the feature ring is complete, you just cut it off at the bandsaw? Genius.
 
Joined
Oct 27, 2022
Messages
32
Likes
16
Location
Auburn, CA
I will flatten this ring and then start the next one right on top of this one. This glue up took about 75 mins; my max is about 3-4 a day. I have a few days of “like watching paint dry” work to do….going offline again….two feature rings…what was I thinking, haha!!
Are you not splitting rings when making up the feature ring? Looking at your pattern guide rows 3,7,11 are identical and can be split from a single ring. Likewise rows 4,6,8,10 are identical as are rows 5,9.
 
Joined
Oct 27, 2022
Messages
32
Likes
16
Location
Auburn, CA
I do have to show you a first for me. I have changed the size of my segments in one of these high count rings. Hmmm, could more be coming? I like this rasp, it’s working nicely!! You don’t see this in the SegmentPro layout; this is called winging it, haha!
Why not go all the way and use a mixture of 36, 48, 72 and 144 segments per ring and cut way down on the number of segments used?
 
Joined
Nov 18, 2012
Messages
664
Likes
1,884
Location
Torrance, CA
Are you not splitting rings when making up the feature ring? Looking at your pattern guide rows 3,7,11 are identical and can be split from a single ring. Likewise rows 4,6,8,10 are identical as are rows 5,9.
Mike, assuming one could make a traditional ring with 144 segments, that could be a way to go. When doing a traditional ring, the MO is to align the outside edges of the segments when fitting them together.

If you look at my first 144 segment ring when fully assembled, you may notice that the outside edge is is not even. These segments are cut at 1.25 degrees.

We are all constrained by the limitations of our tools. Cumulative error is a huge issue with this many segments. Since 144 segments has 288 cuts, one can see this clearly.

By using the jig and thin segments, the cumulative error in now offset to the uneven exterior edge. The joints are now tight and well glued. I mill wood into bundles of eight. Every cut I make actually cuts 8 segments. It’s a system that works well with high count segment work.
 
Joined
Oct 27, 2022
Messages
32
Likes
16
Location
Auburn, CA
Mike, assuming one could make a traditional ring with 144 segments, that could be a way to go. When doing a traditional ring, the MO is to align the outside edges of the segments when fitting them together.

If you look at my first 144 segment ring when fully assembled, you may notice that the outside edge is is not even. These segments are cut at 1.25 degrees.

We are all constrained by the limitations of our tools. Cumulative error is a huge issue with this many segments. Since 144 segments has 288 cuts, one can see this clearly.

By using the jig and thin segments, the cumulative error in now offset to the uneven exterior edge. The joints are now tight and well glued. I mill wood into bundles of eight. Every cut I make actually cuts 8 segments. It’s a system that works well with high count segment work.
I wasn’t thinking a traditional 144 segment ring. I’m looking at it from the perspective of someone who has only done one segmented bowl so I may be way off base! Can’t you make the first ring 3 + times as thick and slice off two rings Then add the second ring 4+ times as thick then slice off three rings add the third ring 2+ times as thick and slice off one ring? From there on just add the rings that have been sliced off. This requires a fixture to mount the face plate to cut the rings on the bandsaw but that is easy enough to do.
 
Joined
Nov 18, 2012
Messages
664
Likes
1,884
Location
Torrance, CA
I wasn’t thinking a traditional 144 segment ring. I’m looking at it from the perspective of someone who has only done one segmented bowl so I may be way off base! Can’t you make the first ring 3 + times as thick and slice off two rings Then add the second ring 4+ times as thick then slice off three rings add the third ring 2+ times as thick and slice off one ring? From there on just add the rings that have been sliced off. This requires a fixture to mount the face plate to cut the rings on the bandsaw but that is easy enough to do.
The technique has been developed for processes that do not really have repeatable rings. Alignment is tough with 1/8” segments on the wide end; the jig handles this nicely. I suppose one could try your idea; for me…..if it ain’t broke, don’t fix it!
 
Joined
Apr 30, 2022
Messages
475
Likes
2,331
Location
Beavercreek, OH
Website
www.ovwg.org
Great question Gabriel!

I am only using SegmentPro. The feature ring is basically a short vessel w/ straight sides. While I proudly own all of Lloyd’s programs, SegmentPro is the only one I have opened. I found what I needed in this program and never left. As usual, I just scratch the surface of most program’s capabilities!

Everything I print out of SegmentPro are screen shots. For my pattern on the longer paper, that is two screen shots, trimmed with scissors and scotch taped together.
Now there might be an easier way to do this but my “old school” mind has issues wrapping my head around the nuances of modern digital life!
Actually, this solution comes straight from Lloyd. If you have questions about his Suite of Software, his own forum has great FYIs and he is absolutely approachable for more detailed inquiries!
Oh, I forgot about his forum! I probably should ask over there too.
 
Joined
Nov 18, 2012
Messages
664
Likes
1,884
Location
Torrance, CA
A few progress pics. Two more rows and feature ring one is complete. A couple of oops; I will discuss later. This should be finished tomorrow. I might focus on the Wenge vessel, I’m in a time crunch with an upcoming trip 8 days away. There is a deadline for shipping which will be a first for me….meeting a Woodturning deadline. Missing them is one of my specialties, haha!! BTW, the dental pic is showing the reason for the squeeze clamps. I’ve used all three of my Pete Marken sleds to get these angles cut!
 

Attachments

  • IMG_1708.jpeg
    IMG_1708.jpeg
    590.9 KB · Views: 28
  • IMG_1713.jpeg
    IMG_1713.jpeg
    464.1 KB · Views: 27
  • IMG_1714.jpeg
    IMG_1714.jpeg
    644.2 KB · Views: 28
  • IMG_1715.jpeg
    IMG_1715.jpeg
    395.5 KB · Views: 26
Joined
Jan 23, 2023
Messages
11
Likes
8
Location
Little Ferry, NJ
I've done many smaller, less complex segmented projects, but looking at your one project I have learned so much and I thank you. One question, which I might have missed in your demos is; How do the inner diameters of your rings wind up round before turning? Or do you stack a few and then turn them round and then stack and glue a few more?
 
Joined
Nov 18, 2012
Messages
664
Likes
1,884
Location
Torrance, CA
I've done many smaller, less complex segmented projects, but looking at your one project I have learned so much and I thank you. One question, which I might have missed in your demos is; How do the inner diameters of your rings wind up round before turning? Or do you stack a few and then turn them round and then stack and glue a few more?
Sal, I like to true up edges as I go. This allows me to see tiny issues so I can go ugh ASAP, haha!!

The value of high count segment pieces is shear volume! “You can’t see the trees because of the forest” if you know what I mean!! If you look close enough, you can tell it’s handmade!

Thanks for talking about how you’re learning; that is part of my reward for doing a follow along project. Woodturners typically love to share, I’m in that crowd!
 
Joined
Nov 18, 2012
Messages
664
Likes
1,884
Location
Torrance, CA
Feature ring is looking great Russ. The mix of differing large and small segments in each ring is clever and likely challenging to get all the angles right?
Absolutely Steve! I am learning many things with this “new to me” process. I will share some of that later.
 
Joined
Aug 4, 2015
Messages
80
Likes
931
Location
Pleasant Valley MD. U.S.A
I do like my band clamps. They are from McMaster Carr, stainless steel and they have a worm screw that is releasable to allow for quickly changing the size of the clamp. No more needing to screw them bigger or smaller as needed!! The screw device is low profile on the inside so it doesn’t offset a segment like the older clamps. They also join together for your large clamping pleasure needs!!
I like your clamps Russ, do you have a link for McMaster Carr?
 
Joined
Nov 18, 2012
Messages
664
Likes
1,884
Location
Torrance, CA
I loaded this base into my largest vacuum Chuck, then hollowed out the bottom…..I left the walls pretty thick. I want to flatten part of this base so the piece tilts. I think the added weight at the bottom won’t hurt anything. I love this Wenge grain…..Wenge camo!
 

Attachments

  • IMG_1722.jpeg
    IMG_1722.jpeg
    510.4 KB · Views: 23
Back
Top