• Beware of Counterfeit Woodturning Tools (click here for details)
  • Johnathan Silwones is starting a new AAW chapter, Southern Alleghenies Woodturners, in Johnstown, PA. (click here for details)
  • Congratulations to Jim Hills for "Journey II" being selected as Turning of the Week for May 6th, 2024 (click here for details)
  • Welcome new registering member. Your username must be your real First and Last name (for example: John Doe). "Screen names" and "handles" are not allowed and your registration will be deleted if you don't use your real name. Also, do not use all caps nor all lower case.

Russ Braun's Segmenting Project

Joined
Nov 18, 2012
Messages
664
Likes
1,884
Location
Torrance, CA
I use the larger rings to contain the smaller ones as often as possible when drum sanding. This same large ring carried all the smaller rings. It might be a hair thinner than the rest ... shhhhh!! It doesn’t matter with this build-up, lol!!

IMG_1634.jpeg
 
Joined
Nov 18, 2012
Messages
664
Likes
1,884
Location
Torrance, CA
A rough stack of rings just for S&G (sheets and giggles). I still need my feature rings and some movement….hmmmm. “Winging it” time is about to begin!! Woohoo!!

IMG_1635.jpeg
 
Joined
Nov 18, 2012
Messages
664
Likes
1,884
Location
Torrance, CA
Coring holes through the neck segments.
 

Attachments

  • IMG_1639.jpeg
    IMG_1639.jpeg
    364.1 KB · Views: 14
  • IMG_1640.jpeg
    IMG_1640.jpeg
    530.2 KB · Views: 14
  • IMG_1641.jpeg
    IMG_1641.jpeg
    330.2 KB · Views: 14
Joined
Jul 2, 2008
Messages
128
Likes
262
Location
Huntsville, TX
Read the words, he is talking about segment angle. Shop time for me too......
Steve, with those learning and new to segmenting, you have to read between the lines. You can have a gap with a perfect set up. It may be just on one side. in your illustration, the segments are proud. No one glues up rings that way. They flatten them down. These errors are from blade alignment issues. It is necessary to teach alternating the segments correctly. You can also have different gaps on opposite sides of a ring. I usually can assess a problem from a pic. You can also have a curved cut. In that case the ring fits perfectly in the center but has a gap at the outside. That comes from setting the blade height just above the segment height and the blade not parallel to the track. A simple thing like debris between the strip and fence can cause a nightmare. Most segmenters not just beginners do not know this stuff. To them, everything is about the “segment angle”. It either works or it doesn't.
Brian was relating his experience in is own words, not joining the fray.
 
Joined
Feb 12, 2014
Messages
97
Likes
310
Location
Waterloo IA
Website
www.stevebonny.com
Steve, with those learning and new to segmenting, you have to read between the lines. You can have a gap with a perfect set up. It may be just on one side. in your illustration, the segments are proud. No one glues up rings that way. They flatten them down. These errors are from blade alignment issues. It is necessary to teach alternating the segments correctly. You can also have different gaps on opposite sides of a ring. I usually can assess a problem from a pic. You can also have a curved cut. In that case the ring fits perfectly in the center but has a gap at the outside. That comes from setting the blade height just above the segment height and the blade not parallel to the track. A simple thing like debris between the strip and fence can cause a nightmare. Most segmenters not just beginners do not know this stuff. To them, everything is about the “segment angle”. It either works or it doesn't.
Brian was relating his experience in is own words, not joining the fray.
Jerry,
Actually the sketch does represent how I assemble rings.... and Russ as well. He is using steel band clamps and tightening them as much as he can, I don't see any mention of him using a press or weight to flatten them during assembly. This band clamp will force the vertical edges to align as shown in my pic. I use a wooden cider press to flatten my rings, but I only snug it. The band clamp is snugged first, the press is them snugged to push all the segments down in place, the band clamp is then tightened as tight as practical. the press is released, all while the glue is wet. The band clamp wins this battle easily, forcing the vertical faces to align and creates the assembly shown in my picture.
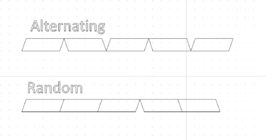
I can see how people will do it differently. If you use rubber bands and sit a weight on the ring, it will flatten like you say. Here is a sketch of what happens:-

1698584076207.png

As you can see, the alternating segment scenario creates gaps on both the top and bottom surface. The random arrangement only creates gaps where there are alternating pieces at the joint. With the flattening ring scenario with off vertical blade, it looks like alternating segments makes the situation worse, not better.
You keep telling me that blade verticality errors are what are fixed by alternating segments, but I don't see it. I have intentionally made rings with blade off vertical to prove to myself that alternating segments doesn't fix or improve it. The sketches I've shown here are my attempts at illustrating what is happening. Both show to me that alternating segments doesn't help this problem. If you flatten rings it appears to make it worse. I'm still missing something. Help me master!

I agree with most of what you say. There are many things that can go wrong with your setup when cutting segments. I've done most of them myself and continue to find new ways to mess up.
I'm just asking you to give a clear example of what error is fixed by alternating segments.
Apologies to Brian if I misinterpreted what you were saying.
 
Joined
Feb 12, 2014
Messages
97
Likes
310
Location
Waterloo IA
Website
www.stevebonny.com
I use the larger rings to contain the smaller ones as often as possible when drum sanding. This same large ring carried all the smaller rings. It might be a hair thinner than the rest….shhhhh!! It doesn’t matter with this build up, lol!!
Russ, I'd be careful with this setup. Maybe your sander is set up different to mine. Mine has 2 clamping rollers that hold the workpiece down that are about 3" apart with the sanding drum between them. If your small ring is smaller than 3" it will still be unsupported when the drum is sanding it. It is obviously working for you, perhaps the rings are big enough to be under at least one roller all the time?
 
Joined
Jul 2, 2008
Messages
128
Likes
262
Location
Huntsville, TX
A simple zigzag will go together naturally. Anything else will not. I have spent my entire life in the theoretical world. What makes life interesting is when you strap a parachute on a student and jump into the cockpit, their world, they will take you into places that our personal “theory“ is alien to. We assume too much. Over the years I have learned to value of being wrong as much as being right. I have never learned a thing by being right. They have taught me.
Yes, I can flat spin an airplane upside down. I am still alive because I pick the right airplane. Beginning segmenters have taken me places I did not know existed. Bless um.

Talk about random thoughts and verbating.
 
Joined
Nov 18, 2012
Messages
664
Likes
1,884
Location
Torrance, CA
I’m adding a second Maple ring after adding a Wenge ring. I rounded these rings to make sure the maple rings are sized the same. I eyeballed the sizing.
 

Attachments

  • IMG_1649.jpeg
    IMG_1649.jpeg
    570.1 KB · Views: 11
  • IMG_1648.jpeg
    IMG_1648.jpeg
    632 KB · Views: 11
Joined
Feb 12, 2014
Messages
97
Likes
310
Location
Waterloo IA
Website
www.stevebonny.com
A simple zigzag will go together naturally. Anything else will not. I have spent my entire life in the theoretical world. What makes life interesting is when you strap a parachute on a student and jump into the cockpit, their world, they will take you into places that our personal “theory“ is alien to. We assume too much. Over the years I have learned to value of being wrong as much as being right. I have never learned a thing by being right. They have taught me.
Yes, I can flat spin an airplane upside down. I am still alive because I pick the right airplane. Beginning segmenters have taken me places I did not know existed. Bless um.

Talk about random thoughts and verbating.
Hi Jerry, your second sentence is actually not correct. You may also making assumptions about me that aren't correct. I is a engoneer. I spend all day in the world of designing and developing engine and aftertreatment systems. It always starts with theory and analysis. The analysis software these days is nothing short of astounding in what it can do. But you are right, they never work straight off the analysis. You have to prototype and test and iterate.
I've already made several rings with intentional error built into the saw blade angle for other non-believers. I wouldn't be making this claim if I hadn't done that. I couldn't find any in my shop, so quickly made one especially for you!!
This has 3 deg blade error which I think is large, even for a beginner. I can eyeball it closer than that.
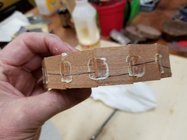
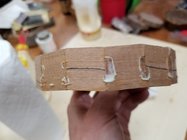
I drew your lines on it on the top and side of the strip and then shook all the parts up in a bucket to defuzz and randomly assembled them. Glue up assembly was no issue. The joints are all still vertical, just like my picture. This goes together naturally, just like a zig zag, because the vertical edges will naturally come together. The pieces don't try and pop up or down, they are quite happy to be in equilibrium and look identical to my sketch that you are questioning. I didn't do anything special, just glued it and band clamped it the same as always. 15 seconds to assemble tops, with no issues. It sits flat on a bench surface The only interesting thing to me is that random can include 4 or 5 pieces in a row in the same orientation. Great for this demo.

Here are the pics. First one is a section that has a zigzag and it looks just like my zig zag sketch. Second is a section that has 5 segments in a row that aren't zig zags. Also looks just like my random sketch.

1698599075036.jpegWWWW1698599175263.jpeg

Time to put your money where your mouth is Jerry. Go try it. It works.
 
Joined
Nov 18, 2012
Messages
664
Likes
1,884
Location
Torrance, CA
Russ, I'd be careful with this setup. Maybe your sander is set up different to mine. Mine has 2 clamping rollers that hold the workpiece down that are about 3" apart with the sanding drum between them. If your small ring is smaller than 3" it will still be unsupported when the drum is sanding it. It is obviously working for you, perhaps the rings are big enough to be under at least one roller all the time?
It seems to work Steve, w/o issue. I did have a dip in one of the maple pieces but that could have come from an initial run that I ran them solo. I do check things before glue up for issues.
 
Joined
Jul 2, 2008
Messages
128
Likes
262
Location
Huntsville, TX
Hi Jerry, your second sentence is actually not correct. You may also making assumptions about me that aren't correct. I is a engoneer. I spend all day in the world of designing and developing engine and aftertreatment systems. It always starts with theory and analysis. The analysis software these days is nothing short of astounding in what it can do. But you are right, they never work straight off the analysis. You have to prototype and test and iterate.
I've already made several rings with intentional error built into the saw blade angle for other non-believers. I wouldn't be making this claim if I hadn't done that. I couldn't find any in my shop, so quickly made one especially for you!!
This has 3 deg blade error which I think is large, even for a beginner. I can eyeball it closer than that.
I drew your lines on it on the top and side of the strip and then shook all the parts up in a bucket to defuzz and randomly assembled them. Glue up assembly was no issue. The joints are all still vertical, just like my picture. This goes together naturally, just like a zig zag, because the vertical edges will naturally come together. The pieces don't try and pop up or down, they are quite happy to be in equilibrium and look identical to my sketch that you are questioning. I didn't do anything special, just glued it and band clamped it the same as always. 15 seconds to assemble tops, with no issues. It sits flat on a bench surface The only interesting thing to me is that random can include 4 or 5 pieces in a row in the same orientation. Great for this demo.

Here are the pics. First one is a section that has a zigzag and it looks just like my zig zag sketch. Second is a section that has 5 segments in a row that aren't zig zags. Also looks just like my random sketch.

View attachment 56868

View attachment 56871

Time to put your money where your mouth is Jerry. Go try it. It works.
I know nothing about you. I am sharing my experience with beginners. I also can make perfect rings. As I said before, I demo’d making a 2 layer feature ring with trapezoid, and leaning segments with different woods where every blade angle was different. I did not measure a single angle or dimension and it went together perfectly. You can try that and I will give you pointers along the way. :)
It may shock you but I put my money where my mouth is many years ago when I invented it. I do have a clue.
I never said you are wrong. My point was and is, there are things beginners and the equipment they have will produce surprises. No more no less. If this is a contest, you win.
 
Joined
Nov 18, 2012
Messages
664
Likes
1,884
Location
Torrance, CA
Okay, I‘ve taken these neck rings and compressed them with clamps. I then hot melt glued the ends to hold them in place and let that set up nicely. Now I will state that I have double stick taped rings like this together w/o the dowel…the fact that I’m looking for an alternate way speaks volumes on my D/S tape method!
 

Attachments

  • IMG_1654.jpeg
    IMG_1654.jpeg
    542.9 KB · Views: 14
  • IMG_1653.jpeg
    IMG_1653.jpeg
    569.8 KB · Views: 14
  • IMG_1652.jpeg
    IMG_1652.jpeg
    523.5 KB · Views: 14
Joined
Nov 18, 2012
Messages
664
Likes
1,884
Location
Torrance, CA
This worked pretty well and got the diameter of the neck in the ballpark. Pic 2 shows it roughly on the stack of rings w/o the dowel. I was still plagued by some spinning segments but they remained centered on the dowel…..a nice plus vs d/s tape method. The wall thickness is now around 5/16”. There will be some hand tooling work needed on this later which will eat up a bunch of that thickness!
 

Attachments

  • IMG_1655.jpeg
    IMG_1655.jpeg
    530.8 KB · Views: 16
  • IMG_1656.jpeg
    IMG_1656.jpeg
    459 KB · Views: 16
Joined
Nov 18, 2012
Messages
664
Likes
1,884
Location
Torrance, CA
I had more of a challenge with the “red-neck”….sorry, had to go there, haha! Lots of slippage. I tapered so stir sticks as wedges and that pretty much broke the seal with the HM glue. What I found is the dowel was pretty smooth, not a lot of bond there to start with. BTW, electrical tape helped a tiny bit. I got through this with a little more HM glue and no a quit mentality.
 

Attachments

  • IMG_1658.jpeg
    IMG_1658.jpeg
    573.6 KB · Views: 16
Joined
Nov 18, 2012
Messages
664
Likes
1,884
Location
Torrance, CA
Back to the drum sander using Malcolm Tibbetts great method go beveling rings. I don’t care about the math, I just want a bend in the neck. Double stick tape on the sled, rings on the tape. I have turned each ring 1/2 segment so I can brick lay my rings. The tape is XFasten which was a Steve Bonny tip. The tape sticks well and releases easily…..what??? You heard that right!! I’ve added a pencil line across the segment so I can see when the ring has a complete bevel. The sled has two thin rips of Wenge on the bottom to tilt the sled.
 

Attachments

  • IMG_1662.jpeg
    IMG_1662.jpeg
    350.3 KB · Views: 19
  • IMG_1661.jpeg
    IMG_1661.jpeg
    454 KB · Views: 20
  • IMG_1663.jpeg
    IMG_1663.jpeg
    420.7 KB · Views: 18
  • IMG_1660.jpeg
    IMG_1660.jpeg
    472.3 KB · Views: 20
Joined
Nov 18, 2012
Messages
664
Likes
1,884
Location
Torrance, CA
Three passes and the bevel is done. Do I want a second bevel on these rings? I roughly tape them together and I like the bend…I’m quitting while I’m ahead!!
 

Attachments

  • IMG_1665.jpeg
    IMG_1665.jpeg
    388.9 KB · Views: 27
  • IMG_1666.jpeg
    IMG_1666.jpeg
    487 KB · Views: 27
  • IMG_1667.jpeg
    IMG_1667.jpeg
    340.1 KB · Views: 27
Joined
Nov 18, 2012
Messages
664
Likes
1,884
Location
Torrance, CA
Thanks Maestro, you are a great example…as is Mr Bonny!! I love making swap/ exchange pieces for other woodturners; setting a lofty bar. Level one bar is to put my best into it….that is on anything I do. Level two is to make something that maybe the recipient will go “how’d he do that”; the follow along project takes care of that, lol!! Level three is to make a piece that makes the recipient’s socks roll down!! I’m working hard on that….if you can call this working!! More like woohoo!!
 
Joined
Nov 18, 2012
Messages
664
Likes
1,884
Location
Torrance, CA
Pic 1- when your finger goes in this far, so does your sanding. A smaller hole would have been a time saver. The inexactness of the outside is mimicked on the inside. Turning rings round, then beveling then aligning joints creates the uneven exterior. Pic two - some rings glued, interior ground and sanded as good as it’s getting….I mean 800g, lol!! Pic 3 - It’s alive and still standing. Pic 4 - Two types of clamps used: a) rubber bands b) Russ Braun 604-3 clamp…..squeeze between fingers and hands til the glue sets. My 604-3 clamps both have carpel tunnel!!
 

Attachments

  • IMG_1673.jpeg
    IMG_1673.jpeg
    255.8 KB · Views: 23
  • IMG_1670.jpeg
    IMG_1670.jpeg
    431.7 KB · Views: 22
  • IMG_1669.jpeg
    IMG_1669.jpeg
    290.5 KB · Views: 23
  • IMG_1668.jpeg
    IMG_1668.jpeg
    356.9 KB · Views: 22
Joined
Nov 18, 2012
Messages
664
Likes
1,884
Location
Torrance, CA
Six glue blocks required for two vessels!! Luckily, I had 6 faceplates. I’ve used two layers of 1” thick Baltic Birch for the glue block. Normally I wouldn’t use plywood; this ply looks great!
 

Attachments

  • IMG_1674.jpeg
    IMG_1674.jpeg
    469 KB · Views: 14

Michael Anderson

Super Moderator
Staff member
TOTW Team
Joined
Aug 22, 2022
Messages
1,388
Likes
4,030
Location
Chattanooga, TN
That’s a cool system for the neck! I wondered how you were going to bend it. I assumed you would make the rings large and then carve them to size…..but of course not. Just bevel each ring. Awesome! Thanks for showing that—it makes the construction of a lot of pieces a bit more clear. Good stuff Russ!
 
Joined
Feb 12, 2014
Messages
97
Likes
310
Location
Waterloo IA
Website
www.stevebonny.com
I had more of a challenge with the “red-neck”….sorry, had to go there, haha! Lots of slippage. I tapered so stir sticks as wedges and that pretty much broke the seal with the HM glue. What I found is the dowel was pretty smooth, not a lot of bond there to start with. BTW, electrical tape helped a tiny bit. I got through this with a little more HM glue and no a quit mentality.
Would it help if you shorten the dowel, so it is a little shorter than the stack, at least at the tail stock end. Then you could add clamping pressure from the lathe directly to the rings.
 
Joined
Nov 18, 2012
Messages
664
Likes
1,884
Location
Torrance, CA
That’s a cool system for the neck! I wondered how you were going to bend it. I assumed you would make the rings large and then carve them to size…..but of course not. Just bevel each ring. Awesome! Thanks for showing that—it makes the construction of a lot of pieces a bit more clear. Good stuff Russ!
Michael, there will be some carving to clean this neck up. Micromotor and a rough burr, files and sandpaper. Thank you Malcolm Tibbetts….again. I do want to say right now that this swap piece does not have Perone’s Disease! The recipient need not be concerned!!
 
Last edited:
Joined
Nov 18, 2012
Messages
664
Likes
1,884
Location
Torrance, CA
Would it help if you shorten the dowel, so it is a little shorter than the stack, at least at the tail stock end. Then you could add clamping pressure from the lathe directly to the rings.
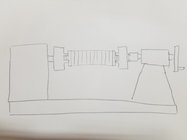
Well I thought about that Steve and I came up with blanks. I’ve got the tailstock/ live end holding the dowel, other end in a chuck. Sooo, I need a clamping mechanism. I could have turned the end of the dowel down to fit my Jacobs Chuck, shortened the dowel and then crank the tailstock up to squeeze the stack….then tighten the Jacobs Chuck on to the dowel; maybe use a piece of wood between the JC and the stack to protect the segmented rings. Next time!
 
Joined
Feb 12, 2014
Messages
97
Likes
310
Location
Waterloo IA
Website
www.stevebonny.com
Well I thought about that Steve and I came up with blanks. I’ve got the tailstock/ live end holding the dowel, other end in a chuck. Sooo, I need a clamping mechanism. I could have turned the end of the dowel down to fit my Jacobs Chuck, shortened the dowel and then crank the tailstock up to squeeze the stack….then tighten the Jacobs Chuck on to the dowel; maybe use a piece of wood between the JC and the stack to protect the segmented rings. Next time!
Another version - how about a chuck at each end with the dowel just protruding a short amount. Snug each end of the dowel in the chucks, clamp the tailstock and then tighten the chucks.

20231101_085636.jpg
 
Joined
Jul 2, 2008
Messages
128
Likes
262
Location
Huntsville, TX
Michael, there will be some carving to clean this neck up. Micromotor and a rough burr, files and sandpaper. Thank you Malcolm Tibbetts….again. I do want to say right now that this swap piece does not have Perone’s Disease! The recipient need not be concerned!!
A good rasp will make the curves fair. Rotary tools will give it the pock. A random orbital sander will gently top it off. Kutzall makes the best rasps for this. Don’t get the coarse.
 
Joined
Nov 18, 2012
Messages
664
Likes
1,884
Location
Torrance, CA
A good rasp will make the curves fair. Rotary tools will give it the pock. A random orbital sander will gently top it off. Kutzall makes the best rasps for this. Don’t get the coarse.
Haha, I knew there was something I needed to buy for this follow-along project to come together, Jerry!! I am interested in a top-quality rasp!! If you say don't get the coarse, of course I want to see that one now, lol!! There is some history behind that statement.....ask Dad!!
 
Joined
Nov 18, 2012
Messages
664
Likes
1,884
Location
Torrance, CA
Ok, gluing rings up, like watching paint dry so here’s how I do it briefly and I will see you back here when it’s done. Pic one is the first ring is glued to the waste block. The drum sanded side is good for this. Once set (no more than an hour with Titebond) pic 2, I take my bowl gouge and true up inside and outside edges the cut a 32nd off the face. Pic 3 is my sanding Block to sand the face to get it flat to the lathe axis. Pic 4 is the ring ready for the next ring to glue on….rinse and repeat. See you all soon!!

IMG_1677.jpeg
 

Attachments

  • IMG_1680.jpeg
    IMG_1680.jpeg
    457.3 KB · Views: 21
  • IMG_1679.jpeg
    IMG_1679.jpeg
    654.8 KB · Views: 22
  • IMG_1678.jpeg
    IMG_1678.jpeg
    464.9 KB · Views: 23

Bill Boehme

Administrator
Staff member
Beta Tester
TOTW Team
Joined
Jan 27, 2005
Messages
12,903
Likes
5,194
Location
Dalworthington Gardens, TX
Website
pbase.com
What??? a chuck on each end, lol!!

Don't laugh... I know somebody very close to me who did it.

_mg_8146small-jpg.4999
 
Joined
Dec 9, 2022
Messages
104
Likes
178
Location
Springfield, OH
Ahhh, stir sticks come in handy again! I love these and bamboo skewers! They are great disposable handy helpers! I ran two beads of extend glue down the top of the segments and started spreading between the segments. Ughh!! I ran two more beads down the row and voila, enough glue to make this technique manageable. Woohoo!!
lose your BabeBot? Works great for me.
 
Back
Top