• January Turning Challenge: Thin-Stemmed Something! (click here for details)
  • Conversations are now Direct Messages (click here for details)
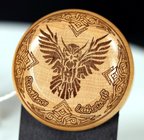
  • Congratulations to Scott Gordon for "Orb Ligneus" being selected as Turning of the Week for January 20, 2025 (click here for details)
  • Welcome new registering member. Your username must be your real First and Last name (for example: John Doe). "Screen names" and "handles" are not allowed and your registration will be deleted if you don't use your real name. Also, do not use all caps nor all lower case.

What's the next toy.. errr tool?

I'm thinking maybe I need to ask Santa for one of these laser peckers for XMAS. For just putting a signature on the bottom of a bowl sounds like a "1" will suffice?

@Charles Cadenhead, is it possible to build your own stand to use it on taller items that the tripod won't work with?

I'm not real familiar with a laser but I'm guessing the distance to the item/bowl is kind of important.
 
You can actually use it sideways. I set it up on proper height blocks to match the project. Distance is set by an included ruler. Just needs to be close. The tripod they supplied mine is to flimsy to use!
 
is it possible to build your own stand to use it on taller items that the tripod won't work with?

I'm not real familiar with a laser but I'm guessing the distance to the item/bowl is kind of important.
Yes, you could build your own stand. They recommend (if I remember correctly) setting the item 200 mm from laser. It doesn't have to be that far apart but the image will distort some. It's pretty easy to use, just don't look at the laser while it's on.
 
You can actually use it sideways. I set it up on proper height blocks to match the project. Distance is set by an included ruler. Just needs to be close. The tripod they supplied mine is to flimsy to use!
Well now we need to see pictures of these lasers in action!

For the 1's, I'm finding something called a mini which looks different than the another 1 I found. both are called ones though I think. Different years? The mini was $209 and the other was $279.
 
You can actually use it sideways. I set it up on proper height blocks to match the project. Distance is set by an included ruler. Just needs to be close. The tripod they supplied mine is to flimsy to use!
Sideways say for instance while the bowl is still on the lathe after removing the tenon/cleaning up the bottom? Then just sitting the laser in front of it sideways on the ways with a block so it's on the center line?
 
Sideways say for instance while the bowl is still on the lathe after removing the tenon/cleaning up the bottom? Then just sitting the laser in front of it sideways on the ways with a block so it's on the center line?
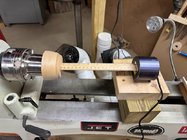
I apparently have the LP Mini I guess, It is just the round laser head with tripod and accessory kit. However, it threads on to the tripod, so it is reasonably simple to see how one could chuck up a screw into tailstock MT2 chuck to hold the laser head and point it right at bowl bottom, so you could sign bottom (or inside of bowl, etc) with it easily enough.

If you really gotta get a Lasperpecker of the 1 series, then I would strongly recommend spending the extra bucks and get the LP1 Pro (Especially if it works with desktop/laptop software and not just cell phone app) It does require the 200mm distance for focus reasons (my other cheapo one has an adjustable focus at least) But as long as you can securely mount it in such a way that it faces square to the surface you are engraving at approximately 200mm (give or take 10mm) and it won't move (AT ALL - It is pretty sensitive to bumps - just bumping my rock solid work bench was enough to make it stop from such a tiny jostle) Then you can mount it on pretty much whatever you can think up. (You just need to be able to plug it in to power and close enough to bluetooth connect.)
 
Sideways say for instance while the bowl is still on the lathe after removing the tenon/cleaning up the bottom? Then just sitting the laser in front of it sideways on the ways with a block so it's on the center line?
Yes. Mine has a flat spot where the tripod bolts on. It is made to sit on any stable surface. Mine is the 1 pro same as Charles. I will grab a pic of it on the lathe if I get a chance today. It couldn't be any easier to use.
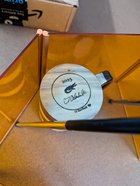
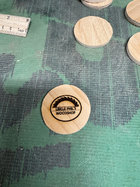
I downloaded a pic of my burner logo to my phone. Added it to my archive and now just laser it onto the bottom or wherever I choose. The best time to use the laser is before you finish the piece so while you have it jigged up on the lathe is the most stable it will be. You can adjust the size to fit the project.
Here is a quick shot of the bottom of my small rounded apple bowl. I have changed the logo to something more legible since this pic.
IMG_6732.jpg
 
Last edited:
@Steve and @Kent, do either of y'all use the stand? I use their tripod and like it because I can adjust it for most size bowls I turn but I've had it fall over on me a couple of times. I've though about purchasing the stand but it looks too small for larger items.
I use their stand. The reviews said it's pretty flimsy, which is true, but once you get it in place it doesn't have to do much.
 
Each of us knows ourselves better than any other woodturner. But if the instant availability and the repeatability are big for you, well, you're the guy with a burning pocket! For me the Wolverine was the hands down winner for repeatability. There is a system I learned from Trent Bosch a couple of years ago that makes setup a cinch. Fast and always the same. If you (or anyone else) doesn't know that system I'll post it here. But, only if someone asks. I'm tired of my own voice!
Yes please, post that system. I do have the Wolverine, would be nice to know if I’m using it to its best advantage.
 
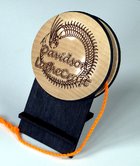
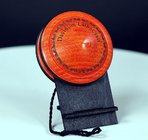
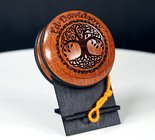
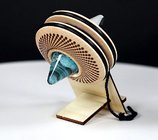
I'm pretty happy with the too-long-thought-about decision to invest in a desktop laser engraver/cutter. It's a 10w diode machine, with a few attachments and a really spiffy software app called Lightburn...added a whole new dimension to my woodturning. Note that all of the turnings shown in the attached photos are lased on a curved surface...this particular laser brand (Ortur LM3) is very forgiving when it comes to beam focus.
 

Attachments

  • 2023_yoyo_85c.jpg
    2023_yoyo_85c.jpg
    236 KB · Views: 15
  • 2023_yoyo_78a.jpg
    2023_yoyo_78a.jpg
    173.7 KB · Views: 14
  • 2023_yoyo_83b.jpg
    2023_yoyo_83b.jpg
    172.3 KB · Views: 15
  • 2023_yoyo_63e.jpg
    2023_yoyo_63e.jpg
    112.3 KB · Views: 14
Last edited:
I'm pretty happy with the too-long-thought-about decision to invest in a desktop laser engraver/cutter. It's a 10w diode machine, with a few attachments and a really spiffy software app called Lightburn...added a whole new dimension to my woodturning. Note that all of the turnings shown in the attached photos are lased on a curved surface...this particular laser brand (Ortur LM3) is very forgiving when it comes to beam focus.
I’m torn between a 5w desktop or laserpecker. Desktop can do more, but laserpecker looks easier. Long focal length and I can put on lathe like @Phil Hamel. With desktop I’d need to have some kind of stand to hold each piece. Both are 30% off for cyber Monday.
 
I've got a desktop laser and really like it. More versatile than the laserpecker. A fellow in our local club made a mount for his laserpecker that goes into the tailstock of his lathe. He really likes it for signing pieces, but says it is pretty well limited to just doing that.
 
I'm pretty happy with the too-long-thought-about decision to invest in a desktop laser engraver/cutter. It's a 10w diode machine, with a few attachments and a really spiffy software app called Lightburn...added a whole new dimension to my woodturning. Note that all of the turnings shown in the attached photos are lased on a curved surface...this particular laser brand (Ortur LM3) is very forgiving when it comes to beam focus.

Hey cool, do you sell those? Someone sent me what must be one of your yoyo's for my birthday.
 
Hey cool, do you sell those? Someone sent me what must be one of your yoyo's for my birthday.
Yes, I've been making, selling and giving away yo-yos and other toys that spin since around 1998. Most of what I sell are through special orders, but a few get posted to my retail site. You can see a few hundred examples of past works here on Pinterest.
 

Attachments

  • 2023_BCmod_1e.jpg
    2023_BCmod_1e.jpg
    225.5 KB · Views: 5
  • 2023_BCmod_4a.jpg
    2023_BCmod_4a.jpg
    157.1 KB · Views: 5
Last edited:
I couldn’t decide between the laserpecker lp1 pro or the xtool d1 pro. Both were on sale cyber Monday with limited stock so I ordered both with the intention to return one. The laserpecker got lost in transit, so I ended up with the xtool.

Seems to be really solidly built and was easy to assemble. The xtool software is mostly intuitive. Only issue I had was with positioning. The positioning crosshairs needed to be calibrated and it took me a long time to find where that feature was hidden in the software.

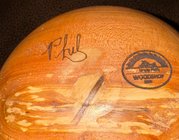
Here is first “signed” piece. I downloaded a font that looks like my handwriting so it looks like I did it by hand.
 

Attachments

  • IMG_0264.jpeg
    IMG_0264.jpeg
    406 KB · Views: 31
The next tool today was a couple of faceplates. Didn't really need any but found easy wood had some discontinued models at a pretty good deal I thought.

Anybody use that brand? 3 1/2" and 4 1/2" aluminum.
 
I couldn’t decide between the laserpecker lp1 pro or the xtool d1 pro. Both were on sale cyber Monday with limited stock so I ordered both with the intention to return one. The laserpecker got lost in transit, so I ended up with the xtool.

Seems to be really solidly built and was easy to assemble. The xtool software is mostly intuitive. Only issue I had was with positioning. The positioning crosshairs needed to be calibrated and it took me a long time to find where that feature was hidden in the software.

Here is first “signed” piece. I downloaded a font that looks like my handwriting so it looks like I did it by hand.

It wouldn't do a jpeg of your signature or initials?
 
It would do a jpeg, but I wanted to include wood species and code number on each piece. By using a font I can just type it in and burn.
I use a jpeg of my signature in a word document. I type other information below my signature, and then use the snipping tool that comes with windows to create the jpeg of my signature and additional info to send to my laser. I have also used word art in word to wrap the text around in a circle.
 
Have had a Stihl peavey with the fulcrum attachment for several years. I use it only once in awhile but find it quite valuable when I do. Just used it to wrangle a good sized trunk of an old Japanese cherry which had to come down (due to age). The trunk was green as could be, and very heavy. I was able by myself to lift, rotate and position it to section into smaller pieces which are now drying under my deck. Even the smaller pieces were so heavy that the peavey was needed to maneuver them onto a hand truck. A simple tool, but a real winner when paired with a good chainsaw. The Stihl one is well made and light but (being Stihl) not so cheap. Makes the chainsaw safer too as it lifts the work above the ground so minimizing the chance of a bind.
 
Have had a Stihl peavey with the fulcrum attachment for several years. I use it only once in awhile but find it quite valuable when I do. Just used it to wrangle a good sized trunk of an old Japanese cherry which had to come down (due to age). The trunk was green as could be, and very heavy. I was able by myself to lift, rotate and position it to section into smaller pieces which are now drying under my deck. Even the smaller pieces were so heavy that the peavey was needed to maneuver them onto a hand truck. A simple tool, but a real winner when paired with a good chainsaw. The Stihl one is well made and light but (being Stihl) not so cheap. Makes the chainsaw safer too as it lifts the work above the ground so minimizing the chance of a bind.
I didn't realize Stihl made a version. I see the reviews say about the same thing for the peavey or the cant hook. You must be happy with your peavey?
 
I didn't realize Stihl made a version. I see the reviews say about the same thing for the peavey or the cant hook. You must be happy with your peavey?
I am and would buy it again. Being able to grip and wrangle an irregularly round and heavy log is great. Any well made one should work well. A cheaply made one might well fail under the forces involved. There is a brief learning curve involved with any peavey or cant to new users, but some hands-on work with on makes it pretty clear quickly what works, and what doesn't. You can move some surprisingly big and heavy wood with one.
 
Well, like my grandma used to say, "I ain't no spring chicken no more." I have found the cant hook a valuable tool. I have a metal handle Sthil also. I doubt I could break it, even in my younger days. Some of my logs are too big for me to roll around by myself until I have chopped off several chunks. I have found having a 5 foot lever bar helpful to elevate one end of the log so I can cut all the way through and then the single piece is more manageable.

robo hippy
Exactly. Autumn chicken helper.
 
I need to take a vote, Peavey or a cant hook? Stick it or hook it?
Unless you are going to use it on your Sawmill, I'd suggest the Peavey , the spike point can be useful getting between 2 logs and wedging them apart , or sticking into the ground or another log to lever/lift/push one log end away from another, etc. You can also poke that point into some offcuts to sort of jury-rig a log lifter...
 
Back
Top