• December Turning Challenge: Tree! (click here for details)
  • Congratulations to José Esteban Cruz"Rocking Horse" being selected as Turning of the Week for December 16, 2024 (click here for details)
  • Welcome new registering member. Your username must be your real First and Last name (for example: John Doe). "Screen names" and "handles" are not allowed and your registration will be deleted if you don't use your real name. Also, do not use all caps nor all lower case.

What's the next toy.. errr tool?

Joined
Jun 10, 2023
Messages
137
Likes
127
Location
Sydney, Nova Scotia
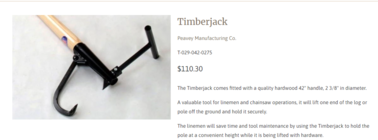
Hmm? Big? Nah, if you know how to use them (I have a Cant Hook from Granddad's farm still) you can roll some massive logs , and the whole tool isn't even 5 feet total length I have used it in the woods working with my brother, to roll logs as big as 16 feet long and 52" diameter (I worked a couple days on a log landing bucking logs to prep for log truck to haul 'em off, filling in for a short handed crew with a tight deadline. ) But yeah, Cant hook / Peavey with the add-on for lifting would be quite nice (and definitely would be a struggle to roll-lift big logs, but depending on your weight & strength can still do logs up to 36" or bigger - Biggest I could manage would be maybe a 24" diameter, myself, but then I'm only 160 Lbs and not all that strong)

Only real difference between a specific purpose log lifter like the one pictured, and a Cant Hook (Which is also used on lumber mills to roll the sawn log A.K.A. the Cant into position desired) is the log lifter is missing the spear point that a (most) Cant hook has , and not all Cant Hooks will have the tabs or ears to which you can bolt on a log lift (Log Jack) but I have had dual purpose ones that can serve either or both purposes.
If it has a point, it is a peavey. No point, a cant hook. The 'loglifter' above is a timberjack. timberjack

1699616518223.png
 
Joined
Feb 28, 2021
Messages
1,426
Likes
1,256
Location
Roulette, PA
Website
www.reallyruralwoodworks.com
Appears there are slight variations in naming schemes for the same tool - locally to me they are Log Jacks (Timberjack being the brand name of a log skidder, so I'm somewhat surprised they let Peavey Mfg use the name...? Dunno, I never really wondered much back then.) and around here, Your "Peavey" (Again also a brand name) is also a popular cant hook for local sawmills - the point is useful for many things, and most mills around here are bandsaw mills so locally the terms are interchangeable , so, other manufacturers than Peavey can't call it a Peavey, I imagine.... Thus it becomes a Cant Hook, with or without the point.
 
Joined
Aug 29, 2019
Messages
44
Likes
21
Location
Vienna, ME
Yes, please post. THANKS!
OK, LOUSY photography! Just not set up to use both hands on the tools and a third hand on the camera.

This method REQUIRES that you have the Wolverine Vari-Grind jig!

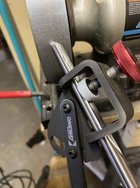
Step 1 - Set up the Wolverine Vari-Grind with a gouge mounted, flute extended to suit the angle you want to grind
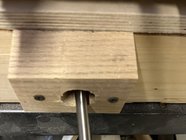
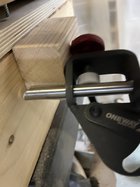
Step 2 - (2 photos for clarity) Make a wooden block with a hole that matches the depth of the exposed/extended part of the flute in Step 1 (what sticks out beyond the face of the Wolverine Vari-Grind clamp). Mine is a through hole in a block, the thickness of which matches the length of the exposed flute. Fasten the block against a flat surface near your grinding station.
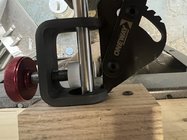
Step 3 - When you need to resharpen, put the Wolverine Vari-Grind together with the gouge but not clamped tight. Stick the gouge into the block hole and push the front of the Vari-Grind jig FLAT up against the surface of the block. Tighten the gouge in the Vari-Grind. Sharpen away!

You can make several blocks to suit different sharpening angles.

I would also like to note that the CBN wheels in the Bosch shop were either 3/4" or 1" wide. I found them to be troublesome because it was too easy to slip off the edge of the wheel when swinging the tool to grind the wings. My wheels are 1 1/2" and those work fine for me.

Step1.jpgWWWStep2A.jpgWWWStep2B.jpgWWWstep3.jpg
 
Joined
Aug 29, 2019
Messages
44
Likes
21
Location
Vienna, ME
Even a brand new 80 grit CBN wheel is slow for shaping a tool if time spent is important. I use a 36 grit belt on my sander for that. You may be able to set up a 36 grit disc on a drill press also. If I am really changing the shape of a tool, I have been known to use a cutting disc on an angle grinder. Just depends on how much you have to remove.

I was surprised to hear the comment about my platform that I used to make being too small. A bigger platform will work until your tool gets short and stubby. I never noticed mine being too small, and designed it based on the size of the Wolverine platform, which is sufficient, at least for me.

Now days, I am more about learning to use hand planes, and want to make a bunch of them, including Japanese style pull planes....

robo hippy
Robo,

Jus saw this comment re:grinding platform size. I definitely did not mean to bad mouth your rest. I tried to be clear that the question of platform size is pretty personal and dependent on personal quirks (I have lots of those!). Your rests are fine pieces of equipment and when I listed them for sale here they were snapped up instantly. Unlike many of the more experienced turners here, I have yet to grind a tool so short and stubby that I have problems with the large platform. Actually, I'm rather short and stubby myself. I am likely to replace the tool rather than be reminded of my personal profile every time I use it!
 
Joined
Jun 10, 2023
Messages
137
Likes
127
Location
Sydney, Nova Scotia
Appears there are slight variations in naming schemes for the same tool - locally to me they are Log Jacks (Timberjack being the brand name of a log skidder, so I'm somewhat surprised they let Peavey Mfg use the name...? Dunno, I never really wondered much back then.) and around here, Your "Peavey" (Again also a brand name) is also a popular cant hook for local sawmills - the point is useful for many things, and most mills around here are bandsaw mills so locally the terms are interchangeable , so, other manufacturers than Peavey can't call it a Peavey, I imagine.... Thus it becomes a Cant Hook, with or without the point.
Yes, there are some variations, but there are other makers also calling it a timberjack; never heard it called a logjack. Stihl call it a 'log stand'.

Here is the Woodchuck one https://woodchucktool.com/timberjack
Cooks Saw https://cookssawcanada.com/timberjack/
This one's yellow: https://www.amazon.ca/Steel-Timberjack-Forestry-Multitool-Back-Saving/dp/B085KVS3N2
Timber Tuff https://www.baileysonline.com/timber-tuff-timberjack-48-wooden-handle-tmb-55.html
etc.

The Peavey company doesn't have any lock on the name anymore; many companies make a peavey, they're all over the place. People do use them interchangeably now (cant hooks and peavies, not so much the names), but the cant hook really is a sawmill tool, like you pointed out. The hook on a cant hook doesn't damage the cant the way a spike does. But the spike on a peavey can be dug into the ground, or pry logs apart, or work with them in water; it's a forestry tool. https://www.cannings.com.au/blogs/n...xt=A cant hook has a,is used to separate logs.

Anyway, best thing is to have some of both, in various lengths and sizes!
 
Joined
Dec 29, 2022
Messages
986
Likes
1,066
Location
USA
OK, LOUSY photography! Just not set up to use both hands on the tools and a third hand on the camera.

This method REQUIRES that you have the Wolverine Vari-Grind jig!

Step 1 - Set up the Wolverine Vari-Grind with a gouge mounted, flute extended to suit the angle you want to grind
Step 2 - (2 photos for clarity) Make a wooden block with a hole that matches the depth of the exposed/extended part of the flute in Step 1 (what sticks out beyond the face of the Wolverine Vari-Grind clamp). Mine is a through hole in a block, the thickness of which matches the length of the exposed flute. Fasten the block against a flat surface near your grinding station.
Step 3 - When you need to resharpen, put the Wolverine Vari-Grind together with the gouge but not clamped tight. Stick the gouge into the block hole and push the front of the Vari-Grind jig FLAT up against the surface of the block. Tighten the gouge in the Vari-Grind. Sharpen away!

You can make several blocks to suit different sharpening angles.

I would also like to note that the CBN wheels in the Bosch shop were either 3/4" or 1" wide. I found them to be troublesome because it was too easy to slip off the edge of the wheel when swinging the tool to grind the wings. My wheels are 1 1/2" and those work fine for me.
Ok, to clarify in your first step, are you setting the angle on the tip or the angle on the wings? It's hard to tell in your photo. If it's the wings, how does that affect the bevel angle on the tip? If it's the tip angle then that's the way the instructions say to do it.
How are you setting the leg on the vari grind?

After re-reading is it not initially a 1.75 inch extended from the jig? Or is it whatever length is necessary. If so wouldn't that also depend on what the leg of the jig is set at?
 
Last edited:
Joined
Feb 28, 2021
Messages
1,426
Likes
1,256
Location
Roulette, PA
Website
www.reallyruralwoodworks.com
Ok, to clarify in your first step, are you setting the angle on the tip or the angle on the wings? It's hard to tell in your photo. If it's the wings, how does that affect the bevel angle on the tip? If it's the tip angle then that's the way the instructions say to do it.
How are you setting the leg on the vari grind?

After re-reading is it not initially a 1.75 inch extended from the jig? Or is it whatever length is necessary. If so wouldn't that also depend on what the leg of the jig is set at?
Just my 2 cents - But I follow what he is saying as I do similar - I have settled on 3 bevel angles on majority of my gouges, and by the use of wood blocks as he describes (Mine are simply squares of 2x4's , drill a 3/4" hole straight down a narrow side to desired depth - Mine are 1-3/4", 2" and 2-1/4" for my 3 bevel angles - and then drill out another hole across the wide side to make a window (bottom of hole lines up with the depth of the first hole) - That way I never need to change the distance of my wolverine pocket arm from the grinder , so when I come to the grinder, I can set varigrind to desired wing sweep (for me, typically line up the movable arm with either #2 or #4 notch , counting from notch closest to the gouge) put gouge in the vari-grind and then drop gouge down desired block , snug up the varigrind to the flat surface to get my bevel angle, and consistently repeatable grinds every time, without having to move the V-pocket arm in or out, which helps keep the exact angle on a consistent basis. Saves me a ton of time over fiddling with jig setups.
 
Joined
Dec 29, 2022
Messages
986
Likes
1,066
Location
USA
Just my 2 cents - But I follow what he is saying as I do similar - I have settled on 3 bevel angles on majority of my gouges, and by the use of wood blocks as he describes (Mine are simply squares of 2x4's , drill a 3/4" hole straight down a narrow side to desired depth - Mine are 1-3/4", 2" and 2-1/4" for my 3 bevel angles - and then drill out another hole across the wide side to make a window (bottom of hole lines up with the depth of the first hole) - That way I never need to change the distance of my wolverine pocket arm from the grinder , so when I come to the grinder, I can set varigrind to desired wing sweep (for me, typically line up the movable arm with either #2 or #4 notch , counting from notch closest to the gouge) put gouge in the vari-grind and then drop gouge down desired block , snug up the varigrind to the flat surface to get my bevel angle, and consistently repeatable grinds every time, without having to move the V-pocket arm in or out, which helps keep the exact angle on a consistent basis. Saves me a ton of time over fiddling with jig setups.

To me it sounds like just another way to skin the same cat.

Because if you set the length like one way recommends to 1.75 out from the vari grind, then to set your angle on the tip you just move the v arm in and out. Lock it and you have repeatability. I don't change my angle so I have put a stop collar on the v arm shaft for the times that I switch to the platform. A mark would do the same thing. That's part of the reason I considered another cbn wheel of the same grit so I wouldn't have to go through the process of swapping the platform/v arm back and forth.

My problem is in the flow of the grind of the wings. I need to experiment with the leg setting on the vari grind and work on technique more than anything I'm sure.
 
Joined
Aug 5, 2022
Messages
236
Likes
134
Location
Appleton, WI
At some point, I realized that just about anything you want to turn, can be done with the same tools your grandpa used!.....all you need to do is forget about investing $$$$$.....and learn to use the basic tools to their potential. That takes time in the saddle, and not throwing money at it!


Odie, I enjoy your philosophy. We can have a Stradivarius but if we haven't had music classes, why do we have the Stradivarius?
 
Joined
Jul 18, 2020
Messages
94
Likes
97
Location
Seattle, WA
For platforms I have 2 Stuart Batty grinding platforms, the larger one (no longer made and almost impossible to find)

Important note: Stu's excellent grinding platforms and many other tools have been back in production for some months now. I have two new-production ones with the Wolverine adapters, which I bought via Cindy Drozda's site where they appeared slightly before going up again on the new Stuart Batty Tools site. I'm super happy with them; just one axis to change to setup the platform for a different angle.

(N.B.: if you're looking to get these platforms for your Wolverine-based grinding setup, you may need to move the Wolverine base back about 1" or so. This doesn't affect the use of other Wolverine system accessories. I had to make this change. Not a big deal, but a little extra work to plan for.)
 
Joined
Jul 18, 2020
Messages
94
Likes
97
Location
Seattle, WA
I can't seem to get a nice flow on the wings from the tip. Comes off the tip and drops down just a little before going into the convex flow of the wings.
For my part, the biggest thing that helped my sharpening was learning to do freehand platform sharpening. That forced me to really understand the connection between the gouge's motion at the grinder and what's happening at the edge. Specifically, this video by John Lucas was great for clarifying two critical things that apply to both jig and freehand approaches: 1) how to troubleshoot and problem solve edge problems (the video's primary topic) and even more important 2) how to start really "seeing" your point of grinding. Once you're able to connect the gouge motion with what's happening at the edge and are able to spot-fix, that helps establish a virtuous cycle where your hands (cough, finally!) start learning how not to create the problem in the first place.

A key point: the rate of the gouge's rotation across the edge is not necessarily uniform! If you have a dip or a rise off of the "ideal" line of your intended grind that means you spent too much (dip) or too little (rise) time at that area of the edge.
 
Joined
Dec 29, 2022
Messages
986
Likes
1,066
Location
USA
For my part, the biggest thing that helped my sharpening was learning to do freehand platform sharpening. That forced me to really understand the connection between the gouge's motion at the grinder and what's happening at the edge. Specifically, this video by John Lucas was great for clarifying two critical things that apply to both jig and freehand approaches: 1) how to troubleshoot and problem solve edge problems (the video's primary topic) and even more important 2) how to start really "seeing" your point of grinding. Once you're able to connect the gouge motion with what's happening at the edge and are able to spot-fix, that helps establish a virtuous cycle where your hands (cough, finally!) start learning how not to create the problem in the first place.

A key point: the rate of the gouge's rotation across the edge is not necessarily uniform! If you have a dip or a rise off of the "ideal" line of your intended grind that means you spent too much (dip) or too little (rise) time at that area of the edge.
I have been watching where the wing touches the cbn more and did learn to slow down and let the wheel work more on that spot to make a flatter grind instead of the big convex wing I have been getting. Plus overall I'm barely touching, just enough to put a fresh surface on the grind.

Makes me wonder if I need to move my leg back to where Doug Thompson said it should always be and just keep adjusting my movements/speed.
 
Joined
Dec 29, 2022
Messages
986
Likes
1,066
Location
USA
Echo 590 or one-way coring system.....also the band saw would save you so much time....maybe a big rikon or old delta

I ended up with a Stihl 20" ms271 the other day to go with my smaller 16" ms180 so I'm set for a bit on saws. A bigger one than the 271 might have been nice but I couldn't pass up the price for a saw that shows hardly any wear and just turned 2 years old.

The local dealer checked it over for me and it's NOT even stolen! Always a plus.

I should walk back my "not having" a band saw comment. I do have a vintage 1947 14" delta metal/wood bandsaw. Only problem with it is when I got it several years ago I was all ambitious about restoration and took it apart, had some parts powder coated then bought new tires and bearings for it. Never did find where they sell ambition though.

It's still sitting out in the garage in a couple of boxes and a variety of spots. I need to get off my butt, track down a bigger motor and put it back together. For just cutting rough wet blanks it would probably work for now with a bigger motor.
 
Joined
Aug 14, 2007
Messages
5,782
Likes
3,092
Location
Eugene, OR
Like Yogi Berra said, and this applies to free hand/platform sharpening, "It's 90% mental and 10% in your head." You do the exact same things you do when you are cutting with your tools, ABC, Anchor the tool on the tool rest/platform, rub the Bevel, and Cut. If you seldom spend time on the lathe, then you may have more trouble learning this than some one who is on the lathe every day.

robo hippy
 
Joined
Apr 1, 2019
Messages
418
Likes
318
Location
Bashaw, Alberta
I ended up with a Stihl 20" ms271 the other day to go with my smaller 16" ms180 so I'm set for a bit on saws. A bigger one than the 271 might have been nice but I couldn't pass up the price for a saw that shows hardly any wear and just turned 2 years old.

The local dealer checked it over for me and it's NOT even stolen! Always a plus.

I should walk back my "not having" a band saw comment. I do have a vintage 1947 14" delta metal/wood bandsaw. Only problem with it is when I got it several years ago I was all ambitious about restoration and took it apart, had some parts powder coated then bought new tires and bearings for it. Never did find where they sell ambition though.

It's still sitting out in the garage in a couple of boxes and a variety of spots. I need to get off my butt, track down a bigger motor and put it back together. For just cutting rough wet blanks it would probably work for now with a bigger motor.
I cut all my blanks on a king delta clone. It manages fine, if slower than a big machine and yours will be higher quality than my cheaply made clone.
 
Joined
Dec 29, 2022
Messages
986
Likes
1,066
Location
USA
I cut all my blanks on a king delta clone. It manages fine, if slower than a big machine and yours will be higher quality than my cheaply made clone.
What horse power motor are you using? This one still has the (I thought small) motor that was put on it back in the day.
 
Joined
Aug 29, 2019
Messages
44
Likes
21
Location
Vienna, ME
What an absolutely wonderful forum! After I post my method for setting up the Wolverine to grind gouges, I was watching some YouTube videos on sharpening. AND I REALIZED, DUH!, THAT THERE'S WAY MORE THAN ONE WAY TO SKIN THIS CAT. Each video has a different take on setup and grinding. I get something helpful from every one and I also disagree with something in every one. Yes, the Wolverine instructions do it one of the other ways - start with a predefined hole depth and adjust the jig to achieve the desired bevel. I saw another video, using the Wolverine, that did a full manual reset of depth and angle every time. Ouch!

My suggestion is PRACTICE, ADJUST, PRACTICE, ADJUST, WATCH SOMEONE ELSE WHO GETS GOOD RESULTS, ADJUST AND FINALLY DEVELOP YOUR OWN STYLE.

I saw a comment asking about how to get the wings and the tip bevel the same. Too complicated for me to try to answer here but I offer that you set the bevel for the tip and the wings work out just fine. It's all about learning to roll the gouge as you sharpen.

And a comment about learning to freehand grind first. That's what I did before I went to the Wolverine and it really helps understand what you are asking the jig to do and what it CAN'T do. I was happy with what I learned about freehand grinding in a Stuart Batty workshop. Did it for a long time. Decided to go with the Wolverine system because it allowed my ham hands to maintain the bevel better than trying to keep the gouge flat on the platform while swinging around to sharpen the wings.

Finally, if it takes me more than 2 or 3 gentle passes to bring a gouge back to razor edge, I know I need to reset my head. Everything about my sharpening process - done quickly, maintain the bevels and shapes and taking off as little steel as possible (less heat, longer gouge life, less time at the grinder), means using a gentle hand, thoughtful passes and watching the profile on every pass. If I am careful, I can see a mis-grind start to happen before it turns into an oops and major regrinding. This from someone who screwed up a major regrind on a spindle gouge yesterday because I just didn't take enough time to remember the little things about something I don't do often and I tried to avoid changing the setup on the Wolverine from my bowl gouge settings! Really Tom?
 
Joined
May 30, 2022
Messages
301
Likes
301
Location
Belchertown, MA
I have been drooling over a laser engraver and one way banjo. The laser because my handwriting degrades my pieces when I sign them it’s so bad. The new banjo because I feel like I’m wrestling it every time I move my 3520 banjo.
 
Joined
Dec 29, 2022
Messages
986
Likes
1,066
Location
USA
I have been drooling over a laser engraver and one way banjo. The laser because my handwriting degrades my pieces when I sign them it’s so bad. The new banjo because I feel like I’m wrestling it every time I move my 3520 banjo.

the cheap laser engravers seem to be hit and miss when you read the reviews. Even taking them with a grain of salt for the reviews where they give the person a freebie for the review.

I just signed my sisters birthday gift and I know what you mean. I usually don't put wood type but I did this time and I might as well left it off because even I'm having trouble reading it!
 
Joined
Feb 28, 2021
Messages
1,426
Likes
1,256
Location
Roulette, PA
Website
www.reallyruralwoodworks.com
the cheap laser engravers seem to be hit and miss when you read the reviews. Even taking them with a grain of salt for the reviews where they give the person a freebie for the review.

I just signed my sisters birthday gift and I know what you mean. I usually don't put wood type but I did this time and I might as well left it off because even I'm having trouble reading it!
Yep - they ARE, (hit and miss) you do get what you pay for (and even then sometimes not even that if the brand has a great marketing campaign) as I have found. I got a "100mm" x-y type engraver ($189) because it was cheap, It works quite well, but extremely fiddly, and only really works on Flatwork, and if you need to do an image bigger than 80mm x 80mm , you have to get lucky with getting things correctly patched together in individual engraving sessions - It rarely hits EXACTLY where you had it lined up "last time" ... I got a LP-1 , cheapest model, and while it is more portable (Could mount it in tailstock and engrave bowls) the engraving depth and darkness is hit and miss, even with identical settings in identical woods one after the other. It is also very sensitive to any and I do mean ANY movement while it is working (even a hiccup if you are close to it) So after spending almost $400 on 2 different laser engravers, neither of which I would want to rely on for customer work (unless I have plenty of spare identical pieces if one doesn't make it) so now I am seeing the logic of saving up and spending the big bucks on a quality machine with a company that can back up their product (and not just half-a$$ed chinese-to-pidgin-English translations) I suppose same goes for any other tool you buy these days , but once you find a quality brand you would stand up and swear by (as if your pocketbook depended on it long term) It'd be worth its weight in gold.
 
Joined
Jul 18, 2018
Messages
1,178
Likes
2,395
Location
Baltimore, MD
Just my $.02, and I know this topic has been beaten to death in other threads, but I’ve always thought that laser engraved signatures look a bit mass produced. I tried a brand and had difficulty getting consistent results. Then went to an archival pen, which I liked, but on some darker woods didn’t show up wonderfully. Now I am using a ball-tipped pyrography pen which gives me (what I think is) a nice result.
 
Joined
Sep 19, 2023
Messages
1,009
Likes
1,855
Location
Columbia, TN
Just my $.02, and I know this topic has been beaten to death in other threads, but I’ve always thought that laser engraved signatures look a bit mass produced. I tried a brand and had difficulty getting consistent results. Then went to an archival pen, which I liked, but on some darker woods didn’t show up wonderfully. Now I am using a ball-tipped pyrography pen which gives me (what I think is) a nice result.

I went through all that, too. I settled on the Laserpecker 1 for $300. So far it works great. I don't like my handwriting and have had mostly poor results with an India ink pen. The brand didn't work at all. Too many uneven surfaces. I agree with Lou that the signature looks more commercial but I can live with that.

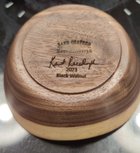
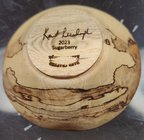
IMG_20231122_083710.jpgIMG_20231122_084000.jpg

Here are a couple of test pieces. You can see the failed brand stamp. I could use a different font for the year and species to make it look less commercial.
 
Joined
Dec 29, 2022
Messages
986
Likes
1,066
Location
USA
I went through all that, too. I settled on the Laserpecker 1 for $300. So far it works great. I don't like my handwriting and have had mostly poor results with an India ink pen. The brand didn't work at all. Too many uneven surfaces. I agree with Lou that the signature looks more commercial but I can live with that.

View attachment 57688View attachment 57689

Here are a couple of test pieces. You can see the failed brand stamp. I could use a different font for the year and species to make it look less commercial.

Was that just a matter of taking a picture of your signature then converting it to g-code or whatever the laser uses?

Is it pretty critical that it be flat? Or is there some leeway?
 
Joined
May 30, 2022
Messages
301
Likes
301
Location
Belchertown, MA
I went through all that, too. I settled on the Laserpecker 1 for $300. So far it works great. I don't like my handwriting and have had mostly poor results with an India ink pen. The brand didn't work at all. Too many uneven surfaces. I agree with Lou that the signature looks more commercial but I can live with that.

View attachment 57688View attachment 57689

Here are a couple of test pieces. You can see the failed brand stamp. I could use a different font for the year and species to make it look less commercial.
Laserpecker 1 pro is at top of my list. Second is the $399 xtool
 
Joined
Feb 7, 2023
Messages
437
Likes
3,058
Location
Gardner, MA
I have the Laserpecker 1 also. It is pretty forgiving if the surface isn't flat. Signatures are easy. You just use the app they have and sign your name in the box of the app just like you were signing anything else. From there you pick a size and then transfer to the laser and it burns on the piece.
 
Joined
Dec 28, 2019
Messages
562
Likes
690
Location
Tallahassee, FL
I went through all that, too. I settled on the Laserpecker 1 for $300. So far it works great. I don't like my handwriting and have had mostly poor results with an India ink pen. The brand didn't work at all. Too many uneven surfaces. I agree with Lou that the signature looks more commercial but I can live with that.
View attachment 57688View attachment 57689

Here are a couple of test pieces. You can see the failed brand stamp. I could use a different font for the year and species to make it look less commercial.
I second the laser pecker. It was a great investment. I can easily write anything I want on the bottom of a piece in a few minutes I just wish they would update the phone app and make it more user friendly. Or just ditch the phone app for a computer application with more design options.
 
Joined
Dec 28, 2019
Messages
562
Likes
690
Location
Tallahassee, FL
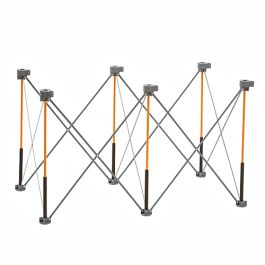
My wife surprised me with an early Christmas gift this morning, she gave me a portable table. Which is a great add to my small, dual purpose, garage workshop. I'm already using it to hold my laser pecker as I engrave some pieces today. I noticed the company also sells some fancy tops for it but I just used a piece of scrap plywood I had. Once I'm done using it I'll pack it away.
 
Joined
Sep 19, 2023
Messages
1,009
Likes
1,855
Location
Columbia, TN
Was that just a matter of taking a picture of your signature then converting it to g-code or whatever the laser uses?

Is it pretty critical that it be flat? Or is there some leeway?

That's exactly how it works, Sam. I created a bunch of bitmaps with my signature, year, and species. Then I uploaded them to Google Photos. From there, I can "share" and send them directly to LaserPecker. It couldn't be simpler.

The laser is aimed straight down. You can burn on an uneven surface, no problem.
 
Joined
Sep 19, 2023
Messages
1,009
Likes
1,855
Location
Columbia, TN
I went through all that, too. I settled on the Laserpecker 1 for $300. So far it works great. I don't like my handwriting and have had mostly poor results with an India ink pen. The brand didn't work at all. Too many uneven surfaces. I agree with Lou that the signature looks more commercial but I can live with that.

I second the laser pecker. It was a great investment. I can easily write anything I want on the bottom of a piece in a few minutes I just wish they would update the phone app and make it more user friendly. Or just ditch the phone app for a computer application with more design options.

See my post to Sam. I just used Paint.net to create my images and then shared them to LaserPecker.
 
Joined
Feb 7, 2023
Messages
437
Likes
3,058
Location
Gardner, MA
If you open the app and go to create and click the drawing button you can just use your finger to sign your name without any other program. It automatically saves it in your archive for future use too.
 
Joined
Dec 13, 2020
Messages
128
Likes
150
Location
Clinton Corners, NY
I went through all that, too. I settled on the Laserpecker 1 for $300. So far it works great. I don't like my handwriting and have had mostly poor results with an India ink pen. The brand didn't work at all. Too many uneven surfaces. I agree with Lou that the signature looks more commercial but I can live with that.

View attachment 57688View attachment 57689

Here are a couple of test pieces. You can see the failed brand stamp. I could use a different font for the year and species to make it look less commercial.
Kent, I have also gone the LP route. Do you have a standard setting you use? I mostly use 100% power and 5 on penetration, but it is not always correct.
 
Joined
Dec 13, 2020
Messages
128
Likes
150
Location
Clinton Corners, NY
I went through all that, too. I settled on the Laserpecker 1 for $300. So far it works great. I don't like my handwriting and have had mostly poor results with an India ink pen. The brand didn't work at all. Too many uneven surfaces. I agree with Lou that the signature looks more commercial but I can live with that.

I second the laser pecker. It was a great investment. I can easily write anything I want on the bottom of a piece in a few minutes I just wish they would update the phone app and make it more user friendly. Or just ditch the phone app for a computer application with more design options.
Charles, they have a desktop app. That said, I usually use the phone app anyway.
 
Joined
Dec 28, 2019
Messages
562
Likes
690
Location
Tallahassee, FL
Charles, they have a desktop app. That said, I usually use the phone app anyway.
Thank you! I found it on their website. They need to make it more obvious like they do for the phone app. I've owned mine for a couple of years now have always used the phone app which I feel is very limiting for design creation. Lately I've been created my sigs in powerpoint, saving it as a jpg, and then sending it to my phone for the app to print.
 
Joined
Dec 28, 2019
Messages
562
Likes
690
Location
Tallahassee, FL
@Steve and @Kent, do either of y'all use the stand? I use their tripod and like it because I can adjust it for most size bowls I turn but I've had it fall over on me a couple of times. I've though about purchasing the stand but it looks too small for larger items.
 
Back
Top