Stunning wood and work.

-
April 2025 Turning Challenge: Turn an Egg! (click here for details) -
Congratulations to Kelly Shaw winner of the March 2025 Turning Challenge (click here for details) -
Welcome new registering member. Your username must be your real First and Last name (for example: John Doe). "Screen names" and "handles" are not allowed and your registration will be deleted if you don't use your real name. Also, do not use all caps nor all lower case.
You are using an out of date browser. It may not display this or other websites correctly.
You should upgrade or use an alternative browser.
You should upgrade or use an alternative browser.
What’s on your lathe?
- Thread starter Rusty Nesmith
- Start date
David nice piece, I have used thin CA to help prevent new turnings from splitting, also knots and the pith areas on the rim, just that bit of CA will strengthen and also slow down the drying of these spots, better outcome.Switch off the walnut to see what the maple I got last week was going to look like. Had a large crotch piece that I wanted to try. It ended up have two offset piths in the top section so both bowls will have a pith in them. Hopefully it won’t crack but there was no way to cut the two blanks with out getting the pith in them. If they crack too much I’ll fill them and they will become give away bowls. Currently 14”x 7” but should finish out once dry at 13.5” x 6.6”
View attachment 71607
View attachment 71606
Got a picture here that shows where I did this, knots and pith areas and inclusions, the bowls dried without splits and were returned and finished.

Last edited:
That is gorgeous. Looks like marble in so many ways. Although I don't think I've seen that brown color in marble.Spalted Missouri Hackberry was a bit punky in places. Final turned at 900rpm.
View attachment 71655 View attachment 71656
Gregory
Thanks Gregory.....That is gorgeous. Looks like marble in so many ways. Although I don't think I've seen that brown color in marble.
Gregory
")
=o=
I did soak the pith area with thin CA on both bowls. It surprisingly soaked it up fairly well, usually green wet wood won’t soak up CA that great but these did.David nice piece, I have used thin CA to help prevent new turnings from splitting, also knots and the pith areas on the rim, just that bit of CA will strengthen and also slow down the drying of these spots, better outcome.
Got a picture here that shows where I did this, knots and pith areas and inclusions, the bowls dried without splits and was returned and finished.
View attachment 71660
Follow up to my previous post. My new pendant jig with an apple pendant mounted on it. Shows how the screwdriver can access a clamp screw to re-clock the pendant to drill and finish the hole in the desired position.
w
w
Worked on a shallow bowl tonight. It's about 8 inches across. I'm not happy with the inside so I think I'm going to put it back on the lathe and keep working on it. It's oak.

- Joined
- Nov 27, 2021
- Messages
- 158
- Likes
- 657
- Location
- Silver Spring, MD
- Website
- www.transpirationturning.com
Sweetgum with some bug holes and a bit of spalting.

Wow!Switch off the walnut to see what the maple I got last week was going to look like. Had a large crotch piece that I wanted to try. It ended up have two offset piths in the top section so both bowls will have a pith in them. Hopefully it won’t crack but there was no way to cut the two blanks with out getting the pith in them. If they crack too much I’ll fill them and they will become give away bowls. Currently 14”x 7” but should finish out once dry at 13.5” x 6.6”
View attachment 71607
View attachment 71606
Small ash hollow form. I'm fixin' to turn off the tenon nub in this shot. 4" or so, finished with Myland's. You can see a little ding where I bumped it with the tool rest. 

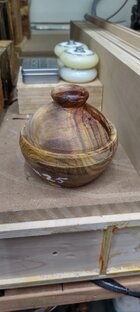
Grabbed a walnut chunk off of the floor. Walnut oil so far.


A small sipo(*) twig pot, slightly larger than the one I posted in the gallery, this one commissioned by a friend. Applying BLO now, then shellac over the weekend.

I decided to make the first twig pot after getting an email about this Rude Osolnik auction. I wasn't intending to make a copy, but clearly I had Osolnik's piece in my mind!
(*) I think? I keep getting my sapele and sipo blanks mixed up.
I decided to make the first twig pot after getting an email about this Rude Osolnik auction. I wasn't intending to make a copy, but clearly I had Osolnik's piece in my mind!
(*) I think? I keep getting my sapele and sipo blanks mixed up.
Last edited:
Finished this small walnut bowl, 7" x 2". It had a recess on the bottom I'm trying to decide whether to make it a footed bowl or leave it as is. The pencil line is the depth of the recess. What's everyone think? I've never made a footed bowl and thought this might be an opportunity.
Attachments
Tom Gall
TOTW Team
Another nomenclature problem for wood turners (most recent - "jam vs. friction" chucking). Many turners would call this a "footed" bowl as it is. If you are talking about carving away material to get 3-4 small feet I would say no. Not enough material to get a continuous artistic curve. But do it anyway ... good practice for the next one where you plan ahead.Finished this small walnut bowl, 7" x 2". It had a recess on the bottom I'm trying to decide whether to make it a footed bowl or leave it as is. The pencil line is the depth of the recess. What's everyone think? I've never made a footed bowl and thought this might be an opportunity.
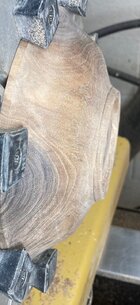
Pulled a once turned blank out of the burn pile. It looked all moldy and rotten, I suspected it was punky but it wasn't. It turned very smoothly with very little tear out and it feels solid. I'm pretty sure it's oak.

Yes, I'm talking about making it a 3 footed bowl by carving away material.Another nomenclature problem for wood turners (most recent - "jam vs. friction" chucking). Many turners would call this a "footed" bowl as it is. If you are talking about carving away material to get 3-4 small feet I would say no. Not enough material to get a continuous artistic curve. But do it anyway ... good practice for the next one where you plan ahead.
I am attaching 2 photos of the process I used on an end grain bowl, however the amount of material in the bottom may not be enough to make that continuous curve. The grain orientation appears to be side grain on yours, so you would need to have a balky leg to make up for the weak side grain. The way you are set up you will not need the live center support as shown here, however your setup will not work for a natural edge bowl.Finished this small walnut bowl, 7" x 2". It had a recess on the bottom I'm trying to decide whether to make it a footed bowl or leave it as is. The pencil line is the depth of the recess. What's everyone think? I've never made a footed bowl and thought this might be an opportunity.

The continuous curve was checked with a profile transfer gauge that easily shows if the curve is continuous on both sides of the leg ring with a small cup center holding the bowl against the jam/friction chuck. On this bowl I marked the locations of the leg by setting the index then made a pencil mark off the tool rest and moving to the next index point, 120 degrees for 3 legs or 90 degrees for 4 legs. The marking jig as shown is used to mark each leg to assure similar contour.

This shows that the contour of the legs was cut close to the lines and then beginning to cut out the material between the legs. The final shaping can be done with files, sand paper, carving knives or whatever works for you.
- Joined
- Nov 27, 2021
- Messages
- 158
- Likes
- 657
- Location
- Silver Spring, MD
- Website
- www.transpirationturning.com
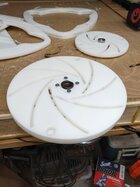
Refining the ability to do basket illusion lines in particular regions. 200 perfectly indexed horizontal segments in 25 minutes. I need to get some real beading tools to make those look nicer.


Edit: added image showing how the region selection works and the job run time.
Edit: added image showing how the region selection works and the job run time.
Last edited:
Worked on a shallow bowl tonight. It's about 8 inches across. I'm not happy with the inside so I think I'm going to put it back on the lathe and keep working on it. It's oak.
View attachment 71667
So, what is it about the interior you're not happy with?
=o=
Working in the shop past midnight last night yielded this 12" Australian Bimble Box Burl bowl featuring an undercut rim. There are a couple of cracks that have been filled with Titebond mixed with sanding dust, one of which is in that dark area on the rim.....


=o=
=o=
Last edited:
Just stunning work and wood.Working in the shop past midnight last night yielded this 12" Australian Bimble Box Burl bowl featuring an undercut rim. There are a couple of cracks that have been filled with Titebond mixed with sanding dust, one of which is in that dark area on the rim.....
View attachment 71762 View attachment 71763
=o=
That shoulder is not strong enough to survive the stresses of turning a bowl that size. You would have to VERY gently turn out the inside of the bowl, and not have even the slightest catch.I am attaching 2 photos of the process I used on an end grain bowl, however the amount of material in the bottom may not be enough to make that continuous curve. The grain orientation appears to be side grain on yours, so you would need to have a balky leg to make up for the weak side grain. The way you are set up you will not need the live center support as shown here, however your setup will not work for a natural edge bowl.
View attachment 71753
The continuous curve was checked with a profile transfer gauge that easily shows if the curve is continuous on both sides of the leg ring with a small cup center holding the bowl against the jam/friction chuck. On this bowl I marked the locations of the leg by setting the index then made a pencil mark off the tool rest and moving to the next index point, 120 degrees for 3 legs or 90 degrees for 4 legs. The marking jig as shown is used to mark each leg to assure similar contour.
View attachment 71754
This shows that the contour of the legs was cut close to the lines and then beginning to cut out the material between the legs. The final shaping can be done with files, sand paper, carving knives or whatever works for you.
robo hippy
I am not sure I understand what shoulder you are talking about.That shoulder is not strong enough to survive the stresses of turning a bowl that size. You would have to VERY gently turn out the inside of the bowl, and not have even the slightest catch.
robo hippy
The post I made was just a methode to carve feet with enough ifs thrown to account for the unknowns. The bowl appears to be done on the inside since it is mounted on the Cole jaws, ready to finish the base.
If there isn't enough material or strength to carve feet then he could easily attach legs such as this photo.

Thanks for asking! I felt like the interior was too shallow and didn't follow the contours of the exterior. I put it back on the lathe and removed a little more wood from the center of the plate/bowl. I suspect if I cut it in half the interior and exterior profile wouldn't match but they would be closer than before and I'm happier about how it looks.So, what is it about the interior you're not happy with?
=o=
Attachments
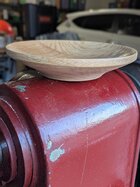
Hello Charles:I felt like the interior was too shallow and didn't follow the contours of the exterior.
Having the interior follow the contour of the exterior is one "rule" that shouldn't be a rule!
I suspect if I cut it in half the interior and exterior profile wouldn't match but they would be closer than before and I'm happier about how it looks.
^^^^^ That I've highlighted in bold above is the only thing that really counts, so follow YOUR OWN plan and always be happier!
=o=
I know and I am happy with it. It was just so flat I wanted it to have a little more depth.Hello Charles:
Having the interior follow the contour of the exterior is one "rule" that shouldn't be a rule!
^^^^^ That I've highlighted in bold above is the only thing that really counts, so follow YOUR OWN plan and always be happier!
=o=
Another gorgeous piece Odie!!Working in the shop past midnight last night yielded this 12" Australian Bimble Box Burl bowl featuring an undercut rim. There are a couple of cracks that have been filled with Titebond mixed with sanding dust, one of which is in that dark area on the rim.....
View attachment 71762 View attachment 71763
=o=
Upgraded all my chucks to the same tool and lathe spindle size (1 1/4 x 8)except for the sc2.

Last edited:
Quick turn today and will have to finish sanding tomorrow.

This piece of Box Elder burl has been sitting around the shop for too long (40 years). Time to do something with it. Thinking of squaring the corner and turning an offset bowl in that corner. On the left side is the underside of a Tree of Heaven rimmed shallow bowl, needs its final coat of wipe-on poly. 

Looks good and you solved the strength problem with the side grain in a very attractive way, I may have to copy that design.I decided to carve the feet on it. I figured good learning experience. Maybe I'll rough out some bowls with thicker bottoms to plan on feet in the future.
Turned and cored a maple today.


Wow! I’d love to find wood like that! Super!
Wow! I’d love to find wood like that! Super!
I agree.....that is one of the better Ambrosia Maple blanks I've seen.
Do some searches for "ambrosia maple" on eBay......they come up now and then....
=o=
Well drive over to western NC and I’ll fix you you up with a blank or twoWow! I’d love to find wood like that! Super!
 . I have about 13 more foot this diameter, 20-24”, and about a 8’ section around 14” diameter. I’m going to turn a few more bowls out of it then try some hollow forms. I’m hoping the rest is marked up like this!
Core is around 13”.

Ah.. rice bowl is green turned first turning.. paint pen in white has the month/year... As a final turning it would be for runway models only as it could hold up to a 1" cube of cheese at the momentLast night was small chunks and scraps to make a lidded rice bowl. Tonight I attempted a Longworth chuck.