Less than 20 bowls done so I’m keeping it simple.
 Less than 20 bowls done so I’m keeping it simple.
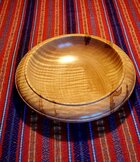
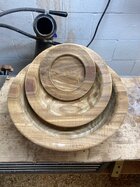
 If you are using a chuck to expand into that recess, the shoulder I am referring to appears to be about 1/4 inch on the rim and maybe 1/2 inch thick on the bottom where it meets the curve of the bowl. I use a recess exclusively on my bowls and platters.I am attaching 2 photos of the process I used on an end grain bowl, however the amount of material in the bottom may not be enough to make that continuous curve. The grain orientation appears to be side grain on yours, so you would need to have a balky leg to make up for the weak side grain. The way you are set up you will not need the live center support as shown here, however your setup will not work for a natural edge bowl.
View attachment 71753
The continuous curve was checked with a profile transfer gauge that easily shows if the curve is continuous on both sides of the leg ring with a small cup center holding the bowl against the jam/friction chuck. On this bowl I marked the locations of the leg by setting the index then made a pencil mark off the tool rest and moving to the next index point, 120 degrees for 3 legs or 90 degrees for 4 legs. The marking jig as shown is used to mark each leg to assure similar contour.
View attachment 71754
This shows that the contour of the legs was cut close to the lines and then beginning to cut out the material between the legs. The final shaping can be done with files, sand paper, carving knives or whatever works for you.
Nice white sapwood. Was the tree cut down recently?
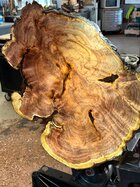
Wow, it doesn't get any better than curly ambrosia maple!Well drive over to western NC and I’ll fix you you up with a blank or two. I have about 13 more foot this diameter, 20-24”, and about a 8’ section around 14” diameter. I’m going to turn a few more bowls out of it then try some hollow forms. I’m hoping the rest is marked up like this!
Core is around 13”.
View attachment 71791
Probably been down a couple months. I’ve been trying to get to it before it sat to long, just been busy lately.Nice white sapwood. Was the tree cut down recently?
I’m hoping it is still there on the final turn. I rough turned the mating side and it also has the curly showing some.Wow, it doesn't get any better than curly ambrosia maple!


I had some curly maple with a little bit of ambrosia a couple of years ago; I made a shallow bowl with it. I need to put my tree-man on finding some more. He can usually get me what I want if I'm patient.I turned the mating side of the maple this afternoon. It is also showing some curly maple with the ambrosia. Hopefully I’ll start a hollow form this weekend and see how it looks. 17” and 13” core.
View attachment 71844
View attachment 71843
View attachment 71842


Wow, if only you could ship them to us! I don't really turn green wood, but this blank I would definitely take!Well drive over to western NC and I’ll fix you you up with a blank or two
Core is around 13”.
View attachment 71791
It is really cool how the Ambrosia streaks "wiggle" along with the figured grain! Awesome stuff!I turned the mating side of the maple this afternoon. It is also showing some curly maple with the ambrosia. Hopefully I’ll start a hollow form this weekend and see how it looks. 17” and 13” core.
View attachment 71844
View attachment 71843
View attachment 71842
Going to try a end grain hollow form and see how they look.It is really cool how the Ambrosia streaks "wiggle" along with the figured grain! Awesome stuff!
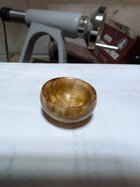
Haven’t seen you do a hollow form! How big is that opening and what wall thickness is the piece?Piece of canary wood.
View attachment 71958
Wow, if only you could ship them to us! I don't really turn green wood, but this blank I would definitely take!
When I have time I’ll see what I can do! We keep our four year old granddaughter during the week, take and pick her up from PreK so until school is out I have limited time during the week. So may be spring break or when school is out.Me, too, happy to pay shipping!
It's only a 4 inch by 2 piece. I've done a few deep hollow projects. Need a bigger machine before I try anything big. Did this urn:Haven’t seen you do a hollow form! How big is that opening and what wall thickness is the piece?


I love how canary looks, but I think it stinks for cutting and sanding. Very pungent.Piece of canary wood.
View attachment 71958
I love how canary looks, but I think it stinks for cutting and sanding. Very pungent.


How’d this one turn out?Piece of canary wood.
View attachment 71958
Ended up the umbrella project in the gallery.How’d this one turn out?
@ Phil Hamel


@Alan WeinbergHaven’t seen you do a hollow form! How big is that opening and what wall thickness is the piece?


Canary wood has a very strong odor. If you have ever green turned white oak (affectionately called piss oak) you can just imagine a dairy coral in the spring. For me canary wood resembles fruity vinegar. Rosewood smells like roses, mesquite smells like a heavenly BBQ and maple smells like burnt pancakes.Does the wood make a big difference in odor?
Bob

Phil, nothing wrong with an enlarged hole to start. Much easier to get the technique down that way.@Alan Weinberg
The opening was 3/4 and the wall thickness was1/8.
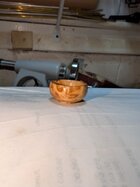
How's this for a hollow form start? Think I made the hole to big already. Full of bug trails and cracks! Will finish it anyway.
View attachment 72099
I turned some bowls for an auction to help artist that lost their shops during the hurricane. The wood was picked up from down trees during after the storm and one piece was some kind of chestnut. It was kind of had a sticky sap and I don’t really care to turn any more. They are drying now waiting for the second turning, at four months so far no cracking and doesn’t appear to have moved very mush at all.Did some chinese chestnut today. Has anyone turned any of this? If so how much does it shrink, does it have cracking problems? I had to cover the bed ways and oil them down before turning it, my friend told me it will turn your lathe blue. It did blue the tools. I oiled the chuck jaws too.