Thanks, Gary-Great idea to try! In any event, I do a lot of finishing with an NRS anyway, so I'll have to give that a try.I find my negative rake scraper with a fresh burr on it does a decent job of making the burnish go away. Might even make sense to run the scraper on it in reverse to get fibers that lay down on the first cut.

-
March 2026 Turning Challenge: Olla! (click here for details) -
Congratulations to David Wyke, People's Choice in the February 2026 Turning Challenge (click here for details) -
Congratulations to Tim Connell for "Black Locust Basket Illusion Series #4" being selected as Turning of the Week for March 16, 2026 (click here for details) -
Welcome new registering member. Your username must be your real First and Last name (for example: John Doe). "Screen names" and "handles" are not allowed and your registration will be deleted if you don't use your real name. Also, do not use all caps nor all lower case.
You are using an out of date browser. It may not display this or other websites correctly.
You should upgrade or use an alternative browser.
You should upgrade or use an alternative browser.
What’s on your lathe?
- Thread starter Rusty Nesmith
- Start date
I don't believe that those stains as you call them are anything more then fine tear out and they are in the same area that tearout normally occurs. I have had similar problems like that on birch and yes it is difficult to detect it on a raw sanded surface. Try to spot sand the area with a 2" disk then when you think you may have eliminated it continue to sand with the piece turning to blend in the surfaces then blow out the dust and look closely at those areas to see if you can detect the tearout.Live Edge Elm with five coats of TruOil. This one has some reddish stains that I sanded out, and then they reappeared several times. I think it's bevel burnish, even though I keep a relief on my gouge bevels. I'll have to be aware of that on the next one. Open to suggestions. (At least the bark held up nicely on this one!).
View attachment 55175
Walnut- 8.25 x 2.5
I had a sanding epiphany yesterday....... I was channeling my inner Odie yesterday on a piece of Elm which I didn't post yesterday and I realized maybe why the simple form is preferred. It's way easier to sand! I ended up burning my finger tips with abrasive paste to get an acceptable look to the Elm with some of the ridges that didn't look good where I had sanded with paper.
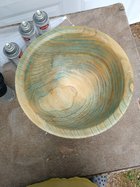
This walnut was a piece of cake to sand compared to yesterdays tragedy of finish. The elm does look better now than it does in the photo. (bronze embellishing wax and high polish) The funky curve on the side wall is intentional just because. I forgot to take a pic when I was finished with the elm. They're all starting to look alike and I'm pretty sure you guys know what a candy dish looks like.
I had a sanding epiphany yesterday....... I was channeling my inner Odie yesterday on a piece of Elm which I didn't post yesterday and I realized maybe why the simple form is preferred. It's way easier to sand! I ended up burning my finger tips with abrasive paste to get an acceptable look to the Elm with some of the ridges that didn't look good where I had sanded with paper.
This walnut was a piece of cake to sand compared to yesterdays tragedy of finish. The elm does look better now than it does in the photo. (bronze embellishing wax and high polish) The funky curve on the side wall is intentional just because. I forgot to take a pic when I was finished with the elm. They're all starting to look alike and I'm pretty sure you guys know what a candy dish looks like.
Attachments

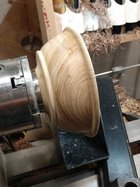
Roughed out a Pecan calabash. The block was bone dry and riddled with cracks, so it’s a little bit smaller than I wanted. That’s okay though, as it’s not about maximizing size. This one is special. I’ve had this piece of wood for longer than I’ve been turning. I originally cut it as a big cube to carve, but it just sat there. Pecan is super hard when dry, but it still cuts beautifully. I suspect it will get its second turn fairly soon, and I’m pretty excited. Pecan finishes like porcelain to the touch. One of my favorites. Anyway…onward!

Last edited:
something I’ve never considered or even heard about. Very interesting.Might even make sense to run the scraper on it in reverse to get fibers that lay down on the first cut
@Aaron Harris I typically use an nrs for the ~ lower 1/4-1/3 of a bowl. Up the sides it doesn’t work sometimes, creating a bit of tear out. If the nrs doesnt work (wood dependent), I use a bar/tip scraper held ~45 deg to dir of rotation to shear scrape it. The cutting bevel on a gouge can be small, providing less resistance and bruising. Pic of one of my 5/8” shaft bg’s. When the bevel gets ~ 1/8” I take more of the secondary bevel.

Muuuhaaa haa haaaa (rubbing hands together)
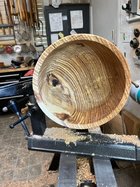
Tomorrow I'll sand this back until just in the grain remains.
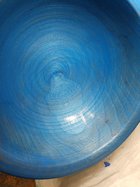
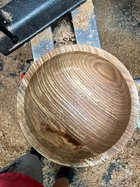
Silver maple I believe. 12 x 5.5 Has some fungus? splotches that were ugly so another experiment.
*EDIT**
Another lesson learned! LOL added after pics (maybe tomorrows experiment on it will be better!)
Tomorrow I'll sand this back until just in the grain remains.
Silver maple I believe. 12 x 5.5 Has some fungus? splotches that were ugly so another experiment.
*EDIT**
Another lesson learned! LOL added after pics (maybe tomorrows experiment on it will be better!)
Attachments
Last edited:
Our youngest grandchild hadn’t received a rattle from grandpa yet, so I turned a piece of hard maple and made one.


A nice sized deeper form out of hickory with a bit of recurve to the shape. Lots of cracks from the weathering filled with CA, coffee grounds going into the biggest crack. The groove at the top is a precut with a skew so the rim will be less prone to splinter as I reduce the top to level.

Walnut calabash. Not sure if I’m going to do a round bottom or not. We will see.
A piece of really punky hickory, just for experiment to see if I could do it. The wood was still kind of wet. I brought it in the house a few days ago to see if drying would help. It was soft enough at the chuck at this spot you could compress the wood with finger pressure, this was the worst spot. I kept the tailstock engaged to help. Was trying out my new 40/40 gouge. I roughed it out and put it away to fully dry and try it again. Other than this spot it turned pretty good.
Attachments

Guess

hedge apple?
Mulberry?
Odie
Panning for Montana gold, with Betsy, the mule!
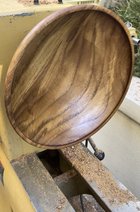
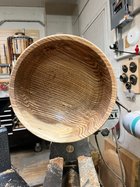
Large Ash salad bowl last evening, 14 1/2" x 5 1/4". This one is a very thick 1" at the bottom and tapers up to about 1/4" near the rim. This was purposefully done with the goal of being very stable while in use. (still very wet from application of D.O.).....
-o-


-o-
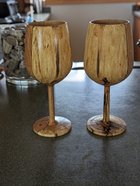
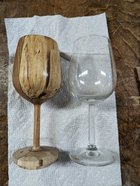
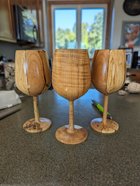
Darryl, both of these goblets are beautiful. Are they meant to display or to use? What finish (s) did you apply?Shavings from a stick of dry firewood that really wanted to be a pair of goblets. #1335
WinnerMulberry?
@Rusty Nesmith did you get your lathe moved into the new shop?
I made something similar, spalted wood that was very soft. I handled it by flooding it repeatedly with varnish after roughing and letting it dry for weeks. Wound up with a pretty hard surface that turned well.A piece of really punky hickory, just for experiment to see if I could do it. The wood was still kind of wet. I brought it in the house a few days ago to see if drying would help. It was soft enough at the chuck at this spot you could compress the wood with finger pressure, this was the worst spot. I kept the tailstock engaged to help. Was trying out my new 40/40 gouge. I roughed it out and put it away to fully dry and try it again. Other than this spot it turned pretty good.
Did a few quarter sawn bowls from a huge pin oak about 4' diameter. Beautiful wood but it smells like a barnyard in my shop. (can someone tell me how to make the images show larger)
Attachments
First try at a Celtic Wedding Goblet for a upcoming wedding. Need to work on the rings. Made out of Cherry.
Yes. I got the electric installed for my dust collection, air comp, band saw and lathe. Waiting to see if other things will move before I run the electric for them.@Rusty Nesmith did you get your lathe moved into the new shop?
When I click on your thumbnails I get 2 bigger sizes that are options. You want bigger than those?Did a few quarter sawn bowls from a huge pin oak about 4' diameter. Beautiful wood but it smells like a barnyard in my shop. (can someone tell me how to make the images show larger)
I think it makes the initial thumbnail smaller for the people on mobile apps like a phone.
6 1/2” diameter, 8” tall wild black cherry kitchen utensil canister:


Working on the first nested set from the tree we just had taken down in the front yard. About half of the largest bowl has some nice figure. This hard maple is highlighting just how inferior the cutting tips that come with the OneWay Easy Core are! Had to sharpen 7 or 8 times to get through 2 cores.

@DON FRANK nice bowls and grain orientation. That pin oak is pretty high contrast!
Re. the photos, instead of attaching them as files, try dropping the images directly into the text box. That will let you adjust the viewing size as needed.

Re. the photos, instead of attaching them as files, try dropping the images directly into the text box. That will let you adjust the viewing size as needed.
Thanks for the tip Gary, I have two of these bowls so I'm going to experiment some more. I'm going to let them dry for a couple months and try to turn them and see how it works. Then I'm going to put shellac on one and minwax wood hardner on the other and try to learn something from this.I made something similar, spalted wood that was very soft. I handled it by flooding it repeatedly with varnish after roughing and letting it dry for weeks. Wound up with a pretty hard surface that turned well.
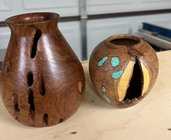
After a hiatus from woodturning for about 3yrs, I have started back digging thru my burn box for things that need to be 'saved'. I don't have a woodburning fireplace so I might as well figure out a fix for each. The claro walnut HF on the left was actually being carved but stopping and stopping overtime left me with leaves that were both right over left and left over right. It was butt ugly. I was overly ambitious in my early carving attempts. So I carved off the offensive stuff and will do a textured top instead this weekend.
The piece on the right was an interestingly spalted silver maple bowl. The tenon broke and the bowl was launched across the garage to an inaccessible place. After several years, I found it but still lacked the skill/patience to remount it. Fast forward to today and I now have a vacuum chuck so remounting was a snap albeit still slightly off-center. But you'd be hard-pressed to notice is now. Turned off the broken tenon, glued on a sacrificial tenon and re-turned the inside and outside. This will be donated to the Empty Bowl charity in October as part of my local turning club: Golden Triangle Woodtuners (Denton, TX).
The two mesquite HFs were also saves just off the lathe this week. The left one I got hyperfocused (several years ago) chasing the bump in the center bottom. I went too deep. When I parted it off the lathe, I made a funnel. I finally just plugged the bottom with a ebonized piece of scrap wood. Easy Peasy. The small HF on the right cracked during hollowing significantly. The void used to have wood but it broke off, too. I wrapped it in shipping plastic, dribbled some CA on the crack from the inside then set out to complete hollowing it. I ended up doing the hollowing with my Munro hollowing tool which gave me better feel for the inside curve than I was getting my usual Monster setup. I'm 6 for 6 on saves. All of these are at least 9 years old. I still have a few more pieces to resurrect. All-in-all....it's been a good return to turning after my absence.
Attachments
you are an inspiration to this recent funnel creator!
Wife said we needed a small candy dish.
A chunk of fir tree for the base and a piece of black limba.
Waiting for the tried and true to soak in.


A chunk of fir tree for the base and a piece of black limba.
Waiting for the tried and true to soak in.
Just display. They're kind of fun to do. I had a piece of firewood that had some figure to it, so I did a 3rd one yesterday.Darryl, both of these goblets are beautiful. Are they meant to display or to use? What finish (s) did you apply?
Attachments
Odie
Panning for Montana gold, with Betsy, the mule!
Quilted maple last evening:


Today I am getting ready to display pieces from my apprenticeship* at the Mid-Atlantic Woodturners Symposium later in September. Just finished this one last evening.
*[I’ve committed to continuing the legacy of a master ornamental turner].
This piece ended up with a small hole in the center (“Careful! Don’t go too thin” - it’s about 1/32” at the center!!), so I used a nickle steel bolt in an aluminum strut screwed to a scrap of wood from cutting out a platter blank for the base.
That’s why I’ll call it ‘Industrial Revolution’ - “the intrusion of iron/steel/aluminum into the formerly, organic wood age”.
The walnut block will support another one - the rectilinear piece pictured below.
Phil,
How well does that Black Limba turn? I’ve seen it offered for sake but have never used it.
How well does that Black Limba turn? I’ve seen it offered for sake but have never used it.
Phil-You didn't ask me, but I've turned black limba. In my experience it was very fibrous and stringy, and was very challenging to get a smooth surface on, though I eventually got it there. It has a certain beauty, and a real intriguing tactile feel even when finished.
Phil,
How well does that Black Limba turn? I’ve seen it offered for sake but have never used it.
It was not to bad. Yes had some tear out on the inside that I had to sand. I have 2 more pieces to try so will see how it averages out.
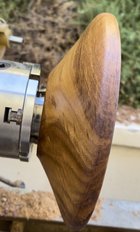
Another Pecan calabash rough out, this one end grain. The blank was very dry, so I probably could have finish turned it in one go. I’ll give it some time and see if it shifts at all, and then turn it again. The grain is pretty wild so it should be cool in the end.

Hays county pecan crotch 14". Spent some time with "Army of Angry Beavers" a.k.a (D-way 3/4" irish grind gouge) this morning and roughed out a large pecan blank that needed quite a bit of material removed due to the wavy exterior of the tree. I'm convinced that if I had no limitation on available torque I could take an 1" off the diameter in a single pass with this tool. Into the kiln with 45% moisture content.


