Outstanding explanation. I most always end up with 1/4 sawn spindle blanks when processing a log into bowl blanks. Once in a while, if the log is big enough a 1/4 sawn platter blank or two. Quarter sawn bowl blanks are an exceedingly rare commodity around my shop. Can't wait to see this one finished.Hi Don, thanks. First off, that's a really nice table. The animal figures on the legs are striking.
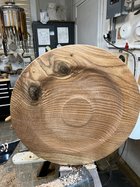
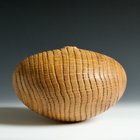
I'm referring to quartersawn in the sense of how I harvested the blank. The log this came from was pretty hefty, so I was able to chainsaw some nice chunks where the grain would run perpendicular to the axis of the bowl. As opposed to plainsawn where the grain would arc through the bowl. Here's a work-in-progress shot of the interior of this bowl, and then another finished one that is plain sawn.
View attachment 55048
View attachment 55049
Obviously the grain is oriented very differently in each bowl. I get the gist of what you're saying (I think) in that something round will not display quarter sawn grain on all surfaces, but I think my terminology is still correct (you’ve been in the game a lot longer than I have, so correct me if I’m wrong). If I have a quartersawn board and I make a bowl/platter from it, does it cease being quarter sawn when the turning begins?

-
It's time to cast your vote in the March 2026 Turning Challenge. (click here for details) -
Congratulations to Chris Lawrence for "Dragon's Grip" being selected as Turning of the Week for March 30, 2026 (click here for details) -
Welcome new registering member. Your username must be your real First and Last name (for example: John Doe). "Screen names" and "handles" are not allowed and your registration will be deleted if you don't use your real name. Also, do not use all caps nor all lower case.
You are using an out of date browser. It may not display this or other websites correctly.
You should upgrade or use an alternative browser.
You should upgrade or use an alternative browser.
What’s on your lathe?
- Thread starter Rusty Nesmith
- Start date
- Joined
- Feb 28, 2021
- Messages
- 1,812
- Likes
- 1,625
- Location
- Roulette, PA
- Website
- www.reallyruralwoodworks.com
I'm in Michael's corner on that - If it starts as a quarter sawn blank such as described (Basically one half of a blank that is left after slicing out the pith on a big log) then it's by any definition I can think of, Quartersawn. I think maybe Don's confusion may have resulted from not seeing that straight grain pattern.... For flatwork, Quartersawn is generally some of the most stable wood to work with, and in some species- most notably White Oak, the flat wood has some gorgeous figure to it from the medullary rays... so Quartersawn in flat work is pretty desirable, I think. But it is relatively rare for bowl blanks unless you have some very large logs (or small bowls)
The question is were both opposing faces displaying the rays equally? Taking a close look at your bowl the inside bottom appears to be rift sawn the way the rays show up and if you were to show a photo of the bottom outside you should be able to see rays in the center gradually getting smaller as the slope increases.Hi Don, thanks. First off, that's a really nice table. The animal figures on the legs are striking.
I'm referring to quartersawn in the sense of how I harvested the blank. The log this came from was pretty hefty, so I was able to chainsaw some nice chunks where the grain would run straight through the bowl. As opposed to plainsawn where the grain would arc through the bowl. Here's a work-in-progress shot of the interior of this bowl, and then another finished one that is plain sawn.
View attachment 55048
View attachment 55049
Obviously the grain is oriented very differently in each bowl. I get the gist of what you're saying (I think) in that something round will not display quarter sawn grain on all surfaces, but I think my terminology is still correct (you’ve been in the game a lot longer than I have, so correct me if I’m wrong). If I have a quarter sawn board and I make a bowl/platter from it, does it cease being quarter sawn when the turning begins?
I see what you're saying. As best I could control, all opposing faces were similar (aside from the sapwood component on one end of the blank). I'm not a sawyer, so take my understanding with a grain of salt. Within the context of harvesting a board/blank from a log, the difference between quarter sawn and rift sawn is that quarter sawn involves quartering a log and slicing the quarter such that the middle slice will have the grain running perpendicular to the board, and all other slices will be parallel to that middle board. Rift sawing involves quartering a log and then rotating that quarter between cuts such that multiple slices have the grain running perpendicular. If you have two log quarters and one is quarter sawn and the other rift sawn, the central slice of each quarter will be identical. This center slice is how I oriented my blank. I didn't measure the blank itself, but it was likely a piece around 8x8x4.5 (ish). I tried to center everything as best I could, and when roughing to the round I tried to size the bowl appropriately so that the grain lines were mostly straight and parallel to one another rather than arcing. Of course, the only way you'll have truly straight and non-arcing grain lines in a blank (or board) is if the slice is infinitely thin (not possible, just like the horizon line is never truly straight).The question is were both opposing faces displaying the rays equally? Taking a close look at your bowl the inside bottom appears to be rift sawn the way the rays show up and if you were to show a photo of the bottom outside you should be able to see rays in the center gradually getting smaller as the slope increases.
Here's a crude drawing I made of how I oriented my blank (including my understanding of the quarter sawing and rift sawing planning process).

The drawing was mostly for my own benefit, but I think it's worthwhile to post. If this was a platter and not a bowl, meaning a completely flat bottom, the quarter sawn ray pattern would be on display. As the bottom of the bowl is curved, the ray pattern will be quite a bit less prominent. In any case, I should be able to finish the bowl tonight or tomorrow so we'll have a better view of the rays.
My understanding is that only the shaded pieces are quartersawn. Only rays from the center.
Generally, as in flatwork, only the face shows. Any curve at the endgrain view wouldn’t been seen.
Generally, as in flatwork, only the face shows. Any curve at the endgrain view wouldn’t been seen.
Right, that’s what I would say as well. My understanding of rift sawn is that it is a way to saw a quartered log so that you get all top quality quarter sawn boards. I read an article a while back about quarter/rift sawn as the terms apply to a sawyer vs as they apply to a builder. It was pretty interesting. I’ll see if I can dig it up.My understanding is that only the shaded pieces are quartersawn. Only rays from the center.
Generally, as in flatwork, only the face shows. Any curve at the endgrain view wouldn’t been seen.
Michael here is some of the info I have, looked this up years ago as I wanted to know  , US government department. info.
In my way of looking at this, I think you are right, but you do need a very large log to make a larger blank for a bigger bowl to be quarter sawn.
PS I did remove the picture with the wrong pointing arrows, and set it apart below with an explanation, sorry I had not seen the mixup.


 .
.
The picture below has the rift and quarter sawn arrows mixed up.

, US government department. info.In my way of looking at this, I think you are right, but you do need a very large log to make a larger blank for a bigger bowl to be quarter sawn.
PS I did remove the picture with the wrong pointing arrows, and set it apart below with an explanation, sorry I had not seen the mixup.
.The picture below has the rift and quarter sawn arrows mixed up.
Last edited:
That platter is a beauty, Don! A lot going on with the grain/figure.
Leo, thanks for posting those articles. Now I’m curious about “bastard sawn”. Interesting! Also that colored drawing has the arrows mixed up for rift and quarter sawn, but that last image is correct.
Leo, thanks for posting those articles. Now I’m curious about “bastard sawn”. Interesting! Also that colored drawing has the arrows mixed up for rift and quarter sawn, but that last image is correct.
What Leo said is spot on. I have a bandsaw mill and am familiar with how to cut quartersawn To get a decent sized bowl or HF blank the tree needs to be bigger because the rings are concentric circles. The bigger the circles the bigger bowl blank you can get. On a bigger log, (if you think of the crosshairs on a scope), those lines would be true quarter sawn on each side of the pith. The bigger the tree the more pieces you can get or a wider board. Then each one of the triangles can be sliced in two to get more. Again, a bigger tree will yield more slices of true quarter.
Mike I didn't see the reference to bastard sawn. The illustrations are a little confusing because there is quarter sawn in the illustration of "plain sawn". In boards the cathedral patterns change from when you are cutting boards parallel to the bark or if you center the pith and then start sawing. The size of the tree and how the pith is centered or not centered in the log all factors in. If your goal is to get end grain bowls or hollow forms draw a line from top to bottom thru the pith. Then look at the grain and see how far right and left you can go before the grain starts to significantly bend. The closer to the center the smaller piece you will get and farther out will yield more. Then draw two more lines and cut the center section out of the log. Cut off any juvenal wood near the pith and you should yield nice stuff.That platter is a beauty, Don! A lot going on with the grain/figure.
Leo, thanks for posting those articles. Now I’m curious about “bastard sawn”. Interesting! Also that colored drawing has the arrows mixed up for rift and quarter sawn, but that last image is correct.
It's pretty easy to find this stuff because tree cutters in the city will cut and stack by the curb. Most people dealing with firewood don't want to jack with huge pieces of wood. I have rolled them over onto a floor jack and used that to raise the piece to the height of the trailer. I have harvested pieces that weigh three or four hundred lbs this way with a little help from a friend.
Thanks for the information Don! It’s interesting to think about these things. I do try to be pretty cognizant of how I’m sawing my logs for blanks. Always room for improvement though! The log I got my quarter sawn bowl from was pretty large (I didn’t measure it though). I harvested the blank (finished bowl will be around 3.5” deep) in a way that qualifies as quarter sawn. I do have some endgrain calabashes in the works, but am focusing on some sidegrain rough outs at the moment.
Bastard sawn was a little snippet in the first article Leo posted. Had to do with the angle of the grain compared to the board. 30-60 degrees. Bastard in the sense that it’s somewhere between plain and quarter, which would be the fringe boards I suppose.
Bastard sawn was a little snippet in the first article Leo posted. Had to do with the angle of the grain compared to the board. 30-60 degrees. Bastard in the sense that it’s somewhere between plain and quarter, which would be the fringe boards I suppose.
Last edited:
Hmm, when people talk about quarter sawn blanks, mostly I think of platters. For oak or sycamore, if you don't quarter saw it, the blank won't show the medullary rays. So, for a sycamore bowl blank, to get the rays in the bottom of the bowl, the bottom of the bowl is near the pith, and the top of the bowl doesn't show the rays. I would guess the same for oak, but I don't get much of it. A bowl with the pith at the bottom, which mostly are natural edge bowls, the bottom is quarter sawn, the the top is not..... Or some thing like that...
I love how this thread keeps running and running......
robo hippy
I love how this thread keeps running and running......
robo hippy
Back on subject..Grabbed some birch, walnut and apple. Christmas will be here before you know it. Barnstorming today.


Ha, it is a super thread! Maybe it's time to start a fresh one?Hmm, when people talk about quarter sawn blanks, mostly I think of platters. For oak or sycamore, if you don't quarter saw it, the blank won't show the medullary rays. So, for a sycamore bowl blank, to get the rays in the bottom of the bowl, the bottom of the bowl is near the pith, and the top of the bowl doesn't show the rays. I would guess the same for oak, but I don't get much of it. A bowl with the pith at the bottom, which mostly are natural edge bowls, the bottom is quarter sawn, the the top is not..... Or some thing like that...
I love how this thread keeps running and running......
robo hippy
Quarter sawn platters are definitely the best to show off the rays well. Flat-ish bottom bowls (gentle curves) can look nice as well. That's my goal for this bowl. The interior should have a nice display of rays as it will be a low-angle curve (1/8" at the rim to ~1/4" at the bottom, so a flatter bottom curve than the exterior). This one is oriented so that the sides of the bowl are toward pith/bark, just like a platter.
Kevin Jesequel
TOTW Team
If the blank is cut with the pith centered on the bottom, like a balanced NE bowl, it will be plainsawn on the bottom. For the bottom to be quartersawn it needs to be cut with the pith towards one side of the blank so that the grain intersects the bottom (and the top of the tree is big enough) at 90 degrees.Hmm, when people talk about quarter sawn blanks, mostly I think of platters. For oak or sycamore, if you don't quarter saw it, the blank won't show the medullary rays. So, for a sycamore bowl blank, to get the rays in the bottom of the bowl, the bottom of the bowl is near the pith, and the top of the bowl doesn't show the rays. I would guess the same for oak, but I don't get much of it. A bowl with the pith at the bottom, which mostly are natural edge bowls, the bottom is quarter sawn, the the top is not..... Or some thing like that...
I love how this thread keeps running and running......
robo hippy
In this quartersawn oak hollow form you can see that the rays are emanating from the right side of the vessel. That is where the pith would have been.
Attachments
Kevin, with that piece, what you are showing is the end grain, and the rays are running from inside to outside, though I can't really tell where the pith is/was. To me, quarter sawn would be cut parallel to the rays so you get the side view of the rays, not the end grain view. Nice piece, even if I don't do hollow forms. That surface looks like maybe it was sand blasted to give it more texture.
robo hippy
robo hippy
@robo hippy here is a side view of the bowl this discussion originally started with, though not oiled, so the rays are a little bit more difficult to see. It’s oriented the same way as Kevin’s hollowform, pith on the right side. I drew in some colored exaggerated rays to show the cone/spread. The pith side is the side where the rays converge, and the bark side is the side where the rays diverge.

Kevin’s form is from a faster growing tree than my bowl, but I bet if you looked at the top or bottom you would see the ray side views. Likewise, with my bowl if you look at the bottom or the interior you can see the ray side view. In any case the blank’s that Kevin’s FH came through was cut in a similar way to the blank that my bowl came from. I suppose the only way to side view of rays on the sides of a bowl would be to turn an endgrain bowl/vessel. But, given the curvature of the sides they wouldn’t really show up. That’s why side-grain is ideal to show the ray flecks that are common with quarter sawn platters/bowl. From a non-ray context, quarter sawn blanks will yield forms with two sides and a bottom/top displaying straight parallel rings. Non-quarter sawn blanks will yield the characteristic waves/arc you see with most bowls. (I’m at work in my office typing on my phone, so forgive the block of text vomit haha)
At the problem’s root, I guess it comes down to whether you consider quarter sawn to refer to harvesting the blank or to a specific view of a piece. Semantics.
Last edited:
Kevin Jesequel
TOTW Team
In my photo above, what you are looking at is the end grain. The top and bottom are the quarter sawn grain. Is it not the orientation of the top and bottom of a piece that we reference when we describe the grain orientation (end grain, side grain, etc…)? If the piece were turned end grain, this grain and ray pattern would be on top of the vessel. If f it were turned side grain, the end grain in the above photo would be running horizontal. Here is a view of the top (I didn’t take a dead-on picture of it). Though, as Michael pointed out, this was a fast growing red (pin) oak and does not have prominent rays.
Attachments
Roughing out a pretty good sized (to me) spalted Pecan calabash, 10.5”d x 7”h. I had this one in a sealed garbage bag in my garage for a few months. The spalting is pretty incredible, but a lot of the wood is super punky of course. Finish turning will be a ways away, but I should probably start batching the shellac now to stiffen the fibers  .
.


.Seems like you have Calabash fever lately!Roughing out a pretty good sized (to me) spalted Pecan calabash, 10.5”d x 7”h. I had this one in a sealed garbage bag in my garage for a few months. The spalting is pretty incredible, but a lot of the wood is super punky of course. Finish turning will be a ways away, but I should probably start batching the shellac now to stiffen the fibers
View attachment 55141
View attachment 55142
View attachment 55143
In the new edition of Woodturning Fundamentals Dr. Seri Robinson wrote an interesting article on turning spalted wood. It's worth reading.Roughing out a pretty good sized (to me) spalted Pecan calabash, 10.5”d x 7”h. I had this one in a sealed garbage bag in my garage for a few months. The spalting is pretty incredible, but a lot of the wood is super punky of course. Finish turning will be a ways away, but I should probably start batching the shellac now to stiffen the fibers
View attachment 55141
View attachment 55142
View attachment 55143
@Gabriel Hoff ha! That fever just never goes away
@Vincent Vogel Vince, I’ll have to check it out! That book’s been on my list for a while now.
@Vincent Vogel Vince, I’ll have to check it out! That book’s been on my list for a while now.
Took the new "G" gripper jaws for a spin tonight. Another walnut, 7.25 x 2.25 . They don't get any simpler than this. Still need to cut the tenon down. I'll leave some for a foot I think.
With the new jaws I went for it and turned this at around 2000 rpm. I'd forgotten how good a surface you can get.
With the new jaws I went for it and turned this at around 2000 rpm. I'd forgotten how good a surface you can get.
Attachments
Finished final piece of Red Oak and made a hollow form (10 x8" letting it dry for a few days before finishing. Thinking of taking the torch and some Indian ink to this one.
Second pic is the second cut on a Hickory bowl rough turned last year. 13" x 6". Learning how to sand properly, I think I am getting the "process" down.
Second pic is the second cut on a Hickory bowl rough turned last year. 13" x 6". Learning how to sand properly, I think I am getting the "process" down.
Attachments

- Joined
- Feb 6, 2010
- Messages
- 3,520
- Likes
- 2,597
- Location
- Brandon, MS
- Website
- threeringswoodshop.square.site
Been trying fo one piece a day to get thru at least the wood on the floors today a natural edge winged hollowform. Not sure if I want to leave wings square or to round them. 
Russ Braun
TOTW Team
Nicely shown example of your point Michael….”a picture is worth a thousand words”!Hi Don, thanks. First off, that's a really nice table. The animal figures on the legs are striking.
I'm referring to quartersawn in the sense of how I harvested the blank. The log this came from was pretty hefty, so I was able to chainsaw some nice chunks where the grain would run straight through the bowl. As opposed to plainsawn where the grain would arc through the bowl. Here's a work-in-progress shot of the interior of this bowl, and then another finished one that is plain sawn.
View attachment 55048
View attachment 55049
Obviously the grain is oriented very differently in each bowl. I get the gist of what you're saying (I think) in that something round will not display quarter sawn grain on all surfaces, but I think my terminology is still correct (you’ve been in the game a lot longer than I have, so correct me if I’m wrong). If I have a quartersawn board and I make a bowl/platter from it, does it cease being quarter sawn when the turning begins?
Odie
Panning for Montana gold, with Betsy, the mule!
@Jim McLainOdie - I think we need a picture with you and the dachshunds on the bike.
@Michael Anderson
I was on another bicycle ride yesterday with my son......so, here you go.....along with Gus in the milk crate, and Roy in the trailer!
")
-o-
.jpg")
Last edited:
Jim McLain
Artist
Love it. Got a good friend with a dachshund that rides on his trike with him.@Jim McLain
@Michael Anderson
I was on another bicycle ride yesterday with my son......so, here you go.....along with Gus in the milk crate, and Roy in the trailer!
-o-
View attachment 55168
Odie
Panning for Montana gold, with Betsy, the mule!
Love it. Got a good friend with a dachshund that rides on his trike with him.
Yep...Dachshunds are just the right size to ride with you.
These two guys are now eleven years old, and they have been my "bicycle buddies" since they were six weeks old.....old hat to them!
-o-
That’s so sweet Odie! There’s a guy in my neighborhood named Van. Walks around every morning with his two chihuahuas in a baby stroller. You have a much cooler setup. Love it.
Live Edge Elm with five coats of TruOil. This one has some reddish stains that I sanded out, and then they reappeared several times. I think it's bevel burnish, even though I keep a relief on my gouge bevels. I'll have to be aware of that on the next one. Open to suggestions. (At least the bark held up nicely on this one!).

That’s a nice NE bowl Aaron. Elm is a nice wood that finishes beautifully. Two things that really helped me to reduce bevel marks. 1) ground off the heel. I tend to be pretty aggressive with this and round it to be very smooth. 2) think about floating the bevel over your cuts (rather than riding the bevel). Especially with interrupted cuts (wood, air, wood, air), if you ride the bevel, it has a tendency to get bounced around. You might also try a slightly smaller gouge for the wings. Less surface area cutting through the wood will help reduce chatter.Live Edge Elm with five coats of TruOil. This one has some reddish stains that I sanded out, and then they reappeared several times. I think it's bevel burnish, even though I keep a relief on my gouge bevels. I'll have to be aware of that on the next one. Open to suggestions. (At least the bark held up nicely on this one!).
Thanks for the tips, Michael! I have been rounding the bevel heel; in fact, I can get a really rounded, smooth surface very quickly on the 2x72 grinding belt I have right beside my grinder. For the finishing cuts into the wings on the last few I have done, I've been trying to do the wings up/12 o'clock bevel rubbing cut that David Ellsworth taught us in his class a few weeks ago (though of course you have to be super-aware of not involving the left wing much beyond the tip!), mostly using his 5/8" signature gouge with his grind on his Ellsworth jig. That cut scares me, to be honest, but I have been really trying to nail it after watching David do it and get a 220-grit finish in his class. And yeah, I hear you on floating the bevel. Tool control is everything coming down into those wings. I may try switching to my 3/8" bowl gouge on my next one. I need to add a couple of 1/2-inch gouges to my tool arsenal. Somehow I still don't have one.
One other thing I have done on a couple of recent NE bowls is finishing the wings with a shear-scraping cut up the wings with the Ellsworth gouge. I can get a pretty nice finish with (almost) no tool marks if I hold my mouth just right. I'm just gonna keep making this style until I feel I've dialed in the more advance cutting techniques it demands. In that sense, NE bowls have been a great learning tool for me as I attempt to "level up" into more advanced work.
One other thing I have done on a couple of recent NE bowls is finishing the wings with a shear-scraping cut up the wings with the Ellsworth gouge. I can get a pretty nice finish with (almost) no tool marks if I hold my mouth just right. I'm just gonna keep making this style until I feel I've dialed in the more advance cutting techniques it demands. In that sense, NE bowls have been a great learning tool for me as I attempt to "level up" into more advanced work.
Those are good options to reduce tool marks/burnish, but its difficult to eliminate. Make sure you get the marks out with the 1st sanding grit. Over time one gets better at observing the sanded surface. Wetting with a solvent can help you see areas that need more sanding.
Doug-The thing is, I thought I had. I got pretty aggressive with 80-grit and eliminated all of it (or so I thought), but it kept "coming back" after I thought it was gone. And for what it's worth, I will almost always wet down with mineral spirtits after 120 or 180 to see better, clean up any coarse grit, and raise the grain for better results going up the grits. My theory is that the bevel bruise like that goes pretty deep, and lays down/crushes fibers below what can realistically be sanded out without going nuclear with super-low grits, and then you can never get out those scratches. Anyway, for the next one I'll remember to float the bevel (that I've put a more rounded relief on), and be more aware of where that bevel is as I move it around. The learning continues.Those are good options to reduce tool marks/burnish, but its difficult to eliminate. Make sure you get the marks out with the 1st sanding grit. Over time one gets better at observing the sanded surface. Wetting with a solvent can help you see areas that need more sanding.
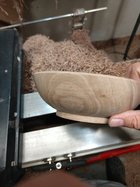
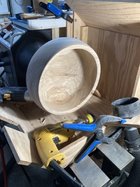
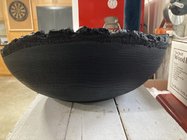
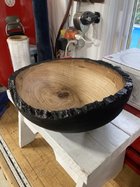
My biggest project so far! Cut a chunk out of the Walnut log butt. Had to remove a bunch off of the face as it was to out of balance.
It was just barely missing the lathe bed when I started.
Tried to keep as much original on the bottom as I could.


It was just barely missing the lathe bed when I started.
Tried to keep as much original on the bottom as I could.
I find my negative rake scraper with a fresh burr on it does a decent job of making the burnish go away. Might even make sense to run the scraper on it in reverse to get fibers that lay down on the first cut.Live Edge Elm with five coats of TruOil. This one has some reddish stains that I sanded out, and then they reappeared several times. I think it's bevel burnish, even though I keep a relief on my gouge bevels. I'll have to be aware of that on the next one. Open to suggestions. (At least the bark held up nicely on this one!).
View attachment 55175