
-
March 2026 Turning Challenge: Olla! (click here for details) -
Congratulations to David Wyke, People's Choice in the February 2026 Turning Challenge (click here for details) -
Congratulations to Tim Connell for "Black Locust Basket Illusion Series #4" being selected as Turning of the Week for March 16, 2026 (click here for details) -
Welcome new registering member. Your username must be your real First and Last name (for example: John Doe). "Screen names" and "handles" are not allowed and your registration will be deleted if you don't use your real name. Also, do not use all caps nor all lower case.
You are using an out of date browser. It may not display this or other websites correctly.
You should upgrade or use an alternative browser.
You should upgrade or use an alternative browser.
What’s on your lathe?
- Thread starter Rusty Nesmith
- Start date
That's a good problem to have ") there's been a couple of recent threads about purchasing a new lathe, you may find those helpful.
there's been a couple of recent threads about purchasing a new lathe, you may find those helpful.
there's been a couple of recent threads about purchasing a new lathe, you may find those helpful.This is a very personal choice. There are many lathes to choose from in very different price ranges. In my case, Record Power fit the bill for capacity, power, and availability. Check this link for Highland Woodworking's stock. If you can elaborate more about your specific needs, I've no doubt there will be more suggestions inbound.I'm in NEED of a larger lathe! Are there any suggestions or ideas?
.jpg")
This is a very personal choice. There are many lathes to choose from in very different price ranges. In my case, Record Power fit the bill for capacity, power, and availability. Check this link for Highland Woodworking's stock. If you can elaborate more about your specific needs, I've no doubt there will be more suggestions inbound.
View attachment 53854
looks like quite a lathe with lots of features though it weighs just half of what a similar Powermatic weighs. Is that a problem—is ballast needed w bigger turnings?
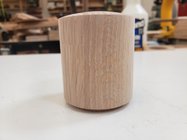
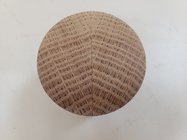
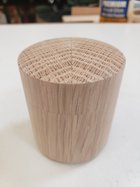
A small box. Glued up White Oak. About 2 inches in diameter and 2-1/2 inches tall. I used some of the sage advice from the query on box making essentials. Thanks to all who responded to that, there was some good ideas presented - I do need to get a box tool rest! I think the grain match across the join is pretty good - I really couldn't remove much less material than I did to separate the mllid from the body. The shape is pretty simple - somewhat limited by the starting material and the interior size.
Cheers.
Barry W. Larson
Calgary, Alberta, Canada eh!
Cheers.
Barry W. Larson
Calgary, Alberta, Canada eh!
Attachments
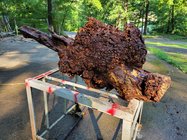
Well! It was punky, soft and crumbling but I showed it who's boss!
Should have thrown the block away but I had to get it turned.
Cross grain was so much easier.


Should have thrown the block away but I had to get it turned.
Cross grain was so much easier.
Picked up a few pieces of ash at my sister's.
First project here:


First project here:
- Joined
- Feb 6, 2010
- Messages
- 3,515
- Likes
- 2,596
- Location
- Brandon, MS
- Website
- threeringswoodshop.square.site
Old injury does not cause spault unless the tree is dying.I kind of doubted it was from the ground, I should have said it could only have been in the mud for 3 days maybe? But I don't know, never ran across it before. This was one of the storm wood finds I've been messing with. It was covered on the end grain with mud though. But up one side there was old gray wood visible for about a foot and the tree had grown around it to a depth of 1.5 inches or so on each side.
Will it keep the color? It's actually a change of pace since hackberry I've turned before has just been plain/boring probably because it's been smaller.
It hasn't been a problem for me. As configured with outrigger and extension it weighs about #510. The large hard rubber feet tend to absorb a lot of vibration.looks like quite a lathe with lots of features though it weighs just half of what a similar Powermatic weighs. Is that a problem—is ballast needed w bigger turnings?
@Daniel Henry like Monty said, there are a ton of ways you can go with your new lathe wishes. Here are couple of recent threads with some good relevant information:
 www.aawforum.org
www.aawforum.org
Lathe upgrade question?
I'm thinking of a lathe upgrade since I've gotten back into round things and found I still like doing it! Currently I'm using an elderly General (Canada) 160 lathe with a Reeves VS drive. I put new bearings in the headstock and new drive belts since it had been sitting for about 20 years. It...
Good bowl lathe for $1k?
Ok team I have two lathes and neither are ideal for bowls. 20 year old Delta 10" and the HF 12" with the Reeves drive is about 10yrs old. I bought the HF specifically to turn an urn for a friend and it really was a bit freaky since the low speed was 600rpm. The urn turned out just what I wanted...
Little Black Cherry bowl work in progress. This was a bowl I wasn’t satisfied with and never finished. I can’t quite get back on the lathe yet (soon!), so I reshaped the bottom with a dremel. I also pyro textured the interior and carved a pattern on the exterior with a fine ball burr. This will eventually be cut apart and reassembled. How it began and how it looks now:


Michael I turned a similar shape (not a natural edge, but the same similar shape and foot, I did not like it and turned another on with a much smaller/thinner foot, that one was taken about the same day it was finished, I still have the other one, and I still do not like the fat foot.Little Black Cherry bowl work in progress. This was a bowl I wasn’t satisfied with and never finished. I can’t quite get back on the lathe yet (soon!), so I reshaped the bottom with a dremel. I also pyro textured the interior and carved a pattern on the exterior with a fine ball burr. This will eventually be cut apart and reassembled. How it began and how it looks now:
View attachment 53867
View attachment 53869
I see you also narrowed the foot and then added the texture, it is an improvement over the original shape that I also did not like, maybe I should see if I could improve on dat one still, maybe not, but I did learn from it
Russian Olive wood


I just put this Apple bowl on 3 pencils to let the Tung oil polymerize and then I will add one more coat and let that harden at least a mont, probable longer, here it is so-far.


@Leo Van Der Loo great minds think alike ") That second one is much better than the first, in my opinion.
That second one is much better than the first, in my opinion.
I got stuck on this type of form for a while (still like it a lot), and played around with lot of variations in proportions and shapes. I ended up with some nice ones along the way, but also some real stinkers. Here is one of the worst offenders (Sugarberry). I kept it around as a reminder of what not to do haha.

By the way, love that Apple bowl you just posted.
That second one is much better than the first, in my opinion.I got stuck on this type of form for a while (still like it a lot), and played around with lot of variations in proportions and shapes. I ended up with some nice ones along the way, but also some real stinkers. Here is one of the worst offenders (Sugarberry). I kept it around as a reminder of what not to do haha.
By the way, love that Apple bowl you just posted.
- Joined
- Feb 6, 2010
- Messages
- 3,515
- Likes
- 2,596
- Location
- Brandon, MS
- Website
- threeringswoodshop.square.site
Yes upside down and it is Three Mile Island. Unfortunately we all have our stinkers and just cannot bring ourselves to throw them out.
A shame too, I really liked that wood. More always comes along though.
Will any mud work to cause spalting or do I need to go back to the stinky mudhole where I got these hackberry chunks to make more that match?
Also, is it a trade off? When you find a wood that cuts like butter (sycamore) is it usually bland and a candidate for paint or inlay?
Also, is it a trade off? When you find a wood that cuts like butter (sycamore) is it usually bland and a candidate for paint or inlay?
Attachments
Hey Sam, there’s a bit of a terroir effect with spalting. If you’re asking if you can spalt that sycamore to look like the hackberry, then no. But if you have some of the same hackberry and you want it to spalt more, just let it sit outside for a while. Or in a plastic bag. If you want to know more about spalting, Seri Robinson is one of the leading experts. Here is a book Seri wrote (that expands on the article Vince mentioned [and Alan linked] below:Will any mud work to cause spalting
Spalting 101: The Ultimate Guide to Coloring Wood with Fungi: Robinson, Dr. Seri C.: 9780764360893: Amazon.com: Books
Spalting 101: The Ultimate Guide to Coloring Wood with Fungi [Robinson, Dr. Seri C.] on Amazon.com. *FREE* shipping on qualifying offers. Spalting 101: The Ultimate Guide to Coloring Wood with Fungi
www.amazon.com
Last edited:
Ya, I didn't make it very clear. spalting another piece of hackberry to match the ones I have. The sycamore I just really liked the way it turns. Too bad it's so vanilla. I was curious if any mud will do or if I need to get some from the same stinky mud hole where I found the hackberry chunks. It was extra special stinky old river mud from a town called London Mills. Home to where one kid blew his hand off on the fourth and another still might lose some fingers.Hey Sam, there’s a bit of a terroir effect with spalting. If you’re asking if you can spalt that sycamore to look like the hackberry, then no. But if you have some of the same hackberry and you want it to spalt more, just let it sit outside for a while. Or in a plastic bag. If you want to know more about spalting, Sari Robinson is one of the leading experts. Here is a book:
Spalting 101: The Ultimate Guide to Coloring Wood with Fungi: Robinson, Dr. Seri C.: 9780764360893: Amazon.com: Books
Spalting 101: The Ultimate Guide to Coloring Wood with Fungi [Robinson, Dr. Seri C.] on Amazon.com. *FREE* shipping on qualifying offers. Spalting 101: The Ultimate Guide to Coloring Wood with Fungiwww.amazon.com
Last edited:
Sounds like the beginning of a Stephen King novel. I would guess that you would be fine without having to get that same mud. You don’t even need mud anyway. Just stick that Hackberry in a plastic bag for a couple of weeks and it will likely be spalt galore. Hackberry/Sugarberry spalts faster and more intensely than just about anything I know of.It was extra special stinky old river mud from a town called London Mills. Home to where one kid blew his hand off on the fourth and another still might lose some fingers.
Last edited:
Sam, I'm not trying to discount the book Michael listed but Seri Robinson wrote an article in American Woodturner, V25 N6. If I remember it was 2010. You can go to AAW main site and look at the article. It gives you a primer on how to do it and what causes it. I'm also interested in the process.Will any mud work to cause spalting or do I need to go back to the stinky mudhole where I got these hackberry chunks to make more that match?
Also, is it a trade off? When you find a wood that cuts like butter (sycamore) is it usually bland and a candidate for paint or inlay?
Page 5 discusses controlled spalting: https://www.woodturner.org/common/Uploaded files/WFPortal/Wood/SpaltedWoodAW2506p54-60.pdf
Sam, try turning the sycamore blanks the other way around, that is pith at the bottom. The grain patterns, although still quiet, will make more sense and be more pleasing. IMOWill any mud work to cause spalting or do I need to go back to the stinky mudhole where I got these hackberry chunks to make more that match?
Also, is it a trade off? When you find a wood that cuts like butter (sycamore) is it usually bland and a candidate for paint or inlay?
When you say bottom, are you meaning the bottom of the picture? Because the pith is on the top edge of that bowl. I did it that way because I figure it will crack there and I'll be able to turn it away when I finish turn it in a few months. And turning that way gave me the biggest bowl since it follows the curve of the 1/2 log on the bottom. It's not a very big bowl. 8 inches across maybe?Sam, try turning the sycamore blanks the other way around, that is pith at the bottom. The grain patterns, although still quiet, will make more sense and be more pleasing. IMO
But, it's not like I don't have more. I'll turn one the other way to compare. I'm not averse to experimenting.
No, the bowl should be facing out from the tree. So, the pith is under the foot, and rim is at the outside of the tree. The bowl will be smaller by about 1/3, but that’s ok.When you say bottom, are you meaning the bottom of the picture? Because the pith is on the top edge of that bowl. I did it that way because I figure it will crack there and I'll be able to turn it away when I finish turn it in a few months. It's not a very big bowl. 8 inches across maybe?
Sycamore, although mostly bland, has a really nice pattern that only shows in quarter sawn pieces. With the pith at the bottom, some of the sides of the piece are in that orientation, a straight line from center out, so has more interest.
In this orientation, the wood cuts differently, less difference between the soft sides and the endgrain sides. Also, the tenon is much stronger.
- Joined
- Feb 6, 2010
- Messages
- 3,515
- Likes
- 2,596
- Location
- Brandon, MS
- Website
- threeringswoodshop.square.site
I think Hackberry spalts if you look at it crooked. As to the dirt the spores are everywhere but easiest to find in a compost pile.Will any mud work to cause spalting or do I need to go back to the stinky mudhole where I got these hackberry chunks to make more that match?
Also, is it a trade off? When you find a wood that cuts like butter (sycamore) is it usually bland and a candidate for paint or inlay?
As to Seri here is a link to an 8n part YouTube SPALTED WOOD
This makes a more even pattern but smaller. The smallest one here is 4 3/4 x 2 3/4. The difference is more prominent in walnut I think. X's vs O's in the bottom.
Now I am more aware of how to make it an x or an o though. Pith at the bottom makes an O. Have to think up a Mnemonic. ___alphabet... O then P on the bottom or after it.
Now I am more aware of how to make it an x or an o though. Pith at the bottom makes an O. Have to think up a Mnemonic. ___alphabet... O then P on the bottom or after it.
Attachments


Last edited:
Yes, X or O, but I‘d never thought of it that way.This makes a more even pattern but smaller. The smallest one here is 4 3/4 x 2 3/4. The difference is more prominent in walnut I think. X's vs O's in the bottom.
Now I am more aware of how to make it an x or an o now though. Pith at the bottom makes an O. Have to think up a Mnemonic. ___alphabet... O then P on the bottom or after it.
Noticeable on your examples are the medullary rays, only seen with O orientation, or quarter sawn. Capitalizing on these patterns can give nice interest.
Another difference in the two orientations would be that, assuming both heartwood and sapwood are present, which of these you’ll feature. X features the sapwood (less than great) and pith down (O) features the beautiful heartwood.
Sam spalting depends on a couple of things, and they are not always set in stone.Will any mud work to cause spalting or do I need to go back to the stinky mudhole where I got these hackberry chunks to make more that match?
Also, is it a trade off? When you find a wood that cuts like butter (sycamore) is it usually bland and a candidate for paint or inlay?
You do need warmer temps, with high humidity at the same time, fungus spores that like the wood, and wood that does not prevent the rotting/spalting.
So some wood do spalt much easier than others, and some do not spelt at all, or only the sapwood.
I know over here the Birch will spalt readily, but still takes much longer than in your area, cut down in the summer and sit on the ground till spring will have spalting lines.
Apple, Aspen/Poplar, Sycamore, Elm and Maple also will spalt readily but Black Cherry will not or just the sapwood, same with Oak, I have some that has spalting, but it is the sapwood that did spalt.
Now where are the fungus spores that you need to spalt the wood ?, of course in a warm damp/wet place and so in your case that was the mud puddle, a damp to wet location like a pile of rotting material, leaves and twigs etc.
Spalted Birch

Spalted Aspen

Spalted White Elm

Spalted Applewood bowl

Last edited:
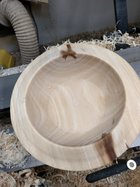
So I took Thom Crothers' "Two Bowls from One Log" class at the Turning Learning Center run by our Carolina Mountain Woodturners club yesterday. The more I get involved with this group of passionate and amazing turners, the more I enjoy it. So much sharing of ideas, tips and techniques. As I'm really just starting to explore live-edge, I really focused on that part. Thom was nice enough to send me home with an extra blank of wet maple to work on on my own, and here it is, in progress:


There are some tool marks, and it could be thinner, I know. I know I need to work on making careful, precise cuts downward into the "air" part of the turning. I have now CA'd the bark with thin StarBond, and plan to let it dry for a bit before finishing the bottom, sanding and finishing. Should I grocery bag it? Include its own shavings? Just curious how you guys do this. I really love this style, and can see me doing a whole bunch of these.
There are some tool marks, and it could be thinner, I know. I know I need to work on making careful, precise cuts downward into the "air" part of the turning. I have now CA'd the bark with thin StarBond, and plan to let it dry for a bit before finishing the bottom, sanding and finishing. Should I grocery bag it? Include its own shavings? Just curious how you guys do this. I really love this style, and can see me doing a whole bunch of these.
Put the old project back on the lathe to make something more useful.


As for Seri Robinson, aka Dr. Spalt, she said the only person that calls her Sara is her mom.... One of the most interesting demonstrators I ever saw, in part because everything I knew about spalting was wrong.... Hope she demos in Portland next year.
robo hippy
robo hippy
Tom Gall
TOTW Team
Doubtful ... since she demonstrated in Louisville this year.As for Seri Robinson, aka Dr. Spalt, she said the only person that calls her Sara is her mom.... One of the most interesting demonstrators I ever saw, in part because everything I knew about spalting was wrong.... Hope she demos in Portland next year.
robo hippy
Another do over. Threw away the bottom as it was rotten in the center and broke! Returned the top to lighten it up. Used pine for the bottom.

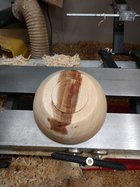
I finished a highly figured hard Maple bowl yesterday, I had worked on it last week, when I took it off of the lathe (I still had to return the bottom foot) I noticed then that there were still some fine scratches that I was then only able to see in the different angles of the light, so set it aside till I was done with the Apple bowl I had started then.

Re-mounted the Maple bowl and sanded the inside till the surface was good, then flipped the bowl over and turned the bottom part, as that was still not done.
Wiped the Polymerized Tung Oil on it and set it here on 3 pencils (star arrrangement) to let it polymerize, will add one more coat in a couple days and let it harden up.


made the double picture to stay within the 4 pict. limit

Re-mounted the Maple bowl and sanded the inside till the surface was good, then flipped the bowl over and turned the bottom part, as that was still not done.
Wiped the Polymerized Tung Oil on it and set it here on 3 pencils (star arrrangement) to let it polymerize, will add one more coat in a couple days and let it harden up.
made the double picture to stay within the 4 pict. limit
Last edited:
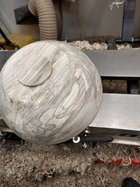
Just started on this norfolk pine. It was a big enough chunk I decided to use the coring jig to remove the top end. Stuff is very dry and tough to turn, lots of tearout. Still have to hollow down some more to get a good pattern then decide what the outsides going to be.
When I once turn I put it in a paper bag for a day or 2, then change the bag to a dry one and leave it open for a few days, then maybe after a week I take it out of the bag altogether and let in finish drying on my shelf. Pretty sure I stole and slightly modified this idea from other turners on here and modified it to what works for me. You definitely don't want to plastic bag it, that will bring mold growth.So I took Thom Crothers' "Two Bowls from One Log" class at the Turning Learning Center run by our Carolina Mountain Woodturners club yesterday. The more I get involved with this group of passionate and amazing turners, the more I enjoy it. So much sharing of ideas, tips and techniques. As I'm really just starting to explore live-edge, I really focused on that part. Thom was nice enough to send me home with an extra blank of wet maple to work on on my own, and here it is, in progress:
View attachment 53900View attachment 53901
There are some tool marks, and it could be thinner, I know. I know I need to work on making careful, precise cuts downward into the "air" part of the turning. I have now CA'd the bark with thin StarBond, and plan to let it dry for a bit before finishing the bottom, sanding and finishing. Should I grocery bag it? Include its own shavings? Just curious how you guys do this. I really love this style, and can see me doing a whole bunch of these.
I've read you mention the three pencils before, can I get a description or pic? I was wondering if you just lay them horizontally or have them oriented straight up some way for smallest contact? The inquiring mind wants to know!I finished a highly figured hard Maple bowl yesterday, I had worked on it last week, when I took it off of the lathe (I still had to return the bottom foot) I noticed then that there were still some fine scratches that I was then only able to see in the different angles of the light, so set it aside till I was done with the Apple bowl I had started then.
View attachment 53918
Re-mounted the Maple bowl and sanded the inside till the surface was good, then flipped the bowl over and turned the bottom part, as that was still not done.
Wiped the Polymerized Tung Oil on it and set it here on 3 pencils (star arrrangement) to let it polymerize, will add one more coat in a couple days and let it harden up.
View attachment 53919View attachment 53920
made the double picture to stay within the 4 pict. limit
View attachment 53921
Plus I picked up a bunch of 2 foot by 1/4" x 1/4" craft (sticks?) the other day and was thinking of devising something with them to hold a bowl up while it dries. I have some of the puck things from rockler but they are too big to get three of them under a smaller bowl to make a sturdy base.
Last edited:
- Joined
- Feb 28, 2021
- Messages
- 1,808
- Likes
- 1,622
- Location
- Roulette, PA
- Website
- www.reallyruralwoodworks.com
I just use small scraps of plywood with a finish nail driven through them. 3 pieces gives you a 3-point stance so as to not have much in the way of wobble, they are easy and quick (and very cheap) to make as many as you like..... for smaller bowls, a larger scrap with 3 nails driven through it would serve the purpose nicely, I imagine.I've read you mention the three pencils before, can I get a description or pic? I was wondering if you just lay them horizontally or have them oriented straight up some way for smallest contact? The inquiring mind wants to know!
Plus I picked up a bunch of 2 foot by 1/4" x 1/4" craft (sticks?) the other day and was thinking of devising something with them to hold a bowl up while it dries. I have some of the puck things from rockler but they are too big to get three of them under a smaller bowl to make a sturdy base.
Dave Landers
Beta Tester
I use old bandsaw blades. Cut a piece, maybe 10" (some smaller, some larger), and fold it into a V. Holds your bowl off the table for finishing.I've read you mention the three pencils before, can I get a description or pic? I was wondering if you just lay them horizontally or have them oriented straight up some way for smallest contact? The inquiring mind wants to know!
Plus I picked up a bunch of 2 foot by 1/4" x 1/4" craft (sticks?) the other day and was thinking of devising something with them to hold a bowl up while it dries. I have some of the puck things from rockler but they are too big to get three of them under a smaller bowl to make a sturdy base.