• Beware of Counterfeit Woodturning Tools (click here for details)
  • Johnathan Silwones is starting a new AAW chapter, Southern Alleghenies Woodturners, in Johnstown, PA. (click here for details)
  • Congratulations to William Rogers for "Ambrosia Maple Platter" being selected as Turning of the Week for September 16, 2024 (click here for details)
  • Welcome new registering member. Your username must be your real First and Last name (for example: John Doe). "Screen names" and "handles" are not allowed and your registration will be deleted if you don't use your real name. Also, do not use all caps nor all lower case.

What’s on your lathe?

Joined
Oct 13, 2016
Messages
1,123
Likes
1,685
Location
Rainy River District Ontario Canada
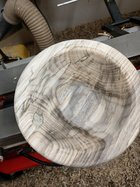
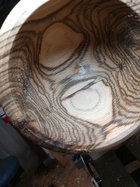
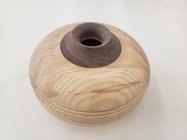
Now this one was not on the lathe recently :rolleyes: , but as I did re-discover it at my son's place in Ottawa, I made a couple pictures, never had a picture of it, (was before I owned a digital camera).

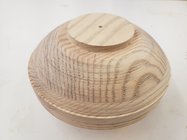
About 9 or 10 inches and less than 2 mm thick with a thicker edge for strength (worked, as it is still alive) , we did call it a large potato chip :)

Made from Yellow Birch burl, with shimmer and thin enough to be opaque.

Yellow Birch.jpg Yellow Birch burl.jpg Yellow Birch profile.jpg Yellow Birch bottom.jpg
 
Joined
May 13, 2020
Messages
184
Likes
1,118
Location
Ontario, CA
More flamed Box Elder. This piece is about 17 x 4 inches. So far, the pieces drying in my garage show no signs of cracking or stress. Have about 4 or 5 larger chunks which will be cored. Then there are numerous 6 x 6 x 10 inch pieces that I will use with the new Oneway hollowing system I bought a week ago.
IMG_1869.jpeg
 
Joined
Oct 6, 2022
Messages
352
Likes
937
Location
Brenham, Texas
Shop insulation project phase 1 completed. Yes it does look like the inside of a cooler but seems to help beat the heat. The material chosen was 2 3/8" x 24 x48 high density poly-styrene tiles. Hopefully this will be enough but have planned Phase 2. This will be blown cellulose in the walls through holes at the top of the wall between each pair of studs.

20230702_100723.jpg

Noticeable side affects, better light reflectivity and some noise reduction.
 
Joined
Feb 18, 2023
Messages
836
Likes
1,918
Location
Orange, CA
Had a leftover piece of wet Norfolk Pine. Pre soaked in dilute dishwashing detergent to stabilize per Ron Kent. Or is it Cook pine? Still some tear out that needs more sanding and it drank tung oil like a desert camel, but I like the shape. I’m a newbie—it’s bowl 28 for me.
 

Attachments

  • IMG_2348.jpeg
    IMG_2348.jpeg
    447.4 KB · Views: 32
  • IMG_2347.jpeg
    IMG_2347.jpeg
    251.7 KB · Views: 32
Joined
Jan 23, 2023
Messages
172
Likes
233
Location
Calgary, AL
Split hollow form - first attempt. I read the post by Mr. Hockenberry in the tips section and decided sine I had a glued up blank I would give one a try. Still needs final sanding and I need to make a doughnut chuck (another first) to finish off the bottom. I'm trying for some texture on the bottom half - wire brushed surface with some tool marks left (not sure how well this shows up) but I'm not sure I'm happy with the result so I might modify this a bit. Ash with a walnut collar for the opening. These are fun little projects. Thanks to Mr. Hockenberry for posting the suggestion.

Barry W. Larson
Calgary, Alberta, Canada eh!
 

Attachments

  • 20230702_165658.jpg
    20230702_165658.jpg
    475.3 KB · Views: 28
  • 20230702_165617.jpg
    20230702_165617.jpg
    378.6 KB · Views: 28
  • 20230701_203756.jpg
    20230701_203756.jpg
    599.1 KB · Views: 28
Joined
Jan 23, 2023
Messages
172
Likes
233
Location
Calgary, AL
Split hollow form - first attempt. I read the post by Mr. Hockenberry in the tips section and decided sine I had a glued up blank I would give one a try. Still needs final sanding and I need to make a doughnut chuck (another first) to finish off the bottom. I'm trying for some texture on the bottom half - wire brushed surface with some tool marks left (not sure how well this shows up) but I'm not sure I'm happy with the result so I might modify this a bit. Ash with a walnut collar for the opening. These are fun little projects. Thanks to Mr. Hockenberry for posting the suggestion.

Barry W. Larson
Calgary, Alberta, Canada eh!
A couple of things bothered me. The collar didn't seem to fit the form, so I simplified and reduced the height. I also re-did the textured base, and also placed a small groove to further differentiate the base from the upper part of the form. I might try to use some colour to further accentuate the texture of the base. Now to finish my doughnut chuck and finish the base off.
Cheers.
Barry
 

Attachments

  • 20230702_200740.jpg
    20230702_200740.jpg
    214.8 KB · Views: 20
  • 20230702_200748.jpg
    20230702_200748.jpg
    200.5 KB · Views: 20
  • 20230702_200806.jpg
    20230702_200806.jpg
    280.1 KB · Views: 20
Joined
Aug 5, 2022
Messages
229
Likes
131
Location
Appleton, WI
Shop insulation project phase 1 completed. Yes it does look like the inside of a cooler but seems to help beat the heat.

View attachment 53732

Noticeable side affects, better light reflectivity and some noise reduction.
Hi Monty,

We who live in the Northernmost states empathize with the heat in the Southernmost states. We only have few days where temps are brutally cold in the Winter. But you have had a lot of brutal heat already this year. Good luck with your project.
 

Tom Gall

TOTW Team
Joined
Feb 20, 2013
Messages
1,055
Likes
2,068
Location
Hillsborough, NJ
Joined
Oct 6, 2022
Messages
352
Likes
937
Location
Brenham, Texas
Nice toys! So, how do you go from horizontal (photo #3) to vertical (#4)? Why can't you use the sling and eliminate the eye bolt step?
The horizonal "eye bolt" phase makes it much easier to trim with a chainsaw. The bridle is a bit of a balancing act to manage and used only to mount the blank.
 
Joined
Feb 7, 2023
Messages
368
Likes
2,462
Location
Gardner, MA
Phil. An amazing transformation to get from the second picture to the last! I assume some wood hardener or other substance was involved in this transformation? Very nice work.
Cheers.
Barry W. Larson
Calgary, Alberta, Canada eh!
I kept slapping on coats of sanding sealer and cutting a layer at a time. Had to super glue a few cracks and chunks back on too!
I tried turning it on this axis and it just disintegrated!
IMG_5012.JPG

Updated my avatar to a pic of me and my wife.
 
Last edited:
Joined
Dec 29, 2022
Messages
933
Likes
1,020
Location
West Central, IL
Little piece of elm I think. Never turned elm before, is it all stringy like that out next to the cambrium or sapwood layer? As seen on the edge in the photo. Would plug the gouge sometimes but I might have been aggressive since it is small and wet.
 

Attachments

  • IMG_20230705_203035178.jpg
    IMG_20230705_203035178.jpg
    458.1 KB · Views: 27
Joined
Oct 13, 2016
Messages
1,123
Likes
1,685
Location
Rainy River District Ontario Canada
Little piece of elm I think. Never turned elm before, is it all stringy like that out next to the cambrium or sapwood layer? As seen on the edge in the photo. Would plug the gouge sometimes but I might have been aggressive since it is small and wet.
Nice Bowl Sam

Yes Sam that is what you get with fresh Siberian Elm, it is the actual cambium layer where both Bark and wood originate.

It is a nice wood sometimes looking almost like Walnut.

Easy to dry without splitting if slow dried.

Here I am taking down a neighbour's Siberian Elm and a couple darker coloured turnings.


Taking down neighbors Siberian Elm.jpg Siberian Elm.jpg Siberian Elm grain.jpg
 
Last edited:
Joined
Jun 2, 2021
Messages
213
Likes
440
Location
Kingsville, ON
A chunk of an old willow blank I thought I would practice on. 15 inch dia. and approximately 6" high. With all its scars, defects in the wood kind of like it. Anyone have any ideas or recommendations on what finish to use.
 

Attachments

  • IMG_3933 Large.jpeg
    IMG_3933 Large.jpeg
    272.3 KB · Views: 12
  • IMG_3929 Medium.jpeg
    IMG_3929 Medium.jpeg
    76.3 KB · Views: 12
Joined
Dec 29, 2022
Messages
933
Likes
1,020
Location
West Central, IL
How long does wood take to get the spalting effect? Curious if this hackberry spalted because it was on the ground and in the mud where I found it or if it was because it had an old spot where the bark had been peeled off years ago and it was almost grown shut again.
 

Attachments

  • IMG_20230706_152135271_HDR.jpg
    IMG_20230706_152135271_HDR.jpg
    501.1 KB · Views: 22
Joined
Dec 28, 2019
Messages
506
Likes
577
Location
Tallahassee, FL
Most likely because it was on the ground in a wet spot. Spalting is caused by fungi getting into the wood and they love a nice damp dark spot. How long it takes depends of the environment and where you live and the wood. In Texas where it was drier it would take a piece of wood 6 months to a year to splat and that was wood that I wet and put into a dark trash bag to hold the moisture. Here in Florida I just have to leave a piece of wood outside for a few weeks and it's splatted. We have a lot of Sweetgum on our property and that wood spalts so fast it's not funny.
 
Joined
Dec 29, 2022
Messages
933
Likes
1,020
Location
West Central, IL
Hackberry spaults almost by just looking at it. If you want to spault wood rub some dirt on the endgrain and place in plastic bag. You can also bury it in the compost pile. Be careful as it is in some woods it is s fine line between spaulted and rotten.
I kind of doubted it was from the ground, I should have said it could only have been in the mud for 3 days maybe? But I don't know, never ran across it before. This was one of the storm wood finds I've been messing with. It was covered on the end grain with mud though. But up one side there was old gray wood visible for about a foot and the tree had grown around it to a depth of 1.5 inches or so on each side.

Will it keep the color? It's actually a change of pace since hackberry I've turned before has just been plain/boring probably because it's been smaller.
 
Back
Top