No it was cored at right angleswas that taken out by simply breaking off the side grain at the bottom?

-
April 2025 Turning Challenge: Turn an Egg! (click here for details) -
Congratulations to Kelly Shaw winner of the March 2025 Turning Challenge (click here for details) -
Congratulations to Guillaume Fontaine for "Nebules" being selected as Turning of the Week for April 6, 2025 (click here for details) -
Welcome new registering member. Your username must be your real First and Last name (for example: John Doe). "Screen names" and "handles" are not allowed and your registration will be deleted if you don't use your real name. Also, do not use all caps nor all lower case.
You are using an out of date browser. It may not display this or other websites correctly.
You should upgrade or use an alternative browser.
You should upgrade or use an alternative browser.
What’s on your lathe?
- Thread starter Rusty Nesmith
- Start date

Now that has some Wow even before you added your mastery
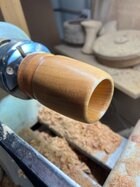
That looks medieval! Would love to see that in use.No it was cored at right angles
I works surprising well, it was held in a Irons Gate tool rest, this good security and stability..I was very leary about possible catches etc , but it proved to be very smooth and stable.That looks medieval! Would love to see that in use.
No it was cored at right angles
I have one of those (somewhere) or one made much like it. It did work but of course limited in core size.
I have one that looks similar but is not that beefy, I can't remember who made it.
I think what I got was called “Bowlsaw”. But it’s been a long time and my memory is not reliable!I have one that looks similar but is not that beefy, I can't remember who made it.
Some years back a fellow was making them and part of his plan was to send them out to certain people for feedback.
He sent me one to evaluate, perhaps because I was active on several forums and a moderator on one. I tried it and I found, as I mentioned, it worked fine but for me it had some limitations, mostly diameter of the core. However, for certain sizes and bowl shapes it could be a timesaver and give a liidded box-sized core. When I find where I put it I’lll give it another try.
A search for “bowlsaw” turned up some communication on Lumberjocks and elsewhere around 2008-2009 saying he sent some out to some Wood Central contributors. The website he gave appears to be no longer be active.
I did find a thread on AAWforum about it:
I had the privilege of evaluating Dick Steussy's bowlsaws and found them easy and safe to use turning 2 bowls from one 7" blank and 3 bowls from a 9" blank. Inexpensive and great for the hobbyist and serious turner, would pay for itself in no time with the wood saved and with minimum sawdaust to clean up.
More information can be seen on www.bowlsaw.com
This is an American invention made in America I just happen to be an Aussie lucky enough try one out.
Bob.
More information can be seen on www.bowlsaw.com
This is an American invention made in America I just happen to be an Aussie lucky enough try one out.
Bob.
- Bob Collins
- Replies: 32
- Forum: Woodturning Discussion Forum

The blurb on Lumberjocks:

What is a BowlSaw?
What is a BowlSaw? In September I introduced an entirely new hand-held coring unit for woodturning amateurs I called the BowlSaw. The response was a deafening silence! My intention was not to disturb the "establishment" but they fiercely resisted any change to their protocol. This thing was...
JKJ
Whatever, Looks greatNo it was cored at right angles
Whatever, looks great
Thanks, John, yup, I found the thread, only after I had used mineI think what I got was called “Bowlsaw”. But it’s been a long time and my memory is not reliable!
Some years back a fellow was making them and part of his plan was to send them out to certain people for feedback.
He sent me one to evaluate, perhaps because I was active on several forums and a moderator on one. I tried it and I found, as I mentioned, it worked fine but for me it had some limitations, mostly diameter of the core. However, for certain sizes and bowl shapes it could be a timesaver and give a liidded box-sized core. When I find where I put it I’lll give it another try.
A search for “bowlsaw” turned up some communication on Lumberjocks and elsewhere around 2008-2009 saying he sent some out to some Wood Central contributors. The website he gave appears to be no longer be active.
I did find a thread on AAWforum about it:
I had the privilege of evaluating Dick Steussy's bowlsaws and found them easy and safe to use turning 2 bowls from one 7" blank and 3 bowls from a 9" blank. Inexpensive and great for the hobbyist and serious turner, would pay for itself in no time with the wood saved and with minimum sawdaust to clean up.
More information can be seen on www.bowlsaw.com
This is an American invention made in America I just happen to be an Aussie lucky enough try one out.
Bob.
- Bob Collins
- Replies: 32
- Forum: Woodturning Discussion Forum
The blurb on Lumberjocks:
What is a BowlSaw?
What is a BowlSaw? In September I introduced an entirely new hand-held coring unit for woodturning amateurs I called the BowlSaw. The response was a deafening silence! My intention was not to disturb the "establishment" but they fiercely resisted any change to their protocol. This thing was...www.lumberjocks.com
JKJ
") But what I did find it works very smoothly with a minimal learning curve. So much so that I will probably knock up another at some time as its a 'one per size' thing. I will also refine the primary tool to make the kerf, this came from what I had to hand.
But what I did find it works very smoothly with a minimal learning curve. So much so that I will probably knock up another at some time as its a 'one per size' thing. I will also refine the primary tool to make the kerf, this came from what I had to hand.Bowlsaw.com no longer exists and nothing in the Wayback machine, so I guess nobody took it on, shame as it works darn well.
Last edited:
- Joined
- Nov 27, 2021
- Messages
- 163
- Likes
- 673
- Location
- Silver Spring, MD
- Website
- www.transpirationturning.com
My first test with a different approach to generating the code for flutes with arbitrary shapes. 2 hours 14 minutes.


Spalted Maple 4.5"x13" close to being too far gone.

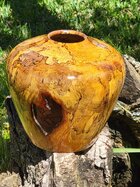
Just finished polishing this today. I was originally going to make an urn, but changed plans when I found the hole. Set it aside for a few months and finally decided it was time to finish it. This is spalted sycamore with Waterlox original finish.
Attachments
Did a couple bowl feet this evening.
Currently experimenting with some acrylic paint pens to do a permanent inventory number. (Thanks to @Ed Davidson for the idea!)
I've found that you really have to be careful with the buffing to prevent the process from ruining the numbers, but with some practice, it can be done.
The paint needs to dry for 24hrs before a sealing coat of DO is applied.
I also re-wired the dash and replaced the input voltage wire to the distributor of my 1928 Model A Ford Pickup truck today! I think this fixed my hard starting issues.....fingers crossed! It was getting dark, so couldn't test drive it today......soon!!!!!
=o=
That truck is cool Odie. Looks in great shape too. I'm amazed at watching old videos on how good those get around off road in mud etc.
That truck is cool Odie. Looks in great shape too. I'm amazed at watching old videos on how good those get around off road in mud etc.
Thanks......he's like the dwarf Grumpy!
A bit cantankerous at times, but with heart of gold!
As with quite a few Model A enthusiasts, he's got a name......Orville!
(Most have named their Model A with a feminine name.....but a pickup truck just had to be a man!)
Member: Big Sky A's automobile club.
=o=
Last edited:
So I finished the crazy square winged tray/lidded bowl Frankenstein's monster that I posted about recently. I have to say I was both a little shocked and very pleased that it looks almost exactly like the image that has been haunting my dreams for months; maybe the wings could have been a hair thinner, but it started to flex quite a bit at the cutting speeds I like for wings, so I figured I better quit before I ruined it with a catastrophic chip-out. African Blackwood finial on a Padauk lid to go on the Canarywood base. All sanded to 1k, and friction polished (VERY carefully out on those wings!) with Yorkshire Grit. This one is getting multiple light, thinned coats of TruOil in this week's dry/sunny/breezy weather. I have to thank Mike Sorge; his recent class at our CMW Turning and Learning Center gave me the techniques and the confidence to start introducing more complex curves to my wings. (The only snafu was that a tiny little piece on the end of the finial broke off after I had finished it, I guess just to remind me that nothing is perfect).


I like it!! Nice detail on the lid!So I finished the crazy square winged tray/lidded bowl Frankenstein's monster that I posted about recently. I have to say I was both a little shocked and very pleased that it looks almost exactly like the image that has been haunting my dreams for months; maybe the wings could have been a hair thinner, but it started to flex quite a bit at the cutting speeds I like for wings, so I figured I better quit before I ruined it with a catastrophic chip-out. African Blackwood finial on a Padauk lid to go on the Canarywood base. All sanded to 1k, and friction polished (VERY carefully out on those wings!) with Yorkshire Grit. This one is getting multiple light, thinned coats of TruOil in this week's dry/sunny/breezy weather. I have to thank Mike Sorge; his recent class at our CMW Turning and Learning Center gave me the techniques and the confidence to start introducing more complex curves to my wings. (The only snafu was that a tiny little piece on the end of the finial broke off after I had finished it, I guess just to remind me that nothing is perfect).
View attachment 73742View attachment 73743View attachment 73744
Thanks, David-I learned to make that bead into an actual chuck recess (35mm for these small lids for me) from Pat Carrol's class on lidded bowls that I took at our TLC last fall. I use it on everything now that gets a lid like that. In fact, this project was a conscious effort to synthesize a lot of recent skills I've learned there into my current obsession with wings and square turning. That said, there is no worse "dust monster" wood for turning than padauk (even worse than cedar!)I like it!! Nice detail on the lid!
Last edited:
I wish I had time to take some classes, hopefully in a year or two when my granddaughter starts school full time.Thanks, David-I learned to make that bead into an actual chuck recess (35mm for these small lids for me) from Pat Carrol's class on lidded bowls that I took at our TLC last fall. I use it on everything now that gets a lid like that. In fact, this project was a conscious effort to synthesize a lot of recent skills I've learned there into my current obsession with wings and square turning. That said, there is no worse "dust monster" wood for turning than padauk (even worse than cedar!)
I love everything about canary wood except for the smell while working it. Like a 2x4 from a dock taken from a city pond, left to dry almost... Then feeding it through a belt sander at full speed so it smokes a little bit.So I finished the crazy square winged tray/lidded bowl Frankenstein's monster that I posted about recently. I have to say I was both a little shocked and very pleased that it looks almost exactly like the image that has been haunting my dreams for months; maybe the wings could have been a hair thinner, but it started to flex quite a bit at the cutting speeds I like for wings, so I figured I better quit before I ruined it with a catastrophic chip-out. African Blackwood finial on a Padauk lid to go on the Canarywood base. All sanded to 1k, and friction polished (VERY carefully out on those wings!) with Yorkshire Grit. This one is getting multiple light, thinned coats of TruOil in this week's dry/sunny/breezy weather. I have to thank Mike Sorge; his recent class at our CMW Turning and Learning Center gave me the techniques and the confidence to start introducing more complex curves to my wings. (The only snafu was that a tiny little piece on the end of the finial broke off after I had finished it, I guess just to remind me that nothing is perfect).
View attachment 73742View attachment 73743View attachment 73744
Yeah, Michael, it's a weird wood in a lot of ways. A lot of really annoying, painful little splinters/chips coming my way during the turn, and the dust is a bit noxious. Funny how different woods are all so different in their properties, huh?I love everything about canary wood except for the smell while working it. Like a 2x4 from a dock taken from a city pond, left to dry almost... Then feeding it through a belt sander at full speed so it smokes a little bit.
Indeed. The reality is I like Canary more than box elder for the gold tones it has. It makes beautiful handles for chisels and pencil boxes, but I have to run the dust collector or a circulation fan. The only thing worse is green turning white oak. Smells like urine.Yeah, Michael, it's a weird wood in a lot of ways. A lot of really annoying, painful little splinters/chips coming my way during the turn, and the dust is a bit noxious. Funny how different woods are all so different in their properties, huh?
Glued some walnut and maple to try. Need to make a jig as it slipped on me overnight.


Needed a little piece for a woodturning workshop for our high school children tomorrow
Had been given a few dry cherry round so I cut them up on the bandsaw
A have some free black walnut
Wal la a small easy to turn box !
Had been given a few dry cherry round so I cut them up on the bandsaw
A have some free black walnut
Wal la a small easy to turn box !
Attachments
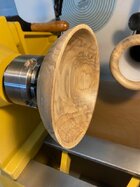
Last night I roughed this 8" x 3" red Mallee burl bowl with a very large section of natural burl figure. It's been turned thicker than usual because of the natural burl. At the thinnest point, it's about 3/8" before the burl breaks through to the bowl interior. The finished bowl will be much heavier than normal because it's necessary to keep from breaking through. There is still plenty of surface to play with when I final turn it, so it's up to the imagination on how to complete it. It has 22% MC, so I suspect it'll be a year or more before I can finally turn it to a finished bowl.
I'm hoping to take full advantage of the outstanding white coloring around the burl......very great contrasting to the red coloring of the RMB.
Wish me luck!!!!!
=o=


I'm hoping to take full advantage of the outstanding white coloring around the burl......very great contrasting to the red coloring of the RMB.
Wish me luck!!!!!
=o=
Last edited:
Nice chunk of wood Odie. Hopefully will be lots of pics when complete.
Spalted maple never gets old to me. Wish I had a giant stack of it!
By definition.. spalted maple is old....Spalted maple never gets old to me. Wish I had a giant stack of it!
Latest project. Walnut, Curupau, and Mexican royal ebony.

Put up a new shelf for bowls that are drying and while moving some around I found a spalted cherry I had forgot about, now trying to find the cored bowl . It was one of only four I could get out of a log as the rest were too far gone. Had to do a lot of sharpening and shear scraping and it required a little extra sanding. It also soaked up the walnut oil, 16” x 6” finished size.


. It was one of only four I could get out of a log as the rest were too far gone. Had to do a lot of sharpening and shear scraping and it required a little extra sanding. It also soaked up the walnut oil, 16” x 6” finished size.Spalted cherry?! Nice! I think it's good for us to turn challenging pieces like that. They force us to up our game all around: sharpening, tool angle and presentation, shear-scraping (and yes, the dreaded sanding).
And it can also increase your vocabularySpalted cherry?! Nice! I think it's good for us to turn challenging pieces like that. They force us to up our game all around: sharpening, tool angle and presentation, shear-scraping (and yes, the dreaded sanding).

By definition.. spalted maple is old....
In some places, perhaps. Mine spalts in a year or less on the wood pile.
By definition.. spalted maple is old....
In some places, perhaps. Mine spalts in a year or less on the wood pile.
A gentleman on another forum described his “spalting farm” where he successfully created spalting in log sections. (He stands sections upright on the dirt.) IIRC he said 6 months is often enough in warm weather.
JKJ
Two nights ago, I roughed this 11x3 Red River Gum burl from Australia. Even though the bowl block had a heavy coat of wax, it had a very low MC of 12%. This indicates that it was in storage somewhere for a long time before I came into possession of it. Probably won't take too long to stabilize, ready for the 2nd turning.
No anchorseal necessary on this one....
=o=


No anchorseal necessary on this one....
=o=
Last evening, I roughed these two:
Olivewood and Thuya burl.
Both had a high MC of around 30%.
I suspect the Olivewood will stabilize before the Thuya burl....we'll see.
Photos taken just prior to applying the anchorseal.
=o=


Olivewood and Thuya burl.
Both had a high MC of around 30%.
I suspect the Olivewood will stabilize before the Thuya burl....we'll see.
Photos taken just prior to applying the anchorseal.
=o=
A gentleman on another forum described his “spalting farm” where he successfully created spalting in log sections. (He stands sections upright on the dirt.) IIRC he said 6 months is often enough in warm weather.
JKJ
The one that surprised me was a 6" maple log that was sitting on top of the wood pile, with little contact with the rest of the pile. It was completely spalted (and getting punky) despite not being in contact with the ground.
Turning a 5 year old Cottonwood bowl blank. I didn't have high expectations for this blank as cottonwood is noted for tearout and plain grain with little figure. But I got lucky on this blank as there is very nice figure. There was tearout I had to deal with, especially on the inside of the bowl. But it wasn/t to bad. Just had to make sure my tools were sharpe.
Attachments
Not sure if I'll be able to pull this one off. Dogwood. I'll be getting rid of that shoulder on the chuck side.
