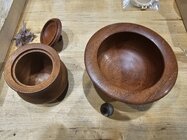
I have a laserpecker 2 machine.What are you using for a laser?
-
April 2025 Turning Challenge: Turn an Egg! (click here for details) -
Congratulations to Kelly Shaw winner of the March 2025 Turning Challenge (click here for details) -
Congratulations to Guillaume Fontaine for "Nebules" being selected as Turning of the Week for April 6, 2025 (click here for details) -
Welcome new registering member. Your username must be your real First and Last name (for example: John Doe). "Screen names" and "handles" are not allowed and your registration will be deleted if you don't use your real name. Also, do not use all caps nor all lower case.
You are using an out of date browser. It may not display this or other websites correctly.
You should upgrade or use an alternative browser.
You should upgrade or use an alternative browser.
What’s on your lathe?
- Thread starter Rusty Nesmith
- Start date
Nova Nebula. With bed extension.What lathe did you buy?
I have a laserpecker 2 machine.
Thank you. It looks like it does a good job.
Bob
Happy Friday, All! I haven't posted in this thread for awhile because I have been crazy busy turning stock for my 1st full-time show season (which definitely falls under being careful what you wish for, but I love it!). Anyway, I lucked into some gorgeous black walnut after Hurricane Helene when it seemed every huge tree in our whole region fell. I green-turned some really nice live-edge bowls for a few customers who of course all wanted them before Christmas, then after flooding the bark with thin CA, sealed them up with a few coats of basic Zinssers shellac to slow the drying (which has worked well for me on a lot of different green-turned woods). I figured I could do it if I turned them thin enough to actually dry, maybe.
Fast forward a few weeks, and I finished the outside of the 1st one a few days ago. I have turned lots of black walnut, but rarely with this much sap-wood. Anyway, as I was sanding the exterior starting at 120 (having stabilized a few cracks with coffee and CA), I was getting some serious blotchiness in the sap-wood, presumably from the tannins in the heart wood or bark getting into end-grain (but also a good bit into the side grain). I would sand it out mostly, then blow it out, then wipe down with MS and there it was again like it had been hiding. I finally managed to eliminate most of it, then sanded to 400, smoothed it with a Scotchbrite pad, and started rubbing in some thin coats of Tru-Oil (which finishes like it was made for walnut IME). As you can see in the pics, there is still some staining, but it mostly blended in, sort of.
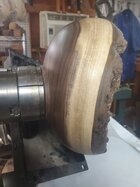

Even though the curve, grain balance, etc. are all fine, the real trouble is inside. I again started at 120 with an angle-drill and 2-inch disks, and started getting even more of the blotchy stains. I tried everything I could think of: sanding with various solvents, dropping down to 80 grit and really trying to even it out, but nothing worked-it just got more blotchy, with some glaring near-white spots. This is the interior after more or less giving up and sanding to 150, but I can't in good conscience sell this to a favorite customer who is hoping to take it home tomorrow. At this point I'm not sure exactly what to do with it. I know some of you turn live edge walnut successfully without all of this mess. Please help me solve this dilemma, as I have several more blanks drying, and eager customers waiting for me to not screw up their bowls.

Thanks in advance for any insights. If asking for all this technical help is not appropriate for this thread, I can make into a separate post.
Fast forward a few weeks, and I finished the outside of the 1st one a few days ago. I have turned lots of black walnut, but rarely with this much sap-wood. Anyway, as I was sanding the exterior starting at 120 (having stabilized a few cracks with coffee and CA), I was getting some serious blotchiness in the sap-wood, presumably from the tannins in the heart wood or bark getting into end-grain (but also a good bit into the side grain). I would sand it out mostly, then blow it out, then wipe down with MS and there it was again like it had been hiding. I finally managed to eliminate most of it, then sanded to 400, smoothed it with a Scotchbrite pad, and started rubbing in some thin coats of Tru-Oil (which finishes like it was made for walnut IME). As you can see in the pics, there is still some staining, but it mostly blended in, sort of.


Even though the curve, grain balance, etc. are all fine, the real trouble is inside. I again started at 120 with an angle-drill and 2-inch disks, and started getting even more of the blotchy stains. I tried everything I could think of: sanding with various solvents, dropping down to 80 grit and really trying to even it out, but nothing worked-it just got more blotchy, with some glaring near-white spots. This is the interior after more or less giving up and sanding to 150, but I can't in good conscience sell this to a favorite customer who is hoping to take it home tomorrow. At this point I'm not sure exactly what to do with it. I know some of you turn live edge walnut successfully without all of this mess. Please help me solve this dilemma, as I have several more blanks drying, and eager customers waiting for me to not screw up their bowls.

Thanks in advance for any insights. If asking for all this technical help is not appropriate for this thread, I can make into a separate post.
- Joined
- Feb 28, 2021
- Messages
- 1,560
- Likes
- 1,368
- Location
- Roulette, PA
- Website
- www.reallyruralwoodworks.com
Looks about par for the course with black walnut, especially if it's still relatively green. Also if the tree grew in an area of high iron content I'd not be surprised at all... once the iron + Tannins + Air meet up, it does tend to darken.
Like you we had a lot of trees come down during the storm and currently have a large black walnut to start green turning. I also have 4 walnuts, 2 pecan, and 2 maples to get over the next few weeks. I’m also getting ready for a 3 day show in a couple weeks so packing and pricing will start next week.Happy Friday, All! I haven't posted in this thread for awhile because I have been crazy busy turning stock for my 1st full-time show season (which definitely falls under being careful what you wish for, but I love it!). Anyway, I lucked into some gorgeous black walnut after Hurricane Helene when it seemed every huge tree in our whole region fell. I green-turned some really nice live-edge bowls for a few customers who of course all wanted them before Christmas, then after flooding the bark with thin CA, sealed them up with a few coats of basic Zinssers shellac to slow the drying (which has worked well for me on a lot of different green-turned woods). I figured I could do it if I turned them thin enough to actually dry, maybe.
Fast forward a few weeks, and I finished the outside of the 1st one a few days ago. I have turned lots of black walnut, but rarely with this much sap-wood. Anyway, as I was sanding the exterior starting at 120 (having stabilized a few cracks with coffee and CA), I was getting some serious blotchiness in the sap-wood, presumably from the tannins in the heart wood or bark getting into end-grain (but also a good bit into the side grain). I would sand it out mostly, then blow it out, then wipe down with MS and there it was again like it had been hiding. I finally managed to eliminate most of it, then sanded to 400, smoothed it with a Scotchbrite pad, and started rubbing in some thin coats of Tru-Oil (which finishes like it was made for walnut IME). As you can see in the pics, there is still some staining, but it mostly blended in, sort of.
View attachment 69007
View attachment 69006
Even though the curve, grain balance, etc. are all fine, the real trouble is inside. I again started at 120 with an angle-drill and 2-inch disks, and started getting even more of the blotchy stains. I tried everything I could think of: sanding with various solvents, dropping down to 80 grit and really trying to even it out, but nothing worked-it just got more blotchy, with some glaring near-white spots. This is the interior after more or less giving up and sanding to 150, but I can't in good conscience sell this to a favorite customer who is hoping to take it home tomorrow. At this point I'm not sure exactly what to do with it. I know some of you turn live edge walnut successfully without all of this mess. Please help me solve this dilemma, as I have several more blanks drying, and eager customers waiting for me to not screw up their bowls.
View attachment 69008
Thanks in advance for any insights. If asking for all this technical help is not appropriate for this thread, I can make into a separate post.
With black walnut I had the same issues with bleeding into the sap wood and some is just natural and you can’t sand it out. However one thing that has helped tremendously is I sand the bark edge first then the rest of the bowl with out touching the bark if possible. Once I geo through the lower grits I will sand the sap wood with the higher grits to remove any staining from the heart wood or bark. I then sand the heart wood and sap wood but will hit nothing but the sap wood one the final passes. I also blow the piece off after every grit.
Thanks, David-Having seen your live edge walnut work, I was hoping you would chime in. And in my gut I sort of knew that on the next one, I need to do exactly as you suggest: sand the bark 1st, then stay away from it if possible. It sands straight into a fine flour that I know gets into walnut's open grain structure.
And Brian, I am pretty sure our local red-clay soils are high in iron. After all, it's the iron oxide that turns it that reddish color if I remember my college geology elective right.
Finally, part of me wonders if a sanding sealer might help, but maybe not on that open grain? I have a tin of Myland's cellulose sealer that I rarely use. You folks who use it a lot, do you think its' worth a try? I don't know. Anyway, thanks for the tips! Aaron
The key I think is to turn only live trees that have not had a chance to dry much.To prevent the darkening of the sap wood turn it thinner then you have done so that it will dry faster, the bark will not come loose and the sapwood stays lighter. The sanding is held off until the wood is dried and thoroughly dead and it then becomes a natural edge bowl.Happy Friday, All! I haven't posted in this thread for awhile because I have been crazy busy turning stock for my 1st full-time show season (which definitely falls under being careful what you wish for, but I love it!). Anyway, I lucked into some gorgeous black walnut after Hurricane Helene when it seemed every huge tree in our whole region fell. I green-turned some really nice live-edge bowls for a few customers who of course all wanted them before Christmas, then after flooding the bark with thin CA, sealed them up with a few coats of basic Zinssers shellac to slow the drying (which has worked well for me on a lot of different green-turned woods). I figured I could do it if I turned them thin enough to actually dry, maybe.
Fast forward a few weeks, and I finished the outside of the 1st one a few days ago. I have turned lots of black walnut, but rarely with this much sap-wood. Anyway, as I was sanding the exterior starting at 120 (having stabilized a few cracks with coffee and CA), I was getting some serious blotchiness in the sap-wood, presumably from the tannins in the heart wood or bark getting into end-grain (but also a good bit into the side grain). I would sand it out mostly, then blow it out, then wipe down with MS and there it was again like it had been hiding. I finally managed to eliminate most of it, then sanded to 400, smoothed it with a Scotchbrite pad, and started rubbing in some thin coats of Tru-Oil (which finishes like it was made for walnut IME). As you can see in the pics, there is still some staining, but it mostly blended in, sort of.
View attachment 69007
View attachment 69006
Even though the curve, grain balance, etc. are all fine, the real trouble is inside. I again started at 120 with an angle-drill and 2-inch disks, and started getting even more of the blotchy stains. I tried everything I could think of: sanding with various solvents, dropping down to 80 grit and really trying to even it out, but nothing worked-it just got more blotchy, with some glaring near-white spots. This is the interior after more or less giving up and sanding to 150, but I can't in good conscience sell this to a favorite customer who is hoping to take it home tomorrow. At this point I'm not sure exactly what to do with it. I know some of you turn live edge walnut successfully without all of this mess. Please help me solve this dilemma, as I have several more blanks drying, and eager customers waiting for me to not screw up their bowls.
View attachment 69008
Thanks in advance for any insights. If asking for all this technical help is not appropriate for this thread, I can make into a separate post.
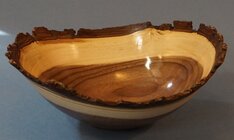
Notice on this bowl the darker area on the upper left indicates the wood beginning to dry before it was turned.
Fighting Mother Nature is a loosing battle as I have found out  .
.
Determent to keep some Black Walnut sapwood white, I did get kind of close, and this is the outcome, note that I kept only the sapwood without the heartwood but for a very small area.
As I had figured out that the color of the heartwood was leaching into the sapwood and changing it to a darker wood, so I turned this thin and dried the wood as quick as I dared without it splitting, and not giving the wet wood the time to leach into the sapwood.
Here is the outcome and even that did darken a bit over (after 18 years) time, not nice white but a more light colored wood.
However I find that leaving the sapwood and let it change color gives nice outcome, IMO .
.
Have a look in what it changes to, here is a dry rough turned bowl, oh, and BTW with or without the bark left on makes no difference in the color change.
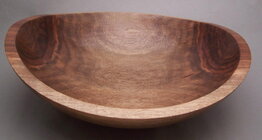
Here are two Black Walnut bowls that are finished.

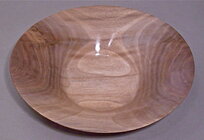
So in my opinion the wood gets nicer as it matures, just give it time
Determent to keep some Black Walnut sapwood white, I did get kind of close, and this is the outcome, note that I kept only the sapwood without the heartwood but for a very small area.
As I had figured out that the color of the heartwood was leaching into the sapwood and changing it to a darker wood, so I turned this thin and dried the wood as quick as I dared without it splitting, and not giving the wet wood the time to leach into the sapwood.
Here is the outcome and even that did darken a bit over (after 18 years) time, not nice white but a more light colored wood.

However I find that leaving the sapwood and let it change color gives nice outcome, IMO
Have a look in what it changes to, here is a dry rough turned bowl, oh, and BTW with or without the bark left on makes no difference in the color change.

Here are two Black Walnut bowls that are finished.


So in my opinion the wood gets nicer as it matures, just give it time
This is one I just finished and has the first coat of walnut oil on it. I usually sand while green to get tool marks out and go to maybe 180. Once it is dry I sand again starting with 180, 320, and sometimes 400 grit. You can still see some discoloration in the sap wood but I was able to keep most of it out.Thanks, David-Having seen your live edge walnut work, I was hoping you would chime in. And in my gut I sort of knew that on the next one, I need to do exactly as you suggest: sand the bark 1st, then stay away from it if possible. It sands straight into a fine flour that I know gets into walnut's open grain structure.
And Brian, I am pretty sure our local red-clay soils are high in iron. After all, it's the iron oxide that turns it that reddish color if I remember my college geology elective right.
Finally, part of me wonders if a sanding sealer might help, but maybe not on that open grain? I have a tin of Myland's cellulose sealer that I rarely use. You folks who use it a lot, do you think its' worth a try? I don't know. Anyway, thanks for the tips! Aaron
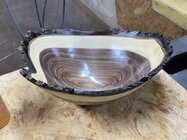
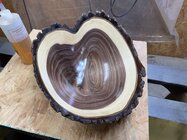
Very nice outcome DavidThis is one I just finished and has the first coat of walnut oil on it. I usually sand while green to get tool marks out and go to maybe 180. Once it is dry I sand again starting with 180, 320, and sometimes 400 grit. You can still see some discoloration in the sap wood but I was able to keep most of it out.
View attachment 69022
View attachment 69021
Wow! That is one nice bowl David.This is one I just finished and has the first coat of walnut oil on it. I usually sand while green to get tool marks out and go to maybe 180. Once it is dry I sand again starting with 180, 320, and sometimes 400 grit. You can still see some discoloration in the sap wood but I was able to keep most of it out.
View attachment 69022
View attachment 69021
I don't have a cool picture right now as it's in a bag w/ shaving. Hoping to get back to roughing it today. But, it's Camphor wood. BOY does the shop smell good!
My wife had some homemade biscuits in the oven when I went out to get the last two bowls I finished for the show in two weeks. I wasn’t planning on turning anything but she will need a platter for biscuits in the future so I did the second turning of a maple platter and made the inside edge a little more defined so the biscuits won’t fall off
 !
!

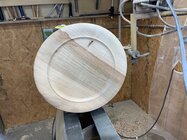


My wife had some homemade biscuits in the oven when I went out to get the last two bowls I finished for the show in two weeks. I wasn’t planning on turning anything but she will need a platter for biscuits in the futureso I did the second turning of a maple platter and made the inside edge a little more defined so the biscuits won’t fall off
!
View attachment 69082
View attachment 69081
View attachment 69080
Looks awesome David. But where are the biscuits?
And gravey…..Don’t forget the gravy.Looks awesome David. But where are the biscuits?
Bob
Happy Friday, All! I haven't posted in this thread for awhile because I have been crazy busy turning stock for my 1st full-time show season (which definitely falls under being careful what you wish for, but I love it!). Anyway, I lucked into some gorgeous black walnut after Hurricane Helene when it seemed every huge tree in our whole region fell. I green-turned some really nice live-edge bowls for a few customers who of course all wanted them before Christmas, then after flooding the bark with thin CA, sealed them up with a few coats of basic Zinssers shellac to slow the drying (which has worked well for me on a lot of different green-turned woods). I figured I could do it if I turned them thin enough to actually dry, maybe.
Fast forward a few weeks, and I finished the outside of the 1st one a few days ago. I have turned lots of black walnut, but rarely with this much sap-wood. Anyway, as I was sanding the exterior starting at 120 (having stabilized a few cracks with coffee and CA), I was getting some serious blotchiness in the sap-wood, presumably from the tannins in the heart wood or bark getting into end-grain (but also a good bit into the side grain). I would sand it out mostly, then blow it out, then wipe down with MS and there it was again like it had been hiding. I finally managed to eliminate most of it, then sanded to 400, smoothed it with a Scotchbrite pad, and started rubbing in some thin coats of Tru-Oil (which finishes like it was made for walnut IME). As you can see in the pics, there is still some staining, but it mostly blended in, sort of.
Even though the curve, grain balance, etc. are all fine, the real trouble is inside. I again started at 120 with an angle-drill and 2-inch disks, and started getting even more of the blotchy stains. I tried everything I could think of: sanding with various solvents, dropping down to 80 grit and really trying to even it out, but nothing worked-it just got more blotchy, with some glaring near-white spots. This is the interior after more or less giving up and sanding to 150, but I can't in good conscience sell this to a favorite customer who is hoping to take it home tomorrow. At this point I'm not sure exactly what to do with it. I know some of you turn live edge walnut successfully without all of this mess. Please help me solve this dilemma, as I have several more blanks drying, and eager customers waiting for me to not screw up their bowls.
Thanks in advance for any insights. If asking for all this technical help is not appropriate for this thread, I can make into a separate post.
I see a lot of odd coloration in green walnut. Green colorations, mostly. It evens out when it oxidizes. However, I've never seen blotches like that. Have they changed in the 3 days since you posted this?
Not really, Kent-Still there. As I stew on what to do about it, I am sanding another one that turned up into a beautiful shallow form, trying to keep in mind the advice I have gotten above. I'll post results if and when I am able to get these to a point that I am happy with.
Funny, but I have had numerous projects before that I ran into a wall with somehow due to some seemingly-impossible technical challenge, and just let them sit on the back of the bench giving me the side-eye. And then one day, a solution just hits me out of nowhere, and I finish the piece successfully. Problem here is the Christmas deadline breathing down my neck!
Funny, but I have had numerous projects before that I ran into a wall with somehow due to some seemingly-impossible technical challenge, and just let them sit on the back of the bench giving me the side-eye. And then one day, a solution just hits me out of nowhere, and I finish the piece successfully. Problem here is the Christmas deadline breathing down my neck!
Nice bowl!
Gone by the time the oil soaked inLooks awesome David. But where are the biscuits?
Great save!It didn’t want to be a hollow form. Whoops. View attachment 69129View attachment 69130
Good save.It didn’t want to be a hollow form. Whoops. View attachment 69129View attachment 69130
Not quite. Was 30 seconds from being done turning and I blew it up. Tried to make it 1/8 inch thick. Sure was pretty.Good save.
Oh no! I'm sorry. I hate when that happens. I blew up a bowl this summer that was done.Not quite. Was 30 seconds from being done turning and I blew it up. Tried to make it 1/8 inch thick. Sure was pretty.
Sounds familiar.Not quite. Was 30 seconds from being done turning and I blew it up. Tried to make it 1/8 inch thick. Sure was pretty.
Tom Gall
TOTW Team
$#!T happens to everyone! But you got right back on the saddle, and I like the end result.It didn’t want to be a hollow form. Whoops. View attachment 69129View attachment 69130
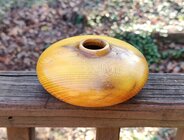
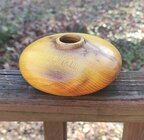
Great form. Rough and tough job to hollow that most lateral part. Super!Osage Orange hollow form. 5" x 2". Finished with Myland's.
View attachment 69171View attachment 69172
View attachment 69173
Nova chuck number 7. Waiting for insert to come in before putting on jaws.
You might have a problem. ;-)

