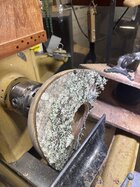
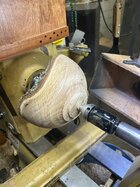
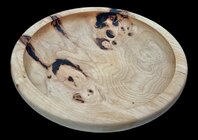
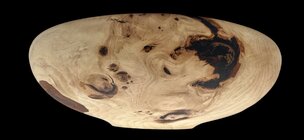
Nice looking HF!I'm working on my hollowing. I grabbed this piece off the shelf. It was sitting next to some elm, which is what I was going for. It turned out to be a mulberry blank. 6" x 2.5". Finished with shellac. I was inspired to try shellac after seeing Jaramiah's pieces. Mine didn't turn out as well. I use a 1# cut of shellac. I brushed it on with a fine brush with the lathe turning at 80 RPMs. I still got pooling and runs on the shellac. @Jaramiah Severns, would you share your shellac application technique?
View attachment 66504View attachment 66505
View attachment 66506View attachment 66507

-
April 2025 Turning Challenge: Turn an Egg! (click here for details) -
Congratulations to Kelly Shaw winner of the March 2025 Turning Challenge (click here for details) -
Congratulations to Guillaume Fontaine for "Nebules" being selected as Turning of the Week for April 6, 2025 (click here for details) -
Welcome new registering member. Your username must be your real First and Last name (for example: John Doe). "Screen names" and "handles" are not allowed and your registration will be deleted if you don't use your real name. Also, do not use all caps nor all lower case.
You are using an out of date browser. It may not display this or other websites correctly.
You should upgrade or use an alternative browser.
You should upgrade or use an alternative browser.
What’s on your lathe?
- Thread starter Rusty Nesmith
- Start date
Note 1# cut is basically a sealer so would only be first application. Second app 2# for 2-3 and then if you have learned to apply on to 3#. Best way to apply is French Polish. I roll up a piece of old t-shirt. As you apply do not go back until that area is dry. You can buff shellac but at slower rpm and very light touch.. I use a 1# cut of shellac. I brushed it on with a fine brush with the lathe turning at 80 RPMs. I still got pooling and runs on the shellac.
Thanks, Gerald. My logic was that the 1# cut wouldn't leave as many runs, being thinner. I'll try 2# and 3# cuts.Note 1# cut is basically a sealer so would only be first application. Second app 2# for 2-3 and then if you have learned to apply on to 3#. Best way to apply is French Polish. I roll up a piece of old t-shirt. As you apply do not go back until that area is dry. You can buff shellac but at slower rpm and very light touch.
We cut a dead Laurel Oak and I had to try a piece. Cut some more to take to the club in two weeks. Added a new turner to the family as my youngest son tried his hand. He wanted a staff for a head I carved for his Cosplay and he wanted to turn it.
Attachments

Hey Kent - don't toss those into the firewood pile just yet.... I don't know if you sell your work, but if so, I've plugged many a funnel with a contrasting wood or epoxy combo and they are sometimes the first ones off the shelf... Ive had one customer ask for more bowls with this "feature" (his word) because he likes having something unexpected to see in the bottom of a bowl. Other people (often buyers) comment on various "funnel fixes" as "unique," "inspired," "how do you do this?" kind of stuff.

Act like you did it on purpose as an artistic choice!

Yes. It is apple.That should keep you busy for a while. What is the wood in this last picture? Is that the apple? If it's cherry, it's the strangest cherry I've ever seen.
Decided to see if I could salvage something nice looking out of the apple box. Glued on a new base. Waiting for glue to set so I can final turn and sand. I also removed the finish that was on there as it was way to dark! Have 3 projects waiting also.


15” black walnut, second turn in process. Of the 3 second turned bowls out of this log so far I’m seeing a lot of little hidden knots or defects, several on the other side. Unusual since I have turned a lot of walnut and usually don’t see this. But it a good opportunity to practice angle hair production . Seems like I may be posting a little to often in this thread so I’ll start posting every third “ what’s on my lathe” Edit: left the little knots, first coat of walnut oil applied.


. Seems like I may be posting a little to often in this thread so I’ll start posting every third “ what’s on my lathe” Edit: left the little knots, first coat of walnut oil applied.
Last edited:
Seems like I may be posting a little to often in this thread so I’ll start posting every third “ what’s on my lathe”
Nah. We don't mind. At least I don't.
")
Never too many posts David, especially with pictures, just keep er coming, I love seeing your nice turnings and ways of doing it15” black walnut, second turn in process. So far of the 3 second turned bowls out of this log so far I’m seeing a lot of little hidden knots or defects, several on the other side. Unusual since I have turned a lot of walnut and usually don’t see this. But it a good opportunity to practice angle hair production
View attachment 66522
View attachment 66521
View attachment 66520
You're lucky if you don't find defects. I get those little surprises all the time. Can be frustrating.15” black walnut, second turn in process. So far of the 3 second turned bowls out of this log so far I’m seeing a lot of little hidden knots or defects, several on the other side. Unusual since I have turned a lot of walnut and usually don’t see this. But it a good opportunity to practice angle hair production
View attachment 66522
View attachment 66521
View attachment 66520
Yes, but then I have to decide if I should fill or leave naturalYou're lucky if you don't find defects. I get those little surprises all the time. Can be frustrating.

Speaking of walnut, usually I'm beating a piece of hedge into submission but this is my first walnut shaft. Log in driveway to this. (ignore the too enthusiastic inlaying)
The second picture isn't this shaft but from the same log and similar to the one on the lathe when I started.
The second picture isn't this shaft but from the same log and similar to the one on the lathe when I started.
Attachments
I tend to fill because I use a vacuum chuck to finish the bottom and I don't want it sucking air.Yes, but then I have to decide if I should fill or leave natural
Trees that have had big injuries like the top broken out will then start growing shoots on the trees, and often die off later on, that's my experience at least.
I only use 1#. I find anything heavier to be too thick for my process. Here’s a quick rundown of my process:Thanks, Gerald. My logic was that the 1# cut wouldn't leave as many runs, being thinner. I'll try 2# and 3# cuts.
- Sand to 400
- Apply three coats of 1# while the piece is still on the lathe (all of my shellac application happens with the lathe spinning). I find ~230 rpm lets me apply it without the centrifugal force causing any runs
- Let the shellac harden (about 20m for this round is usually enough). Sand the entire piece w/ 600. This will take most/all of the shellac off the side grain, but that’s the goal. I don’t want the shellac to build up on the side grain while it’s still being soaked up by the end grain
- Apply three more coats and sand with 800. This will even out the shellac and take care of any runs or drips. Once this round of sanding is done, the difference in glossiness between side grain and end grain should be minimal. This is want you want, as subsequent coats will sit evenly on the surface. If you still see a big difference in glossiness between side and end grain, repeat this step.
- Once the last round of shellac is hard (about an hour in my experience), apply three more coats of 1# shellac. At this point, the shellac should be sitting on the surface of the vessel and will go on very shiny…and stay that way once it’s dried. You don’t have to stop at three coats; keep going until you get the level of gloss you’re looking for. I find three coats at this stage is usually enough, but sometime do another pass or two if I want it super glossy.
- Let the shellac cure for 24 hours. If there are any imperfections at this stage, I’ll hit the piece with 1000 grit before taking it to the buffing wheel, which is where the shine really comes out. Once you’ve buffed the piece to the desired level of shine, you’re done!
- Every coat of shellac should be applied in one pass to ensure it goes on evenly and consistently. I usually go top to bottom
- When sanding shellac, it’s critical that the shellac is dry and that you sand at a slow speed with the lathe turning very slowly. This keeps the heat down and prevents the shellac from clogging the sandpaper (although that still happens occasionally despite my best efforts)
- When buffing, never buff faster than 1000rpm or you risk melting the shellac.
- When applying the shellac, apply it with a soaked lint-free cotton rag. I find this works best for even, thin coats.
- View: https://www.instagram.com/reel/C5M1Hl7rsad/?igsh=bGkzbGdxcXV6OXMw
- View: https://www.instagram.com/reel/C43hhQ9L_cW/?igsh=MWYzMmRkZWtrYjAxMg==
That pretty much it. Let me know if that’s not clear or if you have any questions.
Last edited:
Great summary. Do you keep the lathe running as the shellac dries? Do you sand with lathe running? Since you still have a tenon, how do you integrate the bottom with the already shellacked bowl?Let me know if that’s not clear or if you have any questions.
Last edited:
Thanks, Alan. I keep it spinning after each coat until it’s dry to the touch, but slow the lathe to about 100 rpm. It’s mostly to keep bugs from landing on the wet surface, as I like to turn with the garage doors open. Probably helps speed up drying, too, though.Great summary. Do you keep the lathe running as the shellac dries? Do you sand with lathe running?
Thanks, JS— Do you sand with lathe running? Since you still have a tenon, how do you integrate the bottom with the already shellacked bowl? What brand shellac do you use?
Usually, yes, the lathe is running, albeit slowly; personally, I like 200-300 rpm for sanding (especially if the wood isn’t completely dry). If there are large voids, I’ll sand with the lathe off and manually rotate the piece to avoid potential sanding “catches” that might cause the piece to break apart.Thanks, JS— Do you sand with lathe running? Since you still have a tenon, how do you integrate the bottom with the already shellacked bowl? What brand shellac do you use?
I always leave the base sanded, but unfinished. I like a little glimpse of matte wood when someone peeks underneath and it’s better for adding a signature. Removing the tenon and creating a nice curve along the bottom is the last step before buffing and not gonna lie, it can be dicey. I use a 3/8 bowl gouge and make sure it’s got a fresh edge when approaching the base. Have to have a firm grip and close the flute when engaging the piece to ensure the gouge cuts forward and doesn’t climb the side. I’ve definitely ruined a few pieces like that.
As for brands, I’ve mostly used the Zinsser sanding sealer cut with DNA, but have recently been experimenting with flakes from shellac.net
Keep posting em all15” black walnut, second turn in process. Of the 3 second turned bowls out of this log so far I’m seeing a lot of little hidden knots or defects, several on the other side. Unusual since I have turned a lot of walnut and usually don’t see this. But it a good opportunity to practice angle hair production
View attachment 66529
View attachment 66522
View attachment 66521
Between work and some home renovations I have barely touched my lathe lately and enjoy living vicariously through this thread...I only use 1#. I find anything heavier to be too thick for my process. Here’s a quick rundown of my process:
A couple of things to keep in mind:
- Sand to 400
- Apply three coats of 1# while the piece is still on the lathe (all of my shellac application happens with the lathe spinning). I find ~230 rpm lets me apply it without the centrifugal force causing any runs
- Let the shellac harden (about 20m for this round is usually enough). Sand the entire piece w/ 600. This will take most/all of the shellac off the side grain, but that’s the goal. I don’t want the shellac to build up on the side grain while it’s still being soaked up by the end grain
- Apply three more coats and sand with 800. This will even out the shellac and take care of any runs or drips. Once this round of sanding is done, the difference in glossiness between side grain and end grain should be minimal. This is want you want, as subsequent coats will sit evenly on the surface. If you still see a big difference in glossiness between side and end grain, repeat this step.
- Once the last round of shellac is hard (about an hour in my experience), apply three more coats of 1# shellac. At this point, the shellac should be sitting on the surface of the vessel and will go on very shiny…and stay that way once it’s dried. You don’t have to stop at three coats; keep going until you get the level of gloss you’re looking for. I find three coats at this stage is usually enough, but sometime do another pass or two if I want it super glossy.
- Let the shellac cure for 24 hours. If there are any imperfections at this stage, I’ll hit the piece with 1000 grit before taking it to the buffing wheel, which is where the shine really comes out. Once you’ve buffed the piece to the desired level of shine, you’re done!
Here are a couple of IG Reels of my applying shellac that might be good reference:
- Every coat of shellac should be applied in one pass to ensure it goes on evenly and consistently. I usually go top to bottom
- When sanding shellac, it’s critical that the shellac is dry and that you sand at a slow speed with the lathe turning very slowly. This keeps the heat down and prevents the shellac from clogging the sandpaper (although that still happens occasionally despite my best efforts)
- When buffing, never buff faster than 1000rpm or you risk melting the shellac.
- When applying the shellac, apply it with a soaked lint-free cotton rag. I find this works best for even, thin coats.
- View: https://www.instagram.com/reel/C5M1Hl7rsad/?igsh=bGkzbGdxcXV6OXMw
- View: https://www.instagram.com/reel/C43hhQ9L_cW/?igsh=MWYzMmRkZWtrYjAxMg==
That pretty much it. Let me know if that’s not clear or if you have any questions.
Awesome. Thanks, Jaramiah.
- Joined
- Nov 3, 2008
- Messages
- 17
- Likes
- 27
9 X 2 1/2 cherry dish and a 5 x 3 apple funnel today.

Weighing a few bowls the other day and was moving my fix or burn bowls and came across this one. I had turned it about 2 years ago and it had a few cracks in the rim. I fixed those with CA but just don’t like cracks in the rim so it ended up in the fix or burn pile.
I decided this would be a good opportunity to practice my pyro to hide the cracks. So I sanded, pyro with round tip, wire brushed, and used black Indian ink. I tried following the contour of the natural edge to see how it would look.
Step out of the comfort zone again, some touch up sanding and it’ll be ready for the finish.


. I decided this would be a good opportunity to practice my pyro to hide the cracks. So I sanded, pyro with round tip, wire brushed, and used black Indian ink. I tried following the contour of the natural edge to see how it would look.
Step out of the comfort zone again
, some touch up sanding and it’ll be ready for the finish.Turned out great!Weighing a few bowls the other day and was moving my fix or burn bowls and came across this one. I had turned it about 2 years ago and it had a few cracks in the rim. I fixed those with CA but just don’t like cracks in the rim so it ended up in the fix or burn pile
I decided this would be a good opportunity to practice my pyro to hide the cracks. So I sanded, pyro with round tip, wire brushed, and used black Indian ink. I tried following the contour of the natural edge to see how it would look.
Step out of the comfort zone again
View attachment 66579
View attachment 66578
Stunning!This maple from a friend's property has mi in love! And I now have a LOT of it to get me through the winter. 17 1/2". The top is after oiling and the back before.
Working on a Sapele teapot. Good ole hot glue provides a means to mount this securely (err, hopefully  ).
).

).So this is hollowed out on the inside, like two bowls glued together? Try to compare with your other thread on the teapot.Working on a Sapele teapot. Good ole hot glue provides a means to mount this securely (err, hopefully
View attachment 66590
How thick are the walls?
Hey David. I haven't updated the follow along thread to this point yet--had a few minutes before work this morning, so figured I would throw a post up here. Yes, this is hollowed out on the inside. I left a tiny bit more meat on the teapot than final dimensions, so at this point the walls on all sides are around 11-12mm thick.So this is hollowed out on the inside, like two bowls glued together? Try to compare with your other thread on the teapot.
How thick are the walls?
Hopefully your teapot will come out better than mine @Michael Anderson ! (I know it will!)
Wife likes it. Not real bad for my first attempt.


Wife likes it. Not real bad for my first attempt.
Last edited:
Looks awesome Phil!! Has a real classic look to it. Not bad at all. I haven’t yet made it to the handle and spout phase but. How did you attach yours?Hopefully your teapot will come out better than mine @Michael Anderson ! (I know it will!)
Wife likes it. Not real bad for my first attempt.
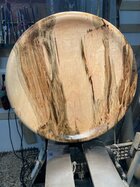
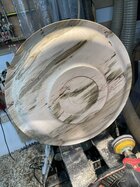
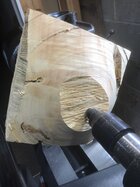
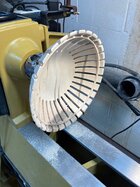
First attempt at an open flute fruit bowl. This was a less than desirable blank with some cracks in it so I figured good for practice. Thanks to @Pat Wisniewski for advice. I made the wall thickness 1/4" and the inner support bead is 1/4" wide x 1/8" thick. Suprizingly it's fairly sturdy.
Attachments
Last edited:
Used a tooth pick size pin and epoxy. The spout isn't hollow all the way down.Looks awesome Phil!! Has a real classic look to it. Not bad at all. I haven’t yet made it to the handle and spout phase but. How did you attach yours?
Got a request for another live edge maple bowl from the old owner of the tree.
6 X 6 with Walnut oil so far.

6 X 6 with Walnut oil so far.
An Extra Large Pecan Salad Bowl: 16 7/8 inches in diameter, 4 3:4 inches tall, 1-inch concave rim, 5 3/4 inches bottom slight pedestal base, and 7/16 of an inch side wall (from the bottom of the rim to start of pedestal).
Attachments
wormy and cracked, but still a very pretty piece of koa. So I’ve got black epoxy in cracks and worm holes, 5 wenge pewa. Will hopefully finish it tomorrow—more sanding, refine the bottom, couple other things 
Canarywood bowl last evening......
-o-


-o-
Cherry crotch bowl. Wavy edge. 11" x 2".


