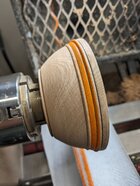
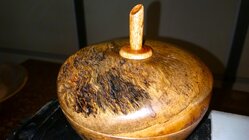
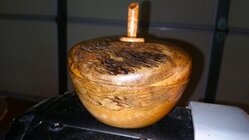
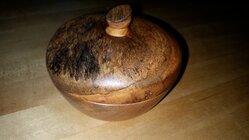
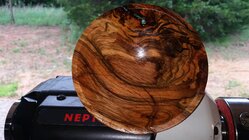
Just finished a small pecan hollow form, my first in pecan. Looked great but when I applied the oil I noticed fine scathes. Is this what you mean by difficult and what do you do different for the pecan? ThanksThe symposium this past weekend was great, but I was definitely pining to get back on the lathe. Working on a fairly small, very curly Pecan calabash for a friend. I rough turned this quite a while ago and am now finish turning. Pecan is quite hard, and kind of a pain to sand, but when all said and done it is beautiful. Will finish with Danish oil and then will try a topcoat of varnish oil for the first time.
View attachment 63785

-
March 2026 Turning Challenge: Olla! (click here for details) -
Congratulations to David Wyke, People's Choice in the February 2026 Turning Challenge (click here for details) -
Congratulations to Michael Nathal for "Eroded Wheel" being selected as Turning of the Week for March 23, 2026 (click here for details) -
Welcome new registering member. Your username must be your real First and Last name (for example: John Doe). "Screen names" and "handles" are not allowed and your registration will be deleted if you don't use your real name. Also, do not use all caps nor all lower case.
You are using an out of date browser. It may not display this or other websites correctly.
You should upgrade or use an alternative browser.
You should upgrade or use an alternative browser.
What’s on your lathe?
- Thread starter Rusty Nesmith
- Start date
Sugarberry again. I have some larger pieces I'll rough in for twice turning.


8x3ish Ambrosia Maple bowl after sanding to 320, Yorkshire Grit friction polish, and a 2nd coat of Tru-Oil. 

I actually just flipped it and finished the bottom. Gonna do a few more coats of TruOil before calling it done.
I actually just flipped it and finished the bottom. Gonna do a few more coats of TruOil before calling it done.
Hi Ted. You're spot on with what I mean about it being difficult--scratches show up in a very obvious way, especially when you have a darker piece. Despite Pecan being semi-porous, it is still fairly tight and fine grain. Yet, it is still prone to tearout and splitting. I tend to treat it like a hard exotic wood, and usually sand to at least 600g and then rub/burnish on and off the lathe with gray scrotchbrite. Off the lathe rubbing, I'll try to follow the grain as well as move randomly. This seems to take care of the fine sanding marks. Between coats of oil, I will rub repeat the same hand rubbing process. Note, there is a lot of variety in Pecan. Lighter, faster growing trees tend to be a bit more forgiving. The wood in my photo came from the lower trunk heartwood of a fairly slow-growing, very old tree. Hope that helps!Just finished a small pecan hollow form, my first in pecan. Looked great but when I applied the oil I noticed fine scathes. Is this what you mean by difficult and what do you do different for the pecan? Thanks
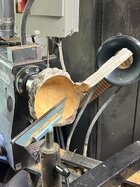
A new drive belt! After 20 years, the belt on my 1640 Oneway was noisy and no amount of belt dressing could put an end to the “racket”. Following the instructions from the owners manual (Oneway website), made it an easy task to complete.
I sometimes put a coat of oil on just to see scratches I’ve missed. That and the darn sun sure show them and it’s back to a lower grit.when I applied the oil I noticed fine scathes
Thanks Michael, very helpful.Hi Ted. You're spot on with what I mean about it being difficult--scratches show up in a very obvious way, especially when you have a darker piece. Despite Pecan being semi-porous, it is still fairly tight and fine grain. Yet, it is still prone to tearout and splitting. I tend to treat it like a hard exotic wood, and usually sand to at least 600g and then rub/burnish on and off the lathe with gray scrotchbrite. Off the lathe rubbing, I'll try to follow the grain as well as move randomly. This seems to take care of the fine sanding marks. Between coats of oil, I will rub repeat the same hand rubbing process. Note, there is a lot of variety in Pecan. Lighter, faster growing trees tend to be a bit more forgiving. The wood in my photo came from the lower trunk heartwood of a fairly slow-growing, very old tree. Hope that helps!
Thanks Alan.I sometimes put a coat of oil on just to see scratches I’ve missed. That and the darn sun sure show them and it’s back to a lower grit.
I've only done once-turned pieces up to this point. Yesterday I roughed in a few pieces for twice turning. Sassafras and sugarberry, 9 and 10 inches. That was about as much as I want to do in one session.


Odie
Panning for Montana gold, with Betsy, the mule!
I just wasn't happy with the quality of the grooves on the top of this Amboyna burl bowl. Although, it stuck out like a sore thumb every time I looked at it, I kept thinking nobody would notice the flaw, but that saying, "If you think it's good enough, it probably isn't" kept bugging me......so, I put it back on the lathe last night and re-did the top surface. I was afraid I'd ruin a very expensive piece of wood.....but, all turned out well!
Before pic: --------------------------------------------------- After pic:


-o-
Before pic: --------------------------------------------------- After pic:
-o-
Last edited:
Odie
Panning for Montana gold, with Betsy, the mule!
Finished up an Australian Red River Gum burl bowl last night, too.
Man, this wood really tears up your sandpaper and discs!
-o-


Man, this wood really tears up your sandpaper and discs!
-o-
Jim McLain
Artist
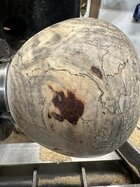
Started working with a piece of spalted maple. I gave up as it was just so soft and rotten I couldn't get it smooth with any tools. Felt like a sponge! Test cut shows it goes all the way in. Gave up before wasting any more time!

Much better Odie, I think there were too many lines and it was detracting from the figure and color on the rim....I just wasn't happy with the quality of the grooves on the top of this Amboyna burl bowl. Although, it stuck out like a sore thumb every time I looked at it, I kept thinking nobody would notice the flaw, but that saying, "If you think it's good enough, it probably isn't" kept bugging me......so, I put it back on the lathe last night and re-did the top surface. I was afraid I'd ruin a very expensive piece of wood.....but, all turned out well!
Before pic: --------------------------------------------------- After pic:
View attachment 63813 View attachment 63814
-o-
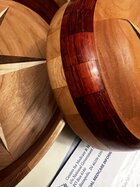
But boy that red color isFinished up an Australian Red River Gum burl bowl last night, too.
Man, this wood really tears up your sandpaper and discs!
-o-
View attachment 63815 View attachment 63816

- Joined
- Nov 27, 2021
- Messages
- 268
- Likes
- 1,140
- Location
- Silver Spring, MD
- Website
- www.transpirationturning.com
I can't really call them pewa, so I was calling them staples. I might have to change the name to tie-fighters. My bolt-on CNC let me start from the idea to cutting 10 pockets in about 1.5 hours. 
Concave, radius is about 15”, so a slight dish to the piece.Hey Pat, is the profile flat or slightly concave? Looked at your previous Picts and couldn't decide.
Last edited:
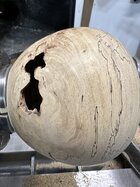
I just finished hollowing a piece of Monkeypod (suar) with some nice spalting and a very cool bark inclusion. Still pondering the finish because the other side has a lot of gray stain. I may try a wash of wood dye to blend it without obscuring the spalting.
Attachments
- Joined
- Feb 6, 2010
- Messages
- 3,516
- Likes
- 2,596
- Location
- Brandon, MS
- Website
- threeringswoodshop.square.site
Urn progression is speeding up. Hollowed it yesterday and today got the embellishments done. Carved the upper and used a burr to burn in the lower pattern. 

Then dyed black and dry brushed two shades of blue. Dimples got a dry brush of Pearl white.
Then dyed black and dry brushed two shades of blue. Dimples got a dry brush of Pearl white.
Red Gum Eucalyptus bowl approximately 14" in diameter. It was quite interesting to see what was hiding inside. First coat of oil, will apply another, and the sand to 600 and apply a finish.


Been a busy Friday evening and Saturday. Had to do a few turning videos for a gallery and finished up a 12” walnut natural edge, 16” pecan natural edge, 15 “ walnut second turning, and started my second hollow form! I love this hobby !!
!!


!!Odie
Panning for Montana gold, with Betsy, the mule!
Quilted Maple finished last night:
-o-


-o-
Another chunk off of the wood pile. Ash I think.


Decided on some color. Used brown, orange and a little yellow. Walnut oil for the inside.
Will let it dry a few days and decide on finish.


Will let it dry a few days and decide on finish.
Paper Birch from a former club member whose trees died in the last drought and he donated the wood to the club. Had some spalting, but it looks better on a few pieces that I have not gotten around to turning yet. Natural edge on the rim although the bark fell off while drying. The spout feature was nature doing its thing.
Jay


Jay
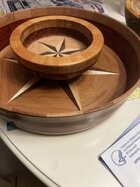
Well I was able to make this into two pieces so back the table saw to cut another ring or two to safe the bottom pieceWorking on a dip bowl to go along with the chips
Odie can I ask what media do you use on you glue block?Couple of projects.. Natural edge Mesquite bowl and Ambrosia Maple vaseView attachment 50142View attachment 50143
Grabbed a chunk off of this maple burl.

Small Cherry bowl from part of a crotch. The sapwood side was rotted/spalted but it made for an interesting look. Yorkshire grit followed by Myland's.


My LaserPecker does this to me once in a while. Despite my sending it a new image, and that new image showing up correctly in the app, it sometimes uses the previous image I uploaded. This burning is sort of deep so I really don't want to sand off the logo and re-burn it.

My LaserPecker does this to me once in a while. Despite my sending it a new image, and that new image showing up correctly in the app, it sometimes uses the previous image I uploaded. This burning is sort of deep so I really don't want to sand off the logo and re-burn it.
And a bunch of stuff I recently finished. Oak, cherry, mulberry, walnut.

Been turning and engraving these bottle openers for this year's stocking stuffers for family members. My wife told me I have 15 more to go. ")

After blowing up a bowl earlier this week I decided to finish this rough turned crepe myrtle bowl as a morale booster. I think it turned out pretty well (I still need to remove the tenon).

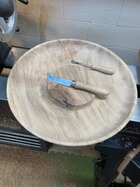
Cheese & cracker plate with cheese knife and cheese fork. Going to make two more, this one was practice since it had a crack. Had to hand inlet the pewa since the router and template wouldn't fit into the curve. Filled the knot voids with epoxy and coffee grounds.
Attachments
While waiting for glue and paint on other projects to dry, I whipped up a vase from a piece of oak my wife found and doubled back for on the road. Must have fallen off of someone's fire wood haul.
