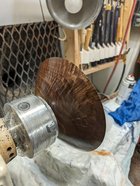
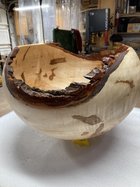
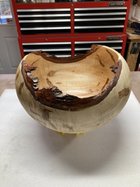
Yeah, that's definitely padauk. If your shop is covered in a fine neon orange dust despite all efforts at dust collection, it's definitely padauk!I think it’s padauk, about 7.5 inch diameter. One coat PTO.
View attachment 58747View attachment 58748
")

Yeah, that's definitely padauk. If your shop is covered in a fine neon orange dust despite all efforts at dust collection, it's definitely padauk!I think it’s padauk, about 7.5 inch diameter. One coat PTO.
View attachment 58747View attachment 58748
If I didn’t have my Peke Powercap I’d look like Ronald McDonald.it's definitely padauk!


Opthomologists do prescriptions for patience?I think before I do another I need to visit the opthomologist and update my prescription.
Eye strain leads to frustration to lack of patience, so yeah, indirectly.Opthomologists do prescriptions for patience?


This is a good sample. Covers most of the ones i know (you can google "Merovingian swearing in French" if you want to get a translation"...I need to learn some French swear words other than the one I use a lot.
")


I asked my friend that grew up at the house where the tree was cut down and he said that it is Horse Chestnut. That seems to fit.That maybe basswood.


Not all bowls need embellishments. That's a really pretty piece.One of those plain ol walnut candy dishes..
Couldn't bring myself to put any embellishment/glitter inlay on it.
9.5 x 2.25 inch


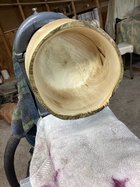
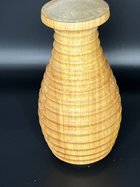
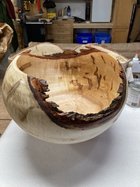
Marc:A few pages back, I showed this ash bowl, in progress, that I wanted to keep as white as possible, to avoid the darkening and yellowing that happens when finishing. My plan, this time around, was to use two part wood bleach followed by shellac, the lightest I could find.
Simple enough, but the devil’s always in the details.
The bowl was sanded to 800, then bleached. Bleaching was straightforward enough, directions are easy. The bleaching liquids really soak in deep. The wood was quite wet. I let it dry longer than the directions suggest, two days. I really think that I should’ve let it set for a week or two for the fibers to go back to the dry state.
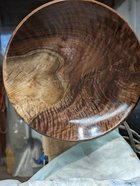
I resanded and brushed on a one pound cut of ultra blonde shellac, from flakes and dna. Let dry overnight, resanded and recoated for three coats. I buffed the last coat with white non-woven pads while on the lathe.
I like it, think the process was mostly good. And the result is close to what I wanted.
Ive debated giving it a top coat of something more handleable than just shellac, but am not sure it’s necessary, and don’t want to add yellow at this point. Maybe just a coat of wax for that extra pop will be enough for the uses it’s likely to see.
View attachment 58909
Sanded lathe white
View attachment 58910
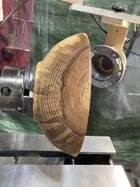
After bleach
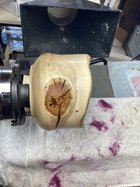
View attachment 58911
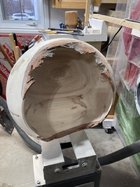
Wet shellac. I was kind of concerned!
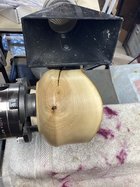
View attachment 58912
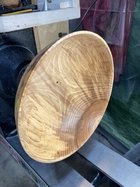
After shellac dried and sanded
The finished photo is in the gallery

Yep Tried & True original is quite thick, it being a blend of linseed oil & Beeswax (I find it comes out better if you put your first coats on being T&T Danish Oil or Varnish, with Original being the last coat - T&T Danish oil is the quickest to deal with at the beginning, I think) T&T Original only needs a very thin coat per application , Can't really flood it on, and then it would take forever to cure if you layer it in too thick, and a lot gets wasted wiping it "dry" after, so I usually just dab a bit of rag and apply lots of elbow grease to rub it in until it won't rub in any further out, then dab a bit more, until full coverage is achieved. Which is why it seems to go a bit faster starting with their Danish oil (soaks in and wipes away excess relatively quickly - 15 minutes compared to the 1 hour soak time for Original & Varnish) and then the Original coats on much easier with the D.O. underneath it. JMHO - but their website instructions on the use of each kind is a huge help over trying it "by the seat of the pants".... (Plus, if you later decide on a different oil finish , nothing will stick to the oil & beeswax properly, but it can be applied over the D.O. and Varnish oils)First coat of Tried and True Oil on Ambrosia Maple Bowl this morning. Does anyone thin this oil it seemed to be a bit thick. The Danish Oil and Varnish Oil by tried and true is much thinner.
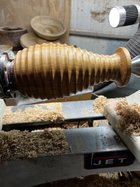
Been trying to organize and clean out basement shop and I found this pice that I started a while ago and he fell on the ground and was forgotten about so I took some time and this is what I came up with? It’s not finished yet still needs to be hollowed out and finished better!
View attachment 58891


No, Gary, I haven’t. I’m still very new to all of the different finishes. I’ve shied away from water base finishes because I think they are surface only, and reports are that it doesn’t do much for enhancing grain. Something I should try though. Also I haven’t used lacquer either. Info from other threads here suggests that it could be interesting and fun.Marc have you looked into a waterbased finish? They are supposed to resist yellowing to a high degree.


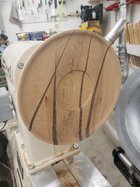
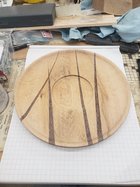
I looked up fungi in "Hoadley's Understanding Wood" came across this text between two illustrations and I quote "As certain white rots develop, dark zone lines form as on this piece of sugar maple above. This type of decay is called spalting. Below, turning of spalted maple, by Mark Lindquist".I roughed out a couple of English Walnut bowls from some wood I got a few months ago. It is already starting to spalt. I got one core from each piece.
View attachment 58948View attachment 58949