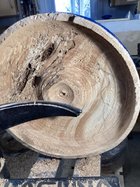
• Beware of Counterfeit Woodturning Tools (click here for details)
  • Johnathan Silwones is starting a new AAW chapter, Southern Alleghenies Woodturners, in Johnstown, PA. (click here for details)
  • Congratulations to Chad Eames for "Twisted Walnut Vessel"being selected as Turning of the Week for September 2, 2024 (click here for details)
  • Welcome new registering member. Your username must be your real First and Last name (for example: John Doe). "Screen names" and "handles" are not allowed and your registration will be deleted if you don't use your real name. Also, do not use all caps nor all lower case.

What’s on your lathe?

Joined
Jul 27, 2020
Messages
311
Likes
1,242
Location
Durham, NC
I’ve (finally) learned to spray a little shellac on before the CA repair. I’m told sanding sealer works also. I like the spalting or blue rot or whatever it’s called. Nice form.
Thank you for the kind comments, Alan.

Regarding the use of shellac as you mentioned, I wish it were that simple. Because it prevents glue from penetrating, it also stops things like oils from doing the same on the sealed areas. It’s fine if you use film finishes, because they don’t penetrate. Film finishes won’t give the highest contrast, which in my mind, is what it’s all about.

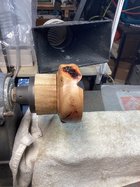
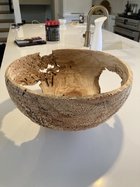
Best practice for closing cracks is to be sure it’s done while tools are still being used. That’s where I made the mistake, or misstep. Either I caused the cracks ( miniscule) by allowing the wood to change moisture when on the lathe,,or the cracks were always there, but now visible as the surface quality allows them to be seen.

I could have, probably should have increased the moisture level a bit by misting with water (close the cracks) and just continue work. The finish would stabilize the cracks just fine. I weighed that against the off chance that the cracks would run, and took the safe bet. Shame on me for that!

Choices, choices………
 

odie

TOTW Team
Joined
Dec 22, 2006
Messages
7,220
Likes
10,877
Location
Panning for Montana gold, with Betsy, the mule!
Odie, I have friends in Darby, south of Hamilton. What direction from Missoula are you. Beautiful country thru there.
Don......In his youth, my Dad went to Victor H.S., just north of Hamilton. I live between Frenchtown and Missoula, along the old highway.

One of my favorite stories about my Dad, is his first job was driving a team of four horses hauling a hay wagon for the local farmers there!.....this would be around 1935. He was glad to move on to other things, because the horses didn't behave very well! :)

-o-
 
Last edited:
Joined
Jul 27, 2020
Messages
311
Likes
1,242
Location
Durham, NC
I guess I’m trying to understand so bear with a newbie. I was taught to spray some shellac so that glue won’t penetrate or stain the area around the crack. Then that shellac gets sanded off after CA is applied. No?
You might be right. I’ve never used spray shellac. When I use shellac, it’s applied with a small cloth, so it’s wet and penetrates. Maybe with just a light spray there isn’t penetration? It can be easily sanded off?
My concern has been that sanding off might not be uniform and complete, effecting the finish. I need to investigate.
 
Joined
Oct 15, 2015
Messages
190
Likes
454
Location
Smithville, MO
Don......In his youth, my Dad went to Victor H.S., just north of Hamilton. I live between Frenchtown and Missoula, along the old highway.

One of my favorite stories about my Dad, is his first job was driving a team of four horses hauling a hay wagon for the local farmers there!.....this would be around 1935. He was glad to move on to other things, because the horses didn't behave very well! :)

-o-
We have it pretty easy compared to our parents and grandparents. During the depression my grandfather could not find any winter work other than digging graves. He'd walk almost 5 miles carrying his shovel and pic and dig in the frozen ground. Life doesn't get much tougher than that.
If I drive out there to fish with my buddy I'll bring some missouri hardwoods and drop off. I have a sawmill and good selection of timber.
 

odie

TOTW Team
Joined
Dec 22, 2006
Messages
7,220
Likes
10,877
Location
Panning for Montana gold, with Betsy, the mule!
Last evening, I worked on processing four bowls:

L.....Birdseye maple and Coolibah burl undergoing inspection #2 of 3, and touch up sanding with random orbit by hand.

R.....Applying D.O. to foot of Olivewood and Maple burl bowls.

-o-

20231210_222913.jpg 20231210_223009.jpg
 
Joined
Jul 27, 2020
Messages
311
Likes
1,242
Location
Durham, NC
Closing in on the box elder.
I cleaned up the glue stain as best I could, felt like a gamble even though I had relative confidence that they would go away with application of thin danish oil. As soon as the finish hit the wood, the stains vanished. What a relief. The rest of the day was great!
The close ups are the very same spot, with the scratches.
Also, need to add the ’wet with DO’, wood porn shot. Like Kat Dennings in her pvc dress.

IMG_2466.jpegIMG_2485.jpegIMG_2481.jpeg
 
Joined
Feb 18, 2023
Messages
809
Likes
1,699
Location
Orange, CA
added pewas. Practice helps. Figured out a couple things so next ones will be better. Use lots of glue to fix template and let it dry. Blue tape is helpful but not needed since you will be sanding. Be real gentle moving the router around the inside of the template to avoid template dislodgement. Do many small increments of moving router bit deeper rather than taking too much wood at a time. Don’t go too deep in wood removal or midsection of pewa will be under bowl surface—best to sand more to bring them down to bowl surface level. These pewas are koa. Before and after pictures IMG_4384.jpegIMG_4376.jpeg
 
Joined
Aug 16, 2022
Messages
329
Likes
763
Location
Butler, PA
You might be right. I’ve never used spray shellac. When I use shellac, it’s applied with a small cloth, so it’s wet and penetrates. Maybe with just a light spray there isn’t penetration? It can be easily sanded off?
My concern has been that sanding off might not be uniform and complete, effecting the finish. I need to investigate.
The aerosol cans of shellac don't penetrate like the liquid does and I've had good luck doing it like Alan said with thin ca glue. You do have to either spray a large area or use rags to stop the glue from going places you don't want it. because it runs on the shellac and doesn't penetrate like bare wood. Just put a light coat of spray shellac on so it sands off easy.
 
Joined
Sep 19, 2023
Messages
661
Likes
1,252
Location
Columbia, TN
You might be right. I’ve never used spray shellac. When I use shellac, it’s applied with a small cloth, so it’s wet and penetrates. Maybe with just a light spray there isn’t penetration? It can be easily sanded off?
My concern has been that sanding off might not be uniform and complete, effecting the finish. I need to investigate.
I bought a can of spray lacquer for this purpose. It won't soak in and sands off easily.
 
Joined
Feb 7, 2023
Messages
356
Likes
2,356
Location
Gardner, MA
Started working on two other projects while down in the shop.
Walnut project first. Removing the foot here :
IMG_6953.jpg
Second project is a first time trying Canary wood. Outside is turned. Applied two 1/8th beads to the bottom with 3/32nds foot to give it a shadow line. Going to attempt using the bottom bead to hold it on the lathe to turn the inside. Need to figure out what finish I will use after final sanding.
IMG_6972.jpg
IMG_6973.jpg
 

odie

TOTW Team
Joined
Dec 22, 2006
Messages
7,220
Likes
10,877
Location
Panning for Montana gold, with Betsy, the mule!
Beatiful. How does one get such perfect equivalent spacing between the lines?

Thank you, Michael....:)

I have a special tool rest that I've designed and built myself, and it's been re-thought and subsequently revised several times.....this helps me with the spacing of my detail grooves. The grooves are done with a standard spear point scraper, where the very tip is hand honed, using a diamond hone to a finely sculpted tip. However, getting detail grooves that look good to the eye, are entirely dependent on maintaining geometric integrity. In other words, the shape of the bowl has to stay as close to a perfect circle as possible. The one and only way to do this, is to develop your turning skills to the point where you can completely eliminate the need for any power sanding.....none, zip, zero, nada! The only sanding that can be allowed, is some final fine sanding by hand on these surfaces. This concept becomes especially challenging when turning hard and dense woods, like this Australian brown Mallee burl that preceded your question.

I see this is your first post to the forum. Welcome. You're sure to find much useful information for woodturners on these AAW forums.

-o-
 
Last edited:
Joined
Dec 11, 2023
Messages
10
Likes
9
Location
Westford, MA
Thank you, Michael....:)

I have a special tool rest that I've designed and built myself, and it's been re-thought and subsequently revised several times.....this helps me with the spacing of my detail grooves. The grooves are done with a standard spear point scraper, where the very tip is hand honed, using a diamond hone to a finely sculpted tip. However, getting detail grooves that look good to the eye, are entirely dependent on maintaining geometric integrity. In other words, the shape of the bowl has to stay as close to a perfect circle as possible. The one and only way to do this, is to develop your turning skills to the point where you can completely eliminate the need for any power sanding.....none, zip, zero, nada! The only sanding that can be allowed, is some final fine sanding by hand on these surfaces. This concept becomes especially challenging when turning hard and dense woods, like this Australian brown Mallee burl that preceded your question.

I see this is your first post to the forum. Welcome. You're sure to find much useful information for woodturners on these AAW forums.

-o-
So cool. Nice work. I have struggled with line spacing. It drives me nuts for the spacing not to look right. Yours are, in a word, perfect. No power sanding?! Not there yet. :) Do you have any photos you could share of the special tool rest? I can't imagine what it might look like. Yea, I am totally new to this forum. I have belonged to the AWW for 3 or 4 years.
 
Joined
Dec 11, 2023
Messages
10
Likes
9
Location
Westford, MA
Last evening, I worked on processing four bowls:

L.....Birdseye maple and Coolibah burl undergoing inspection #2 of 3, and touch up sanding with random orbit by hand.

R.....Applying D.O. to foot of Olivewood and Maple burl bowls.

-o-

View attachment 58299 View attachment 58300
I am a fan. Beautiful. Where do you find such amazing wood?
 
Joined
Feb 7, 2023
Messages
356
Likes
2,356
Location
Gardner, MA
I sized it to fit my 4 inch jaws on my Nova 3. Worked like a charm. I have one little spot that was completely my fault. Forgot to make sure it was tight before I turned on the machine! Oops!
Should be an easy repair.
A friend of ours stopped to visit and saw a couple of coasters I had made sitting on the table. He liked them so much he ordered 52 of them. 13 sets of 4. Have to be done by Thursday the 21st. Guess lathe time is off for a bit.
 

odie

TOTW Team
Joined
Dec 22, 2006
Messages
7,220
Likes
10,877
Location
Panning for Montana gold, with Betsy, the mule!
I am a fan. Beautiful. Where do you find such amazing wood?
Hi Michael.....

All of my bowl blanks are purchased online in places like eBay, Cook Woods, Etsy, etc.....but, a few are purchased in private sales by invitation only.

-o-
 

odie

TOTW Team
Joined
Dec 22, 2006
Messages
7,220
Likes
10,877
Location
Panning for Montana gold, with Betsy, the mule!
So cool. Nice work. I have struggled with line spacing. It drives me nuts for the spacing not to look right. Yours are, in a word, perfect. No power sanding?! Not there yet. :) Do you have any photos you could share of the special tool rest? I can't imagine what it might look like. Yea, I am totally new to this forum. I have belonged to the AWW for 3 or 4 years.

Since I'm leaving the option open to someday commercially marketing my spacing tool rest, among a dozen other specialized tools I've developed for my own personal use, I hope you'll understand why photos of these tools are not available publicly. However, if you search these forums, you'll find that I'm very open about my methods and procedures, which include many photos of my other specialized handmade tools.

For the time being, I'm not interested in making money.....or, that's not my primary objective anyway. My main interest is in paying for the cost of producing my bowls. Since I consider it a purpose higher than monetary rewards can give, I am very consumed with the technical aspects of producing my bowls, and whatever artistic satisfaction I can glean from that.

-o-
 
Last edited:
Joined
Dec 11, 2023
Messages
10
Likes
9
Location
Westford, MA
Since I'm leaving the option open to someday commercially marketing my spacing tool rest, among a dozen other specialized tools I've developed for my own personal use, I hope you'll understand why photos of these tools are not available publicly. However, if you search these forums, you'll find that I'm very open about my methods and procedures, which include many photos of my other specialized handmade tools.

For the time being, I'm not interested in making money.....or, that's not my primary objective anyway. My main interest is in paying for the cost of producing my bowls. Since I consider it a purpose higher than monetary rewards can give, I am very consumed with the technical aspects of producing my bowls, and whatever artistic satisfaction I can glean from that.

-o-
Cool. Good on you.
 
Joined
Dec 11, 2023
Messages
10
Likes
9
Location
Westford, MA
Hi Michael.....

All of my bowl blanks are purchased online in places like eBay, Cook Woods, Etsy, etc.....but, a few are purchased in private sales by invitation only.

-o-
Cool. You have so many pretty pieces. I was wondering if you live in a magical forest. The one out behind my house is generous but not so amazing in terms of quality. Perhaps it is time for me to "branch out" hehe.
 
Joined
Nov 27, 2010
Messages
30
Likes
61
Location
Thetis Island, British Columbia, Canada
Sort of a small arbutus/madrone crotch piece. Started out to be a NE bowl but cracked a wing when sanding so became a new "design" element! Want to thank odie for the idea of using temporary tenons when turning bowls. Looking at his superb bowls and attachment methods gave me a new idea instead of spur centres. Who said you were ever too old to learn!!
 

Attachments

  • side.jpeg
    side.jpeg
    403.9 KB · Views: 22
  • inside.jpeg
    inside.jpeg
    370.1 KB · Views: 22
Joined
Jun 2, 2021
Messages
211
Likes
438
Location
Kingsville, ON
Took the artistic approach today on a piece of punky willow I had sitting around for 3 years. 16 inch diameter x 7 inches in height. I call it the Death Star bowl. Going to leave it natural, maybe soak it in something? Nice challenge turning by the way. No sanding needed.
 

Attachments

  • IMG_4911 Medium.jpeg
    IMG_4911 Medium.jpeg
    94.2 KB · Views: 23
  • IMG_4914 Medium.jpeg
    IMG_4914 Medium.jpeg
    116.2 KB · Views: 23
  • IMG_4920 Medium.jpeg
    IMG_4920 Medium.jpeg
    74.2 KB · Views: 23
Joined
Jul 19, 2018
Messages
1,778
Likes
2,388
Location
Ponsford, MN
second bowl of the day. This time I remembered I was using a recess and not a tenon so I didn’t make a funnel! I’m learning. One coat of PTO so far. The wall is about 1/8-3/16 inch thick. View attachment 58409View attachment 58410
Looks like you have gotten to the continuous curve point and you could probably go with a shallower recess especially on a small bowl like that one. You definitely are making progress.
 
Back
Top