• November Turning Challenge: Puahala Calabash! (click here for details)
  • Congratulations to James Seyfried for "Cherry and Redheart Ornament" being selected as Turning of the Week for November 18, 2024 (click here for details)
  • Welcome new registering member. Your username must be your real First and Last name (for example: John Doe). "Screen names" and "handles" are not allowed and your registration will be deleted if you don't use your real name. Also, do not use all caps nor all lower case.

Planing small boards?

Joined
Jul 30, 2021
Messages
249
Likes
77
Location
Aurora, CO
This joint is cut across the grain and would be extremely difficult to do with hand tools. The dado would require a plow plane with scoring cutters on both sides and then it would still be a very rough cut on those end grain sides.
Hand cut dovetails would be much more doable, better looking and there is a multitude of info on the process available.

Dovetails is something I'd like to do eventually. I've never made boxes, outside of turned ones. So I was figuring I'd start simple. The rabbet joint I was thinking only for the sides to base joints. Then a 45 degree joint for the sides...but, maybe also with say a notch cut and filled with an alternative wood (i.e. if it was a maple box, maybe use a couple pieces of thin walnut on each vertical joint to add something more interesting). I know simple 45 degree joints on their own aren't particularly strong, but with additional pieces going across the grain and glued into notches, that should strengthen them. Not as good as a nice dovetail joint, but for a first box I figured I'd start a little simpler. ;)
 
Joined
Jul 30, 2021
Messages
249
Likes
77
Location
Aurora, CO
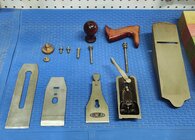
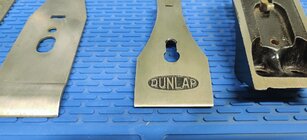
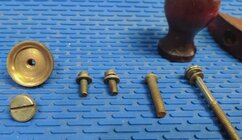
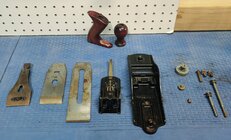
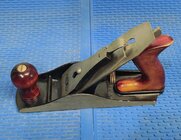
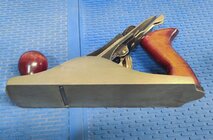
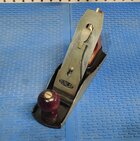
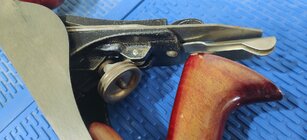
SO! On the plane front. I have disassembled and reassembled the one I pictured above a few times. Its a bit rusty, but, thankfully, nothing was actually rusted together. All the bolts came loose with just a little bit of force, and everything still works really nicely, screws are a great fit for the threads in each hole, everything turns smoothly. It looks like all the parts are there as well.

I am going to get into cleaning here. Sounds like white vinegar is most commonly recommended. Just curious if anyone has any other recommendations for cleaning? I don't want to affect the black enamel on the inside surfaces... Not sure if vinegar will affect that or not. There are a few knicks, but mostly the enamel looks fine, and I'd rather not try and redo that just now.
 
Joined
Feb 28, 2021
Messages
1,396
Likes
1,231
Location
Roulette, PA
Website
www.reallyruralwoodworks.com
Just curious if anyone has any other recommendations for cleaning? I don't want to affect the black enamel on the inside surfaces... Not sure if vinegar will affect that or not. There are a few knicks, but mostly the enamel looks fine, and I'd rather not try and redo that just now.
Dovetails is something I'd like to do eventually. I've never made boxes, outside of turned ones. So I was figuring I'd start simple. The rabbet joint I was thinking only for the sides to base joints. Then a 45 degree joint for the sides...but, maybe also with say a notch cut and filled with an alternative wood (i.e. if it was a maple box, maybe use a couple pieces of thin walnut on each vertical joint to add something more interesting). I know simple 45 degree joints on their own aren't particularly strong, but with additional pieces going across the grain and glued into notches, that should strengthen them. Not as good as a nice dovetail joint, but for a first box I figured I'd start a little simpler. ;)
For cleanup, mineral spirits for dirt/grease, Evap-o-rust works great on rusty metal, and it won't affect the Japanning (what you call black enamel - it isn't paint, though) For a user plane , I'd not even worry about the japanning, unless you wish to preserve the collector aesthetic (Generally, restoring for a user plane also tends to mess up the collector patina, so it's often an either-or thing) Main thing is a relatively flat sole (it doesn't need to be perfect, only needs to be flat mostly from toe to front edge of mouth which is the most critical area, and then mostly sides & heel flat to the toe) and sole square to right side (if you expect to use it double-duty on a shooting board, though close is good enough since things can be squared up a touch with the lateral adjuster All of which have been covered pretty well by Rex and Wood By Wright - I believe Rex has a video on re-doing the Japanning.. or maybe it was Wright... I just remember watching one, would have been within last couple years))

Dovetails are really easy to cut once you wrap your brain around Pin vs Tail, although at first they can be labor intensive and take a LOT of time... 45 degree splined miters as you describe are easy enough but only if you have a reliable saw (My table saw doesn't have a perfectly flat top so trying to cut long miters like that on that saw doesn't work well, so I went to router table to cut my miters) or a good router table & 45 degree chamfer bit. You can also do splined joints (so the splines don't show on the show faces) - I also used to do finger joints using a home made jig/ sled on table saw (Which can also be done on a router table, but setups take longer than handcutting dovetails for me...) Lock rabbets work wonderfully well for drawer boxes (when done right) but don't really look all that great for boxes where those joints become visible on the edges. Another option can be to just glue up your boxes (end grain sides to side grain front & rear) and then drill out appropriately sized holes and drive in contrasting color dowels. - Lots and lots of ways to build a nice-looking box. And lastly, if your wood is thick enough, they do make router bits to do 45 degree lock miter joints (See Stumpy Nubs on Youtube for easy setups on those)
 
Joined
Dec 15, 2017
Messages
270
Likes
165
Location
South Plainfield, NJ
SO! On the plane front. I have disassembled and reassembled the one I pictured above a few times. Its a bit rusty, but, thankfully, nothing was actually rusted together. All the bolts came loose with just a little bit of force, and everything still works really nicely, screws are a great fit for the threads in each hole, everything turns smoothly. It looks like all the parts are there as well.

I am going to get into cleaning here. Sounds like white vinegar is most commonly recommended. Just curious if anyone has any other recommendations for cleaning? I don't want to affect the black enamel on the inside surfaces... Not sure if vinegar will affect that or not. There are a few knicks, but mostly the enamel looks fine, and I'd rather not try and redo that just now.
I've rehabbed probably 15-20 planes, some pretty nasty and rusty. I generally use EvapoRust, since it gets into all the nooks and crannies on a plane. I usually let it sit in the EvapoRust overnight, then wash it off and go from there, depending on its condition. The only drawback with EvapoRust is that it's gotten kind of expensive- around $30/gallon. It can be used multiple time. I buy it at Harbor Freight.
But, I recently watched a video about a homemade version of EvapoRust, from James Wright
View: https://www.youtube.com/watch?v=GYEbzI4AtpA&t=209s

The next time I need some rust remover, I'm going to try this.
 
Joined
Aug 14, 2007
Messages
5,731
Likes
3,069
Location
Eugene, OR
I am learning to cut dove tails. Look up Rob Cosman and the moxon vice he has. There are cheaper options, but he seems to be the expert. I got one set to fit perfectly, but none since then. I will have no excuses after getting the moxon vice done. There are cheaper options rather than the "Cosmonized" variation.

robo hippy
 
Joined
Jul 30, 2021
Messages
249
Likes
77
Location
Aurora, CO
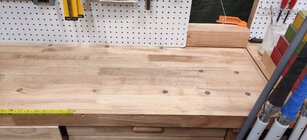
Well, I had a frustrating mishap cleaning up this plane. I disassembled it all, and put all the smaller pieces, screws, washers, knobs, in a small metal pan with some white vinegar. Everything seemed fine, swished things around for a bit, then left it all for about 10 hours. Came back...and the pan was empty. Turned out, there was a ridiculously tiny pinhole in the bottom, and all the vinegar leaked. It spread out over my workbench, and seems to have ruined the finish on it, and is now infused in the wood.....

Darn workbench smells like vinegar now, and I suspect that smell will get worse over time. WORSE...the workbench itself is no longer flat. Its got little warps all over it. I have no doubt I can plane it back into shape...with a longer hand plane. But the smell.... Does anyone know how to get the smell of vinegar out of wood its soaked into? Or am I just screwed now?
 
Joined
Jul 30, 2021
Messages
249
Likes
77
Location
Aurora, CO
One other question as well. Watching Paul Sellers, he has a block of metal that is exstremely flat. Within one thou he said. Someone earlier in this thread mentioned I didn't need to be that perfect, but...I do need a flat surface to sand the bottom of the plane with.

I have some hardboard, with the smooth front surface. It seems very flat to me. Thing is, I am not really sure how to test if it is indeed flat, or at least, flat enough. It appears flat, but there could well be a curvature or something to it that would mess up properly flattening the bottom of this plane. Just wondering if anyone has any tips there. At some point I'll probably be able to pick up an engineers block that is perfectly flat, but that won't happen for a while here. Hoping this hardboard will suffice. It certainly seems to have a very smooth, very flat surface.
 
Joined
Feb 28, 2021
Messages
1,396
Likes
1,231
Location
Roulette, PA
Website
www.reallyruralwoodworks.com
One other question as well. Watching Paul Sellers, he has a block of metal that is exstremely flat. Within one thou he said. Someone earlier in this thread mentioned I didn't need to be that perfect, but...I do need a flat surface to sand the bottom of the plane with.

I have some hardboard, with the smooth front surface. It seems very flat to me. Thing is, I am not really sure how to test if it is indeed flat, or at least, flat enough. It appears flat, but there could well be a curvature or something to it that would mess up properly flattening the bottom of this plane. Just wondering if anyone has any tips there. At some point I'll probably be able to pick up an engineers block that is perfectly flat, but that won't happen for a while here. Hoping this hardboard will suffice. It certainly seems to have a very smooth, very flat surface.
Can't help with vinegar smell in workbench, though probably a google search to neutralize vinegar (Acetic acid, so I hope your bench isn't glued up with PVA glue, which Vinegar will break the bonds - I've used vinegar to take apart glued-up joints....)

As for hardboard, depends on how thick it is - if it is like 1/4 inch hardboard, it'll simply flex on uneven surfaces. Perhaps stop by your local building supply and see if they have any scrap countertops (Melamine, perhaps or Marble - They often may have offcuts from cutting things to size, or scrap melamine which is often used as cover sheets on truckload shipments...) If your hardboard is like 3/4" thick it should probably be flat enough.

As I mentioned, plane soles don't need to be 100% perfectly flat, you just need flatness in the area of the toe to the front edge of the mouth , and then mostly back to the heel and along the sides - If you have unpolished spots (under the frog for example) it isn't so much a problem. Also, when flattening your plane, make sure it is fully assembled with blade and chip breaker and everything installed (just back off the blade so it doesn't stick out) Because the plane body can flex once you fasten down your lever cap , so if you flatten the plane sole without everything assembled, then when you go put it together, your sole is no longer quite flat.
 
Joined
Jul 30, 2021
Messages
249
Likes
77
Location
Aurora, CO
@Brian Gustin Its funny. I've been doing searches for how to clean up white vinegar. But, all I get back from various search engines, is how to clean WITH white vinegar. :p I've become completely disillusioned with search engines these days. They are useless. Maybe Claude will have a better answer...

I don't know if the workbench is glued with PVA or not. I bought it from Harbour Freight. I have several of them, actually, and they were around $120-130 each. Not top of the line, but, they were actually pretty nice overall, and the finish was good, the tops were very flat.

Good thought about countertop cutoffs. I might try that. That's a great idea.

Also thanks for the tip about having it fully assembled. I hadn't thought of that. I guess that's how Paul Sellers did it, but I did not think about the flex. I'll make sure its assembled when I flatten the base. Thanks!

EDIT: Well, Claude recommended using a baking soda paste to clean up the vinegar... Not real sure I want to do that on my workbench, but, I haven't found anything else that I don't think would further ruin the benchtop. Lemon of course, was one recommendation in a cooking article. Another recommended fabric softener. I don't feel like either of those are great options for a wood workbench... I guess I could try the baking soda. Just not entirely sure how that will affect the rest of the wood. I'm undoubtedly going to have to level this thing out then re-finish it once this is all said and done, though... Man, it had a great finish on it until today.
 
Joined
Jul 30, 2021
Messages
249
Likes
77
Location
Aurora, CO
I don't know if anyone uses Claude.ai. It is a useful research tool. Just had a conversation with it about resolving the vinegar issue...pretty interesting:

Q: How do I neutralize white vinegar in a wood workbench top?​

To neutralize white vinegar on a wood workbench top, you can use baking soda, which will neutralize the acid through a simple chemical reaction. Here's how:

1. First, make sure to blot up any excess vinegar with paper towels or a clean cloth if it's still wet

2. Create a paste with baking soda and a small amount of water - just enough to make it spreadable

3. Gently apply the paste to the affected area

4. Let it sit for a few minutes - you may see it fizz a bit as it neutralizes the acid

5. Wipe the area clean with a damp cloth

6. Dry thoroughly with a clean cloth

After neutralizing, since both vinegar and the neutralization process can affect the wood's finish, you may want to:

- Let the wood dry completely for 24 hours
- Lightly sand the area if needed
- Apply a wood conditioner or appropriate finish to protect the surface

How long ago was the vinegar spilled? This will help me give you more specific advice about potential damage to address.

C: Vinegar was spilled less than a day ago. It was sopped up with paper towels a few hours after the spill, and it has been left to dry since then.​

Since it's a relatively recent spill that was sopped up, let's address this right away to minimize any potential damage to the wood. The vinegar being on the surface for a few hours means some acid likely penetrated the wood, but we can still address this effectively.

Here's what to do:

1. Start with the baking soda paste treatment right away:
- Mix baking soda with just enough water to form a thick paste
- Apply it generously to the affected area and slightly beyond
- Let it sit for about 15-20 minutes
- You should see some fizzing as it neutralizes the acid
- Wipe clean with a barely damp cloth

2. Allow the surface to dry completely for about an hour

3. Check the texture of the wood - if it feels rough or raised, the vinegar may have lifted the wood grain. In this case, once fully dry:
- Lightly sand the area with fine-grit sandpaper (220 grit or higher)
- Work in the direction of the wood grain
- Dust off thoroughly

4. Since the vinegar likely stripped some of the original finish, you'll want to reprotect the area:
- If the workbench had an oil finish, apply mineral oil or your usual bench oil
- If it had a different finish, you may need to spot-refinish the affected area

Would you be able to tell me what kind of finish was originally on the workbench? This would help me give more specific advice about the final restoration step.

C: I believe the original finish was wipe on polyurethane.​

Ah, that's helpful - wipe-on poly is actually one of the easier finishes to spot-repair since it bonds well with itself. Here's what I recommend:

1. First, do the baking soda neutralization as described above

2. After it's completely dry (give it 2-3 hours minimum), lightly sand the area with 220-grit sandpaper to ensure the surface is smooth and to give the new poly something to grip to

3. Before refinishing, wipe the area with mineral spirits on a lint-free cloth to remove any dust and check that the surface is truly clean and ready for finish

4. For the poly application:
- Apply thin coats of wipe-on poly with a lint-free cloth
- Let each coat dry completely (usually 2-4 hours)
- Sand very lightly with 320 or 400 grit between coats
- Apply 2-3 coats, or until the sheen matches the surrounding area
- Feather the edges of each coat slightly beyond the affected area to help blend

Wait at least 24 hours after the final coat before putting the bench back into heavy use. The repair may look slightly darker or lighter than the surrounding area at first, but it should blend in better as the finish fully cures over the next few days.

Would you like me to explain any of these steps in more detail?

Q: The surface of the workbench seems to have warped a bit. Should it be planed flat with a hand plane first?​

Yes - if the surface has warped, it's best to address the flatness issue before refinishing. However, before planing, let's make absolutely sure the wood is completely dry to avoid further movement. Since the vinegar can penetrate pretty deep:

1. Wait at least 48 hours after the baking soda treatment for thorough drying. You can aid the drying by:
- Ensuring good air circulation
- Keeping the room temperature steady
- Avoiding any humid conditions

2. Once dry, approach the planing carefully:
- First, check the direction of the grain
- Start with a light cut on your hand plane
- Work diagonally across the warped area first (around 45 degrees to the grain) to quickly remove high spots
- Then switch to planing with the grain for the final passes
- Keep checking for flat with a straightedge from multiple angles
- Be careful not to take off more material than necessary
- Plane a bit beyond the affected area to ensure a smooth transition

After planing, then proceed with the sanding and refinishing steps I mentioned before.

Do you have a way to check that the wood is thoroughly dry before planing? A moisture meter would be ideal, but you can also tell by comparing the affected area's color to the surrounding wood or by touch.

I intended to plane regardless. Just wanted to see what Claude would say. Not sure if I would just sand it. Its too uneven now, and I would be afraid sanding would result in a less than optimal surface. But a longer hand plane I think, should level out the warps nicely.
 
Joined
Feb 28, 2021
Messages
1,396
Likes
1,231
Location
Roulette, PA
Website
www.reallyruralwoodworks.com
I intended to plane regardless. Just wanted to see what Claude would say. Not sure if I would just sand it. Its too uneven now, and I would be afraid sanding would result in a less than optimal surface. But a longer hand plane I think, should level out the warps nicely.
I'd play wait and see - first try and do any neutralizing (water & baking soda mix perhaps) and then give it several days (or a week or two) , might also help to apply some heat to the warped areas of the benchtop (what kind of wood is it anyway? I'd have thought Harbor Freight would have been using MDF or HDF plus laminate - cheap stuff.... unless it is bamboo..)

Wood moves with moisture gain / loss, so if it is allowed to dry completely (assuming it isn't MDF or HDF particleboard) it could easily return to nearly flat & even. However if it was a MDF or HDF particleboard top, then it's pretty much screwed any way you slice it... (I'd as soon go to the building supply store and enough 2x4's when laid side-up to make a benchtop, which is what my workbench is built of...) I can't imagine being concerned with the finish of a workbench top, if it is intended to be used for , well, work..... eventually it is gonna get dings, dents, chips, what have you... my only concern with mine is keeping it flat, and with 3-1/2 inches of thickness, I got TONS or room to plane it down every now and then before I start to hit the construction screws used to hold the boards together (with construction adhesive in between) a #5 jack or #6 fore plane probably would be sufficient for flattening.
 
Joined
Jul 30, 2021
Messages
249
Likes
77
Location
Aurora, CO
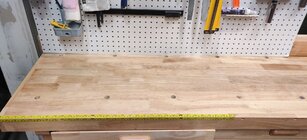
I don't think it was actually a harbor freight brand. It was Taiwanese, or Chinese. Its actually fairly well built. Only 1" thick, but the wood is nice, its well constructed, sturdy, nice drawers. I have three of these now, I think each one was branded differently, but hey are all the same thing.

I've cleaned it with water and baking soda. It did not sizzle or fizzle, it actually looked like the water vanished pretty much instantly, so it probably soaked into the wood. It dried of pretty quickly though. They are nice work benches, for the price. I've seen similar workbenches listed for $1200-$1800 or more. They are thicker on the benchtop, similar in design (but probably more sturdy, the legs and cross braces are usually bigger.) Most only have one row of drawers, or with some of the more expensive ones they have full cabinets. When I bought these, first one was late 2020, then a couple more at different times in 2021, I was very new to woodworking, and only did turning and nothing else. As I get into other things, though, the benchtop becomes more important. I think each of these were $120 or $130 each. So I think I spent less than $400 total on all three. For a beginner woodworker, its a pretty darn good price. ;)
IMG_20241123_202756.jpg

IMG_20241123_202800.jpg
 
Back
Top