• January Turning Challenge: Thin-Stemmed Something! (click here for details)
  • Conversations are now Direct Messages (click here for details)
  • Congratulations to Scott Gordon for "Orb Ligneus" being selected as Turning of the Week for January 20, 2025 (click here for details)
  • Welcome new registering member. Your username must be your real First and Last name (for example: John Doe). "Screen names" and "handles" are not allowed and your registration will be deleted if you don't use your real name. Also, do not use all caps nor all lower case.

Planing small boards?

I'd rather buy Harbor Freight than WoodRiver. 😉 Jokes aside, my lack of confidence in WoodRiver stems from to two sets of forstner bits that would not cut AT ALL. Horrible product. I switched to Fisch Wavecutters and they are amazing (albeit 3 times the money). In fairness, I do have a WoodRiver round scraper that seems OK.
I started with a Harbor Freight #4 which is now a dedicated scrub plane. It isn't fit for much else, sole was nowhere near flat, chip breaker was messed up, blade couldn't hold a decent edge, etc. I only might recommend it for someone afraid of catastrophically messing up restoring a vintage plane. I have a WoodRiver 5 1/2 and have no issues with it, I actually don't remember the last time I sharpened. I also have a set of forstner bits from WoodRiver and they are hit and miss. One bit cuts like butter and another is a pain in the butt.

On the flip side, I have many other Harbor Freight items including my lathe which works well.
 
Paul Sellers, prepping flat boards'
View: https://youtu.be/m231_HKCOWs?si=fgdDT-wX-PX1xXbs

(While there, search his "The Three Joints" videos (3 separate videos), showing how to cut dovetails, mortise and tenon, and dado joints, all with basic hand tools.)

Christopher Schwarz, same-
View: https://m.youtube.com/watch?v=2_96gNMMc_g


Mike Siemsen, same-
View: https://m.youtube.com/watch?v=oEdgF8NDsB0


3 different authoritative sources showing time honored methods to prep flat boards with basic, classic handtools and methods.

Flattening with power tools, a jointer is first used to establish one flat surface, and then a powered planer or drum sander will use that flat surface (face down on the bed) as a reference to flatten the other surface parallel. A power planer or drum sander alone, with no jointer used first, will make it tough to get parallel face surfaces. But, a couple hand planes (#4 and maybe a #5 for somewhat larger boards) and 2 winding sticks, and a bit of practice, can create flat boards with parallel faces for much less money, noise, and equipment footprint vs. electric machines. And for smaller work, like display or presentation boxes, hand work has my vote over machines. Just takes some practice, and sharp blades.
 
Not knowing exactly what equipment Jon (the OP) currently has it's hard to make a recommendation. Most wood comes as either nominally 3/4" smooth planed or 1"+ rough sawn. So how do you get down to the desired 1/4" thick? A hand plane certainly doesn't sound like a good way to be removing 1/2" of material.

If my project was smallish boxes I might want highly figured wood. My experience with my 12 Powermatic planer highly figured wood didn't plane well with it's changing grain directions. Birds eye maple would chip out at the eyes. When we started doing lots of figured wood I bought the narrowest Italian thickness belt sander I could find. That sander would chew right through the worst wood with no issues. The thought of hand planing doesn't appeal to me.

I mentioned before using a hand held router to surface boards like the slab table makers do. That's a well proven way with a homemade jig setup. A similar method can be done on a table saw by supporting the blank on both edges and running over a dado blade. With both these methods final finish can be achieved with light scraping and/or sanding.

Investing in hand planes would be so far down on the list of possible methods it wouldn't even be a consideration for me.
 
Do not remember what I started with but probably a Craftsman used #5. Not the worst but not good. Most of what I have are Stanley Baileys. The blade you have makes a difference too I have a Hock in a #8 and a Pinnacle in a #7. it really made a difference. I did not read everything but Ron Hocks book is a good reference. Oh and I now have 28 planes of all sorts and yes a few are antiques but useable.
 
I'd rather buy Harbor Freight than WoodRiver. 😉 Jokes aside, my lack of confidence in WoodRiver stems from to two sets of forstner bits that would not cut AT ALL. Horrible product. I switched to Fisch Wavecutters and they are amazing (albeit 3 times the money). In fairness, I do have a WoodRiver round scraper that seems OK.
I had a similar experience. WoodRiver forstners that either would NOT cut, or if they did, they burnt the wood in seconds. I switched to Fisch Wavecutters and I've never looked back. Vastly superior product, cuts wood like its butter, no problems ever.

My general problem with WR is the products aren't that great, but they are very expensive. If they had the quality, the price wouldn't necessarily be a problem, but the quality is usually not really there, and the prices seem extreme.
 
Not knowing exactly what equipment Jon (the OP) currently has it's hard to make a recommendation. Most wood comes as either nominally 3/4" smooth planed or 1"+ rough sawn. So how do you get down to the desired 1/4" thick? A hand plane certainly doesn't sound like a good way to be removing 1/2" of material.

If my project was smallish boxes I might want highly figured wood. My experience with my 12 Powermatic planer highly figured wood didn't plane well with it's changing grain directions. Birds eye maple would chip out at the eyes. When we started doing lots of figured wood I bought the narrowest Italian thickness belt sander I could find. That sander would chew right through the worst wood with no issues. The thought of hand planing doesn't appeal to me.

I mentioned before using a hand held router to surface boards like the slab table makers do. That's a well proven way with a homemade jig setup. A similar method can be done on a table saw by supporting the blank on both edges and running over a dado blade. With both these methods final finish can be achieved with light scraping and/or sanding.

Investing in hand planes would be so far down on the list of possible methods it wouldn't even be a consideration for me.

The local woodcraft has small dimensional wood. Lots of exotics, like ebonies, rosewoods, various colored woods (redheart, yellowheart, osage orange, etc.) They have pieces usually 2-4 feet long, 2-4 inches wide, anywhere from 1/2" thick down to 1/16th in some cases. I have...I guess its mostly 2 foot long 2-3" wide, an 1/4" or 1/8" thick. So I don't necessarily have to plane the boards to thickness. My main interest was hand planing to smooth, as the boards are often not smooth...with clear snipes, waviness, etc. that are characteristic effects of rapidly shoving tons of boards into a thickness planer without a lot of care. 🤷‍♂️

I have one router...its big, bulky, and not easy to use handheld. I am not particularly proficient at it, and I am wary of using it on thin stock, say 1/8" thick? I mean, the stock is already flat, it just doesn't necessarily have a nice clean surface, and occasionally one end is a bit warped. I usually try to pick boards with two key characteristics: great grain, and minimal to no warping. I've had a couple of these pieces for close to a year (or maybe over a year now), and they must not have been 100% dry, as they are very slightly warped in some places. But for the most part, most of these boards are small, flat, and pretty much ready...they usually just have kind of a janky surface quality. Certainly not the kind I'd want to use in a product I would sell.

I can get some photos to show what I'm talking about, and why I was thinking hand planing was probably the best way to deal with the issue.
 
So I don't necessarily have to plane the boards to thickness. My main interest was hand planing to smooth, as the boards are often not smooth...with clear snipes, waviness, etc. that are characteristic effects of rapidly shoving tons of boards into a thickness planer without a lot of care. 🤷‍♂️
A card scraper will remove those waves or hand sanding would also work.
Stanley made a "cabinet scraper" which had 2 handles, a sole plate, clamps to hold the blade and a thumb screw to bend the blade into the work. Lee Valley has a similar cabinet scraper listed in their on line catalog.
 
A card scraper will remove those waves or hand sanding would also work.
Stanley made a "cabinet scraper" which had 2 handles, a sole plate, clamps to hold the blade and a thumb screw to bend the blade into the work. Lee Valley has a similar cabinet scraper listed in their on line catalog.

I second that suggestion. I have the Veritas version and have sharpened the scraper and handed it to people who have never touched a scraper before. One of my sons resurfaced a butcher block table with it after 30 seconds of instruction.

JKJ

That is the beauty of a burred scraper (cabinet scrapper or card scraper) it will cut thru the the grease and crud where as sandpaper will gum up and stop cutting.

I actually have a set of scrapers... I forgot about them, but, I guess I can give them a try. Some of the boards, though, have enough sniping and other damage done to the surface, that I don't think a scraper will do the job. I have been reworking my Etsy store today, and I haven't gotten photos of the boards that have issues. I'll try to do that shortly here.
 
Paul Sellers, prepping flat boards'
View: https://youtu.be/m231_HKCOWs?si=fgdDT-wX-PX1xXbs

(While there, search his "The Three Joints" videos (3 separate videos), showing how to cut dovetails, mortise and tenon, and dado joints, all with basic hand tools.)

Christopher Schwarz, same-
View: https://m.youtube.com/watch?v=2_96gNMMc_g


Mike Siemsen, same-
View: https://m.youtube.com/watch?v=oEdgF8NDsB0


3 different authoritative sources showing time honored methods to prep flat boards with basic, classic handtools and methods.

Flattening with power tools, a jointer is first used to establish one flat surface, and then a powered planer or drum sander will use that flat surface (face down on the bed) as a reference to flatten the other surface parallel. A power planer or drum sander alone, with no jointer used first, will make it tough to get parallel face surfaces. But, a couple hand planes (#4 and maybe a #5 for somewhat larger boards) and 2 winding sticks, and a bit of practice, can create flat boards with parallel faces for much less money, noise, and equipment footprint vs. electric machines. And for smaller work, like display or presentation boxes, hand work has my vote over machines. Just takes some practice, and sharp blades.
Thank you so much! I think you understood the "assignment" best! Your last paragraph pretty much summed up my goal...to do it by hand, to learn some new woodworking skills, and to not spend a lot of money. I'd LOVE to have all the machines...I am a fan of machines, but they just aren't in the budget right now.

Plus, I am looking forward to learning some classic woodworking skills. I really want to learn how to hand plane, even if its harder, not as efficient, not as fast, etc. Its a classic skill, and I really love the design of hand planes, so I'm quite looking forward to this little adventure.
 
If my project was smallish boxes I might want highly figured wood.

Investing in hand planes would be so far down on the list of possible methods it wouldn't even be a consideration for me.

So, if you already had wood of the right dimensions...where you did not have to remove significant amounts of wood with a hand planer, but instead only had to smooth out and level the boards you had... Would you use a hand plane? The boards I have do have good grain and sometimes figure (awesome figure hasn't been easy to find in these pre-sized boards...photos coming shortly here.) But, most DO have nice grain in general. Now, some don't necessarily, but, I was also thinking I'd use some of these first to get the hang of things, as I'll undoubtedly screw the first couple or so up in some way. So I wasn't really looking for the most exquisite wood either. I figure if I really wanted a truly EXQUISITE grain, I could probably work with some veneer...that's another skill I do not have, but I do know that I could probably veneer PHENOMENAL grain onto a more basic wood if I wanted something that really popped. I know veneering is a whole different ball of wax, and its not what I'm looking to do right now...

Anyway. FWIW, and I know I mentioned this in my previous reply, the boards are really already sized. They just need to be cleaned up. I could sand...but so many people have told me that hand planing will deliver a better surface than sanding, period, and in my limited experience so far, I can see why they say that. I won't need to plane off half an inch of material. I suspect for the most part, 1/32nd is probably the most I'd ever need to plane off, more likely a 64th or 128th on boards that are already in pretty good shape? I assume a hand plane would work well for that, right?
 
for the most part, 1/32nd is probably the most I'd ever need to plane off, more likely a 64th or 128th on boards that are already in pretty good shape? I assume a hand plane would work well for that, right?
I have to agree with Russell in the previous posting. Use a scraper. Youtube has some videos on scraping, a nice one I was listening to in the background while doing something else covered scraping very well. Plus, it's very inexpensive compared to planes.

I don't know enough about planes to know if removing these small amounts would work well. I have a feeling it would take a good bit of practice and a good plane.
 
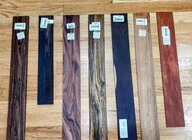
Ok. Sorry, phone died last night and wasn't able to get photos. Here are some of a few of the boards I have picked up this year:


IMG_20241115_114939-EDIT.jpg

Thickest on the left, thinnest on the right: 3/8", 1/4" and 1/8" (I think there are some that are 3/16" and I don't know if there are any thinner than 1/8", but they also have up to 1/2" and I have a few half inch boards as well.) These are all small scale pre-cut/planed dimensional wood.

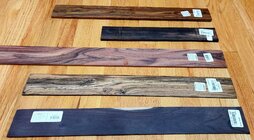
IMG_20241115_114946-EDIT.jpg

Most of these were grain picks, where I grabbed the single nicest grain board at the time that did not have warping. The Katalox was originally quite flat, but it seems its warped a bit since I bought it, sadly. Most are still quite flat...not 100% perfect, but mostly. Grain wise, I think they would make for nice boxes.

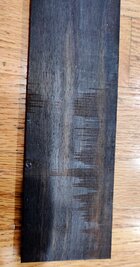
The issue with a lot of them, and the reason I was thinking about hand planing, is this stuff:

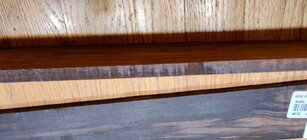
IMG_20241115_114956-EDIT.jpgIMG_20241115_115008-EDIT.jpg

Pretty janky. Sometimes these are close to a millimeter deep? My honest question is...can a cabinet scraper fix this kind of issue? And, also, can a cabinet scraper keep the entire board flat while doing so? I assumed that a planer would be required to fix this, and keep the boards truly flat, given teh nature of the issue. This is what I need to fix. The store staff, one guy in particular, talks about cutting up the wood they sell. I don't think he cares much about the final quality, and some of the boards they sell are in a lot worse condition than this. Looks to me like too fast of a feed rate and probably also dull cutting edges. With both table saw and planer, I would guess. In any case, the truly flat boards, usually have this...hence the thread! 😛
 
Not sure if it's been mentioned, hand planing some crazy grain/reversing grain can lead to some tear out. That where a card scraper excels.

I am curious what grain would qualify? I don't have any burl...I figured if I wanted burl, I'd learn how to use veneer for that instead of using boards (burl boards, if you can even find them, are psychotically expensive in my experience!!)

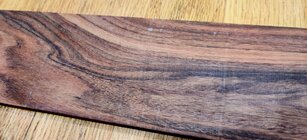
This is another photo, showing the grain of a bolivian rosewood board:

IMG_20241115_115026-EDIT.jpg

You can see the wavyness in the surface from the planer. There are also lines where...I dunno, I actually don't know enough about planers to know what causes them, but many of the harder of these dimensional woods get them. I figure it wouldn't take much to plane this wood to a PRISTINE clean, smooth, perfect surface. I wouldn't even want to take off 1/64th if I could avoid it, but, I don't yet know how thin you can actually go with a hand plane...
 
I wouldn't even want to take off 1/64th if I could avoid it, but, I don't yet know how thin you can actually go with a hand plane...
A properly set up and sharpened hand plane can take ribbons as thin as .0005" (Half a thousandth of an inch) or even less that you could throw in the air and it just floats down like gossamer....
 
A well-tuned hand plane is an efficient and effective hand tool for cleaning up skip-planed lumber with snipe. When I say well-tuned I mean sharp with a properly shaped chipbreaker set very close to the cutting edge, a flat sole, a good blade with proper support from a well-bedded frog. With those conditions met you can get a tearout free surface on most woods, but a less than optimal setup will make a mess on figured material. Getting an old plane in that condition takes elbow grease, patience and finesse. A cabinet scraper (scraper blade set up in a plane-like body) is safer but far slower than a plane- the difference is comparable to that between using a gouge and a negative rake scraper on a bowl. A card scraper is capable of producing a fine surface but is not what you want for taking off much material while maintaining a flat surface.
 
Last edited:
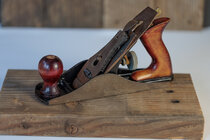
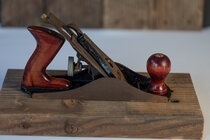
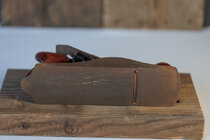
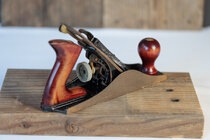
The plane I ordered arrived. It was $14 with $7 shipping. Even if its not going to be useful for the use case I had in mind, it was not expensive, and its in decent condition. Its a Dunlap (I think that was Sears?) Stanleys were a good deal more expensive, so I passed on those for now. But there do seem to be plenty out there on eBay. Anyway, this was cheap, so I can learn how to restore it, and if I botch it, well, no big deal.

Dunlap 9 Inch Hand Plane - 1.jpg

Dunlap 9 Inch Hand Plane - 2.jpg

Dunlap 9 Inch Hand Plane - 3.jpg

Dunlap 9 Inch Hand Plane - 4.jpg
 
Do check out Rex Kruger on You Tube for how to fine tune a hand plane.

robo hippy

Apparently, I'm already tuned into Rex! I watch his shorts all the time, and watching his little videos on planes is partly what inspired me to start this thread. I've already learned a bit from him, and he has some of THE MOST practical advice around!
 
Good for you, Jon, with that old Dunlap. It looks pretty similar to the Stanley #4 smoothing plane. Paul Sellers has tons of videos he made over the past dozen years or so, and the hand planes are at the center of his work life. He's got some videos of rehabbing that old iron. Don't worry about making it perfect. The bottom does not need to be flat to .0001". "Reasonably" flat, the adjustable parts clean and lightly lubed, and a sharp-sharp-sharp blade will go far to give great results. (I've mastered both Sellers' and Schwarz's methods of plane blade sharpening, and I do now follow Schwarz's method and stone suggestions. It's more/less Ford/Chevy...)

I've not made a lot of small boxes like you want to do, but my first one was definitely for practice (or fire bin). The second now lives on my work bench. The third one is treasured by my wife. See where I'm going...? Your learning progress and results will probably be similar. Jump in, frustrations will turn to fun pretty quickly.

Sellers, Schwarz, and Siemsen will also show you how to build proper workbenches for doing this kind of work. Rex Kruger, too. And then... then... then you'll find yourself doing as much flat work as turning. Have fun!

Ah! Now that I am watching, I've been watching Paul Sellers for years, too! 😀 I'm really bad with names, so I don't know these people like some of you do...but, I do know them as I've definitely watched their videos before. Watching one of Sellers' plane restoration videos now.
 
Ah! Now that I am watching, I've been watching Paul Sellers for years, too! 😀 I'm really bad with names, so I don't know these people like some of you do...but, I do know them as I've definitely watched their videos before. Watching one of Sellers' plane restoration videos now.
Not to derail the conversation too much, but it's weird how one innocent, seemingly miniscule nudge of one's attention can lead down a whole new road of discovery. 29 years ago to the month, flat work was put in cold storage in my mind and turning entered my life. About 3-4 years ago, I saw something woodworking-like being prepped for a class at a local park. "Whatchya doin?" I asked. "Getting ready for a wood spoon carving class..." Huh?! Rabbit hole? More like a giant sink hole. 4 hours of home-study and later that afternoon I knew more about carving wood spoons than I ever would have expected. "But a proper workbench in my shop would help me with this as well..." A couple days later, Mr. Sellers and his bench building methods enter my life, and a couple hundred dollars of covid-priced lumber was in my garage. Then Chris Schwarz and Rex Kruger invited themselves to the party in my head. Geez! My little turning shop is bursting at the seams with new-found, and rediscovered interests. Utter madness!! Enjoy!
 
Yes you will want to plane those heavier marks away. On some woods with reversing grain, or quilting, even with a wonderfully set up smoothing plane you can get tearout. That's where the card scraper excels.
The reality is that the outside of your box doesn't necessarily need to be perfectly flat. flat and square matter for referencing. Your reference face and edge need to be perfectly flat( in a box, typically the inside faces for joinery and whatever edge you'll be referencing for your groove for the bottom or top, depending on how you'll be constructing the box. You can always plane the outside of the box after it's built to clean things up as well as flatten the top/bottom. Show surfaces usually need to be pretty, not perfectly flat.
I know I'm not doing a great job explaining what I mean, words aren't always my strength.
 
The lines on the boards come from the bandsaw that was used to rip the boards from thicker stock. One option is to put the marks on the inside and then use a card scraper to remove the lines if you can't plane them out without drastically thinning the board. With some of the carbide blades out now, you can get almost defect free boards.

Glad you like Rex. When I first commented on one of his videos, he said he had watched all of my turning videos.

robo hippy

Oh yeah, I guess it could be the bandsaw blade. I thought they also put em through a planer as well, though. They do have pretty even thickness.

Rex is great. He shared a hand plane cleanup short today. I just love his shorts! He's blunt, direct, and PRACTICAL! 😀 I like his practicality. I used to spend a ton of money on my "hobby", but its become a business now, and I'm becoming extremely frugal now. So his practical tips and recommendations resonate a lot with me now, I guess.

Yes you will want to plane those heavier marks away. On some woods with reversing grain, or quilting, even with a wonderfully set up smoothing plane you can get tearout. That's where the card scraper excels.
The reality is that the outside of your box doesn't necessarily need to be perfectly flat. flat and square matter for referencing. Your reference face and edge need to be perfectly flat( in a box, typically the inside faces for joinery and whatever edge you'll be referencing for your groove for the bottom or top, depending on how you'll be constructing the box. You can always plane the outside of the box after it's built to clean things up as well as flatten the top/bottom. Show surfaces usually need to be pretty, not perfectly flat.
I know I'm not doing a great job explaining what I mean, words aren't always my strength.

Yeah, ok. I can see how reversing grain, or burl, etc. could become problematic. Does the sharpness of the planer blade matter there? I've also read and heard (But not yet seen how to do this) that the blade needs to be sharpened with a slight curvature to prevent the corners from digging. I don't know if that would help.

Besides just the flattening aspect... I'm a sander. I spend a lot of time sanding. For things I can sand to a very high grit, I like the results I get, but oil based finishes will often then not penetrate. Sanding to 320 or 400, sandpaper will still often leave a less than perfect wood surface, and I don't like scratches that show through (hard to eliminate, but its become an annoying pet peeve). One of my hopes, was that I could plane the surfaces so they wouldn't need sanding, would offer the kind of smoothness that requires 1200 grit or more, but would still have open pores for finish. Is it easier to do that before assembling the box, or after? (I would imagine before, right?)
 
Not to derail the conversation too much, but it's weird how one innocent, seemingly miniscule nudge of one's attention can lead down a whole new road of discovery. 29 years ago to the month, flat work was put in cold storage in my mind and turning entered my life. About 3-4 years ago, I saw something woodworking-like being prepped for a class at a local park. "Whatchya doin?" I asked. "Getting ready for a wood spoon carving class..." Huh?! Rabbit hole? More like a giant sink hole. 4 hours of home-study and later that afternoon I knew more about carving wood spoons than I ever would have expected. "But a proper workbench in my shop would help me with this as well..." A couple days later, Mr. Sellers and his bench building methods enter my life, and a couple hundred dollars of covid-priced lumber was in my garage. Then Chris Schwarz and Rex Kruger invited themselves to the party in my head. Geez! My little turning shop is bursting at the seams with new-found, and rediscovered interests. Utter madness!! Enjoy!

Aye. This one's been bugging my brain for about a year now. Wanted to start some time ago, but life has been preventing me. I am trying to keep it reigned in a bit...JUST boxes. Not boxes and tables and ...and...AND!! 😛
 
I'm not an expert but heres my take on your questions.
There's a few schools of thought when it comes to preventing plane tracks. Paul sellers does not sharpen with a camber. In his videos you'll see him lift the iron and slightly round off the corners, achieving the same thing.
If I'm sharpening my irons freehand I do this.
If I'm sharpening my irons in a jig, then I do a slight camber, basically by putting more pressure to the outside of each side of the jig for a few extra strokes, easy to do in an eclipse style jig, slightly tougher in the veritas mkII jig.

On a smoothing plane iron you don't need too much camber because you should just be taking wispy shavings. A little more camber can be helpful when taking heavier cuts, but then when I'm taking heavier cuts I'm not so worried about plane tracks because I'll be hitting it with a smoothing plane to finish the surface.

Sharpness of the iron is probably the
most important aspect. Smoothing iron should be the sharpest you can possibly get it. Sharpening is its own religion when it comes to hand tool woodworking.(most people tend to think their method is the only way to salvation) My advice, pick a method, stick with it till you're really good at it. The first time you think you're sharp, you probably still aren't. If the plane cuts with no downward pressure you're getting close to sharp.

As for an oil finish, I'm not too sure. The plane sole does tend to burnish the wood a bit, I would think the end result woule be sort of equivalent to high grit sandpaper. Any boxes I've built I tend to finish with shellac for simplicity.
When you get your plane prepped and ready to go, grab some scrap lumber and build yourself some practice boxes to familiarize yourself with the steps etc... much easier building a bigger box

Thanks for the advice.

Camber. I have heard that word so many times over the last week, but for some reason I just couldn't bring it to mind. Thanks! 😉

I hear you on the sharpening. I guess if most of my starting work would be smoothing, maybe I don't need to worry about camber so much. And put my focus into getting a truly sharp blade. I was watching videos on sharpening butchers knives for a while, so I understand the nature of how everyone has their technique (I don't think I've ever seen two people sharpen a butcher knife the same way!) Once I get this first plane cleaned up and tuned up, I'll dive into the art of sharp.

Interesting point about the plane burnishing... Well, I guess I'll see how it goes. I do intend to make some practice boxes. I guess I was thinking of making small boxes just with cheaper boards (found some maple for $7 each), but maybe I should go bigger to start. Not have to worry about the quirks of small...
 
I'll add, too, small projects (smaller turnings, smaller flat board work, spoon carving, etc.) is all that really interests me anymore. Same skills used as in the big stuff, but manageable for my patience/tolerance, tools and equipment, and pocketbook. Sellers has some videos where as he's teaching how to cut dovetails and dados, he making small boxes that he keeps near his bench for holding hand tools, such as bench chisels and similar. That is where my interest and comfort levels are. It's been 20 years since my last piece of household furniture was made, and I do not miss that process at all.
 
I'll add, too, small projects (smaller turnings, smaller flat board work, spoon carving, etc.) is all that really interests me anymore. Same skills used as in the big stuff, but manageable for my patience/tolerance, tools and equipment, and pocketbook. Sellers has some videos where as he's teaching how to cut dovetails and dados, he making small boxes that he keeps near his bench for holding hand tools, such as bench chisels and similar. That is where my interest and comfort levels are. It's been 20 years since my last piece of household furniture was made, and I do not miss that process at all.
Yeah, I like small stuff. 🙂 And I am also VERY interested in getting into joints. I really love the whole concept of japanese jointery, but that's not my short term goal. I do want to try and get some of the classic joints figured out on a small scale., though. I have a few japanese pull saws and stuff. I need to get some smaller chisels to clean up edges and whatnot. My thought for the first box was just a couple of simple joints. I don't know if there is a name for them, basically two opposed Ls? But longer term, I'd like to use multiple types of wood, say one type for front/back, another contrasting type and color for the sides, and use nice joinery to attach them. I love the look of a quality joint!
 
A small 110 volt bench planer is cheaper than a couple of hand planes and does a great job of short, thin stock. I got nothing against hand planes and have a half dozen or so. But...I plane my thing stock on the power tool.
 
A small 110 volt bench planer is cheaper than a couple of hand planes and does a great job of short, thin stock. I got nothing against hand planes and have a half dozen or so. But...I plane my thing stock on the power tool.

This surprises me... I've been looking at bench planers for over a year, and it looks like it would be around a grand for a decent one... I've looked at Jet, Laguna, even a Grizzly seemed to be seven or eight hundred bucks?

I've been looking at vintage hand planes on Etsy, and even if I bought several Stanley's, it would be a couple hundred... (And if I go with cheaper brands, even less...) Unless you are talking brand new hand planes?
 
Yeah, I like small stuff. 🙂 And I am also VERY interested in getting into joints. I really love the whole concept of japanese jointery, but that's not my short term goal. I do want to try and get some of the classic joints figured out on a small scale., though. I have a few japanese pull saws and stuff. I need to get some smaller chisels to clean up edges and whatnot. My thought for the first box was just a couple of simple joints. I don't know if there is a name for them, basically two opposed Ls? But longer term, I'd like to use multiple types of wood, say one type for front/back, another contrasting type and color for the sides, and use nice joinery to attach them. I love the look of a quality joint!
Jon, your opposed L joint, are you thinking of this? A locked rabbet joint, uses a rabbet and a dado, both completely doable with hand tools. Or quick on a tablesaw... A video from Fine Woodworking-
View: https://youtu.be/_V8MS0RDxCw?si=0uWryx5kVwmIsaO3

And from the Stumpy Nubs site, same joint from a router table-
View: https://youtu.be/QyokX-BK7FQ?si=GV56rC0-IFsmFDjy
 
Last edited:
This surprises me... I've been looking at bench planers for over a year, and it looks like it would be around a grand for a decent one... I've looked at Jet, Laguna, even a Grizzly seemed to be seven or eight hundred bucks?

I've been looking at vintage hand planes on Etsy, and even if I bought several Stanley's, it would be a couple hundred... (And if I go with cheaper brands, even less...) Unless you are talking brand new hand planes?
I think what he refers to is the small "lunchbox" planers, if you catch one on sale, they can be had for under $300 ... and these CAN be quite effective (I regularly plane stock to as thin as 1/8 inch thick no my DeWalt DW734) Or perhaps he refers to the power hand planers (handheld power tool, almost looks like a handheld belt sander) ither case, I suspect it is a bit of exaggeration to say a it'd be cheaper than a couple used Stanleys, which can be had for as little as $25 to $50 (I have a restored 4-1/2 I've been trying to sell at $50 with no takers, probably going to have to drop the price and offer shipping (and I hate boxing and packing and shipping stuff...))
 
I own a Bosch handheld power planer. I'd say it's a rough-duty tool (remove lots of meat at early stages), not for fine woodworking. It'll plane door edges just fine, but the sharp ends of the blades leave track marks if planing a surface wider than the blade. It would be a good idea to hone away those sharp ends of the cutting blades to alleviate this tendency.
 
A locked rabbet joint, uses a rabbet and a dado, both completely doable with hand tools.
This joint is cut across the grain and would be extremely difficult to do with hand tools. The dado would require a plow plane with scoring cutters on both sides and then it would still be a very rough cut on those end grain sides.
Hand cut dovetails would be much more doable, better looking and there is a multitude of info on the process available.
 
Jon-
make a hand plane sled. Take a decent, flat piece of plywood, rip 2 pieces of wood to the finished thickness that you want, and fasten them to the plywood, spacing them parallel and a little more than the width of the board(s) you want to thickness. Add a stop block of some kind at one end to keep the board in position. The stop block should be a little thinner than the 2 side pieces so that the plane doesn't hit it and move it. If you have a lot to remove, do that planing outside the sled, then do the last few passes on the sled. I'd probably use a # 4 or # 5 for this.
This is a surprisingly fast and accurate way to make thin boards.
 
Jon, your opposed L joint, are you thinking of this? A locked rabbet joint, uses a rabbet and a dado, both completely doable with hand tools. Or quick on a tablesaw... A video from Fine Woodworking-
View: https://youtu.be/_V8MS0RDxCw?si=0uWryx5kVwmIsaO3

And from the Stumpy Nubs site, same joint from a router table-
View: https://youtu.be/QyokX-BK7FQ?si=GV56rC0-IFsmFDjy

Yes, like that, but only for the sides to base joints. The idea was with hand tools, but I do have a table saw if it becomes necessary. No dado blades, but I could cut a rabbit with multiple passes if need be (although, with the smaller stock for small boxes, probably wouldn't be required.
 
I own a Bosch handheld power planer. I'd say it's a rough-duty tool (remove lots of meat at early stages), not for fine woodworking. It'll plane door edges just fine, but the sharp ends of the blades leave track marks if planing a surface wider than the blade. It would be a good idea to hone away those sharp ends of the cutting blades to alleviate this tendency.

I actually have a handheld power planer. Used it to repair parts of my deck and level joists. But its a pretty rough duty tool indeed...I don't think I'd ever use it on exotic wood stock.
 
Back
Top