• November Turning Challenge: Puahala Calabash! (click here for details)
  • Congratulations to Paul May for "Staircase Study #1" being selected as Turning of the Week for November 11, 2024 (click here for details)
  • Welcome new registering member. Your username must be your real First and Last name (for example: John Doe). "Screen names" and "handles" are not allowed and your registration will be deleted if you don't use your real name. Also, do not use all caps nor all lower case.

Planing small boards?

Joined
Jul 30, 2021
Messages
187
Likes
61
Location
Aurora, CO
I've been woodworking since 2020, although since the latter part of 2021 through late 2023, I hardly did much (mostly just pens.) I got back into my other turning this year...including bowls, platters, vases, ornaments and decorative items, and turned boxes. Boxes, and maybe other kinds of wood working, is something I'm more interested in. Not just turned, but more classic types of boxes. As pens are also a staple type of turning, I've been wanting to start making smaller boxes for pens...or maybe sets of two pens, or a pen and a letter opener.

I looked into some articles and videos on box making, and I understand the basics. But most of it was for boxes larger than I would need for pens, or even some of the other small boxes I'd be interested in (to start, anyway)...such as jewelry boxes. Most of the boxes I'm interested in, I figure the wood thickness would be 1/4" or even thinner. For a decent pen box, maybe 1/8" is more likely.

I don't have a thickness planer, and ATM cannot afford one. So I've been looking at buying and restoring vintage hand planers. You can often find them for around $10-20 on ebay, often with free shipping, so its a real steal if they can be cleaned up, fixed up, and sharpened and honed properly. The thing that has caught me, here, as I'm trying to learn what planers I'd need, is how to actually plane smaller boards. I would say, the first few pen boxes I'm thinking of making, are probably going to be about 6" or so long, and an inch or so wide. Maybe with a hinged lid, maybe with magnetic lids. So, pretty small boards...1/8" thick? I suddenly realize I have no clue where to start when it comes to planing such small boards so they have not only even thickness along their length and wide surfaces...but also have the same heights and lengths. I know you can do edge joint planing to make two edges compatible with each other. However, I'm failing to see how that would work, if the planer, even say a #9 smoothing planer, is likely going to be much, much larger than the boards?

Are there smaller types of planes that would get the job done better? Are there certain kinds of jigs I could put together to make planing, jointing, etc. such small pieces of wood easier? Any other insights or resource links are welcome as well.
 
Joined
Aug 14, 2009
Messages
2,330
Likes
1,411
Location
Peoria, Illinois
"as I'm trying to learn what planers I'd need" You are the planer, you are asking about hand planes. It's extremely difficult, (basically imposssible) to teach someone how to use hand planes in a couple of paragraphs. I've been woodworking since 1972. If you are tight on money, just buy the Chinese pen boxes. You can buy them for about the price of your material.
View: https://www.youtube.com/watch?v=hvBUEv34TDc
 
Joined
Apr 1, 2019
Messages
406
Likes
301
Location
Bashaw, Alberta
One way you could do it would be to buy thin plywood and build your boxes from that.
Restoring a plane takes some time and practice to get right, as does getting a razor sharp plane iron.
Check out some you tube videos, Paul sellers has a good one on restoring(to proper function, not show room looks) a Stanly # 4.
A dab of ca glue can hold thin pieces to the bench for hand planing, or some double stick tape.
Tiny boxes are harder than learning on larger boxes.
You'll also want a good square, marking knife, a good saw( some good Japanese ones out there for cheap) and lots of patience.
Lots of good videos on YouTube for dimensioning lumber with hand tools.
 
Joined
Oct 27, 2022
Messages
46
Likes
83
Location
Auburn, CA
I've been woodworking since 2020, although since the latter part of 2021 through late 2023, I hardly did much (mostly just pens.) I got back into my other turning this year...including bowls, platters, vases, ornaments and decorative items, and turned boxes. Boxes, and maybe other kinds of wood working, is something I'm more interested in. Not just turned, but more classic types of boxes. As pens are also a staple type of turning, I've been wanting to start making smaller boxes for pens...or maybe sets of two pens, or a pen and a letter opener.

I looked into some articles and videos on box making, and I understand the basics. But most of it was for boxes larger than I would need for pens, or even some of the other small boxes I'd be interested in (to start, anyway)...such as jewelry boxes. Most of the boxes I'm interested in, I figure the wood thickness would be 1/4" or even thinner. For a decent pen box, maybe 1/8" is more likely.

I don't have a thickness planer, and ATM cannot afford one. So I've been looking at buying and restoring vintage hand planers. You can often find them for around $10-20 on ebay, often with free shipping, so its a real steal if they can be cleaned up, fixed up, and sharpened and honed properly. The thing that has caught me, here, as I'm trying to learn what planers I'd need, is how to actually plane smaller boards. I would say, the first few pen boxes I'm thinking of making, are probably going to be about 6" or so long, and an inch or so wide. Maybe with a hinged lid, maybe with magnetic lids. So, pretty small boards...1/8" thick? I suddenly realize I have no clue where to start when it comes to planing such small boards so they have not only even thickness along their length and wide surfaces...but also have the same heights and lengths. I know you can do edge joint planing to make two edges compatible with each other. However, I'm failing to see how that would work, if the planer, even say a #9 smoothing planer, is likely going to be much, much larger than the boards?

Are there smaller types of planes that would get the job done better? Are there certain kinds of jigs I could put together to make planing, jointing, etc. such small pieces of wood easier? Any other insights or resource links are welcome as well.
Take a look at some YouTube videos on making kumiko strips. Good techniques for hand planing thin material. A thickness planer is not what you want for 1/8” material.
 
Joined
Jan 8, 2021
Messages
337
Likes
454
Location
Wrentham, MA
I use hand planes a lot for my flatwork. Even occasionally for turning related items - say ripping thin stock for accents in a segmented or staved piece, then planing the saw blade marks off of them. Key to planing thin is to make a jig to hold work from slipping. For the size work the OP described, my recommendation would be a #4 or #5 plane, which also happen to be the really common ones.

Making the jig - get a piece of FLAT plywood a bit larger than you need. Glue down two thin strips of wood at 90* angles, one at the end, and one on side away from you. Your stock will rest against these. Clamp the plywood to your bench, or otherwise place it so it can't move. Place your stock on the plywood and plane towards the strips of wood. This technique can be used down to 1/16" or so with care. It will take practice to end up with a flat face.

For making boards square on all sides, takes practice, and a couple more tools than just a plane. A good marking gauge is needed to set and mark the thickness and width of the stock, before you plane to that line. Build a shooting board to plane the ends square is vital, and is a fairly simple project. For the shooting board, I like a larger plane, and have a #6 dedicated to my shooting board. The larger plane has more mass and will power through end grain easier than a lighter plane will. The shooting board can be made to either trim ends at 90* or you can make one to trim ends at a 45* angle depending on your needs.

For boxmaking, you will also need a way to groove the stock to hold the box bottom. This can be done with a table saw or router, but where is the fun in that? There are several types of planes which do a good job with grooves, the Stanley 45 or 50 would be appropriate, as would the Record version of the same.

Others noted that fettling and setting up planes is an adventure and slippery slope in itself, but the reality is that it is not overly difficult. Getting the blade and cap iron (chipbreaker) sharp and set up correctly takes trial and error, but there are a lot of good references online for this.

I like the approach Paul Sellers takes with his hand planes, and he has a blog as well as you tube channel. No nonsense, no tricks, just old school, traditional approach.

A great resource for planes is Patrick Leach's blood and gore site. There is more information here on Stanley planes than you can imagine. All presented with a flair.
 
Joined
Sep 5, 2023
Messages
73
Likes
245
Location
Doylestown, PA
I also recommend watching Paul Sellers if you want to start learning hand tools. It does take lots of practice and patience, especially when you are starting out. I just spent well over 30 minutes the other day making a few wedges by hand. It was a little bit of a workout.
 
Joined
Nov 24, 2010
Messages
448
Likes
347
Location
Lexington, KY
Build your own thickness sander. When I was building plank-on-frame ship models (e.g., a sailing frigate cross-section at 1/48 scale), I needed 'timber' 1/8" or less thick. A typical 'plank' was 1/16" x 3/16" x 6". I built a thickness sander from scrap plywood, using an electric motor salvaged from a furnace fan. Perhaps the largest expense was the link-belt. A number of builds are shown online -- the one I built was based on what several luthiers had done. They need lots of thin wood. If you're fixed on planing, the kumiko suggestion is a good lead.
 
Joined
Feb 28, 2021
Messages
1,378
Likes
1,212
Location
Roulette, PA
Website
www.reallyruralwoodworks.com
Are there smaller types of planes that would get the job done better? Are there certain kinds of jigs I could put together to make planing, jointing, etc. such small pieces of wood easier? Any other insights or resource links are welcome as well.
I see no one has mentioned yet, but check out Bridge City Toolworks (Same company that makes Harvey lathes) They have some beautifully made (albeit expensive) hand planes that are also capable of depth control adjustments like that - then all you'd need is a nice flat piece of MDF with a planing stop and then you can adjust the plane's rails to do small thicknessing work.
 
Joined
Nov 18, 2012
Messages
723
Likes
2,323
Location
Torrance, CA
My drum sander is used on every vessel. It invaluable to me! Being 71 yrs old, hand planning wood sounds tiring and time consuming…..I’m ok with time consumption on gluing up rings….OMG, am I finally using my time wisely, haha??
 
Joined
Dec 5, 2015
Messages
867
Likes
426
Location
Seattle, WA
If the OP has a hand held router that could be used to reduce board thickness. A router and an easy to make simple jig like used in flattening boards for slab tables do a nice job even on highly figured wood. For small boxes exotic woods rems and cutoffs are somewhat affordable, not wood I would want to try hand planing.
 

hockenbery

Forum MVP
Beta Tester
TOTW Team
Joined
Apr 27, 2004
Messages
8,993
Likes
5,486
Location
Lakeland, Florida
Website
www.hockenberywoodturning.com
Any other insights or resource links are welcome as well.
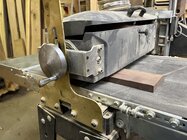
You can often buy planed boards. If you aren’t doing huge runs.

Our Lakeland lumber and mill works will surface lumber for a few dollars a board.
I’ve not used that service but I have had the cut some long boards to fit in my truck that was free.

If you have a bandsaw you can resaw short boards to near parallel surfaces.
If you have a drum sander you can sand the resawn surfaces parallel.

Sanding with paper wrapped around a board will keep the surfaces close to parallel.
 
Last edited:
Joined
Jan 3, 2023
Messages
90
Likes
84
Location
Arnold, CA
I've fixed up a few old hand planes, it's a fun and rewarding process. I don't know if it's the easiest, most cost effective way to get to your end goal but I don't mean that to discourage you. There's already some very good info here on options for you. If you decide to go the hand plane route make sure you watch some videos on restoring planes before you shop for an old plane- you want to pay special attention to certain details, not everything is fixable - the Paul Sellers videos are good.
I would also recommend trying flea markets if that's a possibility in your area first so you can inspect the plane closely before buying.

If your budget is limited consider the sharpening setup you'll need to effectively hand plane - it's like turning, if you buy a bowl gouge but don't have a good sharpening setup you're not going to get very far. Same with your sharpening skills, it's just like sharpening turning tools, there's freehand, jigs, etc...Rob Cosman does some good videos on sharpening and hand planes in general.

Good luck, using a tool that you've restored is a great pleasure!
 
Joined
Jul 19, 2018
Messages
1,821
Likes
2,473
Location
Ponsford, MN
Ditto what Hockenbery said.
Here are some examples of how to mill your own stock. I have surfaced stock as thin as 1/16" thick and 5" long. The latest is some butternut that I milled from about 5" diameter green wood on the band saw then dried and surfaced on the drum sander.DSC01504.JPGDSC01524.JPG
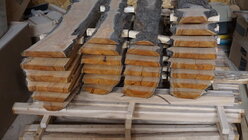
This is some buckthorn stacked for drying and then surfaced and edged ready to be used for segmenting or whatever.IMG_0602.jpg
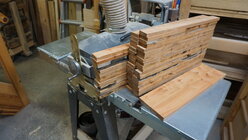
This shows a small board going thru the drum sander. Note the open sided sanders will lift slightly when feeding a board thru so for better accuracy I added the clamping fixture as shown.
 
Joined
Aug 14, 2007
Messages
5,715
Likes
3,054
Location
Eugene, OR
Any hand planes you buy will need some "tune up". Some need a lot and some need a little. If you buy Veritas, Lie Neilson, or Woodriver (post Rob Cosman getting together with them) planes can mostly be used straight from the box, but you will pay for them. Still in the learning phase for me, but I will never take one straight from the box and start to use it, I ALWAYS check it out first. Many good videos out there on doing this. Wood by Wright, Rob Cosman, Rex Kreuger are my favorites. Stumpy Nubs is another one. Then you have to learn to use them. That can take 5 years to figure out what is really going on with them. Sharpening is the easy part with the jigs out there, and they HAVE to have the burr stropped off. I do have a Bridge City plane and it had a major warp in the sole of the plane. Sent it back and got another one with the same problem. Don't waste your money. Rex Kruger did a video about them and that problem. They may have "fixed" that by now. Best bet would be to find a friend, or a community center that has a planer or drum sander. !/4 inch "shim stock" is available at some hard wood stores, but they are often cupped, warped, and/or twisted. We don't call it the vortex for nothing, and that is before getting into flat work.

robo hippy
 
Joined
Jul 30, 2021
Messages
187
Likes
61
Location
Aurora, CO
"as I'm trying to learn what planers I'd need" You are the planer, you are asking about hand planes. It's extremely difficult, (basically imposssible) to teach someone how to use hand planes in a couple of paragraphs. I've been woodworking since 1972. If you are tight on money, just buy the Chinese pen boxes. You can buy them for about the price of your material.
View: https://www.youtube.com/watch?v=hvBUEv34TDc

Boy, the comment about just buying chinese pen boxes is ridiculous. I'm trying to branch out, extend into new areas, and flex newborn skills. Did you miss that part? Money is tight, but even if it was not, I am pretty sure I wouldn't drop $500 on a brand new Benchdog hand plane... o_O I think a cleaned up, tuned and resharpened vintage plane will do just fine. I'm kind of a fan of vintage tools anyway, so its a bonus.

I'm not sure what this video was supposed to do, other than show that restoring vintage hand planes IS possible?
 
Joined
Jul 30, 2021
Messages
187
Likes
61
Location
Aurora, CO
Take a look at some YouTube videos on making kumiko strips. Good techniques for hand planing thin material. A thickness planer is not what you want for 1/8” material.

Looking up kumiko, this was very helpful! Came across some interesting pages that covered the potential for thinner boards (quite thin, couple millimeters or so) to potentially even get pulled into the hand plane while planing, resulting in incorrect thickness. There are some interesting solutions to that problem. Not that it should be a problem for these boxes, but, I'm now very interested in kumiko!
 
Joined
Jul 30, 2021
Messages
187
Likes
61
Location
Aurora, CO
Build your own thickness sander. When I was building plank-on-frame ship models (e.g., a sailing frigate cross-section at 1/48 scale), I needed 'timber' 1/8" or less thick. A typical 'plank' was 1/16" x 3/16" x 6". I built a thickness sander from scrap plywood, using an electric motor salvaged from a furnace fan. Perhaps the largest expense was the link-belt. A number of builds are shown online -- the one I built was based on what several luthiers had done. They need lots of thin wood. If you're fixed on planing, the kumiko suggestion is a good lead.
Do you have more information on your thickness sander? Sounds interesting...
 
Joined
Jul 30, 2021
Messages
187
Likes
61
Location
Aurora, CO
If the OP has a hand held router that could be used to reduce board thickness. A router and an easy to make simple jig like used in flattening boards for slab tables do a nice job even on highly figured wood. For small boxes exotic woods rems and cutoffs are somewhat affordable, not wood I would want to try hand planing.

I'm buying the thicknesses I need mostly. There are imperfections, which is where the hand planing was going to come into play. Most have already been run through a thickness planer, but have that characteristic slightly wavy surface and sometimes are very slightly warped, so not optimal for actually making a truly square box out of. My thought was, outside of the need to thickness plane (which I think I can just avoid by buying the right boards), a hand plane would let me do everything I needed. The other bit was, to get two boards to the exact same dimensions, I think a hand planer could do it. I mean, set the two boards up side by side, upright, and plane until the edges are identical, and the height is what it needs to be? I figure you would hand plane one set of edges flat first, then flip to the other edges and plane down to the necessary size? Then do the same on the ends?

I do have a table saw, its not a great one...a Ridgid construction table saw. I don't know if I'd want to rely on it to cut smaller pieces of wood...but, that is probably an option for making board dimensions exactly the same as well. This thin has no SawStop like security features of course though, and its "break" takes about 4-5 seconds to actually stop the blade. I guess I'm rather wary of using it to cut smaller pieces of wood, even if it might be a more appropriate option? Plus, part of the goal was to expand my skills into hand planing...
 
Joined
Jul 30, 2021
Messages
187
Likes
61
Location
Aurora, CO
I've fixed up a few old hand planes, it's a fun and rewarding process. I don't know if it's the easiest, most cost effective way to get to your end goal but I don't mean that to discourage you. There's already some very good info here on options for you. If you decide to go the hand plane route make sure you watch some videos on restoring planes before you shop for an old plane- you want to pay special attention to certain details, not everything is fixable - the Paul Sellers videos are good.
I would also recommend trying flea markets if that's a possibility in your area first so you can inspect the plane closely before buying.

If your budget is limited consider the sharpening setup you'll need to effectively hand plane - it's like turning, if you buy a bowl gouge but don't have a good sharpening setup you're not going to get very far. Same with your sharpening skills, it's just like sharpening turning tools, there's freehand, jigs, etc...Rob Cosman does some good videos on sharpening and hand planes in general.

Good luck, using a tool that you've restored is a great pleasure!
Thanks!

I am looking forward to the restorations. I don't intend to get into the box making until later in December or maybe even January, probably. So I have time to properly restore some hand planes.

I'll be using the right tools for the job. When I first got into turning in 2020, I bought a Rikon slow speed grinder, and promptly replaced its cheap wheels with a couple of high quality CBN wheels that I'm still using today (which is good, because they cost over $300, plus some extra for these sets of self adjusting washers). I've never looked back, and I rapidly became obsessed with sharpening my gouges, skews, etc. (often multiple times a project) to ensure I had optimal cutting power. I sharpen before every new item at the very least. I do have some sharpening stones, diamond stones, leather strops, etc. My brother also has a number of vintage hand planes for his work, and he has a few stones that are probably optimal for sharpening hand plane blades, as that's what he bought them for.

I have done some research already. I came across something a few days ago about how the blade actually needs to have a slight curvature to it, so the corners don't catch and dig. So I'm prepared for a challenge. I know sharpening a blade ultra sharp that has that proper curvature, won't be easy at first.

Sounds like I need to find Paul Seller's videos! At least three people have recommended him so far.
 
Joined
Jul 30, 2021
Messages
187
Likes
61
Location
Aurora, CO
I use hand planes a lot for my flatwork. Even occasionally for turning related items - say ripping thin stock for accents in a segmented or staved piece, then planing the saw blade marks off of them. Key to planing thin is to make a jig to hold work from slipping. For the size work the OP described, my recommendation would be a #4 or #5 plane, which also happen to be the really common ones.

Making the jig - get a piece of FLAT plywood a bit larger than you need. Glue down two thin strips of wood at 90* angles, one at the end, and one on side away from you. Your stock will rest against these. Clamp the plywood to your bench, or otherwise place it so it can't move. Place your stock on the plywood and plane towards the strips of wood. This technique can be used down to 1/16" or so with care. It will take practice to end up with a flat face.

For making boards square on all sides, takes practice, and a couple more tools than just a plane. A good marking gauge is needed to set and mark the thickness and width of the stock, before you plane to that line. Build a shooting board to plane the ends square is vital, and is a fairly simple project. For the shooting board, I like a larger plane, and have a #6 dedicated to my shooting board. The larger plane has more mass and will power through end grain easier than a lighter plane will. The shooting board can be made to either trim ends at 90* or you can make one to trim ends at a 45* angle depending on your needs.

For boxmaking, you will also need a way to groove the stock to hold the box bottom. This can be done with a table saw or router, but where is the fun in that? There are several types of planes which do a good job with grooves, the Stanley 45 or 50 would be appropriate, as would the Record version of the same.

Others noted that fettling and setting up planes is an adventure and slippery slope in itself, but the reality is that it is not overly difficult. Getting the blade and cap iron (chipbreaker) sharp and set up correctly takes trial and error, but there are a lot of good references online for this.

I like the approach Paul Sellers takes with his hand planes, and he has a blog as well as you tube channel. No nonsense, no tricks, just old school, traditional approach.

A great resource for planes is Patrick Leach's blood and gore site. There is more information here on Stanley planes than you can imagine. All presented with a flair.
Thanks!

I do have some other tools. I have some nice smaller sized squares, engineering grade, so they are very very square. They are not large, so they would work well for smaller boxes. I also have a bunch of smaller clamps (bought them for a different purpose, but they should work well now for small boxes). I have some corner clamps as well, although they might be too big for small boxes. From back when I had a heftier income, I bought a bunch of Woodpecker's "One Time" Tools, including a number for making boxes, such as rabbet guages, marking tools, I actually think I also have a ripping guide for small scale ripping...which, might actually help here (put it in a drawer a year ago and forgot about it.) I also have this "odd job" tool (two sizes) which can serve a lot of roles.


Jigs is where I think my main need is now. Thanks to you here, I now have some better terms to search for. Shooting board!

I found a couple of rabbeting planers on Ebay yesterday. I was thinking that could help with cutting out a rabbet around the bottom board of a box? I can probably find the Stanley 45 or 50...there are so many planes for sale. Looks like those cut a groove offset from the edge a bit... I guess I can see how that would work...but, all the stuff I'm seeing is SO much larger than the kinds of boxes I'd be building. Between pen and jewelry, I can't see needing a groove larger than 1/8", on maybe a 1/4" thick board? Do planers exist for such things? Or, would I have to rely on a table saw to cut something smaller?

Well, guess I'll check out the "blood and gore" site next. ;)
 
Joined
Jul 19, 2018
Messages
1,821
Likes
2,473
Location
Ponsford, MN
Build your own thickness sander. When I was building plank-on-frame ship models (e.g., a sailing frigate cross-section at 1/48 scale), I needed 'timber' 1/8" or less thick. A typical 'plank' was 1/16" x 3/16" x 6". I built a thickness sander from scrap plywood, using an electric motor salvaged from a furnace fan. Perhaps the largest expense was the link-belt. A number of builds are shown online -- the one I built was based on what several luthiers had done. They need lots of thin wood. If you're fixed on planing, the kumiko suggestion is a good lead.
I too built my own thickness sander, but I got the plan from a model airplane magazine in the late 1960's. The purpose was to surface balsa or basswood for model airplane building but it works well for just about any wood.DSC01246.JPG
 
Joined
Feb 2, 2016
Messages
415
Likes
357
Location
Clinton, TN
Does a thickness sander leave a flat board, or does it still leave some of that slight waviness like a thickness planer?

Another vote for a drum sander. I use a 22/44 Performax, prob the 3rd most useful tool in my woodturning shop. I've flattened and sanded to thickness some thick turning blanks and some very thin boards. I use 60 grit on the drum for speed, then sand another way with finer grit if needed. (I wouldn't think of using a hand plane for this but some may be able to.)

Sometimes you can find exactly what you need in a hobby store.

The sander will get the thickness even, but if a thin board is bowed or twisted, the spring pressure from the rollers will hold it flat against the conveyor belt so it will come out even thickness but still bowed. If the board is cupped, repeated gentle passes will make it flat - start with the convex side towards the drum to make a flat, then alternate sides until it's flat.

Best way I've gotten thin boards is to resaw a thicker dry board on the bandsaw, then smooth with the drum sander. I prefer to to process longer boards then cut up into the short pieces needed. Be advised, though, if there are internal stresses in the thicker board they may be relieved during resawing and cause warping where it didn't exist in the thicker board. That's just the nature of wood, made worse if the wood is dried improperly.

Also, even if they are "dry" be sure to let boards acclimate to the shop environment before machining and constructing. I like to put them on stickers for several months for 4/4, longer for thicker, sometimes stand thicker boards on end. Most of my 2+" stuff has been in a controlled environment for a long time, some up to 9 years.

Warning: if passing a short board through a drum sander, I always push down on the leading edge until the board clears the drum. Otherwise, the back of the board can rise against the drum and carve out an unwanted dip near the end. I don't reach over, but stand at the side.

You may be able to do what you need without buying any equipment. Know anyone with a drum sander? Several times people have come to my shop and I've planed or sanded boards for them.

Also, there are several professional woodworking shops in our area. Some will plane and sand boards for a price.


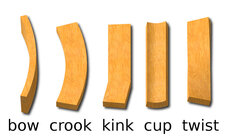
BTW, here's a handy little reference for wood warp terminology!
wood_warp_types.jpg
JKJ
 
Joined
Jan 8, 2021
Messages
337
Likes
454
Location
Wrentham, MA
Jigs is where I think my main need is now. Thanks to you here, I now have some better terms to search for. Shooting board!

I found a couple of rabbeting planers on Ebay yesterday. I was thinking that could help with cutting out a rabbet around the bottom board of a box? I can probably find the Stanley 45 or 50...there are so many planes for sale. Looks like those cut a groove offset from the edge a bit... I guess I can see how that would work...but, all the stuff I'm seeing is SO much larger than the kinds of boxes I'd be building. Between pen and jewelry, I can't see needing a groove larger than 1/8", on maybe a 1/4" thick board? Do planers exist for such things? Or, would I have to rely on a table saw to cut something smaller?

Well, guess I'll check out the "blood and gore" site next. ;)

The 45 or 50 are perfect for 1/8" or 1/4" grooves. Even in thin stock. There are a slew of cutters available for the 45, but I pretty much only use the two mentioned above. It can also do beading and such, and I have the blades, but have yet to have a need for it. An alternative option is to find a wooden grooving plane.

If you simply plan to glue the bottom directly to the sides and not rely on a groove to hold it, the 45 is not needed, but also the box will not be as strong, and there may be wood movement issues (but on the scale you are talking about, not a huge issue), and (gasp) end grain will show. :D
 
Joined
Nov 15, 2020
Messages
587
Likes
452
Location
Huntington, VT
You can do the needful with a reconditioned hand plane. You have been warned of the rabbit hole so jump in.

An old metal plane will have some backlash in the depth adjustment and may need considerable fettling to flatten the sole, refine the frog bedding, reshape the blade and chipbreaker, sharpen the blade, etc. This can involve considerable elbow grease which represents the cost of a new high end plane that can usually be relied on to work properly out of the box. Keep in mind there are as many sharpening methods as there are woodworkers, and each one is right while all the others are wrong.

The traditional method is to flatten one face (a scrub plane can speed up gross stock removal), then use a mortise or cutting gauge to scribe the desired thickness on the edges and plane the opposite face down to the scribe marks. The work can be butted against a bench stop, held between dogs., stuck down with double side tape or blue tape and CA glue, held with a vacuum clamp, etc. Alternatively you can set runners of the desired thickness beside the workpiece and register the plane sole on them. For small work a #4 size can work, but there's a use for everything up to a jointer plane depending on scale.

To accurately plane edge joints for glueing, hold the two pieces edge up in a bench vise with the reference faces together and plane both at once with a plane longer than the work. When hinged back to flat any deviation from 90* will cancel out.

Planing straight grained wood is straightforward, Successfully planing figured wood requires accurate shaping and close setting of the chipbreaker. Here's one discussion setting chipbreaker Here's a video explaining how it works Scrapers are useful for further smoothing.

If the rabbit hole is too deep, get a jointer, planer, bandsaw and drum sander (and dust collector) and dive down that hole. A router sled can also be used for flattening and thicknessing accompanied by considerable tedium and dust.
 
Last edited:
Joined
Jul 19, 2018
Messages
1,821
Likes
2,473
Location
Ponsford, MN
Does a thickness sander leave a flat board, or does it still leave some of that slight waviness like a thickness planer?
The thickness planners typically have 3 or 4 HSS knives which means the cut is not continuous so that results in the sleight waviness. The drum sander has the entire circumference of the drum wrapped with abrasive so the cut is continuous so as long as the material is fed without stops it will come out flat.
 
Joined
Aug 14, 2007
Messages
5,715
Likes
3,054
Location
Eugene, OR
When doing flat work, I use the drum sander to make panels dead flat, you have to pivot them to lift one up without lifting the bottom one up as well. If you are going to sand a bunch of short pieces, then have 4 or 5 of them and push them through in a like where they butt against each other. I still take the finished pieces and use a sander or a plane now that I at least kind of know how to use one, and use that for final finish before applying finish. I don't sand beyond 80 grit on the drum sander. It seems that no matter what grit I start with, there are always sanding stripes in the wood.

Do check out Rex Kruger on You Tube for how to fine tune a hand plane.

robo hippy
 
Joined
Jul 19, 2018
Messages
1,821
Likes
2,473
Location
Ponsford, MN
Neither one will produce a surface ready for finishing, and the machined surface will only come out flat if the reference face is reasonably flat.
Once you have a flat piece of stock, if you are making pen boxes, as the start of this thread stated you would then make the box and then finish sand the assembled project.
The reference face should be flattened before running it thru the surfacing planner or sander. The jointer is an excellent machine to use to flatten rough stock and if done properly can be done safely. note: I don't have pictures of the process but I have some recently dried pieces that I can flatten and photograph to show the process.
 
Joined
Jul 30, 2021
Messages
187
Likes
61
Location
Aurora, CO
Another vote for a drum sander. I use a 22/44 Performax, prob the 3rd most useful tool in my woodturning shop. I've flattened and sanded to thickness some thick turning blanks and some very thin boards. I use 60 grit on the drum for speed, then sand another way with finer grit if needed. (I wouldn't think of using a hand plane for this but some may be able to.)

Sometimes you can find exactly what you need in a hobby store.

The sander will get the thickness even, but if a thin board is bowed or twisted, the spring pressure from the rollers will hold it flat against the conveyor belt so it will come out even thickness but still bowed. If the board is cupped, repeated gentle passes will make it flat - start with the convex side towards the drum to make a flat, then alternate sides until it's flat.

Best way I've gotten thin boards is to resaw a thicker dry board on the bandsaw, then smooth with the drum sander. I prefer to to process longer boards then cut up into the short pieces needed. Be advised, though, if there are internal stresses in the thicker board they may be relieved during resawing and cause warping where it didn't exist in the thicker board. That's just the nature of wood, made worse if the wood is dried improperly.

Also, even if they are "dry" be sure to let boards acclimate to the shop environment before machining and constructing. I like to put them on stickers for several months for 4/4, longer for thicker, sometimes stand thicker boards on end. Most of my 2+" stuff has been in a controlled environment for a long time, some up to 9 years.

Warning: if passing a short board through a drum sander, I always push down on the leading edge until the board clears the drum. Otherwise, the back of the board can rise against the drum and carve out an unwanted dip near the end. I don't reach over, but stand at the side.

You may be able to do what you need without buying any equipment. Know anyone with a drum sander? Several times people have come to my shop and I've planed or sanded boards for them.

Also, there are several professional woodworking shops in our area. Some will plane and sand boards for a price.


BTW, here's a handy little reference for wood warp terminology!
View attachment 68699
JKJ

I could see resawing boards. I think you would still need to smooth them...so either a plane or drum sander would still be necessary (at least, when I resaw things with my bandsaw, there are always those fine vertical blade marks, I don't know if there is a way around that.) It would probably be cheaper in the long run as well.

FWIW, I have a bunch of small boards right now, 2-3 feet in length, around 1/4" down to maybe 1/8" (probably more like 3/16" most of the time) thick, and a few inches wide, that I bought over the last 6-8 months. I was planning to use them for a few things, including boxes. So I have boards, largely cut down to reasonable sizes already. I don't know if I could afford a drum sander for a while (they look to be as expensive or more expensive than a tabletop planer). So I figure I'd still need hand planes to smooth things out, regardless. At some point my work will pick up again to full time here, and I should be able to afford either a thickness planer or a drum sander (or both), but its not in the books right now.
 
Joined
Jul 30, 2021
Messages
187
Likes
61
Location
Aurora, CO
The 45 or 50 are perfect for 1/8" or 1/4" grooves. Even in thin stock. There are a slew of cutters available for the 45, but I pretty much only use the two mentioned above. It can also do beading and such, and I have the blades, but have yet to have a need for it. An alternative option is to find a wooden grooving plane.

If you simply plan to glue the bottom directly to the sides and not rely on a groove to hold it, the 45 is not needed, but also the box will not be as strong, and there may be wood movement issues (but on the scale you are talking about, not a huge issue), and (gasp) end grain will show. :D

My original thought was to cut rabbets in the base board, then glue the side boards into that L shape. But now that I'm reading about these planes, I think I'm understanding that a groove offset from the edge, would provide a more sturdy hold. I'm assuming since you would have a tonge on the side boards that fits into the groove in the base board, which would then have glue on all four sides to hold it in place. This is all just assumption, but I'm learning here. :p
 
Joined
Jul 30, 2021
Messages
187
Likes
61
Location
Aurora, CO
Keep in mind there are as many sharpening methods as there are woodworkers, and each one is right while all the others are wrong.

Such truth!! 🤣 Tis been this way since the dawn of time!

You can do the needful with a reconditioned hand plane. You have been warned of the rabbit hole so jump in.

An old metal plane will have some backlash in the depth adjustment and may need considerable fettling to flatten the sole, refine the frog bedding, reshape the blade and chipbreaker, sharpen the blade, etc. This can involve considerable elbow grease which represents the cost of a new high end plane that can usually be relied on to work properly out of the box. Keep in mind there are as many sharpening methods as there are woodworkers, and each one is right while all the others are wrong.

The traditional method is to flatten one face (a scrub plane can speed up gross stock removal), then use a mortise or cutting gauge to scribe the desired thickness on the edges and plane the opposite face down to the scribe marks. The work can be butted against a bench stop, held between dogs., stuck down with double side tape or blue tape and CA glue, held with a vacuum clamp, etc. Alternatively you can set runners of the desired thickness beside the workpiece and register the plane sole on them. For small work a #4 size can work, but there's a use for everything up to a jointer plane depending on scale.

To accurately plane edge joints for glueing, hold the two pieces edge up in a bench vise with the reference faces together and plane both at once with a plane longer than the work. When hinged back to flat any deviation from 90* will cancel out.

Planing straight grained wood is straightforward, Successfully planing figured wood requires accurate shaping and close setting of the chipbreaker. Here's one discussion setting chipbreaker Here's a video explaining how it works Scrapers are useful for further smoothing.

If the rabbit hole is too deep, get a jointer, planer, bandsaw and drum sander (and dust collector) and dive down that hole. A router sled can also be used for flattening and thicknessing accompanied by considerable tedium and dust.

Thanks for the links about the chipbreaker. I was exploring the anatomy of hand planes yesterday and was noticing that bit, didn't know why it existed.

For the time being, additional machines are out of the budget. Your comment about restoration being as expensive as a new plane, though, is interesting. I'm only $18 in so far on this one smoothing plane, so, if it turns out that $125 or so on a brand new one is a lower cost investment, I might go that route. It would still be a lot cheaper than a bunch of additional machines (which, now that I think about it, I don't really have room for...maybe a small tabletop drum sander or thickness planer, but, that is probably all I have room for right now.)

I am curious, do you recommend any resources that would help me in my restoration efforts? I'll try with just one hand plane here, and see how it goes. If it ends up looking like its going to be a very expensive project, I'll probably just look into getting a couple new hand planes that will do what I need. I'm not afraid of a challenge...its really a money thing right now.
 
Joined
Jul 30, 2021
Messages
187
Likes
61
Location
Aurora, CO
When doing flat work, I use the drum sander to make panels dead flat, you have to pivot them to lift one up without lifting the bottom one up as well. If you are going to sand a bunch of short pieces, then have 4 or 5 of them and push them through in a like where they butt against each other. I still take the finished pieces and use a sander or a plane now that I at least kind of know how to use one, and use that for final finish before applying finish. I don't sand beyond 80 grit on the drum sander. It seems that no matter what grit I start with, there are always sanding stripes in the wood.

Do check out Rex Kruger on You Tube for how to fine tune a hand plane.

robo hippy
Thanks for the mention of Rex Kruger. I'll check him out.

Is the choice to stick with 80 grit, just a matter of speed? Or are finer grits just, not really effective in such a use case?
 
Joined
Feb 28, 2021
Messages
1,378
Likes
1,212
Location
Roulette, PA
Website
www.reallyruralwoodworks.com
I am curious, do you recommend any resources that would help me in my restoration efforts? I'll try with just one hand plane here, and see how it goes. If it ends up looking like its going to be a very expensive project, I'll probably just look into getting a couple new hand planes that will do what I need. I'm not afraid of a challenge...its really a money thing right now.
Most of what I learned for skills improvement in hand planes (and hand tooled woodworking in general) has been from 3 major sources on Youtube (In order of my favorites): Wood by Wright (James Wright - Hand tools & Restoration), Rex Krueger (got me interested in green woodworking - Bodgers, Stick Chairs, etc) and Rob Cosman (Dovetailing and boxmaking) All three give excellent and clear advice (It's a lot to absorb)

- However I dislike WoodRiver, even though Cosman pushes them (I got one, it's made in china and not much better than a Bench Dog from Rockler, and looks just the same, so Maybe the fit and finish is better, but nowhere near what I got with Lie-Nielsen -Granted my experience may have been a one-off, but when I saw "Made in China" on the box, I definitely was not impressed!), so any future new tooling I get (or have gotten since that woodriver fiasco) has been Lie-Nielsen (I buy from Lee Valley Tools) Considering the difference in price between the Wood River and the L-N was not much more than $20 to $40, If I wanted cheap, I'd just get a Taytools hand plane (That was my first new plane) and invest a little time into fettling it for fit and finish and I'd have a plane just as good as Wood River for considerably less... but eventually I plan to replace my collection of Stanley (and others) all with Lie-Nielsens (I do have a 1880's Stanley Bailey 5-1/2 being my oldest plane) and just park my Stanleys in a collection case somewhere. (or maybe sell 'em, even though they now work beautifully after minimal restoration - It isn't all that expensive to restore them, although getting a new Hock blade & chip breaker might make it seem so, it's still cheaper than a Lie-Nielsen... and the older planes (Pre-war seem to always have excellent fit and finish especially if you luck out and get to buy out of an old craftsman's collection (where I got my 5-1/2, along with a couple wood body planes (rabbet and cove planes) instead of the dozens of homeowners used & abused planes)
 
Joined
Sep 19, 2023
Messages
870
Likes
1,571
Location
Columbia, TN
- However I dislike WoodRiver,

I'd rather buy Harbor Freight than WoodRiver. ;) Jokes aside, my lack of confidence in WoodRiver stems from to two sets of forstner bits that would not cut AT ALL. Horrible product. I switched to Fisch Wavecutters and they are amazing (albeit 3 times the money). In fairness, I do have a WoodRiver round scraper that seems OK.
 
Joined
Aug 14, 2007
Messages
5,715
Likes
3,054
Location
Eugene, OR
E N Curtis is another flat work channel I watch. He makes some nice furniture. He did comment once "don't buy Woodriver planes, they are junk". Before Rob Cosman was involved with them, they were very unreliable. So, Mr. Curtis did another review, and said they weren't bad. I think he still had a bad taste in his mouth from his first exposure. He does like the Lie Nielson planes. There are many ways to spice up an old hand plane. Main one seems to be that they older ones had very thin blades compared to the newer ones. This is kind of a standard upgrade. Not sure now much that would change the chip breaker and any screw settings on the planes, as in you might need longer screws, but not positive. There is a LOT to learn when using hand planes. I bought a $10 plane once, a #4 Stanley, and it took a month of messing around with it to finally get it working correctly. Some are worse than others....

robo hippy
 
Back
Top