I have several 12-14” wet maple bowl blanks. I have always twice turned bowls, but want to try once turned. What is a good thickness for these size bowls? Should the rim just be plain or can you add some type of embellishment?
-
Beware of Counterfeit Woodturning Tools (click here for details) -
Johnathan Silwones is starting a new AAW chapter, Southern Alleghenies Woodturners, in Johnstown, PA. (click here for details) -
Congratulations to Peter Jacobson for "Red Winged Burl Bowl" being selected as Turning of the Week for April 29, 2024 (click here for details) -
Welcome new registering member. Your username must be your real First and Last name (for example: John Doe). "Screen names" and "handles" are not allowed and your registration will be deleted if you don't use your real name. Also, do not use all caps nor all lower case.
You are using an out of date browser. It may not display this or other websites correctly.
You should upgrade or use an alternative browser.
You should upgrade or use an alternative browser.
Once Turned Bowl Thickness
- Thread starter William Rogers
- Start date
It depends a bit on the type of bowl, but about 8 to 10 mm should e a good wal thickness, as for fancy rims, that's also depending the type of bowl you turn, like a salad or fruit bowl or shallower dish or HF like bowl.
- Joined
- Apr 27, 2004
- Messages
- 8,655
- Likes
- 5,017
- Location
- Lakeland, Florida
- Website
- www.hockenberywoodturning.com
I usually do Natural edge for the once turned bowls.
I usually go with blanks 2-4” longer than wide to enhance the oval look.
Bowls that size 3/16- 5/16 more or less. Certainly less than 1/2
I usually take the bark off so the bowls will be used. I sometimes color the top of the rims.
You can embellish any bowl
I usually go with blanks 2-4” longer than wide to enhance the oval look.
Bowls that size 3/16- 5/16 more or less. Certainly less than 1/2
I usually take the bark off so the bowls will be used. I sometimes color the top of the rims.
You can embellish any bowl
Make sure the bottom is the same thickness as the walls, and stay a fair distance off the pith.
Good Question William, please share your results.
I have good results with as thin as possible. Under 6mm if you can.
john lucas
AAW Forum Expert
I find as thick as 3/8" will work if you put it in a bag or cabinet to slow the drying for the first week or two.
1/4" to 3/8" thickness works well for me on once turned bowls. Sometimes thicker for large natural edge bowls, especially if they have an unusual rim shape (from a tree with weird outer shape.)
Keep in mind that the shape of the bowl changes and is no longer round when it's dry.
With once turned bowls, you can get cool surface texture with figured wood, like crotch pieces or curl. The figured spots don't shrink as much as the adjacent, unfigured wood. So if you sand the surface before the bowl is dry (have to do it soon, since thin bowls dry fast), the dry bowl will have an uneven, corduroy like surface. This can be positive or negative, depending on the effect you are after.
It's more difficult to sand a warped, once turned bowl than a round twice turned bowl. Work hard to get a good surface with minimal tool marks. If my schedule allows, I like to sand the bowls the day after I cut them. After spending the night in a paper bag, the surface is dry enough so that it doesn't gum up sandpaper, but the bowl is wet enough to still be round.
Keep in mind that the shape of the bowl changes and is no longer round when it's dry.
- For natural edge bowls, this can add to the appeal. But it can detract too. Some shapes that look good off the lathe don't look good once dry. For me, NE bowls that have retreat curve (correct term?) where the diameter at the rim is less than than the diameter further down, look worse when dry.
- For cut rim bowls, the rim will not be flat. If the rim of the bowl is from the pith side of the blank, you might end up with a pronounced peak on the dry bowl near the pith location. To me the cut rims look much better when they are from the bark side of the blank, (same orientation you would use for a natural edge bowl). Then the rim un-evenness is more gradual and less noticeable. I also prefer the grain pattern - ovals in the bottom of the bowl - from the natural edge orientation.
With once turned bowls, you can get cool surface texture with figured wood, like crotch pieces or curl. The figured spots don't shrink as much as the adjacent, unfigured wood. So if you sand the surface before the bowl is dry (have to do it soon, since thin bowls dry fast), the dry bowl will have an uneven, corduroy like surface. This can be positive or negative, depending on the effect you are after.
It's more difficult to sand a warped, once turned bowl than a round twice turned bowl. Work hard to get a good surface with minimal tool marks. If my schedule allows, I like to sand the bowls the day after I cut them. After spending the night in a paper bag, the surface is dry enough so that it doesn't gum up sandpaper, but the bowl is wet enough to still be round.
Last edited:
The more my bowls warp, the more I like them. For Pacific Madrone, I won't go over 1/4 inch. For maple and walnut (don't turn walnut any more since it makes me sneezy and itchy), I go to 5/16 to maybe 3/8 max. These woods generally dry with less chance of cracking than Madrone. I used to do a straight curve from bottom to rim. This did leave a slightly thicker area in the transition. Now, I go slightly concave near the foot to reduce that. As always, 'dry it too fast and it cracks, dry it too slow and it molds'. I like the stretch film on the rim of my Madrone bowls, but not on maple because it will mold under the plastic. I start them on the concrete floor of my shop, out of any wind or sun. After 2 or 3 days, if I remember, I will put them up on wire racks to finish drying. Totally dry in 7 to 10 days max in our wet winter weather. You can add details if you want, prior to drying. Difficult to do after since the wood has moved. Paper bags do work. Paper bag, inside a plastic one, and change the paper bag daily, works better. For me, I make too many to do it this way....
robo hippy
robo hippy
Thanks for the explanation. I did a live oak once turned a few years ago and got that effect but did not know what caused it.1/4" to 3/8" thickness works well for me on once turned bowls. Sometimes thicker for large natural edge bowls, especially if they have an unusual rim shape (from a tree with weird outer shape.)
Keep in mind that the shape of the bowl changes and is no longer round when it's dry.
With the thinner bowls, coring can be a more fruitful. I like making cut rim bowls from blanks in the natural edge orientation. It's possible to get 2 or even 3 bowls of very similar and useable size from the same blank.
- For natural edge bowls, this can add to the appeal. But it can detract too. Some shapes that look good off the lathe don't look good once dry. For me, NE bowls that have retreat curve (correct term?) where the diameter at the rim is less than than the diameter further down, look worse when dry.
- For cut rim bowls, the rim will not be flat. If the rim of the bowl is from the pith side of the blank, you might end up with a pronounced peak on the dry bowl near the pith location. To me the cut rims look much better when they are from the bark side of the blank, (same orientation you would use for a natural edge bowl). Then the rim un-evenness is more gradual and less noticeable. I also prefer the grain pattern - ovals in the bottom of the bowl - from the natural edge orientation.
With once turned bowls, you can get cool surface texture with figured wood, like crotch pieces or curl. The figured spots don't shrink as much as the adjacent, unfigured wood. So if you sand the surface before the bowl is dry (have to do it soon, since thin bowls dry fast), the dry bowl will have an uneven, corduroy like surface. This can be positive or negative, depending on the effect you are after.
It's more difficult to sand a warped, once turned bowl than a round twice turned bowl. Work hard to get a good surface with minimal tool marks. If my schedule allows, I like to sand the bowls the day after I cut them. After spending the night in a paper bag, the surface is dry enough so that it doesn't gum up sandpaper, but the bowl is wet enough to still be round.
Maple and cherry turn to 3/16"-1/4". Since wet wood clogs regular sandpaper I'll use abranet and finish bowl. Put in microwave on defrost cycle. Maybe sand a little more and apply finish. From growing tree to finished bowl in a couple of hours.
In boatbuilding the term for this is “tumblehome.” I don’t know if there’s a term for it in turning.NE bowls that have retreat curve (correct term?) where the diameter at the rim is less than than the diameter further down, look worse when dry.
Depends on intended use. For display only, down to 1/8” wall, leave bark or not. Bowl to be used/handled, 1/4-3/8”, no bark, it will break off when the bowl is handled.
As discussed rims will warp from drying. IMO most embellishments dont look that great on a thin rim, and a wide rim stands a good chance of cracking, and the embellishments can get pretty twisted.
I sand when dry, mounted on the lathe, with a drill at low rpm, and turn the piece slowly by hand. Ive tried some sanding while wet, didnt go so great, probably need to try again.
I put all of my wet turnings in double kraft type thick grocery bags and keep them on a wire rack in the house, in constant humidity and temp. Weight as bagged and write it on the bag. Stops losing wt its ready. No mold problems, double bag sows dryinng, less warp and cracking.
The thinner you go, the more important this is - work the ID down in sections, an 1-2 inches at a time, you cant go back up toward the rim, its moved.
What is a kraft type grocery bag?Depends on intended use. For display only, down to 1/8” wall, leave bark or not. Bowl to be used/handled, 1/4-3/8”, no bark, it will break off when the bowl is handled.
As discussed rims will warp from drying. IMO most embellishments dont look that great on a thin rim, and a wide rim stands a good chance of cracking, and the embellishments can get pretty twisted.
I sand when dry, mounted on the lathe, with a drill at low rpm, and turn the piece slowly by hand. Ive tried some sanding while wet, didnt go so great, probably need to try again.
I put all of my wet turnings in double kraft type thick grocery bags and keep them on a wire rack in the house, in constant humidity and temp. Weight as bagged and write it on the bag. Stops losing wt its ready. No mold problems, double bag sows dryinng, less warp and cracking.
The thinner you go, the more important this is - work the ID down in sections, an 1-2 inches at a time, you cant go back up toward the rim, its moved.
Brown paper....thick
What is a kraft type grocery bag?
Example: BagDream Grocery Bags 12x7x17 Inches 100Pcs Heavy Duty Kraft Brown Paper Grocery Bags Durable Kraft Paper Bags, Paper Barrel Sack Bags, 100% Recycled Kraft Paper Gift Bags Bulk https://www.amazon.com/dp/B07Q2XWN5...t_i_4F46R7NGV659ZMWZ17B1?_encoding=UTF8&psc=1Brown paper....thick
I reuse them numerous times.
Large bowls, platters, etc that dont fit a bag:
Builder's paper Paper 3-ft x 140-ft Drop Cloth https://www.lowes.com/pd/Blue-Hawk-Builder-s-Paper-1-Pack-Paper-3-ft-x-140-ft-Drop-Cloth/50265367
Painters tape to close them.
Ah, thanks. Those pqper bags are just starting to come into stores around here.Example: BagDream Grocery Bags 12x7x17 Inches 100Pcs Heavy Duty Kraft Brown Paper Grocery Bags Durable Kraft Paper Bags, Paper Barrel Sack Bags, 100% Recycled Kraft Paper Gift Bags Bulk https://www.amazon.com/dp/B07Q2XWN5...t_i_4F46R7NGV659ZMWZ17B1?_encoding=UTF8&psc=1
I reuse them numerous times.
Large bowls, platters, etc that dont fit a bag:
Builder's paper Paper 3-ft x 140-ft Drop Cloth https://www.lowes.com/pd/Blue-Hawk-Builder-s-Paper-1-Pack-Paper-3-ft-x-140-ft-Drop-Cloth/50265367
Painters tape to close them.
Another paper bag option for large bowls is the "Lawn and Leaf" bags meant for holding yard waste:
They are longer/taller than needed, so I cut about a foot off of the ends before using.
They are longer/taller than needed, so I cut about a foot off of the ends before using.
Thanks for all the information . I turned the bowl yesterday to around 5/16” thick, weighed it and put in a lawn and leaf bag overnight. No cracks this morning. I turned it the same as a natural edge (from the bark side). It is warping, diameter now is 11 7/8” X 11 1/8”. I’ll keep it in. the bag for about a week and then let air dry.
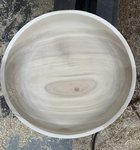
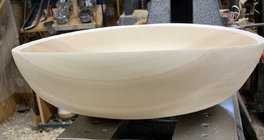


I would suggest that a paper bag would be a better choice or no bag at all. Correction I was thinking that the bag used was plastic.Thanks for all the information . I turned the bowl yesterday to around 5/16” thick, weighed it and put in a lawn and leaf bag overnight. No cracks this morning. I turned it the same as a natural edge (from the bark side). It is warping, diameter now is 11 7/8” X 11 1/8”. I’ll keep it in. the bag for about a week and then let air dry.
View attachment 42632View attachment 42633
Last edited:
Most lawn/leaf bags are paper. We have to use paper bags for lawn/yard trash.I would suggest that a paper bag would be a better choice or no bag at all. Correction I was thinking that the bag used was plastic.
It is a paper lawn and leaf bag.I would suggest that a paper bag would be a better choice or no bag at all. Correction I was thinking that the bag used was plastic.
That leads to a final question. I expect you “flatten the bottom once it has dried, correct?
- Joined
- Apr 27, 2004
- Messages
- 8,655
- Likes
- 5,017
- Location
- Lakeland, Florida
- Website
- www.hockenberywoodturning.com
Wait and seeIt is a paper lawn and leaf bag.
That leads to a final question. I expect you “flatten the bottom once it has dried, correct?
Round bottoms are surprisingly stable. Especially when the bottom is centered on the grain
I leave round bottoms on most of my NE bowls and HFs.
The bottom grain in your bowl is off center - inch??
So your bowl might sit a more bit tilted than if it were centered. Probably will look just fine
The shallow curve on the bottom is well suited for a footless bowl.
The warp centers around the growth rings.
If you like the way it looks sitting on the bottom the warp chose then done.
If you want it to sit on another spot you need to turn a recess- Do you have enough thickness ?
Last edited:
As far as the lawn and leaf bags are concerned I moved out of the city in 2006 at that time I believe that the bags were plastic but I now don't have any need to bag I just throw the leaves back in the uncleared woods.It is a paper lawn and leaf bag.
That leads to a final question. I expect you “flatten the bottom once it has dried, correct?
The bottom can be flattened when the tenon is removed or if you used a a recess you still may want to jam chuck it to true or remove the the recess. The trued up recess can be used to hold the bowl for spray finishing, which allows heaver coats when it is slowly rotated.
I have about a 1/4-5/16” thickness. Not knowing I turned a very shallow recess initially. I could either try and true up the recess or sand it round.Wait and see
Round bottoms are surprisingly stable. Especially when the bottom is centered on the grain
I leave round bottoms on most of by NE bowls and HFs.
The bottom grain in your bowl is off center - inch??
So your bowl might sit a more bit tilted than if it were centered. Probably will look just fine
The warp centers around the growth rings.
If you like the way it looks on its bottom the warp chose then done.
If you want it to sit on another spot you need to turn a recess- Do you have enough thickness ?https://www.aawforum.org/community/...]=18856&hash=2677f3f0cc405030b9c3ade6ee04920b
I removed the tenon already and put a small foot on the bowl when I turned the bowl. I held it with my vacuum chuck. I may have to round the bottom as not a lot of thickness to work with or just leave it as is.As far as the lawn and leaf bags are concerned I moved out of the city in 2006 at that time I believe that the bags were plastic but I now don't have any need to bag I just throw the leaves back in the uncleared woods.
The bottom can be flattened when the tenon is removed or if you used a a recess you still may want to jam chuck it to true or remove the the recess. The trued up recess can be used to hold the bowl for spray finishing, which allows heaver coats when it is slowly rotated.
- Joined
- Apr 27, 2004
- Messages
- 8,655
- Likes
- 5,017
- Location
- Lakeland, Florida
- Website
- www.hockenberywoodturning.com
have about a 1/4-5/16” thickness. Not knowing I turned a very shallow recess initially. I could either try and true up the recess or sand it round.
If you have recess - the rim of the recess will warp.
It may be fairly stable when dry.
Fixing it - can return it - very difficult to blend it in well.
Can clamp a sheet of 220 to a flat surface then without rocking the bowl(easier said than accomplished) slide the bottom over the paper with the grain until the bowl does not rock usually 4-5 passes. This will make 1/4 moon flats on the high spots.
You can blend these into the curve of the bowl hand sanding with 320.
Worse case you could turn three little button feet, maybe like a squashed cone of the same material to glue on the bottom, just tall enough to stabilize it.
Or you can choose to let it rock a little bit…
I use a recess exclusively. I never flatten the bottoms. When the question comes up "How did you carve it out like that? You couldn't have done it on a lathe since it isn't round" I explain the warping process, and the usual comment is 'it's so organic!" Only one who commented on the 'rocking' bowls was a ceramic person. Their clay doesn't move like wood does... I would expect any bowl, other than a 3 legged one, to rock eventually. Wood is never stable, unless it has been 'stabilized'.
robo hippy
robo hippy
William like I have been saying, yes dry the green bowl in a brown paper bag, I've always used the bags from places like KFC, as these are good bags also from other like sources.Thanks for all the information . I turned the bowl yesterday to around 5/16” thick, weighed it and put in a lawn and leaf bag overnight. No cracks this morning. I turned it the same as a natural edge (from the bark side). It is warping, diameter now is 11 7/8” X 11 1/8”. I’ll keep it in. the bag for about a week and then let air dry.
View attachment 42632View attachment 42633
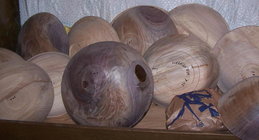
I do not like the leaf bags bags for the reason that these have the inner bag sealed with tar between the layers, so he absorbing and releasing of the paper isn't going to happen, as for length of time. it depends a lot on the thickness of the bowl's wall and foot, here are a couple pictures that show how I have been doing this and still do.
Here are some Ash bowls that have just been taken out of the brown paper bags.
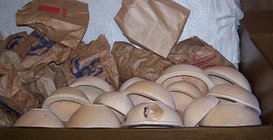
Here I just checked the bowls to see if they are dry enough to take them out of the bag for further drying.
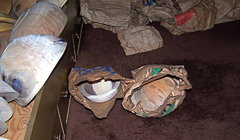
These bowls are dry and can be returned when I have time.
Last edited:
Leo, that first picture shows more bowls than I have turned. You really get after it. Looks like some in the second picture have sealer on the end grain. Correct?William like I have been saying, yes dry the green bowl in a brown paper bag, I've always used the bags from places like KFC, as these are good bags also from other like sources.
I do not like the leaf bags bags for the reason that these have the inner bag sealed with tar between the layers, so he absorbing and releasing of the paper isn't going to happen, as for length of time. it depends a lot on the thickness of the bowl's wall and foot, here are a couple pictures that show how I have been doing this and still do.
Here are some Ash bowls that have just been taken out of the brown paper bags.
View attachment 42635
Here I just checked the bowls to see if they are dry enough to take them out of the bag for further drying.
View attachment 42636
These bowls are dry and can be returned when I have time.
View attachment 42637
The lawn and leaf bags I have seem to be just paper, cheap ones.
Dave Landers
Beta Tester
I did that when I was younger. Probably the cause of my tinnitusOr you can choose to let it rock a little bit…
That leads to a final question. I expect you “flatten the bottom once it has dried, correct?
I put a simple, small foot on once turned bowls, similar to what I do for twice turned bowls.
The key difference is that the foot becomes oval and unflat as the bowl dries. Once the bowl is dry, I mount it using a friction drive, aka jam chuck, cut the bottom flat and cut a recess on the inside. So the center of the foot is round, the outside of the foot is oval. (See picture; the flats on the ends of the foot are wider than on the sides). I've tried making the outside of the foot round, but it's hard to make the transition back to warped sides of the bowl, at least for large bowls. .
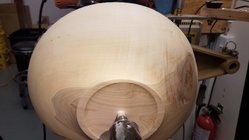
Here's a picture of the completed (no finish yet) bowl, showing the foot:
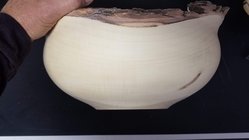
That is the most common way to do it but there are 2 notes for this process, #1 the area of the foot can safely be left thicker due to the flat long grain and # 2 the last step in working the base is to cut a cone from the live center to the bowl, then if the grain is straight just break it off and sand the center until all traces of it are gone.I put a simple, small foot on once turned bowls, similar to what I do for twice turned bowls.
The key difference is that the foot becomes oval and unflat as the bowl dries. Once the bowl is dry, I mount it using a friction drive, aka jam chuck, cut the bottom flat and cut a recess on the inside. So the center of the foot is round, the outside of the foot is oval. (See picture; the flats on the ends of the foot are wider than on the sides). I've tried making the outside of the foot round, but it's hard to make the transition back to warped sides of the bowl, at least for large bowls. .
View attachment 42648
Here's a picture of the completed (no finish yet) bowl, showing the foot:
View attachment 42649
No sealer on any of the rough turned bowls William, there is CA on spots like knots or what I know could become problem spots.Leo, that first picture shows more bowls than I have turned. You really get after it. Looks like some in the second picture have sealer on the end grain. Correct?
The lawn and leaf bags I have seem to be just paper, cheap ones.
I'm pretty sure that bowl is this one I think you mean, it has at least three knots in it and some bark inclusion, I was able to prevent the knots from splitting but one, I still have that one somewhere in my stash, been 14 years since I rough turned that one.
As for the leaf bags I bought (one time only) at Home Depot, these had the tar to prevent wet leaves and grass to have the bags disintegrate when the paper gets wet, anyway if you bag is just like brown paper bags it should work, the bag has to be able to absorb moisture from inside and release it to the surrounding air on the outside.
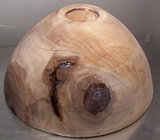
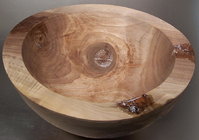
I don't know if you can even find them any more, but feed sack bags used to be several layer thick brown craft paper. It worked well, or at least better than single thickness grocery bags. With the once turned bowls, it seldom is necessary to wrap them. The vulnerable point on a bowl when drying is the rim. Rounding over the rim is done for safety so you don't slice yourself, and also the rounded edge is less prone to cracking than a sharp edge where the sharp part dries first = stress = cracking. I found the stretch film to be a big help in protecting the rim. Knots and pith are also crack instigators.....
robo hippy
robo hippy
It seams as though everyone is going wild about putting once turned pieces into bags I know that I almost never do anything to slow the drying. The procedure I use successfully is to start with fresh cut live wood turn thin walled except for the the very bottom near the foot and leave it uncovered in my shop for maybe a week then finish the foot, do whatever sanding is necessary and put a finish on it.
cut wood into blanks....put in enclosed cardboard barrel....once turn in 3 months....may still be moist and warp
Reed these are not 3 or 4 mm thick Arbutus bowls that you have to turn that thin or else they will split, you have the experience there, however the real problem with these other wood species of bowls, and turned a bit thicker, here comes the big difference in the speed of the engrain drying and the side grain drying to play its roll, that is where the tension comes from, and unless the wall can accommodate this by warping without splitting, it will split.I don't know if you can even find them any more, but feed sack bags used to be several layer thick brown craft paper. It worked well, or at least better than single thickness grocery bags. With the once turned bowls, it seldom is necessary to wrap them. The vulnerable point on a bowl when drying is the rim. Rounding over the rim is done for safety so you don't slice yourself, and also the rounded edge is less prone to cracking than a sharp edge where the sharp part dries first = stress = cracking. I found the stretch film to be a big help in protecting the rim. Knots and pith are also crack instigators.....
robo hippy
Notwithstanding al the claims to the contrarie, you can't win from nature, wood will split if the tension gets larger than the wood tolerates (wood species play a role here) so to get around that you slow down the rapid drying of the endgrain, the single layer brown paper bag will do that nicely.
As the fresh turned bowl is placed in the bag the small amount of air surrounding the bowl will be saturated quickly and so the wood stops loosing the moisture, and this is where the single layer paper comes into play, it will absorb some of the moisture, just a bit, and the bowl can again loose a bit of moisture, now the paper will loose some of the moisture to the air surrounding the paper bag, while this happens moisture from the air surrounding the bowl is absorbed by the bag and the bowl can loose a bit more moisture etc, so you see there is a reason why this works to slow down the drying of the bowl.
With thicker bowls this will takes a couple of weeks at most, you can then remove the bowl from the bag and let it dry further.
.. SO YES IT WORKS, as you eliminate the drying stresses by slowing it down
Last edited:
Leo pretty much nailed it. Whether a turning needs to have drying slowed or not very much depends on the wood species, thickness, shape, and defects in the surface. For me, using kraft paper, bag/sheets/etc to slow drying and reduce loss is a very easy process to increase yield of projects I have put significant time into - harvest, cut blanks, mount and cut on the lathe. I may never learn the finer points of how to be more successful without using a “slower drying method”, and I accept that for now. When I fully retire and have more time this may be an area of experimentation to learn more.
