• Congratulations to 2024 AAW Member Exhibition Common Roots forum member finalists (click here for details)
  • Congratulations to Karl Hansen for "Untitled Basket Illusion" being selected as Turning of the Week for October 7, 2024 (click here for details)
  • Welcome new registering member. Your username must be your real First and Last name (for example: John Doe). "Screen names" and "handles" are not allowed and your registration will be deleted if you don't use your real name. Also, do not use all caps nor all lower case.

Wooden Teapot Project

Michael Anderson

Super Moderator
Staff member
TOTW Team
Joined
Aug 22, 2022
Messages
1,614
Likes
4,946
Location
Chattanooga, TN
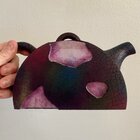
Here is a shot after a bit of work with the colors mentioned above. Fairly subtle at this point.

IMG_9628.jpg

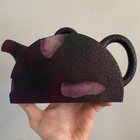
Here is a shot after several more layers of the same, focusing on increasing the saturation of the colors.

IMG_9629.jpg

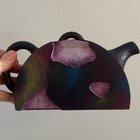
The following is a shot of the other side of the teapot at this point:

IMG_9630.jpg

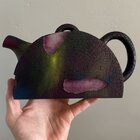
And here is a shot showing the top of the teapot at this point:

IMG_9631.jpg
 

Michael Anderson

Super Moderator
Staff member
TOTW Team
Joined
Aug 22, 2022
Messages
1,614
Likes
4,946
Location
Chattanooga, TN
And.....time to add more color. Unfortunately, this is the last shot I remembered to take of the paint on display. (aside from what is or has been photod, I probably used around 5 distinct colors, plus several mixtures). You can see below the cadmium yellow pale hue, the cadmium yellow medium, and the raw sienna. Each was used to either transition between green and yellow, or to transition between another color and gold/orange. Cadmium yellow pale hue has some green undertones (forgive my terminology, color theorists out there), but the cadmium yellow medium is more of a pure yellow (trends toward orange). The raw sienna is nice because it is a good accent color to put on top of the bronze yellow mentioned previously.

IMG_9635.jpg

Here is a shot of the teapot after several layers of paint:

IMG_9633.jpg

And here is a shot after a few more layers of paint:

IMG_9647.jpg

The side shown above, I wanted to focus a bit more on the golds, blues, and magenta, but on the other side I wanted to focus a bit more on the greens, yellows, and some blue accents. No real reason other than variety is the spice of life. Raku pottery colors are somewhat random (though probably directed in some way I don't know about), so I went with the same mindset for my teapot. The following is a shot of the other side of the teapot after a few layers of paint. The bright spot is an artifact of having to fix a small paint chip I made with my chisel on accident. It stand out here, but I blend it well enough later.

IMG_9634.jpg
 

Michael Anderson

Super Moderator
Staff member
TOTW Team
Joined
Aug 22, 2022
Messages
1,614
Likes
4,946
Location
Chattanooga, TN
I haven't yet mentioned, but throughout the painting process, I occasionally spray a light coat of lacquer to set everything in place. At this point (as of the last photo), I had probably sprayed three individual coats of lacquer. Here is a shot of the same side of the teapot with some more paint added:

IMG_9636.jpg

And here is a shot with several more layer of paint added:

IMG_9644.jpg

I was also working on the bottom of the teapot as well, though I haven't shown it yet. I kept the colors relatively dark, but still added a good bit of variation and gradients.

IMG_9646.jpg

As an aside, and I mentioned this at some point prior, the hole that I had to fix on the lid just looked too obvious. So, instead of keeping something that looked like a fix, I just decided to drill a small hole through my repair and make the copper pin visible from the exterior. Not ideal, but I think it looks more intentional in the end. Plus, the little glimpse of copper invites the viewer to open the lid and see the hollow interior. Here is a very crappy photo showing the open pin hole.

IMG_9653.jpg
 

Michael Anderson

Super Moderator
Staff member
TOTW Team
Joined
Aug 22, 2022
Messages
1,614
Likes
4,946
Location
Chattanooga, TN
I added quite a few more thin layers of paint, but for the sake of not ruing the surprise, I won't post those photos. Following the conclusion of my paint, I used a chisel to clean up any burn lines that were filled with paint (this took a while), and then I sprayed several coats of semi-gloss lacquer (from a rattle can, nothing fancy, though I am planning to get an HVLP setup soon). This is where my first big d'oh! moment happened. Rule of thumb is that fresh lacquer and adhesive don't mix. Rather, fresh lacquer sort of melts the adhesive. Because of this oversight, when I removed my masking tape from the recessed areas, there was so much fine adhesive reside left over. Oh my gosh, I had a mini-panic moment because I obviously had to clean it up, and I had to do it in a way that wouldn't harm my paint/lacquer. Fortunately, an easy way to clean up adhesive reside is with oil, and I had previously oiled my wood. I simply added some more oil (hemp oil in this case), to the recessed areas, let it sit for a while, and then rubbed them clean with a paper towel. Residue erased--whew!

My other d'oh! moment was when I went to spray lacquer on my lid cavity and collar/insert. I didn't mention this, but I used India ink to blacken the interior of the teapot, collar/insert, and lid cavity and underside. I masked off the entrance to my teapot interior with blue painter's tape, as well as put tape over the wooden recesses just to prevent overspray (keep in mind this is after I sprayed my final coats of lacquer):

IMG_9660.jpg

After I sprayed the lacquer, I was left with a couple issue. The minor issue was that the tape on top dulled the semi-gloss, so that that you could see an outline of the paint. No big issue there--I simply lightly rubbed the top with a grey scothbrite pad, cut out some paper masks to protect the wooden recess on top, and then sprayed another coat of lacquer. Fixed!

The bigger problem was that when I removed the tape from the sides of the teapot, a couple of areas (at the border of the recesses) of lacquer/paint adhered to the tape and I was left with black spots.

E831AC32-436F-4A53-973D-BC058ED2D58C.JPG

What to do? Well, I got a bunch of paint back out, did a bunch of mixing, and spot fixed the area that needed repair.
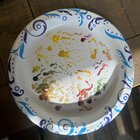
IMG_9669.jpg

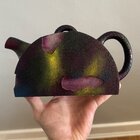
Super tedious, albeit somewhat enjoyable, and the results looked okay. Not perfect, but good enough to be satisfied (and more importantly, good enough to not look like a fix). Here is a shot before I added the final layering touches to one of the fixes.
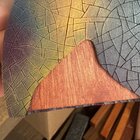
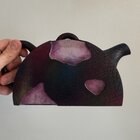
IMG_9666.jpg
 
Last edited:

Michael Anderson

Super Moderator
Staff member
TOTW Team
Joined
Aug 22, 2022
Messages
1,614
Likes
4,946
Location
Chattanooga, TN
As far as progress photos, that's all I have to share! I'll post final photos to the gallery later. For now, here is a little teaser shot of the teapots booty, showing the lid open and pin visible.

_DSC7464.jpg

After most projects, likely similar to everyone else, I like to think about changes I would make or things I would do differently to make the process easier. I think reflecting on the process and final product is an important part of the journey. Here is a list of things I would change with this project:
  • I thought it would be nice to have a lacquer finish on the painted area, and an oil finish on the wooden area. Though I sort of like the look, it made for a heck of a lot of problems. If I do something similar, I will like have a lacquer finish over the entire piece.
  • I would decrease the prominence of my registration pin for the lid, so that I'm at less risk of exposing the hole on the lid. Although I sort of like the look of the visible pin when the lid is closed, I would rather have it invisible.
  • For some reason I thought it was a good idea to ebonize the insert and the lid cavity. However, it would be much better if I left those natural. This was an instant regret when I applied the India ink. I think it looks alright, but having the black there sort of ruins the continuity of the wooden section.
  • I would like wait to route until after I was done ebonizing. This might lead to other issues, but it would save a lot of time and grief.
  • Although I am satisfied with the paint job overall (raku does not leave a totally clean surface, so I'm not worried about everything being perfectly smooth), I think I could've made it a bit better with some airbrush work on top. This is a skill that I have procrastinated learning, but I think it's about time to remedy that.
  • When joining the two teapot halves together (way back on post #4 in this thread), I didn't really need as tight of a connection, and I didn't really need to create as big of a gap for glue to escape. These seemed important at the time, but are unnecessary.
  • Instead of leaving a glue joint in the middle of the teapot, I think I would offset it. Though this was necessary here given my blank size, for the next teapot I do (or similar) I might try to mask the junction in a corner. It will be a bit more challenging logistically, but would work well.
  • Although I liked the CA glue finish to fill in the pores of the Sapele, it was ultimately unnecessary here. Nice enough for the bare wood, but most of that was covered with ink/paint, so it was sort of wasted time in the end.
  • I would try to use all of the same wood. The spout turned out alright, but you can see with the Koa handle, the burn lines are wider than the rest of the teapot. Not really that noticeable unless you know, but still...
  • Given that I was inking and painting anyway, I probably would have just drilled through holes to attach the spout and main handle. That would’ve taken some of the guesswork out of positioning them.
I'm sure I am forgetting a couple of things, but that's probably good enough. If you made it this far, thanks a lot for following along! It takes a bunch of extra work to do these things, but it's pretty fun. And years from now, it will be cool to look back on this project.

Anyway, onward and happy turning!

Michael
 
Joined
Jul 5, 2022
Messages
242
Likes
63
Location
Lima, Peru
Here is a shot after a few layers of the mixture from above. The difference between this and the previous teapot shot is somewhat subtly, but you can see a much deeper gradient (value contrast) between certain areas.

View attachment 67514

For a top color (top at this point), I used another acrylic gouache, turquoise deep.

View attachment 67515

After a few coats, I ended up with the following.

View attachment 67516

The key here is subtlety. When dry brushing, especially on a relatively flat surface like the teapot, you want as little paint on the brush as possible. I typicaly use a paper plate as my pallet. No real reason other than convenience (they're cheap disposable). I usually put a bit of paint on the plate, dab my brush into it and move it around the plate a bit to remove paint (and create a uniform filling on the brush). Then, I rub the brush on a paper towel to remove as much paint as possible. When I'm moving over the painted surface, I use fast, light, whispy strokes. This keeps the visible strokes and splotchiness to a minimum. The downside is that it requires many layers. Fortunately, because you're using so little paint, there is fairly little down/drying time between coats.

Time for more color! For some parts of the teapot, I want to add green and yellow color variations. I started with some fairly dark sap green permanent and some bronze yellow, laying down individual layers of each, as well as a couple layers of these mixed together.

View attachment 67517
Great! I clearly understand everything you’re explaining (I studied fine arts 😁). You’re achieving a more exquisite and complex color that will convey a deeper sense of warmth and emotion.
 
Back
Top