-
April 2025 Turning Challenge: Turn an Egg! (click here for details) -
Congratulations to Kelly Shaw winner of the March 2025 Turning Challenge (click here for details) -
Congratulations to Guillaume Fontaine for "Nebules" being selected as Turning of the Week for April 6, 2025 (click here for details) -
Welcome new registering member. Your username must be your real First and Last name (for example: John Doe). "Screen names" and "handles" are not allowed and your registration will be deleted if you don't use your real name. Also, do not use all caps nor all lower case.
You are using an out of date browser. It may not display this or other websites correctly.
You should upgrade or use an alternative browser.
You should upgrade or use an alternative browser.
What’s on your lathe?
- Thread starter Rusty Nesmith
- Start date
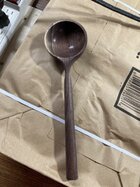
Looks like you could teach it! WOW!First try at a spoon.
I’ve been wanting to do some spoons like that, most of the ones I had done were hand carved. I saw a video on making those, did you remove one of the jaws on you Chuck to hold it or make a fixture?First try at a spoon.
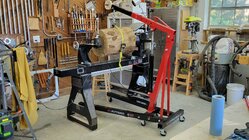
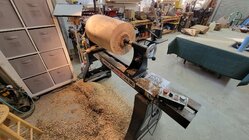
Working on one of my three “ bring them in the booth bowls”. It is walnut, 16-1/2” and should end up between 6-1/2 to 6-3/4” tall. Will turn the inside this afternoon. I have another walnut to second turn that is a little larger and an ambrosia maple that is 18” before the second turn. Probably go for 3/8” thickness on this one instead of 1/4”. Looks like the grain pattern on the outside bottom will be on the inside bottom.
I had 3 this size at my last show and someone bought two of them and the gallery wanted the other one. I try to keep 2-3 large bowls because it brings people in, then they see the price and then buy a smaller bowl !
!


I had 3 this size at my last show and someone bought two of them and the gallery wanted the other one. I try to keep 2-3 large bowls because it brings people in, then they see the price and then buy a smaller bowl
!- Joined
- Apr 27, 2004
- Messages
- 9,152
- Likes
- 5,757
- Location
- Lakeland, Florida
- Website
- www.hockenberywoodturning.com
I saw a Michael Hosulak ladle demo. Between centers turns a ball on one end and the handle. Mounts wood in a chuck turns a jamb chuck to hold the ball and notches the rim of the jamb chuck for the handle. Hollows the ball to make the ladle bowl.I’ve been wanting to do some spoons like that, most of the ones I had done were hand carved. I saw a video on making those, did you remove one of the jaws on you Chuck to hold it or make a fixture?
For extra credit Michael steam bent the handle.
Exactly. Used the chuck to hold it.I’ve been wanting to do some spoons like that, most of the ones I had done were hand carved. I saw a video on making those, did you remove one of the jaws on you Chuck to hold it or make a fixture?
Something a little different. Everyone has these beautiful bowls/blanks on their lathes. I am currently turning 'Pens for Troops'. Here is my drilling setup and pen mandrel. Blanks are Walnut.

Finished up the black walnut today and a little cedar bowl. Had a knot fall out of the cedar so it gave me an opportunity to try turquoise inlay for the first time.


Walnut and Osage orange glue up.

Grabbed a chunk off of the cherry burl to see what it looks like inside. Pretty rotten and soft.

Going to see if epoxy wash will help.


Going to see if epoxy wash will help.
Ooh. I’d move on. . . .Grabbed a chunk off of the cherry burl to see what it looks like inside. Pretty rotten and soft.
View attachment 67979
Going to see if epoxy wash will help.
View attachment 67980
View attachment 67981
Just off the lathe, Screw top basket illusion box out of bradford pear. Finial from pine cone core.

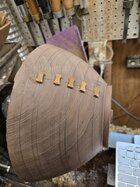
Working on an end grain cherry bowl with 3 walnut legs. The center was rotten so I made a plug out of home made plywood where each layer is made up from 4 squares. The plug was tapered so that it would fit without any gaps, but I didn't get it in square to the bottom of the bowl. At least one layer should be extra thick so that the inside of the bowl can be rounded with out going through the ply.
The next pic is trimming the legs using my lathe mounted miter box.
The bowl was turned green down to about 3/8" wall thickness then let to dry for about a month and a half with very little distortion. I have another one from the same tree and the same rotten core so I should be able to do a better job on that one.
Roughed out a big bowl. Pretty simple shape. Over 11 inches in diameter. Might microwave it to dry sooner vs a couple weeks in a paper bag. Bagged it for now. 
Let's try this again!


Grabbed a chunk off of the cherry burl to see what it looks like inside. Pretty rotten and soft.
I turn a lot of iffy wood, but I'd toss that one in the fire box. But here's hoping you prevail.
 A little plum bowl.
Cool grain.View attachment 68013A little plum bowl.
Hasn't killed me so far! Don't think I'm going to go any thinner. Put more epoxy on the inside and outside. Will let it cure overnight and will see.I turn a lot of iffy wood, but I'd toss that one in the fire box. But here's hoping you prevail.

Scored another bunch of maple today.

Hasn't killed me so far! Don't think I'm going to go any thinner. Put more epoxy on the inside and outside. Will let it cure overnight and will see.
View attachment 68016
Wow. Can’t believe you saved it.
Nice work!
Bob
Cedar crotch. I bumped the rim with the gouge and blew it apart. I got it back together, but the crack is clearly visible. I didn't have a good method of clamping it. Unfinished, but with Yorkshire grit applied.


Working on a cuban mahogany bowl. Love this grain.

I also finished a small crepe myrtle bowl. The finish is just half and half oil from Real Milk Paint co.

I also finished a small crepe myrtle bowl. The finish is just half and half oil from Real Milk Paint co.
Cedar crotch. I bumped the rim with the gouge and blew it apart. I got it back together, but the crack is clearly visible. I didn't have a good method of clamping it. Unfinished, but with Yorkshire grit applied.
View attachment 68021View attachment 68022
View attachment 68023
A few pewas and it will be decorative. I hate when I do that with a gouge.
Love the figure.
Bob
Poured some left over resin from the other day into a small container. Trying to make something with it. Might make a miniature Christal ball. Resin on the cherry bowl is still curing.

Worth saving.Cedar crotch. I bumped the rim with the gouge and blew it apart. I got it back together, but the crack is clearly visible. I didn't have a good method of clamping it. Unfinished, but with Yorkshire grit applied.
View attachment 68021View attachment 68022
View attachment 68023
I'm easily distracted!
Had a small piece of the Mexican Royal Ebony left on the lathe from the ornament. Decided to try an off axis turning. Cherry wood for the box.

Wasn't quite what I was looking for. Did another all in maple. Varnish finish.

Had a small piece of the Mexican Royal Ebony left on the lathe from the ornament. Decided to try an off axis turning. Cherry wood for the box.
Wasn't quite what I was looking for. Did another all in maple. Varnish finish.
Last edited:

The minister at the church where we've been attending is retiring at the end of the year and I was asked to make something for him. So I turned this communion set. I found an old, broken pew in the basement and used the oak from that for this project. There wasn't a lot of good wood, so I added some Sapele in the middle of the plate to make it wide enough, and a piece of walnut in the center of the chalice just to add some contrast/interest. The carving in the middle of the plate was on the pew, so I glued it onto the plate. I coated both sides of the chalice cup with West System epoxy to make it waterproof and usable.
It will be presented to him at his Nov. 10 retirement dinner.
Oh, and I made the little stand for the plate from the same pew oak.
Very nice. It will mean a lot to him.
It was. I'll give it to friends or family.Worth saving.
Cherry burl is still hanging in there! Working on finish now.

Grabbed a chunk of walnut out of the scrap bin while I was waiting for the paint to set on the burl. 1 inch high by 3 1/2 long.


Decided to finish the apple wood hollow form. Putting final coat of lacquer on it. Measures around 9”x 8” and weight is 14 ounces. I’ve been careful not to sneeze around it for fear it will explode  .
.
Currently looking for the Beholder family


. Currently looking for the Beholder family
You could put a diorama in there!
I have a friend who is a caricature carver, I put him to workYou could put a diorama in there!
- Joined
- Nov 27, 2021
- Messages
- 168
- Likes
- 677
- Location
- Silver Spring, MD
- Website
- www.transpirationturning.com
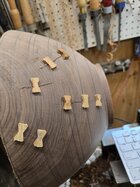
Fast. Takes me longer to apply painter tape on template and bowl, wait for hot glue to dry, then to cut with router. What are your shortcuts?Popping in a plethora of (perfect?) pewa.
It took 22 minutes to cut 13 pockets.
- Joined
- Nov 27, 2021
- Messages
- 168
- Likes
- 677
- Location
- Silver Spring, MD
- Website
- www.transpirationturning.com
See the "trends" thread. Custom built CNC. All the jigs and templates rolled into a single machine.Fast. Takes me longer to apply painter tape on template and bowl, wait for hot glue to dry, then to cut with router. What are your shortcuts?
Attachments
Got a longleaf pine cone cigar pen done today. Ive been shaving down a garbage bag full of longleaf pine cones I picked up at FDR State Park here in Georgia on the bandsaw.