Thanks. I've been using card scrapers and scraper planes for years, as well as hand burnishing and using the Veritas burnisher for turning scrapers for several years. I thought he might be doing something I wasn't aware of. I do like the Veritas burnisher. It controls the angle much better than by hand, and with the 5° and 10° angled burnishers I get more use out of an edge before grinding again. I don't just polish the bottom edges of scrapers, I like to round them off a bit. They glide more easily when turned at an angle for sheer scraping.
-
January 2026 Turning Challenge: Turned and Bent! (click here for details) -
Congratulations to Phil Hamel, People's Choice in the December 2025 Turning Challenge (click here for details) -
Congratulations to David Wyke for "Maple Platter #567" being selected as Turning of the Week for January 5, 2026 (click here for details) -
Welcome new registering member. Your username must be your real First and Last name (for example: John Doe). "Screen names" and "handles" are not allowed and your registration will be deleted if you don't use your real name. Also, do not use all caps nor all lower case.
You are using an out of date browser. It may not display this or other websites correctly.
You should upgrade or use an alternative browser.
You should upgrade or use an alternative browser.
Show us your tool rack/cart
- Thread starter Douglas Ladendorf
- Start date
Mark Hepburn
Artist & Chef
On a more serious note... Odie, do you collect license plates? I had a friend who, until he passed away a few years ago, collected them. He owned the local vehicle inspection station and got them from all over. Anyway, if you do, and you'd like a Louisiana plate, let me know.
I know a guy...
:-D
I know a guy...
:-D
Odie
Panning for Montana gold, with Betsy, the mule!
On a more serious note... Odie, do you collect license plates? I had a friend who, until he passed away a few years ago, collected them. He owned the local vehicle inspection station and got them from all over. Anyway, if you do, and you'd like a Louisiana plate, let me know.
I know a guy...
:-D
Howdy Mark.....
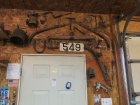
I never really started out to collect license plates, but I accrued a few on my own over the years......then a few neighbors and friends offered some of theirs, when they saw I put them on my shop wall. The number of plates grew from there. Still, I really don't consider myself a "collector", it was something that just sort of happened on it's own.......but if you've got one you'd like to send me, I'd be happy to put it on my wall......and, thanks for the offer. Let me know the postage, and I'll pay for that.
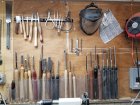
I also have some antique tools and nick-knacks on another wall......same story.......never intended to be a collector. Sort of accumulated these things over the years, and eventually decided to "adorn" one of the walls of the shop with them. I sort of like having them there, now!
-----odie-----
Mark Hepburn
Artist & Chef
Howdy Mark.....
I never really started out to collect license plates, but I accrued a few on my own over the years......then a few neighbors and friends offered some of theirs, when they saw I put them on my shop wall. The number of plates grew from there. Still, I really don't consider myself a "collector", but if you've got one you'd like to send me, I'd be happy to put it on my wall......and, thanks for the offer. Let me know the postage, and I'll pay for that.
I also have some antique tools and nick-knacks on another wall......same story.......never intended to be a collector. Sort of accumulated these things, and eventually decided to "adorn" one of the walls of the shop with them. I sort of like having them there, now!
-----odie-----
View attachment 29102
When I run across one I'll send it but can't charge a friend for a couple bucks postage.
Mark Hepburn
Artist & Chef
Odie
Panning for Montana gold, with Betsy, the mule!
When I run across one I'll send it but can't charge a friend for a couple bucks postage.
Mark.......
Since I offered, you wouldn't technically be charging for postage......but, I get it, and will gladly take a license plate for the gesture it represents. Thank you, Friend.
-----odie-----<><
Antique? I still use a good many of those. The eggbeater drill, the push drill, etc. I do have a drill few have, a bung hole drill with a reamer incorporated. Still has the original paint. Only used it once so I could install a wooden tap.Howdy Mark.....
I never really started out to collect license plates, but I accrued a few on my own over the years......then a few neighbors and friends offered some of theirs, when they saw I put them on my shop wall. The number of plates grew from there. Still, I really don't consider myself a "collector", it was something that just sort of happened on it's own.......but if you've got one you'd like to send me, I'd be happy to put it on my wall......and, thanks for the offer. Let me know the postage, and I'll pay for that.
I also have some antique tools and nick-knacks on another wall......same story.......never intended to be a collector. Sort of accumulated these things over the years, and eventually decided to "adorn" one of the walls of the shop with them. I sort of like having them there, now!
-----odie-----
View attachment 29102
Odie
Panning for Montana gold, with Betsy, the mule!
Antique? I still use a good many of those. The eggbeater drill, the push drill, etc. I do have a drill few have, a bung hole drill with a reamer incorporated. Still has the original paint. Only used it once so I could install a wooden tap.
I suppose all of those old tools could be used again. You know......I once fired up that blow torch out of curiosity. This was probably about 40 years ago! It worked just as well as it did 100 years ago! Who knows how I ever got the instructions to light one up?......If I remember correctly, it used gasoline for fuel!
To me, they are all "wall hangers"!
-----odie-----
Edit: Made me curious......again. I found a tutorial on lighting a gasoline blowtorch on YouTube. I don't think I'll try to fire it up again......lighting that old blowtorch might be tempting destiny!
Last edited:
I remember, my dad using an old gasoline fueled lead pot to melt a quantity of lead for old cast iron sewer pipe. It was like a really steroidal heavy duty coleman lantern, with a burner and a pot on top for the lead to melt in. I still use a brace and bits for mounting gates to posts. Used a scythe to mow a bank for 20 years. Seemed faster than using a weed wacker. I have an old Pratt-Whitney hand crank drill press that I still use sometimes. It is made like the egg beater drill but has a base that clamps to a work bench.
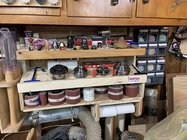
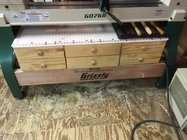
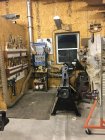
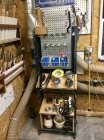
Well I just rd-did some of my setup. I added the sandpaper "holder" and made a "chuck cart" I turned on this lathe for the first time and didn't have any problems with the sandpaper configuration getting chips in the baskets. The chuck wagon is on wheels, and repurposed display rack. This is this month's design.


Odie
Panning for Montana gold, with Betsy, the mule!
Bump on this thread......
It's great to see other turner's shops. Since we have so many new forum members, maybe a few would like to show us their creative ways of organization.
I posted here in 2019, and I'm amazed at how my own shop has evolved! I get a lot of ideas for improvements, and my motto of "do it now" makes many changes happen that wouldn't otherwise. I am very much concerned with making my processes "convenient"......what I need, when I need it, has to be right there and easy to use. New "improvements" either get used, or they don't. If they don't, often times they end up getting revised......until they do!
-----odie-----
It's great to see other turner's shops. Since we have so many new forum members, maybe a few would like to show us their creative ways of organization.
I posted here in 2019, and I'm amazed at how my own shop has evolved!
-----odie-----
Last edited:
Yeah this thread is fantastic, good bump. Right now I have my tools sitting on a table, one rolled of and chipped my carbine tip.Bump on this thread......
It's great to see other turner's shops. Since we have so many new forum members, maybe a few would like to show us their creative ways of organization.
I posted here in 2019, and I'm amazed at how my own shop has evolved!I get a lot of ideas for improvements, and my motto of "do it now" makes many changes happen that wouldn't otherwise. I am very much concerned with making my processes "convenient"......what I need, when I need it, has to be right there and easy to use. New "improvements" either get used, or they don't. If they don't, often times they end up getting revised......until they do!
-----odie-----
Odie
Panning for Montana gold, with Betsy, the mule!
It's a good idea to make a photo record of your shop every few years. Comparing photos is truly an eye-opening experience
It's also helpful if you have to file an insurance claim.
- Joined
- Feb 6, 2010
- Messages
- 3,475
- Likes
- 2,558
- Location
- Brandon, MS
- Website
- threeringswoodshop.square.site
It's a good idea to make a photo record of your shop every few years. Comparing photos is truly an eye-opening experience on just how much your shop does change over time.
6[/ATTACH]
It also might help find that tool you lost
Odie
Panning for Montana gold, with Betsy, the mule!
It also might help find that tool you lost
Ha,ha......
I don't recall losing any tools.....but, then again......my memory suffers an age related deficit these days!
(I understand that it gets worse!
-----odie-----
t also might help find that tool you lost
Tools don't get lost, just misplaced until the job gets done another way, then they are right where you put them.
Stu
Great thread.
I spent a long time trying to come up with the "perfect" tool rack and finally realized that because my turning methods change, and my set of tools changes, and my range of projects changes all the time, I needed something flexible. Cheap is good too. And portable. So I made this cheap-ass tool rack out of a couple of milk crates, some old casters I had in the shop, a scrap of melamine, and zip-ties. It may not be perfect and it's certainly not pretty, but it has served my needs just fine for years now and I haven't felt a need to change a thing. The tools are handle up so there are no exposed points, but the points are easily visible. There are no magnets to make my tools all sticky. I can roll it to wherever I need it to be, though it usually tucks into the space between my lathe and the wall where I can reach everything but it's out of the way. The little triangular holes at what used to be the top edge of the crate are a good size for scissors, glue pipettes and smaller tools like scrapers or detail gouges. It cost $0 to make, took me about 20 minutes, and works like a champ.
This photo was taken right after I made the rack. I no longer store my chucks in this rack since I didn't like putting my hands down there where the pointy things are, and was worried about running a tool edge into a chuck body. The chucks now live on a shelf that's right behind me as I stand at the lathe. The items inside the top crate are now mostly soft or small things I don't use a lot (spot putty, leather pads and gaskets). The bottom crate is where I park my drill for power sanding and the box containing my Beall buffer kit.
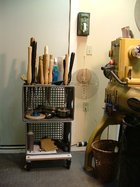
This photo was taken right after I made the rack. I no longer store my chucks in this rack since I didn't like putting my hands down there where the pointy things are, and was worried about running a tool edge into a chuck body. The chucks now live on a shelf that's right behind me as I stand at the lathe. The items inside the top crate are now mostly soft or small things I don't use a lot (spot putty, leather pads and gaskets). The bottom crate is where I park my drill for power sanding and the box containing my Beall buffer kit.

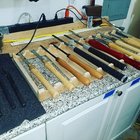
I got tired of just laying mine down next to the lathe and just whipped together a flat, tray-style tool rack today. I added rubber bumpers to keep it from sliding and raise it off the surface to make removing shavings & dust easier. Someone gave me the idea of using a hole saw for this and it plus the drill press worked just fine. Next model will be closer together, I think but this works for now and is also portable; made w/ cutoffs from other projects. I'm still building out my tools, as the newbie that I am. Once I reorganize my lumber storage I'll make a more permanent, vertical solution or three. 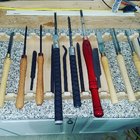 .
. 
 .
. 
Odie. What's in the Folgers container at your sharpening station?It's a good idea to make a photo record of your shop every few years. Comparing photos is truly an eye-opening experience on just how much your shop does change over time.
Here's an example:
View attachment 35826
Odie
Panning for Montana gold, with Betsy, the mule!
Odie. What's in the Folgers container at your sharpening station?
Hi John........ just H2O.....
-----odie-----
Thanks. I was just curious.Hi John........ just H2O.....
-----odie-----
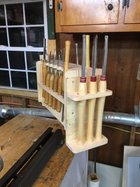
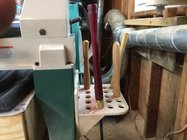
Hi Doug,All of my cutting tools are mounted under the lathe and some on the end, sliding into pvc pipes sharp end 1st All tool handle butt end are labeled as well as like tools co-located. Tool rests and chucks have an anchored spot on a shelf under the angled tools. Drawers underneath all that hold extra jaws and various other tool. The pics are a bit dark but all I have at the moment.View attachment 29016 View attachment 29017
I know this post dates from the dark ages, but it's guiding my own plan for a new turning tool storage "solution". Can you say/remember how you labelled all the tools? I definitely want to store my tools pointy-end down because I know I'll just end up impaling myself on something sometime, if I don't. But it will be hard to know which tool is which without labels as good as yours.
Also, what is at the bottom of the tubes? Or are the tools stopped from falling through by tubes small enough to catch the ferrules? My tools are of radically different lengths, and I really like the way all your handles are roughly in lines, making it easy to pick one without having to reach down through a forest of other handles.
Thanks in advance for your help.
Tim
I built a 3 level cart with shelves, pvc pipe for tools, peg board to hang stuff on on wheels.I'm finding myself sticking tools hear and there and need to make a proper tool rack or cart so they are organized and accessible. I'm looking for ideas and would love to see how you have solved this. What do you like or don't like about what you have? Any plans to change or expand? Does it include chucks and other accessories?
Thanks!
Doug
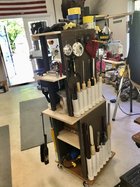
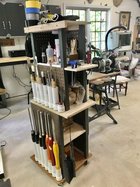
I use std Avery round dot labels, 3/4” dia I think. I use an avery Word template for the specific label #. I made up what goes on the labels, ie 5/8 BG. I use white letters with the circle background colored. I change background color for a different grind, 5/8 BG Ellsworth is a different color than a 5/8 BG 40/40 grind. I made up various id’s for scraper type. Printed with a std ink jet printer. Could be hand written over a magic marker colored background, use light colors and a black marker for writing.Hi Doug,
I know this post dates from the dark ages, but it's guiding my own plan for a new turning tool storage "solution". Can you say/remember how you labelled all the tools? I definitely want to store my tools pointy-end down because I know I'll just end up impaling myself on something sometime, if I don't. But it will be hard to know which tool is which without labels as good as yours.
Also, what is at the bottom of the tubes? Or are the tools stopped from falling through by tubes small enough to catch the ferrules? My tools are of radically different lengths, and I really like the way all your handles are roughly in lines, making it easy to pick one without having to reach down through a forest of other handles.
Thanks in advance for your help.
Tim
The end of handles are cut off to 3/4-1” dia hi
The tubes are sized so the ferrule fits and the front handle bulge stops it. I cut pvc union fittings in 1/2, use a 1/2 at each end of the pipe. The top end pipe/union is routered with a radius bit.
I make a box, router a rabbet to hold ~1/8” ply which is hole sawed for each tube. A “tube guide” ply layer goes in the top and bottom of the box. Box is fully assembled, then the tubes inserted. There are simpler ways to do it.
I modified Ron Browns roll around tool rack and I find it better than the original set up. The tubes that hold my tools are PVC that has a cap on the end and an electrical connector on the other end that is held in place by electrical connector. Almost 4 years of frequent use and it's still going strong. In four years, I've only managed to cut myself once and a bandaid took care of the cut.
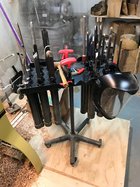

Nice collection of Thompson tools.I modified Ron Browns roll around tool rack and I find it better than the original set up. The tubes that hold my tools are PVC that has a cap on the end and an electrical connector on the other end that is held in place by electrical connector. Almost 4 years of frequent use and it's still going strong. In four years, I've only managed to cut myself once and a bandaid took care of the cut.
View attachment 45619
Brian Horais
In Memoriam
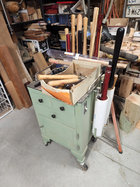
That looks like a very functional cart Paul. I modified an old medical cart (with wheels) to hold tubes for my turning tools. The back tubes are square plastic covers for fence posts that I modified by inserting crossing wood dividers to create four locations per tube. I use the drawers to keep my various drives and sanding attachments. I keep the cart very near the end of my lathe for easy access.I modified Ron Browns roll around tool rack and I find it better than the original set up. The tubes that hold my tools are PVC that has a cap on the end and an electrical connector on the other end that is held in place by electrical connector. Almost 4 years of frequent use and it's still going strong. In four years, I've only managed to cut myself once and a bandaid took care of the cut.
Attachments
Odie
Panning for Montana gold, with Betsy, the mule!
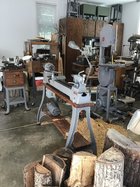
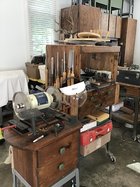
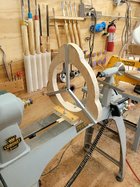
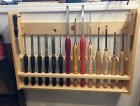
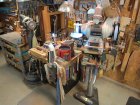
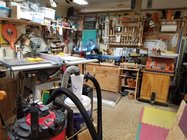
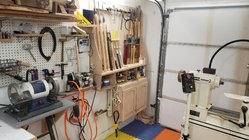
My stuff is old... but made my rolling tool cart and sharpening stand.
If not abused, and maintained, there is nothing wrong with some of the older equipment.
Can you give me model numbers, and photos of your drill press and band saw, please?
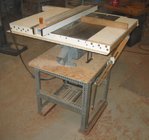
I'm still using the same 1950's Delta table saw that I originally purchased at an estate sale, back in the mid-1970's! It was rebuilt by me back in the 1990's.....or, maybe that was in the 1980's......my memory isn't so good about that. I added a new motor, table extensions, and Beismeier (sp) fence for it. For basic sawing, it still works as well as it ever did...
-----odie-----
Last edited:
The drill press is a “Buffalo No. 15 Heavy Duty Floor Drill”. There are actually two heads on one floor -length column; one head is mounted low. The lower head normally resides on a bench column/stand but I’m trying to save some space. The band saw is a 14” late-30’s Delta Model 890. The model number was later changed to 28-207 with a steel, flared leg stand or 28-205 if purchased with the art-deco cast iron stand. I’ve been restoring older machines in anticipation of retirement and a larger shop.
Your saw appears to be a 10” tilt-table Model 1160 although they made a similar 8” but the model number escapes me.
Your saw appears to be a 10” tilt-table Model 1160 although they made a similar 8” but the model number escapes me.
Last edited:


![DSC_0794[1].JPG DSC_0794[1].JPG](https://www.aawforum.org/community/data/attachments/42/42871-a2bf67580dc6290bab4d615a1209c7fa.jpg?hash=or9nWA3GKQ)
