Titebond II or III diluted 10 to 20% works very well particularly on rough turned bowls. Seldom do I get any cracking. Works well on logs too. Craft Supply sells a PVA sealant that they make great claims for. Anchorseal wax is too messy for me.

-
April 2025 Turning Challenge: Turn an Egg! (click here for details) -
Congratulations to Kelly Shaw winner of the March 2025 Turning Challenge (click here for details) -
Congratulations to Ellen Starr for "Lotus Temple" being selected as Turning of the Week for 21 April, 2025 (click here for details) -
Welcome new registering member. Your username must be your real First and Last name (for example: John Doe). "Screen names" and "handles" are not allowed and your registration will be deleted if you don't use your real name. Also, do not use all caps nor all lower case.
You are using an out of date browser. It may not display this or other websites correctly.
You should upgrade or use an alternative browser.
You should upgrade or use an alternative browser.
Sealing wood
- Thread starter John Torchick
- Start date
-
- Tags
- anchor seal sealing wood
Yep: Bradford Pear sealed with Tightbond II. Big one is about 28"in diameter x 4ft long


I would love to get ahold of some Bradford Pear.
Our club buys AS in 50 gal drums. Works out to about $12 a gal. I do what John Lucas does. Cut logs 2" longer than the dia. Stand them up and put to coats of AS on the end. Can stay with no cracks for months.
As for the Bradford Pear, I read an article some where that states it is now considered an invasive species. Pear is nice to turn.
robo hippy
robo hippy
I use Anchor Seal, but painting it on was always time consuming to get it properly coated. I finally found a use for my Wagner Power Painter "airless" sprayer! I now use it to apply the AS. It goes on quickly and fairly evenly. You just need to cover the area with a polyethylene "drop cloth" (I use heavier poly sheets that I just roll/fold and store until next time.)
Since I don't use the Wagner for anything else, I'm not too worried about cleaning it up perfectly. I figure the wax will keep it protected and lubricated for the next time.
Since AS has now doubled in cost (I think that's for the new Poly Vinyl Acetate PVA formula), I've tried using Elmers/Titebond/etc. in the gallon bottle which is about the price of the orignal AS ~$15.00/gallon. And what is Elmers/Titebond? PVA glue of course!
I'll set some aside for you. I have 5 more trees to take down due to some kind of blight, so there will be plenty of it. Even the small pieces are useful. the pieces shown here are about 5-6 inches in diameter. I will check to see how many suitable blanks may fit into a USPO flat-rate box.I would love to get ahold of some Bradford Pear.
I was having a "senior moment" and got the lids mixed up: see below. Talk about "outhouse luck" each lid was a snap fit and would fit either body?? The top pulls are hawaiian sandlewood aka illeahi. The roughed out blanks took about two months to dry sealed with yellow glue


very happy with the results of standard PVA wood glue. I use titebond I
The state of South Carolina has banned the planting of Bradford Pear. Since we have no problems here, our legislature has plenty of time to deal with tree issues.
As for the Bradford Pear, I read an article some where that states it is now considered an invasive species. Pear is nice to turn.
Here’s a link to the New York Times article about Bradford pear that ran last year. https://www.nytimes.com/2021/11/26/...ytcore-ios-share&referringSource=articleShare
I find the wood very pleasant to turn, but generally lacking in interesting grain or figure. A good base for dying or otherwise embellishing though.
Same here in Ohio. They just banned it over the summer.The state of South Carolina has banned the planting of Bradford Pear. Since we have no problems here, our legislature has plenty of time to deal with tree issues.
Maybe you are not turning the Bradford Pear we have down hereHere’s a link to the New York Times article about Bradford pear that ran last year. https://www.nytimes.com/2021/11/26/...ytcore-ios-share&referringSource=articleShare
I find the wood very pleasant to turn, but generally lacking in interesting grain or figure. A good base for dying or otherwise embellishing though.
.


Grand Central Avenue in Vienna, WV has a median lined with BP, unless they have now removed them all. Every strong windstorm a few shattered and when I lived there city crews cut them up for removal. They loved if someone else wanted to haul some away. Might be worth a call to Vienna city hallI would love to get ahold of some Bradford Pear.
These pears guard the entrance to my barn....these are the attack species

I would love to get ahold of some Bradford Pear.
Come and get some.


Stopped using Anchorseal and started using Tree Saver. A lot less crackes, half the drying time and you can dilute it. You can use PVA glue like Elmers too. The problem with Anchorseal is that it doesn't breath. Most turners target less than 12% MC to turn. Suggest you look iinto the humidity and temperature for your drying climate. Here you only get you wood under 12% MC two months out of the year unless you store your rough turned bowls inside with a dehumidifier. My drying room is kept in the low 60s with a dehumidifier set at 40%. Folks blaming their sealant for drying problems is misplaced.
Where do you get that. I googled tree saver and only anchorseal and a couple of others come up.Stopped using Anchorseal and started using Tree Saver. A lot less crackes, half the drying time and you can dilute it. You can use PVA glue like Elmers too. The problem with Anchorseal is that it doesn't breath. Most turners target less than 12% MC to turn. Suggest you look iinto the humidity and temperature for your drying climate. Here you only get you wood under 12% MC two months out of the year unless you store your rough turned bowls inside with a dehumidifier. My drying room is kept in the low 60s with a dehumidifier set at 40%. Folks blaming their sealant for drying problems is misplaced.
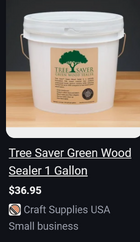
Look at Craft Supplies. Looks like a good price tooWhere do you get that. I googled tree saver and only anchorseal and a couple of others come up.
I use to buy the Rockler sealer, but no longer find it on their web site. I now get the Kilngspor green wood sealer @ $22.95 a gallon.I buy the green wood end sealer from Rockler. I get 2 gallons for $50 with free shipping. It last a long time.
Does the Tree Saver product breathe?The problem with Anchorseal is that it doesn't breath
If you stand them on end, (and on top of each other) you only really need to do the tops. It will make your Anchorseal go a lot further.
Not sure, but I think the "Tree Saver" is a PVA glue of some sort, or very similar to it. Think I heard that from Mike Mahoney, but can't remember exactly.
robo hippy
robo hippy
I have discovered another. In the building trade there are occaisions when you need to water proof brick walls. I found the water based product darn good and goes a long way.
 www.smartseal-business.co.uk
Brick Sealer | Waterproofer for Brickwork/Masonry
Suppliers of highly protective brick sealer and masonry sealers for all types of brickwork and walls. Order online today or by calling 01268 722500 for fast nationwide delivery
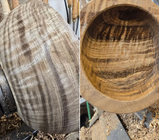
12 inch chatoyant Claro walnut bowl that I rough turned tonight. Chamfered sharp edges. Walls and bottom thichnesses are 10% of the diameter. Coated with Tree Saver.
Put on a shelf with breathing sheet hanging over the front the shelf. The room is controlled to 40% humidity and low 60Fs.
Should be dry enough, <12% MC, in a year. Will check.
Put on a shelf with breathing sheet hanging over the front the shelf. The room is controlled to 40% humidity and low 60Fs.
Should be dry enough, <12% MC, in a year. Will check.
Attachments
My best luck is with paraffin however on really wet wood it is better to let the blank air dry for a bit in front of a fan to remove the surface moisture. That makes the paraffin penetrate and stay on. If you put it on wet wood it will often turn white or light gray and end up cracking off. I have blanks sealed this way for years that have held up really well.
I have not had good luck with latex but have never put more than one coat on. Robo's idea of two coats with a layer of saran on while still wet makes a lot of sense.
I have had better luck with pva glue than I have with anchor seal for long term sealing.
Vacuum packing wood.
I have a twist on this idea that I haven't tried yet. You can buy a continuous roll of heat shrink plastic tubing in different widths from Uline. You heat seal one end, slide the object in and heat seal the other end and then use a heat gun and it shrinks down to conform to the shape. I used to package some products this way before I retired.
If the blank was allowed to air dry in front of a fan for a few minutes when it's fresh cut and then sealed it would at least be free of surface moisture. I assume it would mold up over time but the fact that no air can get to it makes me wonder. Also if there was a mild clorox solution or something safer that was sprayed on the outside before air drying would that help prevent molding. A second idea was to cut a small square opening on each side of the blank so there was a place for moisture to leave but it would be leaving from side grain not end grain so there should be no checking or cracking over time.
I have considered selling turning blanks from my sawmill and was considering using this method to seal the blanks before they were shipped or picked up. This method would not make sense for the everyday woodturner because of the expense of a larger impulse sealer and the roll of bags but it might for wood sales. I would be interested in your thoughts good or bad.
Sounds interesting. Is it clear plastic or solid color? Clear might be nice for remembering what's inside. It might also let you a hint of what's happening inside.
Chime in here about sealing.
There are a number of things that will work and I've tried many. My least favorite was latex paint - water vapor goes through it too easily and doesn't stop end-grain checking well. Two or three coats of latex are better, but even better is a coat or two of oil-based paint. Some sawmill/kiln operators recommend applying aluminum paint. However, my favorite is Anchorseal, or the same stuff sold under a different name (and at a premium price.)
It's cheaper too buy in quantity. I bought a 55gal drum of Anchorseal a LONG time ago, when the price was such I could sell (at my cost) to fellow turners for $6/gal. I used it at my sawmill and to seal many hundreds of turning blanks I cut from green wood over the years. I'm on my last few gallons and may drive up to the distributor one of these days for a 5-gal can or two.
The thing about Anchorseal is for me, it works. There are rare cases with certain types of wood and conditions where I get cracks, but for me almost all blanks of all species dry without cracks. (Some species require more care than others.) I dry all wood in my shop which has heat and air, keeping the thermostat about 68 in the winter and 80 in the summer.
I do apply Anchorseal to the ends of freshly cut logs but only as short-term protection until I can saw the logs into boards, or into turning blanks for woodturning.
I almost always turn dry wood so I usually cut the logs into blanks with the shop bandsaw (sometimes after sectioning big wood with a chainsaw or sawmill), seal, and dry. Some larger blanks take years to dry.
Processing the green wood on the bandsaw (for anyone interested, I made a video about this):
Note that if the goal is to temporarily preserve green log sections for turning green, there are other options and ways to manage the wood. If the goal is to save green logs for the long term there are a few different options, none of which involve sealing the ends. The best method is don't - turn the wood ASAP after bringing it home! I've heard voices of experience say never bring home more green wood than you can use in quickly. I've visited turners who ambitiously acquired way too much green wood and most of it was destined for the fireplace.
JKJ
There are a number of things that will work and I've tried many. My least favorite was latex paint - water vapor goes through it too easily and doesn't stop end-grain checking well. Two or three coats of latex are better, but even better is a coat or two of oil-based paint. Some sawmill/kiln operators recommend applying aluminum paint. However, my favorite is Anchorseal, or the same stuff sold under a different name (and at a premium price.)
It's cheaper too buy in quantity. I bought a 55gal drum of Anchorseal a LONG time ago, when the price was such I could sell (at my cost) to fellow turners for $6/gal. I used it at my sawmill and to seal many hundreds of turning blanks I cut from green wood over the years. I'm on my last few gallons and may drive up to the distributor one of these days for a 5-gal can or two.
The thing about Anchorseal is for me, it works. There are rare cases with certain types of wood and conditions where I get cracks, but for me almost all blanks of all species dry without cracks. (Some species require more care than others.) I dry all wood in my shop which has heat and air, keeping the thermostat about 68 in the winter and 80 in the summer.
I do apply Anchorseal to the ends of freshly cut logs but only as short-term protection until I can saw the logs into boards, or into turning blanks for woodturning.
I almost always turn dry wood so I usually cut the logs into blanks with the shop bandsaw (sometimes after sectioning big wood with a chainsaw or sawmill), seal, and dry. Some larger blanks take years to dry.
Processing the green wood on the bandsaw (for anyone interested, I made a video about this):
- Note: when processing log sections into blanks, I always remove the pith. Unless I have a targeted use, I cut the largest squares or rectangles I can get from the log.
- I generally cut so there is very little or no bark on the blank.
- I always trim the ends square, then do this which can save a lot of grief: cut an additional thin slice off the end grain and gently bend it to see if he breaks. This can reveal invisible cracks, ring shake, and other defects. If the thin slice breaks, I keep cutting away slices until I reach good wood (or cut the blank into a smaller blanks or just throw it away.)
- First, I rarely use Anchorseal directly as it comes - I think it's too thin and doesn't seal as well as I like. Two coats would be better but a second coat won't stick well to a dried 1st coat. (The stuff is a suspension of water, wax, and a surfactant)
- Anchorseal works better for my use if it's a little thicker. To make it thicker I simply pour a little into a container (I use a plastic coffee can). By a "little", I mean an inch or so. Then I leave the lid off for a few days until some of the water evaporates and the Anchorseal thickens.
- When applied with a brush, this thicker stuff seals better and still does not inhibit proper drying. Never get any mold. I apply with a cheap throw-away brush from HD, store it in the can with the lid on between uses. The brush never needs cleaning.
- Write the date (month/year) and species one side of each blank before sealing.
- Always seal the end grain. I seal the sides of the blanks under some conditions, such as wild grain, burl, etc. If cut from a relatively small log, one or two sided may be primarily transverse grain from close to the bark side of the log - I usually seal those sides since that's where most of the shrinkage occurs.
- I seal the sides of the blank in some other cases such dogwood, privet, or any side of SOME other species where there is both heartwood and sapwood that dry at much different rates and are almost sure to crack at the boundary. Much depends on the species, the individual tree, how the blank is cut, and whether there is reaction wood in the blank. Learning this requires a bit of research and experience.
- Put the sealed blanks on wire shelves and/or stacked to allow air circulation.
- Certain wet blanks will start to develop cracks regardless of how they are sealed. Because of this, I examine newly processed and sealed blanks after a week or two of air drying. If I see any cracks or checks developing, I immediately cut them away at the bandsaw and reseal. Since the stresses of this initial drying phase are the most severe, cutting away and resealing almost always stops any developing cracks and the blank dries to EMC without further cracking. I do periodically examine blanks later in the drying period and if I see any sign of a crack developing I cut it away as above - however this is rare.
- To track the drying, after this initial stage I pick some typical pieces from the batch to track the drying. By "some" I mean one or more depending on the number of pieces in the batch and the range of sizes in that batch. I apply a piece of tape to the side, weigh the blank on a good scale, and record the weight (in grams), the month and the year. Periodically (usually after a few months), I'll reexamine the drying blanks and reweigh the test pieces and again record the weight and date. When the weight quits dropping, the blank is dry.
- For blanks I buy that are not kiln dried, such as exotics such as blocks of olivewood, I track the drying the same way. Since these often come from the dealer sealed with a thick layer of paraffin, drying can take a LONG time - after some initial drying I sometimes scrape away most of the thick paraffin to speed up the drying.
- After the blank is completely dry, before turning, putting it back in storage, or giving it away, I might take it back to the bandsaw to square up warped sides. This also better reveals the true color and figure, often hidden by the drying process. If I see any cracks in a dry blank I might cut them away, or if minor, mark with a red sharpie so I can take note when turning. (Any time I clean up a blank at the bandsaw, I rewrite the species and original date on the side.)
Note that if the goal is to temporarily preserve green log sections for turning green, there are other options and ways to manage the wood. If the goal is to save green logs for the long term there are a few different options, none of which involve sealing the ends. The best method is don't - turn the wood ASAP after bringing it home! I've heard voices of experience say never bring home more green wood than you can use in quickly. I've visited turners who ambitiously acquired way too much green wood and most of it was destined for the fireplace.
JKJ
That´s what is called vacuum drying.That won't work ... at least not in the way that you hope it will. Here is what will happen:
I prefer Anchorseal and so far, I haven't found anything that beats it for my local climate. There are some places (Hawaii and Gulf Coast, for example) where Anchorseal might slow down the rate of evaporation too much and lead to molding. I have used plastic stretch wrap a few times and if I leave it on for more than a few days the wood turns black with mold. My wife had practically cornered the world wax market judging by all the candles we have, but my experience with paraffin wax has been less than encouraging ... and for me it's a big mess ... some wax on the wood, a lot of wax on my clothing and shoes, and even more wax on the driveway.
- First you put the wet wood in a plastic bag, seal it and then use a vacuum pump to remove the air. And, then . . . .
- The first thing that you encounter is you can't seem to evacuate the bag. (scratch head and say hmm)
- What is going on?
- First of all, there may be a lot of air in the wood unless it is a green tree that has been cut in the last day or two. The entrapped air takes a long time to be drawn out.
- Second and more importantly, the wood is full of water and as soon as the pressure begins to drop, the liquid water is no longer in equilibrium with the water vapor pressure inside the sealed bag environment. This will cause liquid water to evaporate out of the wood until the pressure inside the bag is exactly the same as atmospheric pressure outside the bag.
- So, being tenacious, we decide to just run the vacuum pump a little longer. But we will realize sooner or later that as long as there is any moisture in the wood, the water will continue to evaporate as long as we run the vacuum pump and we will wind up with the same pressure inside the bag as it is outside the bag ... that is, until the vacuum pump sucks the wood completely dry of any moisture .... but, that sorts of defeats the whole point of keeping the wood from drying out too fast.
- The bottom line is it will only serve to suck moisture out of the wood faster than it would otherwise evaporate and, at the very best, won't be any better that putting the log in an ordinary plastic bag.
The wax should be hot! I usually aim at about 170 °C, 340°F (old frying pan on electric plate). Dip only the end grain for may be 10 sec. It should look like deep frying with water boiling off. When it cools, water vapour condenses and wax is drawn in a mm or two. Since I started with this many years ago I have never had an end crack.If you do use parrafin wax I would not get it anywhere near a flame. It's flashpoint is 480 degrees F. That's why I use the electric frying pan or something like the Frydaddy. You can melt it at about 160 degrees or so and keep it well below the flashpoint, and you never get near a flame.
That won't work ... at least not in the way that you hope it will. Here is what will happen:
I prefer Anchorseal and so far, I haven't found anything that beats it for my local climate. There are some places (Hawaii and Gulf Coast, for example) where Anchorseal might slow down the rate of evaporation too much and lead to molding. I have used plastic stretch wrap a few times and if I leave it on for more than a few days the wood turns black with mold. My wife had practically cornered the world wax market judging by all the candles we have, but my experience with paraffin wax has been less than encouraging ... and for me it's a big mess ... some wax on the wood, a lot of wax on my clothing and shoes, and even more wax on the driveway.
- First you put the wet wood in a plastic bag, seal it and then use a vacuum pump to remove the air. And, then . . . .you
- The first thing that you encounter is you can't seem to evacuate the bag. (scratch head and say hmm)
- What is going on?
- First of all, there may be a lot of air in the wood unless it is a green tree that has been cut in the last day or two. The entrapped air takes a long time to be drawn out.
- Second and more importantly, the wood is full of water and as soon as the pressure begins to drop, the liquid water is no longer in equilibrium with the water vapor pressure inside the sealed bag environment. This will cause liquid water to evaporate out of the wood until the pressure inside the bag is exactly the same as atmospheric pressure outside the bag.
- So, being tenacious, we decide to just run the vacuum pump a little longer. But we will realize sooner or later that as long as there is any moisture in the wood, the water will continue to evaporate as long as we run the vacuum pump and we will wind up with the same pressure inside the bag as it is outside the bag ... that is, until the vacuum pump sucks the wood completely dry of any moisture .... but, that sorts of defeats the whole point of keeping the wood from drying out too fast.
- The bottom line is it will only serve to suck moisture out of the wood faster than it would otherwise evaporate and, at the very best, won't be any better that putting the log in an ordinary plastic bag.
My son and daughter in law live in Anchorage and, as Alaskan residents, are allowed to harvest large amounts of salmon in the summer months. They like to vacuum seal the fillets and discovered, like Bill described, that it's impossible to pull good vacuum on room temperature or even refrigerated fish due to the water evaporating. The solution is to freeze the fish before vacuum sealing.That´s what is called vacuum drying.
It's a tedious process for preserving food and would be even more onerous for preserving green wood, but I bet it would work if you had something special enough to make it worthwhile. If you have limited freezer space, store the wood in plastic bags while it's waiting its turn in the freezer. If you have unlimited freezer space, just store it in the freezer, before or after vacuum sealing.
Last edited:
freeze...It's a tedious process for preserving food and would be even more onerous for preserving green wood, but I bet it would work if you had something special enough to make it worthwhile. If you have limited freezer space, store the wood in plastic bags while it's waiting its turn in the freezer. If you have unlimited freezer space, just store it in the freezer, before or after vacuum sealing.
FWIW, freezing wood, in general, is also a good way to preserve wet wood. If wrapped well, the freezing will prevent drying while stopping the any fungus and decay.
As a test, I wrapped a wet wood block in plastic wrap and put it in the freezer. Thawed out years later (10?) it was like fresh green wood.
Warning: if the outside is not sealed all the way around, the wood can dry quickly and likely crack badly. That, and repeatedly thawing and refreezing is said to degrade wood but I didn't experiment with that.
I don't know what vacuuming while frozen would do to the wood. Doesn't seem like it would dry it.
BTW, I bought an extra chest freezer for cheap from the local appliance store's scratch and dent department. I used it at first for freezing honey supers to save for winter beehive feeding, then later for saving farm varmints for the university veterinarian program for dissection. (Gotta seal those too!
") I put them in plastic bags.)
I put them in plastic bags.)Somewhat related: When cutting trees, the winter can be a great time. Not only will the sap be low, but the cold will prevent fungal growth. When cutting and processing on the sawmill in cold weather, I had far less stain on light colored wood like maple, holly, persimmon, dogwood, and even poplar.
In fact, the recommended way to get pure white holly is to cut the tree in the dead of winter, immediately seal the log ends, then dry immediately and aggressively (e.g., by kiln.) I've had perfectly beautiful holly turn an ugly grey when air dried when during a warm season. (Grey stain in holly and other white woods can reportedly be whitened with wood bleach after turning but I haven't tried that.) In warmer weather, before sealing some people reportedly spray the freshly cut log ends with a household bleach solution to kill fungal spores. A scientist friend told me a 50% solution of Clorox bleach and water was more effective than straight bleach for killing and preventing mold and fungus.
Also, in the winter powder post beetles are not out seeking out freshly cut end grain! I was once cutting up a sugar maple log into chunks in front of my garage and was amazed to see a "swarm" PPBs come from the woods and watched them land on and immediately start boring into the end grain, even right through some Anchorsealed ends. (I could see them coming from across the yard!) They apparently could smell the maple from the woods maybe 100' away. (I quickly sprayed the surfaces with insecticide.) This is not just a problem with maple - later I saw it with freshly cut tulip poplar logs. It might be worth keeping that in mind when collecting turning wood in warm weather.
Sawing frozen logs is apparently not uncommon. When I ordered new blades for my sawmill, Woodmizer asked me if I wanted them for frozen wood.
JKJ
An easy replacement for AS is a mixture or wax and mineral oil. I melt wax (bees wax, old crayons, it really doesn't matter much what type of wax) and mix in enough mineral oil to make a semi-think paste. It can then be brushed on, rather like AS. I rarely have to add a second coat.I have some logs that were cut about two weeks ago. Right now, they are in an outside storage building. I have about a gallon of Anchor Seal and wonder if there is something else that can be used when the AS is gone. Thanks.
In Portland, Oregon we have high humidity. I recently got a dehumidifier to control my drying area to 40% humidity, 65F.
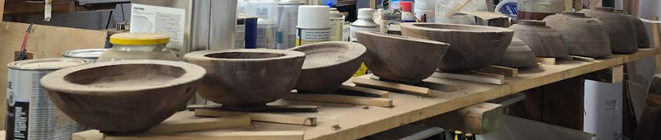
In early Jan 2025 I rough turned (10) 7" to 10" walnut bowls, 1" wall thickness.The bowls ran 25% t0 30% MC. I single coated the bowls with diluted 50% Tree Saver. Half the bowls I dried upside down and on half the bowls I froze them before drying, letting the surface moisture dry for a day.
I checked the bowls this morning after 2 months. Average weight loss was 29% and a moisture meter measurement on the bottom tenons averaged 6.3%, cross grain.
Two of the bowls had cracked.
If I had not diluted the Tree Saver the cracks may not have occurred and the drying may have been longer.
Drying the bowls upside down didn't seem to make any difference. Freezing the bowls before drying didn't seem to make any difference.
Follow up: Do another experiment, more professionally, with other PVA glue like Elmers. Try not diluting Tree Saver sealant. Include Anchorseal. Stack some of the bowls with spacers for drying.
My goal is to dry rough turned 15 inch bowls in under 6 months with no cracks. Write a peer reviewed article for publishing on AAW web site.
Would anyone like to participate, review, provide input into the next experiment? A small drying room with a dehumidifier might work and is simply to set up.
Here's a picture of my bowl drying experiment line up. I don't have a kiln or vacuum equipment. I believe a simple drying method would appeal is to us weekend turning warriors