• We just finished moving the forums to a new hosting server. It looks like everything is functioning correctly but if you find a problem please report it in the Forum Technical Support Forum (click here) or email us at forum_moderator AT aawforum.org. Thanks!
  • Beware of Counterfeit Woodturning Tools (click here for details)
  • Johnathan Silwones is starting a new AAW chapter, Southern Alleghenies Woodturners, in Johnstown, PA. (click here for details)
  • Congratulations to Dave Roberts for "2 Hats" being selected as Turning of the Week for April 22, 2024 (click here for details)
  • Welcome new registering member. Your username must be your real First and Last name (for example: John Doe). "Screen names" and "handles" are not allowed and your registration will be deleted if you don't use your real name. Also, do not use all caps nor all lower case.

Sanding your work

Emiliano Achaval

Administrator
Staff member
Beta Tester
TOTW Team
Joined
Dec 14, 2015
Messages
3,316
Likes
4,267
Location
Maui, Hawaii
Website
hawaiiankoaturner.com
I wish I could tell you that from day one I was doing a great job of sanding my pieces. Truth is, sanding is an acquired skill. I'm amazed when beginners bring their work to the meetings. The scratches are so obvious and deep. If I don't explain to them what's wrong, they would be happy with it. I could write a book on sanding techniques, for different items. I have at least 6 or 7 different sanders, angle drills, inertia, extensions, pads, soft pads, dense pads, on and on. For my big urns, the outside of most bowls I prefer, my to-go tool is a 5 in Festool rotary sander. Today I purchased a Festool RO 125 FEQ rotary and non-rotary sander. I seem to be in the minority with the 5 in discs. I used to keep it a secret. No real woodturner would use such a large sander. When I mentioned this to my good friend Steve Worcester, owner of turningwood.com, where I buy my sanding supplies, he said that I was right, that I was in the minority. He then added, only me and David Ellsworth buy the 5 in discs from him! That's when I felt that I could come out of the closet, that I could open my doors and let everyone know that sometimes if the works call for it, I use 5 in discs. They really speed up my job, especially with my large Koa and or Milo urns. I figure that if it's good enough for David, is good for me.
I have asked Steve Worcester to do an IRD about sanding your work for our club. He is putting things together and hopefully, soon he will be ready.
 

odie

TOTW Team
Joined
Dec 22, 2006
Messages
7,116
Likes
9,828
Location
Panning for Montana gold, with Betsy, the mule!
Truth is, sanding is an acquired skill.
Very true, Emiliano..... :)

A hard learned rule of thumb for me was: "No matter what grit of sandpaper you think you can get away with for starting sanding......drop it one grit coarser!"

You'll save yourself lots of time and frustration that way! o_O

-----odie-----
 
Joined
Jan 20, 2021
Messages
51
Likes
258
Location
Stuart, FL
As a fairly new turner ( about a year in now ) and being self-taught, I now know that my sanding techniques need improvement. I’ve concentrated so much on developing my turning and sharpening skills while neglecting proper sanding practices. I’ve definitely gotten a lot better .but feel like I’ve got a long way to go.
 
Joined
Aug 26, 2006
Messages
656
Likes
558
Location
Hampton Roads Virginia
I've had a Rotex 125 for maybe ten years, give or take... Never knew I was in the minority. Some of our (wood turning community) sanding problems I blame on turning demonstrators. I don't know how many times I've heard a demonstrator say, "I hate sanding, don't you hate sanding, ha ha ha... " And then the new guy goes away thinking sanding is a whiff and a promise, just to make things smooth. Hey, look at this, I sanded to 1200 grit... Feel how smooth it is. Ok, but look at the torn grain...
Sanding is a skill, teachable and learnable. What happens when you start with too fine a grit, or too course? What is over sanding? How come you are sanding at 1200 rpm when everybody knows you should sand at a few hundred or less? These are good discussions, it goes along with odie's discussion on "Seeing" the curve. I've had interesting round table discussions with these topics and sometimes you see a few eyes glaze over and the person might say, "I'm just happy to get something off the lathe in one piece". That's ok, nothing wrong with that, but eventually (hopefully) they will start to look at their work critically, maybe ask for an honest critique. I don't feel I "have" to explain what is wrong with someones piece unless they "want" to know. Subjective of course... If I want kudos, I show pieces to family, If I want the unvarnished truth I have a few friends who won't hesitate to hurt my feelings...
 
Joined
Jul 19, 2018
Messages
1,713
Likes
2,246
Location
Ponsford, MN
I have been using random orbital sanders in 5" and 6"for at least 25 years on convex surfaces (outside surfaces of turnings) and the fairly flat face on platters, but then I don't have a closet in my shop. My advice to new turners would be forget what you are supposed to do and just do what works.
 
Joined
Jan 8, 2021
Messages
322
Likes
420
Location
Wrentham, MA
Sanding can make or break a piece. This is as true in the flatwork world as in the turning world. I'm finding that there are as many techniques and tricks to sanding round things as turning them. My work is nowhere near as large as Emiliano's - only have a 12" swing, but even then I'm seeing where using discs larger than 2" will be both faster and possibly better. One thing I've noticed is there is a tendency to brag about ones ability - I'll start sanding with 180/240 etc., like it is a badge of honor. That strikes me as being a corollary to lathe speed - while useful as a general reference or starting point, it should not be taken as fact - too many variables exist in terms of the wood species and specific piece being turned, as well as equipment and experience one has or hasn't.

But overall, this gives me the thought of maybe trying a larger RO sander on outside of some of my bowls. If nothing else, it says that it can be done, and just that knowledge is a great start. Thanks for sharing.
 
Joined
Feb 26, 2019
Messages
1,825
Likes
1,423
Location
Lebanon, Missouri
If I made a lot of large items as you do @Emiliano Achaval, I would use 5”.

I certainly agree sanding is a skill, and one that does not have much of a physical component (unlike learning tool control). Its mostly a matter of learning the rules of what works best (which is probably an endless debate). A sub skill of sanding, and in a sense the most important sanding skill, is scratch inspection - knowing how to know all the previous grit scratches are gone, since that is the actual goal. Another sub skill is understanding the surface finish requirements for the particular finish that will be used, as all are not equal. A fully filled film finish will fill in and cover scratches whereas a non film finish with some gloss will serve them right up to the eye.
 
Joined
Jul 24, 2008
Messages
717
Likes
189
Location
Montfort, Wisconsin
Lots of good points made. Sanding can be frustrating. Emiliano mentioned a potential IRD being offered by Steve Worchester for their club. Can anyone recommend a demonstration of sanding that goes into detail? Most just skip over it or use wood that is easy to work. I'm specifically talking about the inside of bowls where too large of a disk can dig in at the edges and create havoc, or how to handle face grain and end grain on the same piece. Also how to adjust the size of the disk for the inside curve of different sized bowls. The list goes on and on.
 
Joined
Nov 15, 2020
Messages
450
Likes
309
Location
Huntington, VT
I too use a 5" ros for sanding outside largeish pieces. I don't know why it would be considered deviant.

I also don't understand "everybody knows you should sand at a few hundred or less". My 5" random orbit turns at 10k rpm as designed, so smaller diameter discs should work fine at multiples of that. When I took a lesson from Al Stirt he was using 3" discs at at least 10k in a pneumatic die grinder. Granted, his tool control leaves very little tearout to be sanded away, but if high speed sanding was not effective he would have figured it out by now.

One thing worth thinking about is that sanding side grain forms with the lathe running invite out-of-roundness since the side grain disappears faster than the side-to-end grain transition where tearout mostly occurs. Power sanding and using a hand-held scraper with the lathe off allow for removing tearout and blending contours locally without removing to much of the flat grain.

The surface of a piece is what you see and touch- why wouldn't it take skill to get it right? As Doug says, good light is important.
 
Last edited:
Joined
Feb 26, 2019
Messages
1,825
Likes
1,423
Location
Lebanon, Missouri
I also don't understand "everybody knows you should sand at a few hundred or less". My 5" random orbit turns at 10k rpm as designed, so smaller diameter discs should work fine at multiples of that. When I took a lesson from Al Stirt he was using 3" discs at at least 10k in a pneumatic die grinder. Granted, his tool control leaves very little tearout to be sanded away, but if high speed sanding was not effective he would have figured it out by now.

ROS speed is completely different vs drill powered vs a true dual action orbit/rotating action (like a Flex), which are all different vs lathe rpm for sanding a piece while mounted, whether powered or just holding abrasive against the wood. The matrix can get quite large - there are a lot of variables.

Regardless of the method, “cool sanding” provides the best overall results - heat takes its toll.
 
Joined
Jul 26, 2015
Messages
331
Likes
465
Location
Hot Springs, AR
Great topic Emiliano! I just emailed Steve when I you mentioned he might put together an IRD on one. Our club would be interested too. He won't have to get up as early as you did!
 

brian horais

Beta Tester
TOTW Team
Joined
Dec 20, 2014
Messages
249
Likes
1,845
Location
Knoxville, TN
Website
www.horais.com
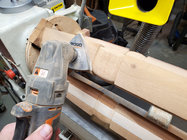
Yes, sanding is a continuing quest to achieve that final surface quality. I like your comment Odie about 'drop it one grit coarser'. I also like a comment I heard years ago 'treat sandpaper like it is free and discard it when it is not working'. I have added a number of sanding tools to my arsenal. One tool that I find useful for my twisted curved surfaces is an oscillating tool with sanding attachments. A view of this tool in action is shown below. There are mid-size and small size triangular sanding heads for these tools and the oscillating motion makes the sanding head easy control. Tools aside, some hand sanding is always needed. Lately I have been adding mineral spirits to highlight areas that need additional sanding. Sanding with the grain with each progressive grit also helps.
 

Attachments

  • sanding.jpg
    sanding.jpg
    472.9 KB · Views: 45
Joined
Nov 4, 2018
Messages
841
Likes
937
Location
Penrose, NC
As usual for me… I think of a vector of this discussion I have not seen brought up yet.
Having a background in furniture making, I was taught that it did not matter how good your joinery is, your scale and proportion, or anything at all *IF* your finish work is lacking. THAT is what the customer sees first.
So…. without any desire to ruffle feathers or start a cat-fight….. I will submit to you that often heard philosophy among turners that “no need to sand anove 400 grit” comes from a love of turning…. and a deficiency of skill or even hatred of sanding. properly. I see much lauded pieces frequently that when examined closely, it is clear that the turner is excellent…. at turning. But the piece could have been so much more appealing had the turner spent a little more time in studying the piece and in proper sanding and finish work. Yes, it is my opinion and not one I am not anxious to bring up to anyone while looking over a piece of someone’s work. I respect that we all have potentially differing views on this. So, I made two virtually identical pieces. Sanded one to 400 grit. And one sanded to 3000. Applied walnut oil. Allowed to dry a few days and buffed. The much higher yet natural sheen on the piece sanded to 3000 grit gets all of the initial attention when I watch people looking at my pieces for sale. That pretty much confirms for me what I thought I knew. And sanding to a higher grit is not the same as “proper sanding”…. That has been covered…
 
Joined
Aug 14, 2007
Messages
5,491
Likes
2,840
Location
Eugene, OR
I need to remake my sanding video.... For most of my bowls, a 5 inch sander won't work, other than maybe on the outside, and I don't want to switch back and forth between sanders. I think it was Mike Mahoney who said that a 3 inch disc has more than double the surface area compared to a 2 inch disc. Other than that, I need to make a second version of my articulated arm for sanding. It totally supports the angle drill I use and I can spin the bowls with the other hand. This is HUGE in being able to see scratches and defects that need to be sanded out, and I do mean HUGE. I want to figure out how to do a flex shaft that will run off of a variable speed motor like a mini lathe, and can handle discs up to 5 or so inches. It would also have to have 3 axis rotation for both inside and outside of a bowl......

Some woods like true Mahogany or Oregon Myrtle Wood really glow if you sand up way past 600 grit. Most of the other woods do not. Might have to experiment, again....

robo hippy
 
Joined
Jun 30, 2021
Messages
11
Likes
3
Location
Powell River, BC
I too use a 5" ros for sanding outside largeish pieces. I don't know why it would be considered deviant.

I also don't understand "everybody knows you should sand at a few hundred or less". My 5" random orbit turns at 10k rpm as designed, so smaller diameter discs should work fine at multiples of that. When I took a lesson from Al Stirt he was using 3" discs at at least 10k in a pneumatic die grinder. Granted, his tool control leaves very little tearout to be sanded away, but if high speed sanding was not effective he would have figured it out by now.

One thing worth thinking about is that sanding side grain forms with the lathe running invite out-of-roundness since the side grain disappears faster than the side-to-end grain transition where tearout mostly occurs. Power sanding and using a hand-held scraper with the lathe off allow for removing tearout and blending contours locally without removing to much of the flat grain.

The surface of a piece is what you see and touch- why wouldn't it take skill to get it right? As Doug says, good light is important.
What a relief to see someone mention using a hand-held scraper. I'm a novice turner arriving with several decades of amateur wood working under my belt. As I struggle to get good results on the inside of bowls (and on the outside to be frank), I turned to curved scrapers, rather than sanding, to get a better finish and even to remove some of my many turning errors. I find the scraper does superior work over sanding especially in wet/green wood. Seems logical to me, but I feel like I'm compensating for poor turning skill.
 
Joined
Jul 24, 2008
Messages
717
Likes
189
Location
Montfort, Wisconsin
Reed, I do hope you make another video. I've watched the one you have made several times and feel it's one of the best out there. Right now I'm having a terrible time with end grain on a walnut bowl. It has a combination of different density wood and the potential of great chatoyance in the lighter area but the sanding lines persist in the inside face grain. Glad you brought it up Emiliano, no one seems to want to deal with it. Still wondering if anyone has a recommendation on a good video besides Reed's?
 

Tom Gall

TOTW Team
Joined
Feb 20, 2013
Messages
965
Likes
1,776
Location
Hillsborough, NJ
First off, let me say I don't turn a lot these days and when I do most items are 6-7" or smaller. Even when I turned bowls (10-12" or so) I usually used the same sanding regimen - unless I'm going to texture, carve or paint the surface. For the last 30 years or more my sanding method has been pretty much the same.

I usually start with 120# (even if I think I could start with a higher grit) to level the surface and remove surface imperfections (even if there aren't any :)). Then through all the grits up to 1000-1200# - then usually some Ultrafine or Microfine 3M foam pads and finishing up with 2000 & 4000 Abralon pads. The wood will glow at that point

The longest sanding time will be spent on the lower grits and decreases the finer you go (5-10 seconds by the time you get to the pads). So, basically sanding above 400# takes hardly any extra time and the end result will be noticeable. And despite arguments I've heard in the past I've never had a problem with a finish penetrating the surface. Try it - you might like it !!! ;)
 
Joined
Jul 1, 2021
Messages
17
Likes
7
Location
Park Ridge, Il
Great topic! I am new to turning (1yr) and struggle with sanding as well. I spend a lot of time trying to make clean cuts, but still have to sand (seems like forever). I am now trying to see if sanding sealer will help. I sand at 100/120, 180, clean w/DNA, 240, 320, sometimes 400 (but not that often), clean w/DNA again, sanding paste. Find all the mistakes and start over.

Now I am replacing the last DNA step w/ sanding sealer. The jury is still out

Any suggestions are welcome.
 
Joined
Jul 19, 2017
Messages
431
Likes
345
Location
Roscoe, Illinois
The final product is, to some degree, a function of what satisfies the turner or the woodworker. I, for example, lean more toward the perfectionist end of the spectrum. Even today, the pieces I consider having a perfect finish are a small number. I work at it and have acquired a couple of different assists, including a right angle drill and, most recently, The Sanding Glove's - Sanding Solution. While everyone probably wants to have a finished bowl or hollow vessel they are proud of, the final product is at least partly the result of what satisfies the individual. Some bowls don't need a fine, smooth, shiny finish.
 
Joined
Jan 12, 2022
Messages
28
Likes
14
Location
Bixby, Oklahoma
Reed, I do hope you make another video. I've watched the one you have made several times and feel it's one of the best out there. Right now I'm having a terrible time with end grain on a walnut bowl. It has a combination of different density wood and the potential of great chatoyance in the lighter area but the sanding lines persist in the inside face grain. Glad you brought it up Emiliano, no one seems to want to deal with it. Still wondering if anyone has a recommendation on a good video besides Reed's?
Turn a Wood bowl on YouTube has a really good video on sanding as well.
 
Joined
Feb 6, 2010
Messages
2,980
Likes
1,955
Location
Brandon, MS
One thing that is hard to learn, almost as hard as when to sharpen, is when to change sandpaper or to throw that little scrap away. This is compounded if you are using the synthetic pads.....How do you know?

Now to the other side not really covered is beside what is your last grit ( for me usually up to 400 to 600) . On my last two grits may be used on a power sander but are also used manually. This use of the last two grits manually sanding with the grain will remove swirl marks and hide the last scratches with the grain lines. AND yes there are still scratches no matter how high a grit you use , they are just smaller and smaller and smaller.
 
Joined
Feb 26, 2019
Messages
1,825
Likes
1,423
Location
Lebanon, Missouri
it did not matter how good your joinery is, your scale and proportion, or anything at all *IF* your finish work is lacking. THAT is what the customer sees first.

Agree whole heartedly - interested to hear what others have to say about the subject. I do think the customer may see the larger scale of the item - form, type of form, color, etc. 1st, but finish - and touch - come immediately into play with closer inspection.

Cabinet scrapers are useful, but I find NRS's and shear scraping more useful - they can have you bypassing the lower grits that cause those deep scratches. Scraping and sanding do cover up turning tool issues - so what? It just means as one improves with the tools the finish prep process gets shorter. Just keep working on the tool choice and control, it will eventually come around.
 

odie

TOTW Team
Joined
Dec 22, 2006
Messages
7,116
Likes
9,828
Location
Panning for Montana gold, with Betsy, the mule!
One thing I've noticed is there is a tendency to brag about ones ability - I'll start sanding with 180/240 etc., like it is a badge of honor.

Hello Kirk....

Since I'm the only one I know of that has mentioned starting sanding at 180/240.....I think you must be referring to me. :(

I certainly hope you'll consider it not an act of bragging, but rather an appeal to others that fine tuning their use of tools prior to sanding is the key to achieving a surface where choosing a finer initial starting grit is something that is possible. I believe it is possible for others to do this, even though they may not have done yet. It can (and should) become a habit, and when it does, it opens up other possibilities......mainly because less sanding means less altering of a pure geometric shape.

A tooled surface, prior to sanding, is a near perfect geometrical shape.....and, aggressive sanding significantly alters that. We all have to conduct sanding operations, can't change that.....but if less sanding is necessary, the more the fine "details" will become crisp and distinct. When that happens, the entire turning is significantly more aesthetically pleasing to the eye.

I believe it was the thread about "spiritual turning" where I mentioned these things......and, I absolutely believe in what I had to say there. :)

-----odie-----

Agree whole heartedly - interested to hear what others have to say about the subject. I do think the customer may see the larger scale of the item - form, type of form, color, etc. 1st, but finish - and touch - come immediately into play with closer inspection.

Cabinet scrapers are useful, but I find NRS's and shear scraping more useful - they can have you bypassing the lower grits that cause those deep scratches. Scraping and sanding do cover up turning tool issues - so what? It just means as one improves with the tools the finish prep process gets shorter. Just keep working on the tool choice and control, it will eventually come around.

Note: I do believe Doug has acquired some "vision" here that's important. It obviously wasn't the result of over-thinking, but rather by observing results, repetition, and experience. I personally don't use NRS, but do use shear scraping extensively.....I believe Doug knows something that I, and a few other turners know.....and, the only way to get that knowledge is through deductive reasoning, and "hands on" experience! :)

-----odie-----
 
Last edited:

hockenbery

Forum MVP
Beta Tester
TOTW Team
Joined
Apr 27, 2004
Messages
8,641
Likes
4,979
Location
Lakeland, Florida
Website
www.hockenberywoodturning.com
I'm the only one I know of that has mentioned starting sanding at 180/240

Most folks who learn from Ellsworth, Batty, or many others will start sanding bowls and hollowforms at 220 and spot treat areas with 180.

When I do finials I start with 320 except for coves - I usually need 220 fo the bottom middle of the cove.
220 will dull the details.
 
Joined
Feb 28, 2021
Messages
1,226
Likes
1,075
Location
Roulette, PA
Website
www.reallyruralwoodworks.com
One thing that is hard to learn, almost as hard as when to sharpen, is when to change sandpaper or to throw that little scrap away. This is compounded if you are using the synthetic pads.....How do you know?
I watch the dust coming off the piece as it flows into my dust collector, when the volume of dust starts to drop, I move to another spot on the paper, or discard it for a new piece of paper.
 
Joined
Jul 27, 2005
Messages
279
Likes
1,842
Location
North Ogden, Utah
My sanding secret? Put your glasses on!
Wow, can I relate to that!
One more thing to consider is your light source. It's great to be able to have ample light to turn but too much light can at times be a deterrent when sanding. Too much light coming from multiple directions will hide the "shadows" which are what you're really seeing when you're seeing scratches. A single, bright source of light from one direction will make the scratches much more visible.
 
Joined
Jan 8, 2021
Messages
322
Likes
420
Location
Wrentham, MA
Hello Kirk....

Since I'm the only one I know of that has mentioned starting sanding at 180/240.....I think you must be referring to me. :(

Nope, was definitely not referring to you, Odie. :D When a demonstrator or video host states they start at x grit, there are those in audience who will mimic, without understanding all that goes into the decision.

I absolutely understand that as ones tool control and turning skills improve, that the need for coarser sanding is diminished. Keeping the crispness of the details is what it is all about, after all. I do see it as somewhat of a goal, but also stand by the thought that there are other variables at play, such as wood species and it's orientation.

This has been a very educational thread.
 

Emiliano Achaval

Administrator
Staff member
Beta Tester
TOTW Team
Joined
Dec 14, 2015
Messages
3,316
Likes
4,267
Location
Maui, Hawaii
Website
hawaiiankoaturner.com
Scratches magically appear when I walk back to the house to show my wife the latest piece. Not everything that I make gets that nowadays, she’s seen it all. I stop before moving on to finer grits and look at it in the sun. 180 wont get rid of the 120 scratches.
 

Randy Anderson

Beta Tester
Beta Tester
Joined
May 25, 2019
Messages
840
Likes
1,262
Location
Eads, TN
Website
www.etsy.com
The biggest leap in outcome for me was when I decided to NEVER put a once turned piece up to dry with tool marks or tear out. Fix it while it's wet with steep sheer scrapes, NR scrapers, 80 grit open weave pads or another pass with the gouge, anything that works. Thinking I'll just deal with those nasty tool marks and grooves with 80 grit after it has dried was one of my early mistakes that really cost me. The other was changing sanding strategy based on the wood rather than a fixed routine.
 
Joined
May 4, 2010
Messages
2,449
Likes
1,877
Location
Bozeman, MT
What is over sanding?
Somebody please explain this one. I have been wrestling with a comment on one of my earliest pieces for over 12 years. The fellow who started me turning, when shown a piece I had made and was reasonably proud of commented, "It's over-sanded". How can you 'over' sand something? What did he mean? What did he see that I couldn't? Why didn't I ask him these questions at the time??

This thread has brought out the most widespread sharing of experience and learning that I've ever seen on the forum. I've been looking for help with sanding forever, and apparently, I'm not alone. Yes, somebody who instructs clearly should put out a demo. It's clearly much needed.

Odie, the comment on proudly saying you start sanding at a particular grit was NOT directed at you. You have no way of knowing since you don't go to demos, but it's pretty common for the experts to comment on what grit they start sanding with, and I'm pretty sure it started with the Big Dog. They don't intend it to sound like bragging, but there's always a little hint of it anyway.
 

Tom Gall

TOTW Team
Joined
Feb 20, 2013
Messages
965
Likes
1,776
Location
Hillsborough, NJ
Scratches magically appear when I walk back to the house to show my wife the latest piece. Not everything that I make gets that nowadays, she’s seen it all. I stop before moving on to finer grits and look at it in the sun. 180 wont get rid of the 120 scratches.
I know what you're trying to say, Emiliano - but, 180 is supposed to remove scratch patterns that 120 produces. However, 180 won't remove scratches missed by 120. :) Of course it will eventually - but it will take an excessive amount of time and paper.
 
Joined
Nov 13, 2019
Messages
117
Likes
105
Location
IL.
Most folks who learn from Ellsworth, Batty, or many others will start sanding bowls and hollowforms at 220 and spot treat areas with 180.

When I do finials I start with 320 except for coves - I usually need 220 fo the bottom middle of the cove.
220 will dull the details.
@hockenbery you know a lot more about it than I ever will (sincere comment) so can you explain why learning from from a professional turner ("or many others") gives that person the "skills" to start sanding at 220? I agree they will learn proper tool technique, but it will still take months/ years for "most folks" to master the necessary skill to perfect that type of tool control no matter who they spent 3-5 days learning from. There's no magic, just takes LOT'S of practice. My 2-cents ☺
 
Joined
Nov 15, 2020
Messages
450
Likes
309
Location
Huntington, VT
Somebody please explain this one. I have been wrestling with a comment on one of my earliest pieces for over 12 years. The fellow who started me turning, when shown a piece I had made and was reasonably proud of commented, "It's over-sanded". How can you 'over' sand something? What did he mean? What did he see that I couldn't? Why didn't I ask him these questions at the time??
I take it to mean that the sanding process has muddied some detail that should appear crisp or affected the texture or overall contour of the piece. It is very easy to mess up a sharp quirk or bead with sandpaper while compensating for rough or inaccurate toolwork. It takes more effort to destroy a fair curve, but it can be done- imagine sanding a soft wood with coarse paper with the lathe running. The softer side grain will be worn away more than the endgrain transition area from which you are trying to eliminate tearout. Just digging in on a bad spot can leave a divot - with care that spot can be faired out with the surrounding contour but it's not easy. Finally, heavy sanding on a wood with uneven texture (soft latewood and hard earlywood in each ring, like Doug fir) can leave a washboard surface. All of these problems are best avoided by clean cutting - I'm working on it.
 
Last edited:

hockenbery

Forum MVP
Beta Tester
TOTW Team
Joined
Apr 27, 2004
Messages
8,641
Likes
4,979
Location
Lakeland, Florida
Website
www.hockenberywoodturning.com
@hockenbery you know a lot more about it than I ever will (sincere comment) so can you explain why learning from from a professional turner ("or many others") gives that person the "skills" to start sanding at 220? I agree they will learn proper tool technique, but it will still take months/ years for "most folks" to master the necessary skill to perfect that type of tool control no matter who they spent 3-5 days learning from. There's no magic, just takes LOT'S of practice. My 2-cents ☺
Your quite right.
It is more about what is achievable with good technique.
It does take practice. But practice of good technique.

I have been involved with 3 week long classes with David Ellsworth. One as a student and 2 that he taught in my shop.
In those classes the students were at the intermediate level or higher and not beginners. So it was like a little bit of magic watching students learn the flute up shear cut on the inside if the bowl.

The surfaces achieved with good technique are achievable within a week of instruction for intermediates who have mastered the fundamental and have decent tool control. It’s like they did the years of practice before coming to the class.

A beginner taking a class in most cases will be a beginner with solid fundamentals. They will need lots of practice to get consistently good surfaces. An intermediate taking a class will likely get consistently smooth surfaces from the class onward..
 
Last edited:

odie

TOTW Team
Joined
Dec 22, 2006
Messages
7,116
Likes
9,828
Location
Panning for Montana gold, with Betsy, the mule!
Odie, the comment on proudly saying you start sanding at a particular grit was NOT directed at you. You have no way of knowing since you don't go to demos, but it's pretty common for the experts to comment on what grit they start sanding with, and I'm pretty sure it started with the Big Dog. They don't intend it to sound like bragging, but there's always a little hint of it anyway.

Hello Dean.......Actually, I've seen quite a few demonstrations, but you are right that I've not attended any in person. Maybe I missed the comments. I hope a few people figured out where I was coming from and cut me some slack. Regardless, it did give me the opportunity to say a few related things I feel are important to a turner's progress... :)

On another note, just about every demo I've seen uses wet, or otherwise easy woods to turn. For sure, there are a few demos out there that use difficult woods, but most everything done for an audience, the demonstrator avoids these. I recently turned a KD African Bubinga bowl block, and remember how I felt at that time.....that this wood will never be used in a demo. I really had to work at this one to get a tooled finish that could skip any need for power sanding, and therefore went straight to hand sanding......I believe it took 180gt to start the sanding process on that one.

-----odie-----
 

Emiliano Achaval

Administrator
Staff member
Beta Tester
TOTW Team
Joined
Dec 14, 2015
Messages
3,316
Likes
4,267
Location
Maui, Hawaii
Website
hawaiiankoaturner.com
I know what you're trying to say, Emiliano - but, 180 is supposed to remove scratch patterns that 120 produces. However, 180 won't remove scratches missed by 120. :) Of course it will eventually - but it will take an excessive amount of time and paper.
I remove my 120 grit scratches with 150. 150 is by far my favorite grit. I know some people go from 120 to 180. I would think that if you skip 150, it would take double the amount of time and paper to move out of 180...
 
Joined
Aug 26, 2006
Messages
656
Likes
558
Location
Hampton Roads Virginia
My definition of over sanding is when a too fine a grit is used too soon on too soft a pad abrading summer growth more than winter growth leaving a rippled surface.
This can sometimes be felt on end grain but more often on long grain. Certain woods are more susceptible than others. Light touch, firm pads for lower grits transitioning to softer pads for the higher grits and experience help a lot... As does not skipping grits.
Wiping out detail using 80 grit to get rid of tear out and tool marks I would call something else.
Great topic. Lots of info.
 
Joined
Nov 15, 2020
Messages
450
Likes
309
Location
Huntington, VT
I remove my 120 grit scratches with 150. 150 is by far my favorite grit. I know some people go from 120 to 180. I would think that if you skip 150, it would take double the amount of time and paper to move out of 180...
My rule of thumb is to jump grit #s no more than 50% (120-180, 180-220, etc.)

One way to make sure the tracks from each grit are removed is to change the sanding method or direction between grits, for example turning the piece by hand and disc sanding at 120, hand sanding with the lathe on at 150, then back to disc sanding for the next grit. On flat work the direction of straight line sanding can be altered somewhat between grits. A strong raking light is invaluable.
 
Back
Top