• November Turning Challenge: Puahala Calabash! (click here for details)
  • Congratulations to Ted Pelfrey for "Forest Floor" being selected as Turning of the Week for November 4, 2024 (click here for details)
  • Welcome new registering member. Your username must be your real First and Last name (for example: John Doe). "Screen names" and "handles" are not allowed and your registration will be deleted if you don't use your real name. Also, do not use all caps nor all lower case.

Photography gradient background

Michael Anderson

Super Moderator
Staff member
TOTW Team
Joined
Aug 22, 2022
Messages
1,672
Likes
5,173
Location
Chattanooga, TN
Hi everyone,

Following the Louisville symposium, I haven’t done a ton of actual turning; however, I have spent a lot of time cleaning, reorganizing, and planning. Planning for ways to get more serious about the craft. One of these ways is to improve my photography setup. I think it was Emiliano A or Bill B that said something along the lines of “your piece is only as good as its photograph”. The more involved I get, the more I realize this is true. So…one of the ways I am trying to improve my photographs is to get a proper gradient background or two. That said, they are expensive. I realize this is an investment, so I’m willing to pay for worthwhile backgrounds, but I’m wondering about this site, and if anyone has purchased through it/them:


The prices seem almost too good to be true; although this usually screams “run away”, that’s not always the case. I like the offerings in larger sizes, but am not sure if the quality is there. Any thoughts?

Thanks for the help!
 
Joined
Apr 30, 2022
Messages
687
Likes
3,286
Location
Beavercreek, OH
Website
www.ovwg.org
I bought a gradient background from a seller two months ago( can't remember who) and it never shipped. They did not even sent a email receipt. We did a PayPay dispute and fortunately got our money back. I don't know if this site is good or not. Price does seem really low though...
 
Joined
Mar 14, 2023
Messages
21
Likes
18
Location
Victoria, BC
Hi everyone,

Following the Louisville symposium, I haven’t done a ton of actual turning; however, I have spent a lot of time cleaning, reorganizing, and planning. Planning for ways to get more serious about the craft. One of these ways is to improve my photography setup. I think it was Emiliano A or Bill B that said something along the lines of “your piece is only as good as its photograph”. The more involved I get, the more I realize this is true. So…one of the ways I am trying to improve my photographs is to get a proper gradient background or two. That said, they are expensive. I realize this is an investment, so I’m willing to pay for worthwhile backgrounds, but I’m wondering about this site, and if anyone has purchased through it/them:


The prices seem almost too good to be true; although this usually screams “run away”, that’s not always the case. I like the offerings in larger sizes, but am not sure if the quality is there. Any thoughts?

Thanks for the help!
They appear to be an order portal to Alibaba and not much more, so maybe it will be good, maybe mediocre, maybe bad, maybe never arrive...
 

Michael Anderson

Super Moderator
Staff member
TOTW Team
Joined
Aug 22, 2022
Messages
1,672
Likes
5,173
Location
Chattanooga, TN
Thanks Gabriel and Gary. I did a bit more digging, and the site as a whole gets around 2-3 out of 5 stars on average. Probably best to avoid…
 
Last edited:

Tom Gall

TOTW Team
Joined
Feb 20, 2013
Messages
1,085
Likes
2,123
Location
Hillsborough, NJ
The prices seem almost too good to be true; although this usually screams “run away”, that’s not always the case. I like the offerings in larger sizes, but am not sure if the quality is there. Any thoughts?

Thanks for the help!

You're right about those prices. I believe the material is probably different than most offerings. Many years ago a woodturner/photographer recommended a #09 gradient background (dk. gray to white). I still have it. I'm sure they are available from other sources, including Amazon, but here are two links. (Can't believe Photo Tech is the same price as when I bought from them 12 yrs. ago. B&H is a great company - my go-to for most items).


Randy Anderson

Beta Tester
Beta Tester
Joined
May 25, 2019
Messages
909
Likes
1,394
Location
Eads, TN
Website
www.etsy.com
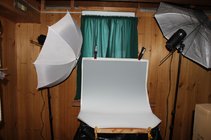
Michael, I REALLY struggle with getting good pics for my online store. It can consume a lot of time and be very frustrating. I ended up buying this setup on Amazon and have been reasonably pleased with it. It's no longer available but there are other suppliers for the same thing I think. The background sheets are a solid color, not a gradient shading. Maybe they make one with gradient sheets?? Not sure what that really adds but I am not a photographer in any way. Pay close attention to the dimensions. It was hard to find one that was the right size.


john lucas

AAW Forum Expert
Joined
Apr 26, 2004
Messages
8,481
Likes
4,017
Location
Cookeville, TN
I buy all my background from bhphoto. I've been buying photo supplies from them for 50 years so I trust them
Gradient backgrounds are fragile. They are painted. If you rotate the work or slide it in anyway you can scratch it. Many times you can position new work over the scratch but sooner or later it shows. So they do have a limited life. However if your careful you can get a lot of shoots out of them.
I gave up using them for anything but small work when I was shooting professionally. With proper lighting you can get a fade background look using a regular seamless back ground. I use an overhead strip light. This is a softbox that is 8" wide and 2 feet long. It has a grid so I can control where the light falls off. I simply position it so the shadow starts behind the piece and gets darker toward the top.
 
Joined
Jul 19, 2018
Messages
1,815
Likes
2,469
Location
Ponsford, MN
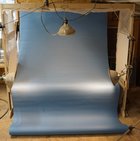
Not exactly sure of the year but it was somewhere around 1995 I went into a high-end photography store and bought what was called at the time seamless. The roll is 107" wide X 36' long so I cut a 5' length off to yield a 5' wide X 107" long seamless background and made a roller 5' wide.
DSC01161.JPG
This is my current setup with my second 5' so the roll should outlast me. The setup works reasonably well but would be better with indirect lighting. Note: the walnut oil stain on the left below the tabletop, so it might be time to cut off a new piece.
 
Last edited:
Joined
Apr 30, 2022
Messages
687
Likes
3,286
Location
Beavercreek, OH
Website
www.ovwg.org
You're right about those prices. I believe the material is probably different than most offerings. Many years ago a woodturner/photographer recommended a #09 gradient background (dk. gray to white). I still have it. I'm sure they are available from other sources, including Amazon, but here are two links. (Can't believe Photo Tech is the same price as when I bought from them 12 yrs. ago. B&H is a great company - my go-to for most items).


Don't buy from Phototec. They are the seller I bought from that never shipped my item. Sent multiple emails and never heard from them
 
Last edited:
Joined
Apr 30, 2022
Messages
687
Likes
3,286
Location
Beavercreek, OH
Website
www.ovwg.org
You're right about those prices. I believe the material is probably different than most offerings. Many years ago a woodturner/photographer recommended a #09 gradient background (dk. gray to white). I still have it. I'm sure they are available from other sources, including Amazon, but here are two links. (Can't believe Photo Tech is the same price as when I bought from them 12 yrs. ago. B&H is a great company - my go-to for most items).


Tom- that link doesn't work
 

Donna Banfield

TOTW Team
Joined
May 19, 2004
Messages
560
Likes
1,588
Location
Derry, NH
I spent a stupid amount of money on graduated gray background. It was thick paper, and the graduated color was layed down just like an ink or paint. The problem with that was it scratched if you had to roll it up, and if you were not careful placing pieces on it when moving them at different angles when shooting your photos. And once a scratch appeared, it was a white line in all your images.

I ended up replacing it with just a roll of gray paper. If you search on Amazon for gray photo backdrop paper rolls, you will find many options; different widths and lengths for less than $100. I paid around $50 for a roll 5 feet wide and 15 yards long. I have it suspended from the ceiling in my finish room. When I need fresh paper, I just pull the the roll a little more down the table and cut away the trashed section. All my images taken since 2015 is using that gray paper.
 

Michael Anderson

Super Moderator
Staff member
TOTW Team
Joined
Aug 22, 2022
Messages
1,672
Likes
5,173
Location
Chattanooga, TN
You all are awesome! Thanks everyone for the advice and suggestions. I’ve read and noted everything. I like a few of the cost effective strategies mentioned here, as well as the example setups. I have some thinking to do re gradient background vs solid background and light diffusion techniques. I appreciate the help!
 

Michael Anderson

Super Moderator
Staff member
TOTW Team
Joined
Aug 22, 2022
Messages
1,672
Likes
5,173
Location
Chattanooga, TN
I disagree. A piece can be great without a single photo ever being taken.

Tim
Well, if a tree falls in the woods and no one is around, does it even make a sound? :p

You’re not wrong. The point is if someone isn’t able to see your piece in person, the next best thing is the photograph. And if the photograph doesn’t do your piece justice then the viewer likely isn’t going to be very interested in knowing more, buying, jurying, etc…
 
Joined
Mar 21, 2023
Messages
101
Likes
353
Location
Wichita Falls, TX
Well, if a tree falls in the woods and no one is around, does it even make a sound? :p

You’re not wrong. The point is if someone isn’t able to see your piece in person, the next best thing is the photograph. And if the photograph doesn’t do your piece justice then the viewer likely isn’t going to be very interested in knowing more, buying, jurying, etc

I suspected your point, although not what was written. Gaining interest of remote viewers is another matter all together, apart from how good a piece really is.

Tim
 
Joined
Apr 20, 2006
Messages
1,359
Likes
1,151
Location
Erie, PA
Michael I don't think it was me that told you that but you are headed in the right direction. A graduated backround is a definite aid in photographing your work. B&H Photo has them for about $42 for a 31" X 43". A decent camera that you can stop down to a higher F-stop for greater depth of field is also a good aid. I bought a complete set of lights that work with my camera from Cowboy Studio for a very decent price. A piece in your hand is what you see, a photograph of that piece may enhance the look or a photo can make it look bad. My setup.
 

Attachments

  • Fig. 1.jpg
    Fig. 1.jpg
    177.1 KB · Views: 60

john lucas

AAW Forum Expert
Joined
Apr 26, 2004
Messages
8,481
Likes
4,017
Location
Cookeville, TN
I made a graduated background by simply spraying gray paint on a white canvas piece. It didn't look good straight down but looked great from a low angle like you would shoot a bowl. I will try to do a simple photo set up later today and show how to create a graduated background with judt lighting.
 

Michael Anderson

Super Moderator
Staff member
TOTW Team
Joined
Aug 22, 2022
Messages
1,672
Likes
5,173
Location
Chattanooga, TN
Thanks a lot for the tips and the setup photo Bill.

A decent camera that you can stop down to a higher F-stop for greater depth of field is also a good aid.
I have a solid camera setup. The biggest problem with my current background is that at higher f-stops the texture is really obvious and distracting. So I usually shoot at f8 or so to mitigate that, but then depth of field is limited of course. I’m working on my lighting situation as well, so I’ll keep Cowboy Studio in mind.

John L, looking forward to seeing your setup when you get around to posting later today. Thanks!
 
Joined
Mar 12, 2017
Messages
88
Likes
207
Location
Sweden
You don´t need a graduated background. Just make sure the remote part is in shadow. Here is my setup. The background is a roller blind from IKEA, painted a mottled grey with a sponge. Very convenient to roll up or down. Lighting by fluorescent tubes at left and handheld reflective board to the right. Shadow by another roller blind.
K3_04974LRs.jpgK3_05634LRs.jpgK3_05631LRs.jpg
 
Joined
Jul 27, 2020
Messages
316
Likes
1,258
Location
Durham, NC
The backgrounds from B&H have a very fine texture, just a bit of tooth for a mat surface. I’ve been shooting my more recent shots at f-16 or f-22 without showing texture.

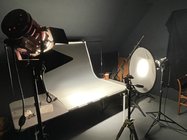
This current set-up is a 300 watt fresnel for main light, and a 200 watt fresnel shooting through a diffuser for my fill. I’ve had these lights since shooting portraits, not worth buying now. I recently bought an led fresnel from B&H, 300 watt equivalent that is reasonably priced, $130 or so.

I like the adjustable beam spread, uniform color and intensity, and control with barndoors for light cut off.
I’ve gone back and forth between using soft light (the norm) and a harder light. I’ve decided on the hard light for its ability to show details so well. Things like figure, chatoyance can really be popped! Also, any scratches, surface defects will be illuminated quite nicely!
3AAD2EAA-48BD-4449-9AB3-C0F362C5BE7F.jpeg
 

john lucas

AAW Forum Expert
Joined
Apr 26, 2004
Messages
8,481
Likes
4,017
Location
Cookeville, TN
I would recommend buying a plain white roll of seamless background paper and a light with a softbox. You can create any type of gradient fade with a white backround just by adjusting the background to light distance.
Very difficult to get a white background to go dark. I shot with Thunder gray most of the time. You can get it to go black faily easy and the foreground usually photographs lighter than it looks.
 

john lucas

AAW Forum Expert
Joined
Apr 26, 2004
Messages
8,481
Likes
4,017
Location
Cookeville, TN
I set up a quick shoot a few minutes ago. My normal light is a softbox strip light with a cloth grid in the front. This allows me to control the direction of the light better. The trick to getting a faded background is #1 move the rear of the background further away. The farther it is the easier it is to keep the light off of it. I'm using a Thunder gray background that I got from BHPhoto. If you move your light closer to the subject it naturally falls off quicker behind the subject. Then you have to aim the light so it is not hitting the background. in the first second photo, I have a 12" reflector light with no grid. By aiming it forward I can cast a shadow on the background. In the photo on the left, I have placed a card between the light and my camera to keep it from shining directly into the lens. In the 3rd photo is my normal setup. I use a strip light and aim it forward slightly to cast a shadow on the background. The photo on the right is my piece shot with the softbox. I placed a reflector on the right side to cast more light into the right-hand edge of the piece. The light stands are about 5 feet from the front of the setup. If I wanted to use a white background I would need to have the background about 8 feet or more unless my light is very direct and the room very dark.

Graduated backgrounds require very little space. My friend Mike Gibson has been using the same graduated background for several years. He is careful to keep scratches down. His photo set up only takes up about 6 feet wide by 4 deep deep not counting the tripod and camera of course. You can look up his photos in the gallery and you will see that he does a great job.

One more thing. If you're good at Photoshop you can create your own graduated background. You are limited to your printer size of course. I used to do this for jewelry. My boss would make the backgrounds for me to whatever size I needed but we were limited to 11x 14

faded background-2.jpgWWWWfaded background-3.jpg


faded background-4.jpgWWWWfaded background-6.jpg
 

john lucas

AAW Forum Expert
Joined
Apr 26, 2004
Messages
8,481
Likes
4,017
Location
Cookeville, TN
Another advantage of graduated backgrounds. Often with textured turnings you side light the piece to show off the texture. This makes it hard to create a fade background using your light. I do it by blocking the light from that main light to keep it from hitting the background and then use a top light to give me the fade. However this is quite a balancing act. The graduated back ground makes this easier.
 

Michael Anderson

Super Moderator
Staff member
TOTW Team
Joined
Aug 22, 2022
Messages
1,672
Likes
5,173
Location
Chattanooga, TN
Thanks a lot for the helpful comments Lennart, Marc, Kurt, and John! I also appreciate the additional shots of your photo setups. I’m picking up a ton of valuable information, and I think I have an idea of where I want to go. This is all extremely educational and much more than I hoped to gain from my original question. I know that I’m not the only person to benefit from this thread.

Len art, nice use of an IKEA rollerblind. Thy would come in real handy as a primary or secondary background.

Marc, I’m going to check out some led fresnel lights. I actually have a fresnel lens from an overhead projector that I salvaged. I’ve been saving it for “something”. Could be a fun diy tinker.

John, I really like the systematic approach you take—the photographs are very helpful to illustrate your point. And, that’s a good point re. graduated backgrounds and texture that I hadn’t thought about before.
 
Joined
Oct 23, 2015
Messages
223
Likes
364
Location
Springdale, Arkansas
I don't know how common this is but my local library in Fayetteville Arkansas has a photo studio. All kinds of lights, backdrops, tripods, and even cameras. All free if ya have your library card.

I have a small table top setup with a graduated background that I can leave setup in a spare bedroom like others have pictured. I still use the library at times especially for bigger flat work.
 
Joined
Mar 12, 2017
Messages
88
Likes
207
Location
Sweden
Another possibility is to use post processing. If you are using Lightroom classic, it is very easy with the new masking tool. Just click on masking, select object, invert, intersect with linear gradient. Takes may be 30 sec. Another great advantage is that you can just as easily apply it to your old photos and fine tune it to your likes. Example with original and applied gradient.
K7_10709-2.jpgK7_10709.jpg
 
Joined
Aug 6, 2009
Messages
759
Likes
567
Location
Lummi Island, WA
One thing I seldom see mentioned when discussing photo setups is the focal length of the lens. It pays to use a slightly longer focal length than the 'normal' to get the best images from your system, whatever it is. A 'normal focal length for 35mm cameras is about 50mm - if possible, better to zoom in slightly (or use a 75 - 90mm prime lens). It means getting back from your subject a little, but uses slightly less background width while rendering the subject with much less distortion than getting in close and using a wider focal length. There's also more room to position lights, bring in reflectors or gobos to modify the light.
And, as I got hammered into my head from the start – always, always, always use a lens hood (or just clamp a card to shield the lens front from any direct light). Its surprising how much of a difference it makes in the final images.
 

Michael Anderson

Super Moderator
Staff member
TOTW Team
Joined
Aug 22, 2022
Messages
1,672
Likes
5,173
Location
Chattanooga, TN
That’s a great point Jeff, and an important thing to consider. I think 85mm is probably the ideal focal length to represent how we would view a piece in person. That’s also a focal length I lack. On the list though. I usually use a 50mm macro lens, or a 100mm lens. I’m usually limited with space for the 100 on most turnings (because of my current setup), so the 50 is my go to. 85 would be better though.
 
Joined
May 7, 2004
Messages
24
Likes
2
Another possibility is to use post processing. If you are using Lightroom classic, it is very easy with the new masking tool. Just click on masking, select object, invert, intersect with linear gradient. Takes may be 30 sec. Another great advantage is that you can just as easily apply it to your old photos and fine tune it to your likes. Example with original and applied gradient.
View attachment 53451View attachment 53452
I use Lightroom Classic and photograph a lot of turnings, but I didn't know how to do what you described. I just tried it, and it works really well. Thanks for posting!
 

Attachments

  • 2023-03-03 11-26-57 (B,R8,S4).jpg
    2023-03-03 11-26-57 (B,R8,S4).jpg
    1.9 MB · Views: 40
Last edited:

Michael Anderson

Super Moderator
Staff member
TOTW Team
Joined
Aug 22, 2022
Messages
1,672
Likes
5,173
Location
Chattanooga, TN
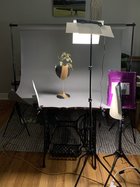
Quick update on my photo setup. I took all of the comments and tried to distill down what would work best for my space. I bought a couple of LED panels with tripods (as part of a video filming kit), a roll of seamless neutral grey paper, and a backdrop stand. I bought a couple of these on sale, but the total was around $130 after tax. I don't have a permanent photo spot, so it's also nice that this breaks down into a couple of bags and a box for the paper. I still have a couple of things to add/refine, and am still sussing out the new setup, but it's a huge improvement. Here's a pic of the setup, and some sample shots. Thank you all for the help and suggestions.

IMG_5754.JPG
_DSC6233.jpg
_DSC6191.jpg
_DSC6192.jpg
 
Joined
Aug 6, 2009
Messages
759
Likes
567
Location
Lummi Island, WA
Looking good Michael. I’d suggest that, depending on your situation, keeping the subject as far as possible from the background (vertical section) allows a lot more control over the gradient while allowing you to position your main light above and slightly behind the subject to give a little edge light that helps pull it out of the background a black card can shade the background from any stray light while a couple of reflector cards open the shadows where you’d like.

I know it all eats up precious room, but it does give you more control…
 

Michael Anderson

Super Moderator
Staff member
TOTW Team
Joined
Aug 22, 2022
Messages
1,672
Likes
5,173
Location
Chattanooga, TN
Thank you for the helpful suggestions Roy and Jeff! Edge lighting isn’t something I had thought too much about, but gives me room to improve.
 

Bill Boehme

Administrator
Staff member
Beta Tester
TOTW Team
Joined
Jan 27, 2005
Messages
13,022
Likes
5,426
Location
Dalworthington Gardens, TX
Website
pbase.com
Michael, one suggestion that I would like to make is to change the way that the background paper is arranged. If you look at the pictures of my photography set up you can see that the graduated background gently sweeps back from horizontal at the bottom and roughly 45° at the top. The curve is very gradual. I use some pieces of ⅛" Baltic birch plywood and a sheet of Formica to make the support for the graduated background.

https://www.aawforum.org/community/threads/got-a-new-moffatt-style-lamp.12481/#post-119955

The reasons for doing this are that it helps the background fade into darkness, it puts the background further out of focus, and most importantly it prevents the bright horizontal bar where the background makes a sudden turn from horizontal to vertical.
 
Back
Top