• We just finished a fairly major forum upgrade. If you are having problems using the forums, please clear your browser cache and that should clear up any issues. Otherwise post in the Help Thread or email us at forum_moderator@aawforum.org. Happy Holidays!
  • It's time to cast your vote in the December 2024 Turning Challenge. (click here for details)
  • Congratulations to Vincent Luciani for "Flower Pot" being selected as Turning of the Week for December 23, 2024 (click here for details)
  • Welcome new registering member. Your username must be your real First and Last name (for example: John Doe). "Screen names" and "handles" are not allowed and your registration will be deleted if you don't use your real name. Also, do not use all caps nor all lower case.

Pewa (butterfly) installation

Are these ever installed such that they go all the way through the bowl wall? I've done some and end up with an interesting patch on the outside and still just an ugly crack on the inside. I suppose I could just try it and see what problems emerge, no shortage of cracked bowl blanks! I suspect the issue might be routing that deep a recess with a small bit and keeping the sides straight for a tight joint line on both sides.
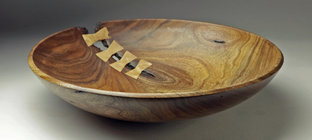
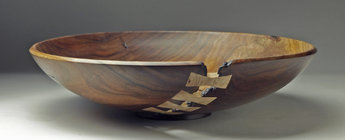
I have done some that go all the way through. My first attempt was on a 17” black acacia bowl that had a large fissure from a bark inclusion. The pewas were meant as more functional to keep contents from falling through the crack.
I used an inlay template and kit, but found the bit too short to clear the inside wall and the full thickness of the template. I completed the outside first, then needed to locate a 1/8” bit that would give me about 3/4” of depth to clear the inside wall. Planned for 1/2” wall thickness to expose the pewa and then finish thickness of 3/8” - 5/16”. Used the template kit to cut the pewa and the recess.
It does work just fine. The glue bond is not anywhere as strong as the standard pewa because of the difference in strength between the mostly face glued standard and the mostly end grain glued through pewa. I found this out when the bowl was dropped by a relative onto a concrete floor and two of the pewa popped out - no harm, they glued back in nicely.
Working a 1/8” bit to a total depth of 3/4” is an excercise in going slowly and working to several steps in depth, unless you buy several bits upfront, you’ll be waiting on the mail. These small diameter bits aren’t capable of withstanding a lot of lateral stress.
One other observation that applies to surface or through pewas - when routing the recess, take care to keep the router angle consistent as you rotate around the template. If your bit is even very slightly off center, changing the angle as you rout will make the recess either slightly smaller (a pain to fix) or slightly larger (easier to fix, but ugly unless your filler matches perfectly).
Here’s the result of my first attempt…standard surface pewas are way, way easier.
 

Attachments

  • 6F10E7BF-D3D4-47E2-9C3D-65D989121BF8.jpeg
    6F10E7BF-D3D4-47E2-9C3D-65D989121BF8.jpeg
    201.3 KB · Views: 31
  • 5DE8BAC3-362F-4DC1-9814-B7EB8F50C882.jpeg
    5DE8BAC3-362F-4DC1-9814-B7EB8F50C882.jpeg
    145.9 KB · Views: 29
Last edited:
What palm router are you guys , and gals, using for PEWAS?

I don’t have a palm router and I have been meaning to pick one up for doing PEWAS and other smaller stuff.

Thanks,

Bob
 
A little time saver for pewa installations I just figured out: instead of cleaning off the wax from the template to melt more for the next pewa, use blue tape on the wood. Then the wax stays on the template when you remove it. Then use a heat gun to re-melt or soften the same wax. Reapply in a different location for the next pewa. Much quicker and easier than removing the wax and starting over.
 
A little time saver for pewa installations I just figured out: instead of cleaning off the wax from the template to melt more for the next pewa, use blue tape on the wood. Then the wax stays on the template when you remove it. Then use a heat gun to re-melt or soften the same wax. Reapply in a different location for the next pewa. Much quicker and easier than removing the wax and starting over.
Alan, I use the painter's tape on both the wood and the plastic templates at the same time. For me it has worked and held fine with no movement during routing. Glue cleans off easily. No need for wax or a heat gun at all. I also use different size wood wedges (also covered in painters tape) to keep the template level. (learned that from attending a demo by Dave Landers at the Rocky Mtn. symposium last fall.
 
Nice tutorial Michael, great share! Being a segmenter, I wonder a couple of things; why two Pewa so close together? Wouldn’t one be structurally enough? When I look at pewa in pieces, they look better to me when the crack is visible. I might be the only one thinking that way but letting the crack show now makes sense as to why it’s there. I’m curious about your thoughts on these points.
 
@Alan Weinberg like Rick, I use blue tape on both the template and the wood. I do like the idea of using a heat gun to re-use the same glue though. Good idea. I'm assuming this doesn't warp the template at all? Believe it or not, I don't have a heat gun., so this could be the excuse I need to rectify that 😉. I've also started applying glue to the template first, based on your suggestion--good tip!
 
Nice tutorial Michael, great share! Being a segmenter, I wonder a couple of things; why two Pewa so close together? Wouldn’t one be structurally enough? When I look at pewa in pieces, they look better to me when the crack is visible. I might be the only one thinking that way but letting the crack show now makes sense as to why it’s there. I’m curious about your thoughts on these points.
Thanks Russ! Unless the crack is really short, I tend to use at least two pewa so I can target the ends of the crack. Especially when the crack is super close to the rim like the example here. Even though the crack likely won't move any more, I'm trying to mitigate any sort of expansion of the ends (for example, from shifts in humidity or mishandling. Also, there's a bit of design preference as well. I personally like to see a little series of pewa instead of one.
 
another “tip” or pewa screwup salvage technique I did once when I messed up a 0.9 inch pewa was to put a larger one over it and cover the mistake.
 
What size Pewas to start with?

I am going to order some pewas but I’m not sure what to order to get started. I am not sure what sizes are most commonly used.

Thanks,

Bob
 
I am going to order some pewa

What size Pewas to start with?

I am going to order some pewas but I’m not sure what to order to get started. I am not sure what sizes are most commonly used.

Thanks,

Bob
Order templates also. 0.9 and 1.1 inch are great. Bigger for bigger bowls. I probably should have used bigger ones—didn’t have them or template. Big Island will also do custom sizes and shapes.
 
Back
Top