• We just finished moving the forums to a new hosting server. It looks like everything is functioning correctly but if you find a problem please report it in the Forum Technical Support Forum (click here) or email us at forum_moderator AT aawforum.org. Thanks!
  • Beware of Counterfeit Woodturning Tools (click here for details)
  • Johnathan Silwones is starting a new AAW chapter, Southern Alleghenies Woodturners, in Johnstown, PA. (click here for details)
  • Congratulations to Dave Roberts for "2 Hats" being selected as Turning of the Week for April 22, 2024 (click here for details)
  • Welcome new registering member. Your username must be your real First and Last name (for example: John Doe). "Screen names" and "handles" are not allowed and your registration will be deleted if you don't use your real name. Also, do not use all caps nor all lower case.

Pewa (butterfly) installation

Michael Anderson

Super Moderator
Staff member
TOTW Team
Joined
Aug 22, 2022
Messages
1,360
Likes
3,925
Location
Chattanooga, TN
Sometimes wood cracks during the drying and/or turning process. Sometimes pieces of precious wood are plagued with cracks and related. What to do? Well, there are plenty of options, but a popular favorite is to install pewa/butterflies to stabilize the crack. Here is a photo tutorial of the process. Note: Big Island Engraving has a great video of the process. Also, this is the method that I use and like. Like anything else in the wood world, there are plenty of other good methods.

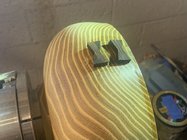
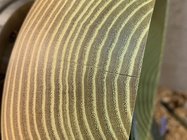
This is a piece of Osage Orange that had a minor, but deep crack. It was a gifted piece of wood, and instead of turning away all of the crack, I wanted to maximize the size and add a couple of pewa. Pewa can be added at many different stages of the process--this example is during the final/second turning after I finished truing the exterior.
IMG_7857.JPG

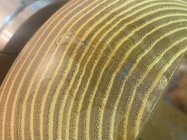
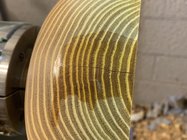
Prior to adding the pewa, it is best to apply glue to the crack. You can use wood glue, epoxy, CA glue, or anything else. I'm using CA glue for this example. The first step is to treat the areas adjacent to the crack with shellac. This seals the surface so that the CA glue (or whatever else) won't penetrate the surface and discolor the wood. I use a 1/2 lb cut that I made with flakes and denatured alcohol.
IMG_7858.JPG

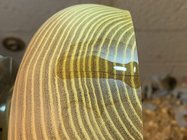
Once the shellac has dried, apply medium CA glue to the crack. Make sure the CA glue penetrates the crack. I like to flex the bowl a bit to encourage absorption, and then add another small bead of glue on top of the crack.
IMG_7860.JPG

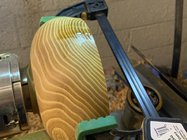
It can be helpful to clamp the bowl while the glue cures. Sometimes this is not possible, but if so, be sure to apply just enough pressure to close the crack. Too much pressure might result in new cracks forming. You can leave the clamp on for the rest of the process if desired/needed, or you can remove.
IMG_7861.JPG
 

Michael Anderson

Super Moderator
Staff member
TOTW Team
Joined
Aug 22, 2022
Messages
1,360
Likes
3,925
Location
Chattanooga, TN
Once the glue has set, it is time to start laying out the pewa. You have options for where to source your pewa. Several companies sell these, for example Big Island Engraving and Slab Stitcher. You can also make your own. The pewa I am using for this example are Wenge and are the 0.9" size from Big Island. The 0.7" size would have probably been better proportioned, but I am currently out of that size. I typically lay out a few different sizes and wood options prior to committing. Consider how the wood color will change over time, and if you want the pewa to stand out or blend in. I prefer a nice contrast. Even when the Osage Orange inevitably browns these Wenge pewa will remain very dark in comparison.

IMG_7862.JPG

In the image above, I've also laid out the spacing and position of the pewa. Ideally, the pewa should be aligned with one another, and evenly spaced. This is mostly for aesthetic purposes, but can also be something to consider in the functional context. Most important is that the middle of the pewa intersect with the crack line. After determining the size and the wood type, draw a couple of registration lines on the wood so you know where to cut out your recesses.

IMG_7863.JPG

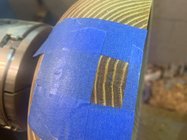
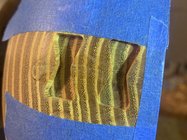
You can see in the image above that my lines aren't perfectly parallel--this will be evident when I install the pewa. I should have slowed down a bit, but for the sake of this example let's pretend that I wanted to show you pewa that were slightly misaligned. ;)Prior to cutting the recesses, place painters tape (or equivalent) around the areas that will receive the pewa. This will prevent the hotmelt glue we will use from sticking to the wood surface (especially important if using porous wood).

IMG_7864.JPG

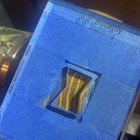
To create a recess for each pewa, I am using a template from Big Island Engraving. Again, you can make your own, OR you can trace the pewa and route out the recess by hand. I've used several but this is the easiest way to go, and results in pretty clean lines. Plus, it is nice to support fellow wood folks. Whatever method, be sure that your template is the appropriate size for your pewa. I apply painters tape to the surface of the template, again to protect from hot melt glue. Apply hot melt glue to the surface of the bowl, being sure to stay close to the border of the tape. Place the template on the glue and make sure your registration mark is in the middle of the template. It can be helpful to add additional hot melt glue to prevent the template from shifting during the next couple of steps. You only get one chance.

IMG_7865.JPG
 

Michael Anderson

Super Moderator
Staff member
TOTW Team
Joined
Aug 22, 2022
Messages
1,360
Likes
3,925
Location
Chattanooga, TN
Use a palm router (or equivalent) with a spiral downcut bit and a bushing to route out your recess for each pewa. It is a good idea to cut each recess in two passes. The first shallow, and the second to full depth. Also be careful to not damage your template. To start the cut, turn on your router and slowly pivot the bit down into the center of one side of the template. When finishing your cut, turn off the router and let the bit stop spinning prior to removing the router. It should be apparent that my recess are slightly misaligned. Functionally, these are fine, but aesthetically they could be better placed. Note, in most instances you want to ensure that your pewa can bottom out, meaning you don't want to route so deep that you cut through to the interior. This is for a couple of reasons, 1) the pew will be much more solid if they are glued on the extra (bottom) surface, and 2) it looks better, and adds a bit of mystery, if the pewa do not show on the interior.

IMG_7868.JPG

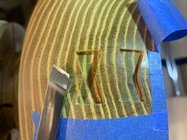
The recesses have rounded corners at this point. You can buy/make rounded pewa and install immediately, or you can chisel the corners to get a more traditional look. Purely a design decision, as it makes no difference functionally. I prefer sharp corners, so that what I'll show. I like to use a skewed carving chisel, in this case a 1/4" by Schaff. For smaller pewa an 1/8" chisel or knife is needed. Plenty of options. Whatever you choose, take your time, and try to keep your cuts in line with the sides of the pewa. Any mistake will show up in the end.

IMG_7869.JPG

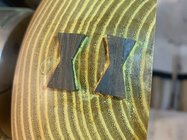
Once the corners are chiseled, clean out any debris that remains in the recess. Then, apply the glue of your choice to the recess. You can use CA glue, wood glue, epoxy. As long as your pewa fit tightly, it doesn't really make a difference. If you are working quickly, CA glue and activator is a good choice. If you find that your pewa are a bit loose, epoxy is a good options as it fills gaps pretty well. I used Titebond 2 here, but I have used all options in the past.

IMG_7871.JPG

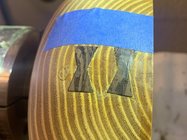
Once your glue has dried, remove the majority of the pewa that is proud of the surface of your bowl. You can use a variety of methods: rotary tool, chisels, sandpaper, etc... I used some carving chisels here, but it doesn't really matter. Just be sure that you don't remove material from below the bowl's surface. Also, be careful to not scratch or damage the surface of your bowl. Adding painters tape (or similar) around the pewa can be helpful insurance.

IMG_7874.JPG
 
Last edited:

Michael Anderson

Super Moderator
Staff member
TOTW Team
Joined
Aug 22, 2022
Messages
1,360
Likes
3,925
Location
Chattanooga, TN
After the majority of the pewa material is removed, use sandpaper and a stiff backer (ex. a piece of wood) to carefully sand away the remaining material. Be careful to ensure that you sand with the curve of the bowl, as you don't want to the pewa to be flat. You want the bowl and the pewa surface to be continuous.

IMG_7875.JPG

It is likely that there will be small gaps that need to be filled. You can use glue and sawdust to fill the gaps/pores as needed. In this example, given the Wenge is pretty porous, I opted to used Wenge saw dust so that both the pew surface and the recess gaps would be nearly invisible when the bowl is finished.

IMG_7877.JPG

The above image shows the gaps filled and the surface sanded to 180g. The primary crack is obvious, but we never tried to hide it of course. The bowl is functionally sound, and the crack will not expand or grow. Feel free to reach out with any questions. Cheers!
 
Joined
Feb 8, 2023
Messages
79
Likes
140
Location
Durham, NH
Use a palm router (or equivalent) with a spiral upcut bit and a bushing to route out your recess for each pewa.

Big Island Engraving's recommendation, in the kit they sell and in most bushing kits for this purpose, is a spiral downcut bit. Have you tried both? BIE says it leaves cleaner shoulders, but I also saw a review complaining about the inclusion of a spiral downcut bit in one of these routing kits. (I just got the template/pewas from BIE and a bushing kit from Powertec, but Covid has kept me out of the workshop, unfortunately.)
 

Michael Anderson

Super Moderator
Staff member
TOTW Team
Joined
Aug 22, 2022
Messages
1,360
Likes
3,925
Location
Chattanooga, TN
Big Island Engraving's recommendation, in the kit they sell and in most bushing kits for this purpose, is a spiral downcut bit. Have you tried both? BIE says it leaves cleaner shoulders, but I also saw a review complaining about the inclusion of a spiral downcut bit in one of these routing kits. (I just got the template/pewas from BIE and a bushing kit from Powertec, but Covid has kept me out of the workshop, unfortunately.)
Oh no, that was just a typo on my end! Thanks for the catch--fixed now. Yes, definitely use a downcut bit. I've only used downcut bits for this purpose, which is one of the reasons that routing the recess in steps is a good idea. The down cut bit pushes all of the shaving to the bottom.

Covid is rough. I hope you heal quickly. Let me know how the process goes for you.
 
Joined
Feb 18, 2023
Messages
615
Likes
1,113
Location
Orange, CA
really nice summary.

I like the rounded corners which make installation easier. Saves a step. They also look more gentle to me.

I also find it easier to apply the glue to the underside of the template (rather than the bowl) after seeing where the template touches the bowl. It maximizes the contact area to prevent slippage while routing.

I can only align the pewa if the crack is straight. Often it curves. As you mentioned, the key is to have the narrow waist of the pewa and the crack in line.

Iā€™ve ruined a couple of the acrylic templates. Friend is making some out of aluminum so now Iā€™ll probably ruin the router bit!

Thanks, Michael! Nice work.
 
Last edited:

Dave Landers

Beta Tester
Joined
Dec 1, 2014
Messages
811
Likes
2,505
Location
Estes Park, CO
Website
dlwoodturning.com
It can be helpful to add additional hot melt glue to prevent the template from shifting during the next couple of steps
I use small wedges (cut from scrap wood, covered with painter's tape), usually one on each corner of the template. I have a couple sizes to fit various contours. For me, the initial glue on the template/bowl just holds it till I can install the wedges, which are the main thing securing the template. Especially helpful if you're patching a very curved spot.


It is a good idea to cut each recess in two passes. The first shallow, and the second to full depth.
I now do two passes at the final depth. There's sometimes a lot of sawdust built up that prevents the router from actually following the template. So one pass to get it mostly there, then blow the sawdust out of the template (and router bushing). Then a final pass.
 
Joined
Apr 30, 2022
Messages
455
Likes
2,274
Location
Beavercreek, OH
Website
www.ovwg.org
After the majority of the pewa material is removed, use sandpaper and a stiff backer (ex. a piece of wood) to carefully sand away the remaining material. Be careful to ensure that you sand with the curve of the bowl, as you don't want to the pewa to be flat. You want the bowl and the pewa surface to be continuous.

View attachment 61271

It is likely that there will be small gaps that need to be filled. You can use glue and sawdust to fill the gaps/pores as needed. In this example, given the Wenge is pretty porous, I opted to used Wenge saw dust so that both the pew surface and the recess gaps would be nearly invisible when the bowl is finished.

View attachment 61272

The above image shows the gaps filled and the surface sanded to 180g. The primary crack is obvious, but we never tried to hide it of course. The bowl is functionally sound, and the crack will not expand or grow. Feel free to reach out with any questions. Cheers!
Very nice Michael!! Easy to follow and understand.
 
Joined
Feb 10, 2023
Messages
21
Likes
60
Location
Yardley, PA
Thanks for the walkthrough-very clearly demonstrated!

You started by calling out cracks which appear during drying or turning. If the blank is fully dried before turning begins, and has checks that show as cracks, how likely are those to grow after turning/likely to need pewas to hold the turning together, long-term?
 
Joined
Feb 28, 2021
Messages
1,226
Likes
1,076
Location
Roulette, PA
Website
www.reallyruralwoodworks.com
If the blank is fully dried before turning begins, and has checks that show as cracks, how likely are those to grow after turning/likely to need pewas to hold the turning together, long-term?
Wood moves. Period. Unless it is being stored in a carefully controlled climate environment (As in Museum level) it is going to move and expand/shrink as it gains & loses moisture. Any cracks that exist are eventually going to extend further (like most any other material with a crack in it and exposed to changing climates & stresses) so , the answer is somewhere between "VERY LIKELY" and "ABSOLUTELY WILL"
 

Michael Anderson

Super Moderator
Staff member
TOTW Team
Joined
Aug 22, 2022
Messages
1,360
Likes
3,925
Location
Chattanooga, TN
@Greg Wold thank you!

It is likely that the cracks will grow. They may get to a point where they grow/shrink seasonally in a sort of equilibrium. It depends on the location and type of crack as to how much and how quickly they will expand. But in most cases, like Brian says, without some sort of reinforcement cracks will probably grow over time.
 
Joined
May 4, 2010
Messages
2,449
Likes
1,877
Location
Bozeman, MT
Very well done, Michael. How is it you get so much more done than those of us who have just 24 hours in a day?

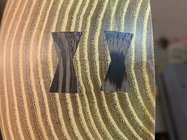
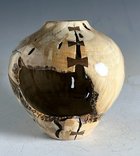
I just finished off the last of the Hawaiian wood that friends gave me, making 4 umeke out of a piece of pheasantwood. 2 of them have small cracks going cross grain in one area. (picture attached) I thought about trying to place pewa, but the orientation is atypical, and they would have to be very small pewa. The guide that I have for pewa has a bow tie pattern, but it's just about life size for a clip-on bow tie. Is this guide usable for small pewa with the right size bushing, or is the mismatch of sizes a deal breaker? What size bushing do you use with your BIE guides? Dave? Emiliano, are you out there?

Thanks for doing this "article". I'll start thinking up the next one.

IMG_1598.JPG
 

Michael Anderson

Super Moderator
Staff member
TOTW Team
Joined
Aug 22, 2022
Messages
1,360
Likes
3,925
Location
Chattanooga, TN
Very well done, Michael. How is it you get so much more done than those of us who have just 24 hours in a day?
Thanks! Ha, hmm, well I should probably sleep a bit more šŸ˜…

Is this guide usable for small pewa with the right size bushing, or is the mismatch of sizes a deal breaker? What size bushing do you use with your BIE guides?
Pheasantwood is beautiful. I have a tiny chunk in my shop, but need to find a bigger one at some point. Love that feather grain.

BIE sells 0.5ā€ pewa. Theyā€™re incredibly small. I suppose you could also use a bigger pewa patch and just cover up the crack completely. BIE bushing is 5/16ā€ diameter and slab stitcher bushing is 3/8ā€ diameter. Not interchangeable. Figured that out prior to measuring. Ha.
 

Roger Wiegand

Beta Tester
Joined
Nov 27, 2018
Messages
794
Likes
932
Location
Wayland, MA
Website
www.carouselorgan.com
Are these ever installed such that they go all the way through the bowl wall? I've done some and end up with an interesting patch on the outside and still just an ugly crack on the inside. I suppose I could just try it and see what problems emerge, no shortage of cracked bowl blanks! I suspect the issue might be routing that deep a recess with a small bit and keeping the sides straight for a tight joint line on both sides.
 

Michael Anderson

Super Moderator
Staff member
TOTW Team
Joined
Aug 22, 2022
Messages
1,360
Likes
3,925
Location
Chattanooga, TN
Are these ever installed such that they go all the way through the bowl wall? I've done some and end up with an interesting patch on the outside and still just an ugly crack on the inside.
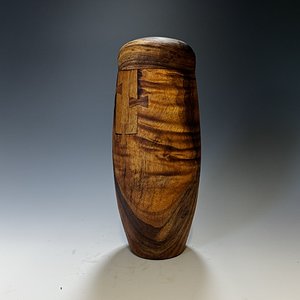
Hey Roger, Iā€™ve never installed them so that they show through on both sides. I suspect they would lose a bit of strength. BUT, I know that an acceptable solution for this is to install a bigger block patch (poho). Cut out the area with the crack, and replace it with another chunk of wood. Then, reinforced the edges of the poho with pewa. Emilianoā€™s recent urn is a good example of this:


I canā€™t see the interior, but I would guess the patch is full thickness, and the pewa are just visible on the outside.

Alternatively, if your bowl is big enough, you can install pewa on the interior (that donā€™t show through to the exterior). In that case, I would try to alternate the positions of the pewa, exterior vs interior, so essentially most of the entire crack is replaced with solid wood. Hopefully that makes sense. In almost every bowl Iā€™ve done, I just leave the filled crack on the interior. Iā€™ve only added these to closed form bowls, so the interior cracks arenā€™t as conspicuous as they would be in a more open form.
 

hockenbery

Forum MVP
Beta Tester
TOTW Team
Joined
Apr 27, 2004
Messages
8,642
Likes
4,983
Location
Lakeland, Florida
Website
www.hockenberywoodturning.com
Are these ever installed such that they go all the way through the bowl wall?
While not pewas, Jerry Kermode had an article in the AAW summer 1999 AAW journal on using splines as stitches.
Jerry was living in Hawaii then. These span the crack and are visible from both sides. Iā€™ve seen a few of these in person and they work well with natural edge bowls too.IMG_1309.jpegIMG_1310.jpeg
 
Joined
Feb 21, 2011
Messages
325
Likes
290
Location
Elkhart, IN
Website
www.riccsdesigns.com
Great tutorial!!! The only thing I would add is that the crack doesn't necessarily need to be glued or filled first. My first attempt at pewas/butterflies was with an open crack. I chose not to filled the crack due to the desire to have the piece flow with another natural void. The pewas added the necessary strength to be able to hollow the piece. It is pictured below. It's my first attempt and I am legally blind so if you look close - I didn't get the center of the pewa exactly lined up with the crack. But I'm haoppy with it.
1709911817411.jpeg


Also Dave Landers does some cool things with pewas. I attended his demo at the Rocky Mountain symposium last fall on sliced hollow forms. Search the AAW forum gallery for "sliced" and you will see some cool pieces.
 
Last edited:

hockenbery

Forum MVP
Beta Tester
TOTW Team
Joined
Apr 27, 2004
Messages
8,642
Likes
4,983
Location
Lakeland, Florida
Website
www.hockenberywoodturning.com
I think the opposite. Though Iā€™ve never done it, a full thickness bridge of wood seems stronger conceptually to me than a thinner bridge.
Which is stronger a blind dovetail or a through dovetail?
The blind has more gluing surface - it wins.

However, itā€™s a marginal argument neither will be a failure point assuming a reasonable thickness of the pewa and using a-glue like tite-bond that is stronger than wood.
 

Michael Anderson

Super Moderator
Staff member
TOTW Team
Joined
Aug 22, 2022
Messages
1,360
Likes
3,925
Location
Chattanooga, TN
I think the opposite. Though Iā€™ve never done it, a full thickness bridge of wood seems stronger conceptually to me than a thinner bridge.
Youā€™d think so, but itā€™s all about the extra glued surface area. But like Al mentioned, as long as the fit is tight and the glue is appropriate, the difference in strength is marginal.
 

Michael Anderson

Super Moderator
Staff member
TOTW Team
Joined
Aug 22, 2022
Messages
1,360
Likes
3,925
Location
Chattanooga, TN
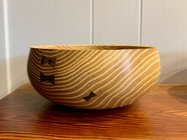
Sometimes the addition of pewa can be decorative (of course), or even pseudo-functional. What do I mean? Well, if you are a bonehead like me and accidentally scratch the surface of your sanded bowl, you can add a pewa to make the scratch look like it was a small crack. Maybe I shouldā€™ve kept this a secret? Too late.

In any case, my carving chisel grazed the surface of my bowl, and after some light sanding, I determined I would not be able to get rid of the scratch easily. I grabbed a tiny 0.5ā€ Wenge pewa, and applied it. Here is the bowl in its current state, exterior sanded to 600 and then rubbed with a gray scotchbrite pad. I was going to leave this as a normal bowl, but it needed something special done to its interior. More on that later, as itā€™s not relevant to this tutorial.

3DE60A58-6A4A-487E-8E73-976947BAC64B.jpeg
 
Joined
Feb 26, 2018
Messages
118
Likes
79
Location
Nashville, TN
Sometimes the addition of pewa can be decorative (of course), or even pseudo-functional. What do I mean? Well, if you are a bonehead like me and accidentally scratch the surface of your sanded bowl, you can add a pewa to make the scratch look like it was a small crack. Maybe I shouldā€™ve kept this a secret? Too late.

In any case, my carving chisel grazed the surface of my bowl, and after some light sanding, I determined I would not be able to get rid of the scratch easily. I grabbed a tiny 0.5ā€ Wenge pewa, and applied it. Here is the bowl in its current state, exterior sanded to 600 and then rubbed with a gray scotchbrite pad. I was going to leave this as a normal bowl, but it needed something special done to its interior. More on that later, as itā€™s not relevant to this tutorial.

View attachment 61335
BigIsland has other options that some might like and if you don't want to "cut corners", use an Infinity Pewa like the type in middle of pic
 

Attachments

  • 20240314_090249.jpg
    20240314_090249.jpg
    423.7 KB · Views: 21
Joined
Aug 16, 2022
Messages
280
Likes
638
Location
Butler, PA
I want to buy some pewa and a template. what size would everyone recommend for 8" to 12" bowls. I have a 9" white oak bowl that has a crack in it and looks like a good place to practice pewa and amonia fuming.
 

Dave Landers

Beta Tester
Joined
Dec 1, 2014
Messages
811
Likes
2,505
Location
Estes Park, CO
Website
dlwoodturning.com
I want to buy some pewa and a template. what size would everyone recommend for 8" to 12" bowls. I have a 9" white oak bowl that has a crack in it and looks like a good place to practice pewa and amonia fuming.
It does depend on the crack, but for "just a crack" (that is, no big gap), the 0.7" size is a pretty good size - not too small nor too big.
You can always cut out some from thick paper - the width is roughly half the height (the .7s are about .35 wide). Lay them on your bowl and see how it looks.
 

Emiliano Achaval

Administrator
Staff member
Beta Tester
TOTW Team
Joined
Dec 14, 2015
Messages
3,317
Likes
4,268
Location
Maui, Hawaii
Website
hawaiiankoaturner.com
@Michael Anderson I'm glad you went with the straight pewa. The only reason to use the round ones is if your eyesight is bad. I use a jeweler's loupe to cut the corners. All pre-contact work done by the Hawaiians was straight pewa.
 
Joined
Aug 16, 2022
Messages
280
Likes
638
Location
Butler, PA
It does depend on the crack, but for "just a crack" (that is, no big gap), the 0.7" size is a pretty good size - not too small nor too big.
You can always cut out some from thick paper - the width is roughly half the height (the .7s are about .35 wide). Lay them on your bowl and see how it looks.
Thanks Dave, the crack I'm dealing with is about the same as Michael's bowl in this article. I'm going with the straight pewa and I'll try the 0.7 size for starting out and can expand my collection of templates as needed.
 
Joined
Feb 18, 2023
Messages
615
Likes
1,113
Location
Orange, CA
I want to buy some pewa and a template. what size would everyone recommend for 8" to 12" bowls. I have a 9" white oak bowl that has a crack in it and looks like a good place to practice pewa and amonia fuming.
Big Island would probably send you a sample of various sizesā€”they are so good to work with.

I prefer the rounded appearance regardless of tradition. Easier also.
 
Joined
May 4, 2010
Messages
2,449
Likes
1,877
Location
Bozeman, MT
@Michael Anderson I'm glad you went with the straight pewa. The only reason to use the round ones is if your eyesight is bad. I use a jeweler's loupe to cut the corners. All pre-contact work done by the Hawaiians was straight pewa.
How did they cut out the hole for the pewa? Pre-contact, they wouldn't have had steel drill bits or chisels, would they? Did they have metal knives? (I've read the museum article about how they made bowls. Incredible!)
 
Joined
May 31, 2019
Messages
292
Likes
364
Location
Highland, MI
Great tutorial! I like the look of pewa, but never explored how it's done. It takes longer, but looks a lot better than my attempts with a staple gun. šŸ˜œ
 

Michael Anderson

Super Moderator
Staff member
TOTW Team
Joined
Aug 22, 2022
Messages
1,360
Likes
3,925
Location
Chattanooga, TN
How did they cut out the hole for the pewa? Pre-contact, they wouldn't have had steel drill bits or chisels, would they? Did they have metal knives? (I've read the museum article about how they made bowls. Incredible!)
Hey Dean, I know your question was aimed at Emiliano, but I can field it a bit from what I've read. There is a lot of mystery surrounding repairs: how they were done, what time periods, etc... With pewa specifically, it's not known if they were done pre-contact or post-contact. Other types of repairs were certainly pre-contact (ex. poho, pegs, kepakepa), but there's not much in the written record about the methodology used. Most pre-contact tools had stone cutting edges (stone adze, for example), but other tools (pump drills, for example) employed bits of coral or even shark teeth. I would guess that if pewa were added pre-contact, the method would be to drill fine holes, and then hog out the rest of the material with stone. Metal was only scarcely available pre-contact, mainly random pieces that washed ashore. Likely this was reserved for weapons. Maybe? It's a really fascinating thing to think about. Labor intensive!
 
Joined
Jan 20, 2011
Messages
397
Likes
476
Location
Traverse City, MI
I thought about trying with my trim router, but decided a plunge router was necessary and ordered a new one. I have a bunch of bowls that have cracks/splits and a few blanks that I'd like to turn, but they need some reinforcing first.
 
Back
Top