• January Turning Challenge: Thin-Stemmed Something! (click here for details)
  • Conversations are now Direct Messages (click here for details)
  • Congratulations to Scott Gordon for "Orb Ligneus" being selected as Turning of the Week for January 20, 2025 (click here for details)
  • Welcome new registering member. Your username must be your real First and Last name (for example: John Doe). "Screen names" and "handles" are not allowed and your registration will be deleted if you don't use your real name. Also, do not use all caps nor all lower case.

Live center alternative

The problem with the draw bar in the tailstock is that it will tighten as soon as you extend the ram, therefore to do what you want to do would require positioning it first then tighten the draw bar.
Oh yes, agreed. Although I've got several bits of Draw Bar compatible MT2 tooling for my lathe I’ve not personally had a need for it so far (in the Tail Stock)
 
Last edited:
... Although I've got several bits of Draw Bar compatible MT2 tooling for my lathe I’ve not personally had a need for it so far.


FWIW, I use drawbars (in the headstock) quite a bit. Occasionally for a Jacob's drill chuck, but more often for 2MT collets, and occasionally to hold a Ruth Niles bottle stopper mandrel or an Joyner off-axis jig.

For those who may need to make a drawbar and haven't , it's easy - buy a length of all-thread rod of the size/thread needed from HD or the hardware store (it's cheap, I get the galvanized), cut a length to fit through the headstock and stick out a bit in the back, file off the burrs, and make a knob or use washers and a wing nut to hold it tight. To use, thread a little into the 2MT thing to hold, slide it into the haadstock, then tighten the knob/nut on the other end. (quicker if the working length is already close: insert the MT device and slide the rod in the other end and turn by hand to engage some threads. No need to thread it on tight.)

I find the two thread sizes I mentioned earlier fit everything I have.
The wood knob is simply drilled and tapped for the thread - not much force is needed so no need to glue in a nut.
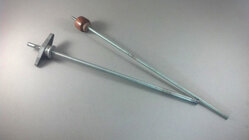
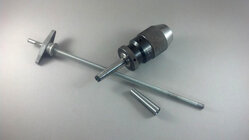
I use these two; just made another 1/4"-20 for a friend. (yes, I do have a friend. just one)

drawbar_two.jpg

Most things I use have the 3/8"-16 thread. I epoxied a flat washer on the end of a knob in my junk drawer.
I grind a small flat on each so if it should get too tight I can loosen it with a wrench.
drawbar_chucks.jpg

JKJ
 
@Neil S
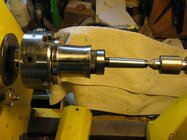
The two chuck method as shown in your 1st photo in message #65 with thicker wood would work very well. This can be used with "inside-out" 4-piece turnings to eliminate the paper/glue/splitting method which is the usual process. Might need a little extra length to accommodate for the chuck jaws.
 
FWIW, I use drawbars (in the headstock) quite a bit. Occasionally for a Jacob's drill chuck, but more often for 2MT collets, and occasionally to hold a Ruth Niles bottle stopper mandrel or an Joyner off-axis jig.

For those who may need to make a drawbar and haven't , it's easy - buy a length of all-thread rod of the size/thread needed from HD or the hardware store (it's cheap, I get the galvanized), cut a length to fit through the headstock and stick out a bit in the back, file off the burrs, and make a knob or use washers and a wing nut to hold it tight. To use, thread a little into the 2MT thing to hold, slide it into the haadstock, then tighten the knob/nut on the other end. (quicker if the working length is already close: insert the MT device and slide the rod in the other end and turn by hand to engage some threads. No need to thread it on tight.)

I find the two thread sizes I mentioned earlier fit everything I have.
The wood knob is simply drilled and tapped for the thread - not much force is needed so no need to glue in a nut.
I use these two; just made another 1/4"-20 for a friend. (yes, I do have a friend. just one)

View attachment 71257

Most things I use have the 3/8"-16 thread. I epoxied a flat washer on the end of a knob in my junk drawer.
I grind a small flat on each so if it should get too tight I can loosen it with a wrench.
View attachment 71258

JKJ

Sorry, I meant in the Tail Stock. I use a drawbar in the Head Stock to secure a Collet Chuck and 2MT Finger Collets.

For Draw Bar use I made a tapered spacer that goes against the nut to ensure the threaded rod is centralised in the bore on the outboard end.
 
Last edited:
For those who may need to make a drawbar and haven't , it's easy - buy a length of all-thread rod of the size/thread needed from HD or the hardware store (it's cheap, I get the galvanized), cut a length to fit through the headstock and stick out a bit in the back, file off the burrs, and make a knob or use washers and a wing nut to hold it tight. To use, thread a little into the 2MT thing to hold, slide it into the headstock, then tighten the knob/nut on the other end. (quicker if the working length is already close: insert the MT device and slide the rod in the other end and turn by hand to engage some threads. No need to thread it on tight.)


JKJ

If your MTs didn't come with a threaded recess in the tail end, mount it in a chuck held in the headstock, align the tail end with a centre in the tailstock and then drill to size ready to tap with the thread size of your drawbar rod....

IMG_1592.JPG
 
Every lathe I have ever owned has a hole through the tail stock. Not all lathes are self ejecting and not all things you stick into them are long enough to self eject, ergo a through hole.
 
I checked again and you are right - the tail stocks of the lathes currently in my shop DO have a through hole. Sorry for spreading misinformation. Don't know what I was thinking - maybe I was drunk (but I don't drink).
Probably more of the feeble-mind and memory loss when pushing 75!

Good observation about the non-ejecting hardware - when I used my chuck alignment adapter with a short taper I didn't need it real tight and just twisted to remove.

As someone mentioned, you'd have to set the tailstock and live center approximately before tightening the drawbar and couldn't move it with the crank wheel.
I tried mounting a large Jacobs chuck with a 3/8" drawbar and it tightened ok. The limitations wouldn't allow precise drilling by cranking on the handwheel but drilling doesn't need a drawbar!

It would allow mounting a chuck on the tailstock with the right hardware.
Neither of my 2MT-to-1-1/4"x8tpi chuck alignment adapters are drilled and threaded for a drawbar which wouldn't help anyway with the dual chuck setup.

I checked a dozen or so of my live centers and none of those were threaded for a drawbar and the through holes were too big to tap for a 3/8" thread.
I haven't seen one like Neil S described using with his mini chuck.

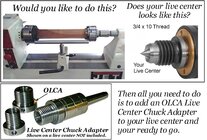
However looking closer now, I see where Best Wood Tools sells a chuck adapter that fits the Oneway live center and clones:

1737219820017.jpeg

I'm having trouble imagining the circumstances when this would be useful (to me) but there it is.

JKJ
 
I just thought of a possibly certifiably insane way to lock an MT live center into the quill of the tailstock without using a drawbar: drill a hole near the front end of the quill and tap it for a hefty set screw. Locking the MT with a set screw that way could allow using the crank on the tailstock to adjust the pressure/tension.

(Would be best to machine a flat at the right spot on on the live center MT to keep the set screw from scarring the mating surface. Or better, mill a slot on the MT with an angle on the back end and put a cone or ball end on the set screw to apply tightening force to the MT)

I have a spare old quill for the PM3520 and spare live centers so it might be fun (and easy) to try that just as an experiment. When I get time. Maybe next year.

JKJ
 
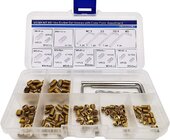
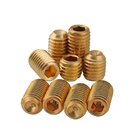
I’m not sure I like the sound of that John. But if you do try it, you can get Brass Socket Set Screws that don’t mark steel items. Hard to buy over here without ordering hundreds so I get mine on eBay from China. Let us know how you get on if you try it.
 
I’m not sure I like the sound of that John. But if you do try it, you can get Brass Socket Set Screws that don’t mark steel items. Hard to buy over here without ordering hundreds so I get mine on eBay from China. Let us know how you get on if you try it.

Well I did say it might be an insane idea.

BTW, I see Amazon here offers a variety of brass set screws at reasonable prices, some in small quantities, some in assortments.
(Yikes, hardware I don't have - hold me back...)

1737381518009.jpeg 1737381680738.jpeg

However, the more I think about it the more I think it could work. But now I'm sketching an even simpler way in my head that would be easier to machine. My inner engineer wantx to design and try this even though I can't think of using it myself! (however if it could tighten taper shank drill bits in a wood lathe tailstock, I could use that)

I have a mill and metal lathe. And not enough to do. (OK, that last was untrue)

JKJ
 
One can only dream.

Gregory
I dreamed and saved for years!!
I decided to buy machines from Little Machine Shop.

Most of the smaller machines are made in China. LMS told me their higher-quality machines are made at the same factories but are made to their specs which include tighter tolerances and better fit and finish, inside and out.

One caution. A friend has has bought several metal turning lathes from places like Harbor Freight, machines also made at those same factories. He knew exactly what he was getting into - before using them he disassembled completely, deburred the gears and cast iron, cleaned and polished where needed, reassembled with proper torque specs, made careful adjustments, and lubricated everything properly. He said before he started doing that, his earlier machines were less precise. (He had years of high-end machining experience at a national laboratory and I believe he knew what he was talking about!)

Another good way to go is to buy used. If I had the space I might look for larger machines.

But remember, with just the machines you can do nothing. Like wood lathes, there are endless tools and accessories needed to make them useful. Besides the chucks, vises, and cutting bits/end mills, quick-change tool posts, boring bars, and collet sets, I added a rotary table, coolant system, lots of precision measuring things like micrometers, dial indicators, dial test indicators, precision height gauge, surface plate, laser alignment tools, 123 blocks, reamers. Can't do much of anything without a good clamping kit. And don't forget the metal-cutting bandsaw and big storage racks for stock! Then there are the books for those of us who don't already know everything. The drawers and cabinets are full. In short order it can get WAY more expensive than setting up a woodturning station! Of course, like almost everything else, much depends on what you want to do and make.

Not trying to be discouraging, but unless you plan use these things a lot (or just for fun to enrich the life!), consider that a local machine shop can usually quickly make anything you want or need for quite reasonable costs!!

This is my little machining area - I use LMS HiTorque models. Have since added a DRO kit to the lathe and have one for the mill when I get time.
The mill has a motorized feed on x-axis. It's amazing what you can do with even small machines.
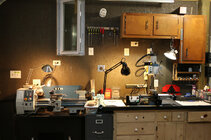
Little_machine_shop_IMG_0605.jpg

JKJ
 
John,

I have years of experience using machinist grade equipment building prototypes. I might enjoy the whole idea of doing what your friend did, it could be an interesting challenge. For now I'll just focus on getting into woodturning though.

Gregory
 
I just thought of a possibly certifiably insane way to lock an MT live center into the quill of the tailstock without using a drawbar: drill a hole near the front end of the quill and tap it for a hefty set screw. Locking the MT with a set screw that way could allow using the crank on the tailstock to adjust the pressure/tension.

(Would be best to machine a flat at the right spot on on the live center MT to keep the set screw from scarring the mating surface. Or better, mill a slot on the MT with an angle on the back end and put a cone or ball end on the set screw to apply tightening force to the MT)

I have a spare old quill for the PM3520 and spare live centers so it might be fun (and easy) to try that just as an experiment. When I get time. Maybe next year.

JKJ

I’m not sure I like the sound of that John. But if you do try it, you can get Brass Socket Set Screws that don’t mark steel items. Hard to buy over here without ordering hundreds so I get mine on eBay from China. Let us know how you get on if you try it.

Well, not totally insane!

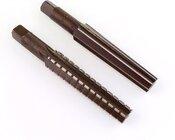
I was going to post something about how I have modified the quills on some lathe that didn't have a bore through the tailstock, but then thought better of it. One issue is that you need a way of accurately removing the burr that will form inside the MT of the quill from drilling and tapping it. If that is not done you may get galling. The appropriate sized MT reamer will re-dress the MT, but not everyone has one of those. It can be done manually, although that is more difficult to do on the internal surface of a MT than on the outside of the centre.
 
The appropriate sized MT reamer will re-dress the MT, but not everyone has one of those.

They are not expensive. I have this set, $30US:

1737420877735.jpeg
I haven't yet had a need for the coarse cut reamer but I've used the finish reamer (gently) to smooth galling.

A hole drilled radially through the quill should be deburred as the next step, entry and exit.
 
Back
Top