Thanks for that John. 
-
January 2026 Turning Challenge: Turned and Bent! (click here for details) -
Congratulations to Phil Hamel, People's Choice in the December 2025 Turning Challenge (click here for details) -
Congratulations to Clayton Thigpen for "Armillary Sphere" being selected as Turning of the Week for January 19, 2026 (click here for details) -
Welcome new registering member. Your username must be your real First and Last name (for example: John Doe). "Screen names" and "handles" are not allowed and your registration will be deleted if you don't use your real name. Also, do not use all caps nor all lower case.
You are using an out of date browser. It may not display this or other websites correctly.
You should upgrade or use an alternative browser.
You should upgrade or use an alternative browser.
Live center alternative
- Thread starter Jamie Straw
- Start date
I look forward to seeing that. 
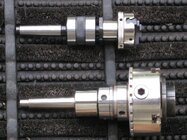
Not a live centre in the same sense as the above posts, but for some jobs a chuck mounted on a live centre in the tailstock is what is needed. One of mine has a mini chuck on it for finer work. Used with a drawbar through the tailstock they can also be used in tension, which works well with very long thin spindles...
Ok I'll have to admit I've seen this a few times, but never in use. Forgive my newbie ignorance here but why would you want a chuck in the tail stock? What does this offer you as a turner that a live center can't do?Not a live centre in the same sense as the above posts, but for some jobs a chuck mounted on a live centre in the tailstock is what is needed. One of mine has a mini chuck on it for finer work. Used with a drawbar through the tailstock they can also be used in tension, which works well with very long thin spindles...
Nope, good question. I’ve seen them before but wondered about specific use.Ok I'll have to admit I've seen this a few times, but never in use. Forgive my newbie ignorance here but why would you want a chuck in the tail stock? What does this offer you as a turner that a live center can't do?
I don't know all the uses people would have.but why would you want a chuck in the tail stock? What does this offer you as a turner that a live center can't do?
But one: Mounting a chuck in the tail stock can help better align it with a tenon on a piece held some way at the headstock, since wood compresses a bit when a chuck i tightened and tightening the chuck aligned this way can help.. Another solution for this is a non-turning adapter that fits into the tailstock MT and has threads for the chuck. I have a couple of these, one made from aluminum and one made from steel.
I heard people suggesting fastening the second chuck to the other end of something and spinning both but I can't imagine a situation where I would do that.
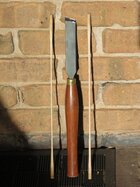
I've also heard of the idea of using tension when turning thin spindles. This in general may have several problems (for one, can't mount a drawbar in any tailstock I have, so I'd like to hear how that works from those who have done it). The method I use for thin spindles needs nothing but the live center (I like the steb live centers for this), and no aids but hand support needed. Keeping mind "thin" is relative, to illustrate my technique I made these, tapered from about 1/2" to 1/16" over 24" or so. One is shelving pine from HD, the other, walnut.
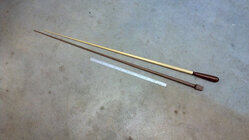
JKJ
Dave Landers
Beta Tester
Basically any time you want to turn a piece around and feel you'll loose accuracy if you remove it from the chuck.Ok I'll have to admit I've seen this a few times, but never in use. Forgive my newbie ignorance here but why would you want a chuck in the tail stock? What does this offer you as a turner that a live center can't do?
I've done this when I want better accuracy aligning a piece when flipping it around to mount on a vacuum chuck. Or I've lost the center point on the tenon and neglected to poke a new one.
I've also found it useful to align two parts for gluing/re-assembly - like I've parted a piece in two with a tenon on each end, and after turning on the inside, I want to re-assemble them.
They're not really meant for turning a piece under power - certainly not at high speed
Ok I'll have to admit I've seen this a few times, but never in use. Forgive my newbie ignorance here but why would you want a chuck in the tail stock? What does this offer you as a turner that a live center can't do?
Alignmrnt is important to me. Echoing what others have said, putting a chuck on the tailstock allows you to transfer the workpiece to another chuck while maintaining concentric alignment, as well as possible. Once I have a workpiece in a chuck I never release that chuck until the next mounting is in place.
Sometimes that will be directly on to another chuck, but frequently I am gluing it on to a sacrificial block held by the second chuck. (Or it could be Cole jaws, et.al).
heard people suggesting fastening the second chuck to the other end of something and spinning both but I can't imagine a situation where I would do that.
They're not really meant for turning a piece under power - certainly not at high speed
I've done the experiment, it might have run 10 seconds before it became a "big red button moment".
As others stated, primary reason for a TS chuck device Is alignment to something in the HS. In my knowledge base the most common reason to use one was to build up layers for segmented work - to have precision alignment of those layers.
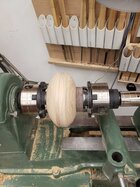
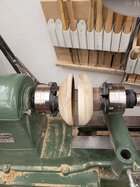
As others have stated alignment is important. I use the tailstock chuck adaptor to maintain alignment when transferring to another chuck and they come in pretty handy to clamp two pieces for glue-up. Example shown is a hollow form I cheated on by making it in two pieces! I find them pretty useful
Cheers.
Barry W. Larson
Calgary, Alberta, Canada eh!
Cheers.
Barry W. Larson
Calgary, Alberta, Canada eh!
Attachments
Help me out here. See Bill's chart above, the #2 taper option, column K. Does the degree-minutes-seconds shown here mean the same thing as the #2 taper shown in this chart (below) I posted in another thread, column Angle From Center, in decimal form? Two methods of representing the same information?The latest version of the Nova looks pretty good. Looking on the website I found out the nose taper for the inserts is also 2MT which is clever.
My OneWay has a small taper in the nose but I’ve no idea what it is, is there a 0MT?
Edit: There is indeed.
View attachment 70999
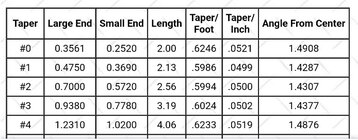
Yes. One is in metric, your is imperial. They should be the same but I didnt check any conversions. I’m sure there is a deg:min:sec to decimal converter online.Help me out here. See Bill's chart above, the #2 taper option, column K. Does the degree-minutes-seconds shown here mean the same thing as the #2 taper shown in this chart (below) I posted in another thread, column Angle From Center, in decimal form? Two methods of representing the same information?
View attachment 71077
Last edited:
I didn't check but could easily calculate.Does the degree-minutes-seconds shown here mean the same thing as the #2 taper shown in this chart (below) I posted in another thread, column Angle From Center, in decimal form?
However, I still think what I do is a lot easier - never even think about the angles - with a caliper just measure the diameter an existing taper in two places, say the pin knocked out of the Oneway or a drive center in the lathe, mark the distance between the two places and size with a parting tool, then cut the taper. I've done this at least 100 times. Probably more, never cared what the actual angle was.
Of course, if machining a taper from metal you'd have to work differently - tapers are often machined by offsetting the tailstock horizontally - they are made for that and even have an offset scale. Then there is CNC...
JKJ
My old LaBlond Regal metal lathe has a taper cutting attachment that will move the y axis while the X axis is feeding. The unit can be set in either degrees or taper per foot, but the settings are not capable of the required accuracy.Of course, if machining a taper from metal you'd have to work differently - tapers are often machined by offsetting the tailstock horizontally - they are made for that and even have an offset scale. Then there is CNC...
My old LaBlond Regal metal lathe has a taper cutting attachment that will move the y axis while the X axis is feeding. The unit can be set in either degrees or taper per foot, but the settings are not capable of the required accuracy.
Yikes, I looked up taper cutting attachments and saw simple sliders for cheap and some presumably accurate devices for over $3000!
When recently making a steel ferrule with several angles I just used the compound slide but, of course, the dimensions were short and the precise angles didn't matter the least. My favorite type of setup!
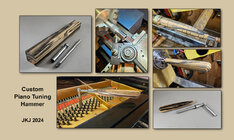
I don't know if I could do an accurate morse taper but I might try to make a short #0MT sometime to fit the Oneway.
Okay, thanks fellas. John- I agree, that's a pretty simple method you've got there, I'll give it a go. I've only done this a handful of times with fairly small/short pieces, so I didn't bother with a taper similar in length to a normal center, just an eyeballed taper a half inch long or so.
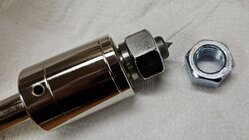
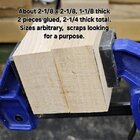
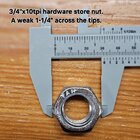
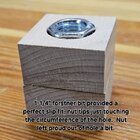
From message #42 above. The finished product, and as I thought, built just before I needed it. It is built from 2 glued pieces of 5/4 beech, any lump of wood about 2-1/4" thick or more will work. The 3/4"x10tpi nut is recessed into the block by a 1-1/4" forstner bit. First use will be drilling my new wood handles for my 3 new Carter scrapers. Drill in headstock, handle supported and advanced from this wood inverse cone center at the tailstock. The outer diameter of the internal wood cone is about 1-1/2". The aluminum (aluminium for our UK friends) Oneway cone has that dimension at its interior flat bottom, where the drive point is poking out, worthless for what I need to do. That Oneway cone is sized for baseball bats.
I took some construction photos, maybe I'll post them, too.
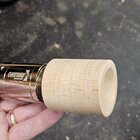
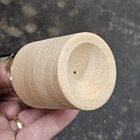
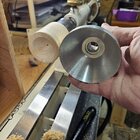
I took some construction photos, maybe I'll post them, too.


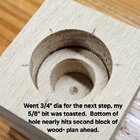

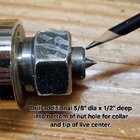
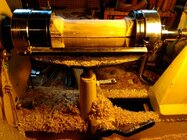
I used a cut-to-length 12D nail taped into the Oneway live center tommybar hole to act as a drive center in the headstock spindle. I threaded the lump of wood onto the isolated live (now acting as a drive) center, and used another live center in the tailstock to hold everything in place. The Oneway live-turned-drive center wasn't real happy about being used this way, but I got it turned to a cylinder. When it was time to cut the interior cone shape, and with the tailstock pulled back, the Oneway would not stay in the headstock spindle morse taper, and I had no threaded rod to make a drawbar to hold it in the morse taper. I had to put the wood cylinder into my Talon chuck to cut the interior cone shape. It took a little fiddling to get the cylinder oriented true in line with the chuck. But, I got it done. I'm out of time tonight, I'll drill those handles soon.
(Editing the next morning...)
And now, today's moment of humility.
5:00am, the alarm clock goes off.
5:00:03, first thought of the day- I don't wanna go to work today.
5:00:10, second thought of the day- hey dummy, why did you make it so hard on yourself forming that stupid piece of wood? Next time, turn the cylinder first using normal methods, with nice, squared ends and a reference mark for drilling, then walk it over to the drill press and poke the holes into it for the nut. There was no need to lock out the live center and try to use it as a drive to shape a square block of wood with an epoxied nut stuck into it. Come on, you know better! Dummy. (Insert head slap here.)
Epilogue- I don't mind confessing my mistakes in a public forum. Over my lifetime I've learned many a valuable lesson by watching the mistakes of others. I figure that if I made the mistake, there could be at least one other person out there, someday, on the verge of making the same mistake, and maybe I'll be their learning example.
Last edited:
Thanks for sharing, and while you may see a better way now, for this particular scenario - you've also opened eyes to an alternative method which might be just the ticket in a different scenario. The idea of the nail in the oneway live center to fix it, is something to file away. May not ever need it, but then again, maybe there is a need.<snip>
And now, today's moment of humility.
5:00am, the alarm clock goes off.
5:00:03, first thought of the day- I don't wanna go to work today.
5:00:10, second thought of the day- hey dummy, why did you make it so hard on yourself forming that stupid piece of wood? Next time, turn the cylinder first using normal methods, with nice, squared ends and a reference mark for drilling, then walk it over to the drill press and poke the holes into it for the nut. There was no need to lock out the live center and try to use it as a drive to shape a square block of wood with an epoxied nut stuck into it. Come on, you know better! Dummy. (Insert head slap here.)
Epilogue- I don't mind confessing my mistakes in a public forum. Over my lifetime I've learned many a valuable lesson by watching the mistakes of others. I figure that if I made the mistake, there could be at least one other person out there, someday, on the verge of making the same mistake, and maybe I'll be their learning example.
At the end of it, the job was done, on time and under budget. The fact there are other ways to do it, will always be the case.
For anyone with a metal lathe I saw this video for turning Morse Tapers. The technique should be good enough for what I do?
Dave Landers
Beta Tester
I usually (well, actually not "usually" but "if I remember") will turn a tenon around the outside of the nut so I can re-mount the block in a chuck to change the profile.There was no need to lock out the live center and try to use it as a drive to shape a square block of wood with an epoxied nut stuck into it.
Mount a block somehow from the non-nut side (chuck, faceplate, whatever). Drill for the nut, and turn the tenon at the same time. The tenon can be re-trued after the nut goes in by mounting it on the live center, using a drive center to spin it, and freshening the tenon with a skew/scraper.
Actually, for many of my temporary live center attachments, it's just a 3/4" hole and a flat to register on the live center shoulder. Is usually good enough.
The idea of the nail in the oneway live center to fix it, is something to file away.
One thing to consider when using something to lock the live center, whether a nail or the piece of bent-over soft iron wire I use, consider wrapping some masking tape or something around the live center, at minimum to protect the hand if distracted. I see Tom Gall mentioned this earlier.
BTW, my hands-down choice for masking tape in the shop, house, around the farm, any where I want reasonably strong tape that will stick well but is easily removable (unless you wait too long) is the Scotch 2060 masking tape for rough "hard to stick" surfaces. I've used it on concrete floors, damp cinder block, buckets, green wood blanks fresh off the bandsaw and over dry Anchorseal wax, on carpet, for extra security when holding a bowl in Cole jaws, as labels on containers in the shop and barn (for animal food) also as freezer labels. Usually write on them with a sharpie. I occasionally even use it when painting, but only rarely.
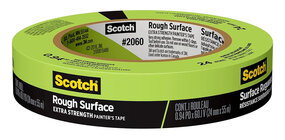
This is not the green masking tape from the big box store. I showed some to some professional painters and they had never seen it and planned to order some. I keep rolls in the shop, barn, house. I mostly use 1" wide but keep other sizes as well.
or search Amazon for 'scotch 2060 tape'
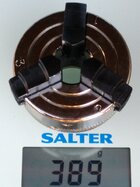
To monitor drying by recording weight change over time.
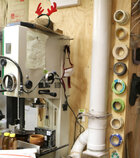
This is my high tech way to keep tape at hand in the shop, uses exotic specialty hardware called Nails.
JKJ
I've also found it useful to align two parts for gluing/re-assembly - like I've parted a piece in two with a tenon on each end, and after turning on the inside, I want to re-assemble them.
I've used mine in the tailstock to hold split in half pieces together while rough turning to round...
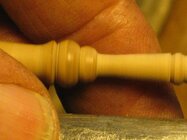
But, I primarily use it to put long thin spindles under tension. The one on the left is a 5/64" (just under 2mm) diameter over about 12" turned down length.
The method I use for thin spindles needs nothing but the live center (I like the steb live centers for this), and no aids but hand support needed. Keeping mind "thin" is relative, to illustrate my technique I made these, tapered from about 1/2" to 1/16" over 24" or so.
Not that I do much spindle turning nowadays and I'm rusty whenever I have to do a bit of it, but yes, I turn thin spindles of modest length the way JKJ does. However, I found when I got down to 2mm over a 12" span that I prefer to turn with the spindle under tension. I do still use my fingers behind the wood to support the fragile spindle and to control the depth of cut....
I have recently used my freewheeling chuck in the tailstock to turn a few drum sticks as a favour for a friend and found that worked quite well for me. If using a heavier chuck keep in mind that it will want to continue to spin after the headstock chuck has been braked by the drive control/mechanism and a thin spindle will twist apart under the unbraked inertia of the chuck in the tailstock. To avoid this, to stop turn the power off to the lathe at the wall and both chucks will spin down slowly together.
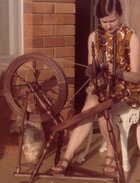
About 55yrs ago I was turning spinning wheels and that is so long ago that I can't remember exactly when I went across to using live centres, but do remember adding a little finishing wax to my dead centres to lubricate them so they didn't burn the wood! There is a lot of spindle turning in old style spinning wheels! Here is one of my spinning wheels being used by my lovely wife, so that is how I know how long ago that was...
.
Last edited:
That's interesting.There is a lot of spindle turning in old style spinning wheels!
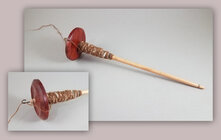
I’ve never turned a spinning wheel but have made parts for others and turned a bunch of custom drop spindles and a supported spindles. (I have years of alpaca and llama fiber.)
Bloodwod and Dogwood
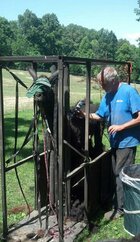
Years ago I welded up a restraint chute for shearing.
I love being able to make what I need (and save a huge amt of money!)
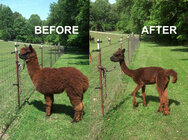
Alpaca Dria
I have one full-sized spinning wheel, two small electrics, gave away an antique, and have drum carder, ball winder, etc.
There are a lot of spinners around here. There’s a handspinners guild nearby and a lot of weaving/needle felting/fiber arts in the area. A friend who told me he wanted to be a sheep farmer when he was a little boy in kindergarten now has a sheep farm, raises sheep for show and meat, shears for others in the area (sometimes the TV station sends a camerman), and sells fiber on etsy! All this while busy in vet school!
JKJ
Tom Gall
TOTW Team
Assuming you can use a drawbar with your tailstock, AND you remember to gradually and slowly turn down the speed to stop the rotation AND remember to do the same to turn it back on - the weight/torque of the chuck will twist and break any thin spindles. And since that is not the way most people turn the lathe off I'm sure muscle memory / forgetfulness (?) will break many spindles. Do you have any secrets or tips in that regard?But, I primarily use it to put long thin spindles under tension. The one on the left is a 1/8" (3mm) diameter over about 12" turned down length.
I have recently used my freewheeling chuck in the tailstock to turn a few drum sticks as a favour for a friend and found that worked quite well for me.
I've made many drumsticks from hickory, dogwood, lignum vitae, ebony, two with dogwood shafts and ebony tips, just for fun, and still can't imagine what value the tension adds. I guess I'd have to watch sometime to learn the benefit. I turn drumsticks like any other spindle. The skeptic in me wonders, tongue-in-cheek, if the double chuck might be a solution in search of a problem.
This young lady, friend since she was a kindergartner, turned two drumsticks from lignum vitae as her first project after my usual introductory skew lesson and bead and cove practice. I think the hardest thing about drum sticks is getting a straight, consistent diameter shaft. There are some tricks...
Held drive end in a chuck, steb center in the tailstock. Perfection at first try. (Her dad took the photos.)
She's an expert on the drums. (And the guitar.)
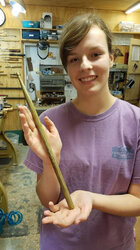
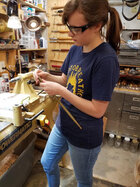
Ha, here she is on another visit - the girl is interested in everything!

JKJ
Tom Gall
TOTW Team
Sorry @Neil S - I didn't read far enough down on your message before writing my response.Assuming you can use a drawbar with your tailstock, AND you remember to gradually and slowly turn down the speed to stop the rotation AND remember to do the same to turn it back on - the weight/torque of the chuck will twist and break any thin spindles. And since that is not the way most people turn the lathe off I'm sure muscle memory / forgetfulness (?) will break many spindles. Do you have any secrets or tips in that regard?
However, turning off the power at the wall to allow for free spinning seems to be a very inefficient method.
Dave Landers
Beta Tester
For most things like wands or drumsticks or reasonable-length goblet stems it isn't necessary, although we know that too much pressure from the tailstock will cause bowing and whipping. Tension is just the extreme of "less pressure".and still can't imagine what value the tension adds.
Putting the spindle under light tension helps keep the spindle straight and running true. The spindle (obviously?) needs to be in a chuck (or otherwise mounted) at the headstock and you need some way to pull on its tailstock end.
The usual arrangement for this is a string steady - for spindles that aren't excessively long, you can make one that fits into the tailstock morse taper or attaches to your live center. Block of wood, 4 nails or screws and some waxed string wrapped around the nails and the end of the spindle.
Longer spindles that need support in the center can have string steady(s) that attach to the lathe bed - can either provide just support or add a little tension if necessary to keep things running true.
I have not had a case to need such a thing (yet) but it's in my mental "tool box" for someday....
It can add to the problem but is not the cause.although we know that too much pressure from the tailstock will cause bowing and whipping
I had a couple of very inexpensive live centers when I began turning and have seen but not used any number of others. Finally purchased the Teknatool version on sale and have never considered anything else. I find it accurate and keep the two starter versions around as 'just in case' tools. IMO...Having used them all, for a period of time it looks, which would suggest a new turner get? They all seem to have a lot of flexibility, just that the Nova isn't threaded directly. Is this the case?
Long term I can see the utility of having both the Nova and one of the others, but could I get good performance with just the Nova to start? Tooling dollars are tight starting out, but getting quality tooling should help learning.
Gregory
The skeptic in me wonders, tongue-in-cheek, if the double chuck might be a solution in search of a problem.
And, if you are not having problems then why try to fix or improve on it!
Fellow forum member @Dennis J Gooding posted the following results from the testing that he did on different holding methods for slender spindles
Introduction
Turning slender wood spindles can be challenging. Generally, for any given spindle profile, as one tries to make the spindle slimmer and slimmer, eventually the spindle begins to vibrate and whip under the pressure of the cutting tool, leaving a rough chatter-like finish on the wood. The onset of this effect can be delayed, but not prevented, by steadying the spindle with one hand and balancing out the tool pressure. It is well known from experience that some mounting methods perform better than others in terms of their resistance to this effect...
Turning slender wood spindles can be challenging. Generally, for any given spindle profile, as one tries to make the spindle slimmer and slimmer, eventually the spindle begins to vibrate and whip under the pressure of the cutting tool, leaving a rough chatter-like finish on the wood. The onset of this effect can be delayed, but not prevented, by steadying the spindle with one hand and balancing out the tool pressure. It is well known from experience that some mounting methods perform better than others in terms of their resistance to this effect...
- Dennis J Gooding
- Replies: 3
- Forum: Tutorials and Tips
I was intrigued by Dennis' results and out of interest gave it a try. What I found with straight but open grained stringy wood (regular 9mm dowl from the hardware shop) was the following...
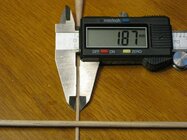
Under tension: With a tension of approx 3kg I managed to get down to 2mm (actually 1.87mm) diameter over a span of 300mm (12") using a mini chuck...
With compression: The pressure applied was similar to what I would normally use with a live centre; ie, as light as possible. Under compression I comfortably got down to about 5 to 6mm diameter over a span of about 250mm, but as you do, I pushed on to see if I could do better, but without any success. The middle ⅓ didn’t want to know about it.
Others, especially those who do a lot more spindle work than me, could probably do better or not need to bother with this, but the above results summarise what I could achieve with the two methods of holding the test spindles.
Should anyone decide to have a go at this, here are some tips if working with very thin spindles :
- When stopping, turn the lathe off at the power point when the speed has been dialled down to its slowest speed and then both chucks will coast down to a gentle stop, which avoids the VFD applying its stop brake.
- If you must stop and start again, especially as the spindle becomes long a thin, pull the tailstock chuck towards you and give it a helping flick as you start up again. This reduces the severity of the twisting.
- Once stopped, if you need to rotate the spindle (eg. to inspect 360°) hand rotate both chucks at the same time to avoid putting the spindle under unnecessary stress.
- A lighter and smaller diameter chuck on the tailstock end, like a Jacobs chuck on a live centre (with drawbar), is expected to create less twist and oscillations.
- Of course, use the VFD to slowly ramp the speed up and down.
- Listen carefully to the vibrations coming from the spindle. As it gets thinner it starts to behave like a string on a musical instrument. I also thought I could see harmonics happening at different points along the spindle. These might be indicators for there needing to be more or less tension or a different speed.
But, as always, your experience and needs could be quite different!
~
Last edited:
And, if you are not having problems then why try to fix or improve on it!
If addressed to me, yes, don't have problems so I'm not trying fix or improve anything. I'm simply trying to understand the physical and practical methods people have used or tried to use tension for thin spindles. The steps listed seem like a lot of trouble. Maybe someone has or will make a video.
Compression for a thin spindle is definitely not a good idea, asking for immediate flexing . With the driving end held firmly, I think of the tailstock role as guiding the free end. If the end is very thin, I remove the point completely and mount a little wood piece with a short hole sized so the end of the spindle can slide into it. No friction, the live center doesn't even need to turn.
I never used strings either, although I've seen them used by demonstrators for turning long and very thin stemmed goblets from green wood. (Watched Rudy Lopez do this once.) I've yet to watch anyone use tension.
And I still don't understand how a drawbar can be used in a tailstock. Did I miss something? None of my tailstocks (PM and Jet) have a through hole for a drawbar - do some tailstocks have a hole all the way through the lead screw big enough for a typical threaded drawbar (such as we use in headstocks to hold Jacob chucks, MT collets, and various mandrels?) Drawbars in these parts are typically 3/8"-16 or 1/4"-20 allthread.
Sorry @Neil S - I didn't read far enough down on your message before writing my response.
However, turning off the power at the wall to allow for free spinning seems to be a very inefficient method.
Agreed, but that only needs to be done if using a standard sized chuck, the sort that most turners already have, and with very long thin spindles.
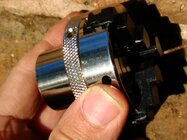
Not that I am likely to be doing any more of those very thin long experimental spindles, but for slightly thicker spindles that I might need to turn I have a mini chuck (shown in my earlier post in this thread) and also now a 'revolving' Jacobs chuck to put in the tailstock and the torque from those is more forgiving provided I dial up and down with the VFD when starting and stopping.
If addressed to me, yes, don't have problems so I'm not trying fix or improve anything. I'm simply trying to understand the physical and practical methods people have used or tried to use tension for thin spindles. The steps listed seem like a lot of trouble.
Sorry, the 'you' was addressed to the forum reader in general and not directed to you John. Apologies if that came across the wrong way, I shouldn't have hung my reply of your quote. I understand fully that you are more than OK with your thin spindle turning...
That posting of mine with all those details apply if anyone is using a standard sized chuck, which has a lot of weight/momentum/torque in them. If a mini or Jacobs chuck is used on a revolving M2 taper in the tailstock end this will minimise or eliminate the twisting issue...
And I still don't understand how a drawbar can be used in a tailstock. Did I miss something? None of my tailstocks (PM and Jet) have a through hole for a drawbar - do some tailstocks have a hole all the way through the lead screw big enough for a typical threaded drawbar (such as we use in headstocks to hold Jacob chucks, MT collets, and various mandrels?) Drawbars in these parts are typically 3/8"-16 or 1/4"-20 allthread.
Well, at least down our way, many lathes have through tailstock bores for knock out bars that allow for a drawbar to be fitted
I have the oneway and the Nova. I like them both. The MT2 on the Nova is easier to make custom widgets for, and the Nova comes with a pretty good assortment of options right out of the box for less money than the Oneway basic kit. I do love the Oneway cone and I also use it with the rubber ducky screw-on attachments. Both are high quality tools. Any of these mentioned will do for you. Given that students lose things, I'd go with the cheapest.
My Axminster lathe has a hole in the tailstock. Not sure of the exact size but it will accept an M10 draw bar.And I still don't understand how a drawbar can be used in a tailstock. Did I miss something? None of my tailstocks (PM and Jet) have a through hole for a drawbar - do some tailstocks have a hole all the way through the lead screw big enough for a typical threaded drawbar (such as we use in headstocks to hold Jacob chucks, MT collets, and various mandrels?) Drawbars in these parts are typically 3/8"-16 or 1/4"-20 allthread.
I thought all wood turning lathes had this feature for long hold boring but obviously not.
I have an earlier version of this lathe.
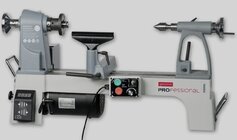
The problem with the draw bar in the tailstock is that it will tighten as soon as you extend the ram, therefore to do what you want to do would require positioning it first then tighten the draw bar.My Axminster lathe has a hole in the tailstock. Not sure of the exact size but it will accept an M10 draw bar.
I thought all wood turning lathes had this feature for long hold boring but obviously not.
I have an earlier version of this lathe.
View attachment 71244
My 3520C has a 3/8" diameter through hole in the tail stock.

