• Congratulations to John K. Jordan winner of the June 2025 Turning Challenge (click here for details)
  • Congratulations to Bobby McCarly for "Hemostatmorphodon" being selected as Turning of the Week for July 7, 2025 (click here for details)
  • Welcome new registering member. Your username must be your real First and Last name (for example: John Doe). "Screen names" and "handles" are not allowed and your registration will be deleted if you don't use your real name. Also, do not use all caps nor all lower case.

Bowl inside sanding

Joined
Jan 24, 2024
Messages
46
Likes
55
Location
Verona, WI
After roughing dozens of bowls I’m working on finishing cut skills. Feeling better about my progress on outside finish quality than interiors. I’ve got this soft maple piece on the lathe with what seems like tear out. With both hand and power sanding this area is 98% as smooth as the surrounding area but it isn’t really getting smaller. I’ve spot power sanded with 120grit. Other tool marks came out fairly easy. Is this a just keep sanding situation or would some sanding sealer or other technique help? I have not sanded in reverse as the chuck grub screws have gone missing.

I appreciate your wisdom here!
 

Attachments

  • IMG_3679.jpeg
    IMG_3679.jpeg
    309.3 KB · Views: 112
  • IMG_3678.jpeg
    IMG_3678.jpeg
    332.7 KB · Views: 112
More sanding on this one,

In the next ones.
Hollowing the inside rim takes practice. It’s an interrupted cut. Taking a big cut will pull fibers. Difficult to maintain the bevel through the air space. Too much bevel contact drags the tool down a bit setting up a vibration.

I Face off the rim before hollowing. I start each hollowing cut slowly until i nibble away a space for the bevel to float over.
Light cuts, sharp tools, float the bevel
Grinding the heel of the gouge reduces bevel drag.IMG_0439.jpeg

If you own a small bowl gouge 3/8 diameter - try that tool for the first 1-2” of the inside wall.
The smaller tool is sharper, takes a small cut, has a short bevel usually makes a clean tear free cut.
Jimmie Clewes’s teaches this in some of his classes with a traditional grind on a 3/8 bard bowl gouge.

See the light cuts
Light cuts with bowl (5/8 bar) gouge. Rim bowl gouge.jpeg Finnish cut 3/8 bar bowl gouge Rim quarter inch.GIF

I return a dried sycamore bowl in a demo video a tips thread on working with green wood
You can see how I do it and the use of the small gouge.
 
Last edited:
I have not sanded in reverse as the chuck grub screws have gone missing.
You can probably find replacements at your local hardware store. If you don't know the grub size, take the chuck, and a set of allen keys with you. It will likely be metric.

This looks like end grain, to me. In any case, I find alternating forward and reverse sanding to be more effective.

As suggested, a NRS could do a lot to smooth the area.
 
With both hand and power sanding this area is 98% as smooth as the surrounding area but it isn’t really getting smaller. I’ve spot power sanded with 120grit.
I’ll assume you don’t have a negative rake scraper.

I sand with a low lathe speed 30-50 RPM. If your lathe doesn’t go that slow go as low as you can.
If 120 isn’t doing the job try 80.
Use sharp paper - it will shoot a stream of dust off the disc.
Press lightly against the wood.
If you don’t see the stream of dust - time to put on a fresh disc.
 
Oh, the joys of turning soft maple! There is a lot of big leaf maple here, and one reason I don't like it is because it is prone to tear out, no matter how sharp your tools are. I have never taken a gouge to the levels that I take my hand planes to though.... For sure, I ALWAYS finish with a shear scrape, and have one video dedicated to that. As for NRSs, they do a good job when sweeping across the bottom. However, when going up the sides of a bowl, they are still scrapers, and you have unsupported fiber, so there is still going to be some tear out. Time for the 80 grit gouge. As always, a fresh gouge for the final finish cuts is necessary. For a long time, I figured that a smaller gouge would not be any advantage. But, as some one who has to experiment. I tried a 1/2 inch gouge, exact same geometry as my 5/8, and I did seem to have an easier time making smoother cuts on the inside of the bowl. It didn't seem to make any difference on the outside of the bowl. This may be because on the inside of the bowl, you have 3 areas to cut. One is the side wall which is similar to the outside of the bowl, two is the transition, and three is the bottom of the bowl. Slightly different grain orientations for all 3.

robo hippy
 
I have not sanded in reverse as the chuck grub screws have gone missing.
I don't use my grub screws, but I still sand in reverse all the time (and sometimes turn in reverse). I've never had an issue with the chuck coming loose, and my lathe does not have a very slow stop. That said, I do use the snap method when putting on my chuck. Make sure the mating surfaces are clean and then give the chuck a little hand-spin to seat it against the spindle shoulder. Not everyone agrees with this though, but it works for me.

A lot of other good advice here. I would also add that you don't necessarily need a negative rake scraper. A normal round scraper usually works fine, especially if you rotate it so that it is cutting at a somewhat shear angle. Hold your scraper flat against the toolrest, and rotate it counter clockwise until the right edge points up to 1/1:30 on the clock. Works like a charm.
 
Don't know what your remaining wall thickness is but if you have enough meat left, as others have said, NR scraper with the lightest whisper pressure as possible might help a little bit. That knot doesn't help you out as it's different hardness than the surrounding wood. Looks as if you have a nice curve on the inside so I'd probably just power sand it with the lathe off in just that area until it blends in with the curve (if NR scraper doesn't work.) I'd use 120 grit. Takes a little longer but getting 80 grit scratches out afterwards can be a real pain.
 
Here are a few thoughts:
  • Gouge might need sharpening and without realizing it, you're compensating by applying more pressure.
  • Gouge might be scraping rather than cutting
  • The tool might be cutting below the centerline. The tool's cutting edge on the bowl's inside must contact the wood above the centerline.
  • The wood might be vibrating. You could try dampening the vibrations by applying light pressure on the outside with a leather work glove.
  • As Robo Hippy said, soft maple can be a PITA.
 
I don't use my grub screws, but I still sand in reverse all the time (and sometimes turn in reverse). I've never had an issue with the chuck coming loose, and my lathe does not have a very slow stop. That said, I do use the snap method when putting on my chuck.

Sounds like you work exactly as I do, sand and turn often in reverse, no screw to lock the chuck to the lathe spindle, and use the snap when mounting the chuck. For years, I’ve been calling it my “calibrated wrist snap” - not too much, not too little.

Even with a heavy blank I also have never had a chuck loosen, although my lathes do have a 5-sec acceleration/deceleration.

I do always use a wrench to remove the chuck - I cringe when I see the chuck key used a lever to loosen the chuck, sometimes by striking it with the hand or a piece of wood (Over the years I’ve seen some damaged from that.) I’ve had people say “just put a board between the chuck jaws” and use it for leverage to remove the chuck. That method doesn’t work to remove the chuck without removing the piece from the jaws! (which I do often)

The only problem I have is one large chuck that has no flats for a wrench. I plan to put it on the milling machine some day and cut some flats.

JKJ
 
Last edited:
Got back to this bowl tonight and followed all this advice. Last session ended in frustration versus ending on a high note tonight!

I have both a round scraper (harbor freight steel doesn’t hold a burr) and a quality NR I had tried already. Those got the me this far but wall thickness was too thin to try again. I went after it with 80 grit but also realized some of the papers weren’t cutting anymore and replaced them. It took a while but at least 90% of those areas sanded out. Walls were getting thin enough to just start glowing through so I stopped.

Scraping up the walls is something I need to build on. There is enough chatter up there to spook me out. Maybe I need to support the wall on the outside? Have plenty of ideas from you all to exercise on the next one. I appreciate everyone’s input! I can feel it helping my skill grow.

Here’s the bowl, just off the lathe. 6 1/2 x 2”, 3 oz
 

Attachments

  • IMG_3687.jpeg
    IMG_3687.jpeg
    295.6 KB · Views: 35
  • IMG_3686.jpeg
    IMG_3686.jpeg
    435.2 KB · Views: 36
  • IMG_3685.jpeg
    IMG_3685.jpeg
    320.3 KB · Views: 35
Got back to this bowl tonight and followed all this advice. Last session ended in frustration versus ending on a high note tonight!

I have both a round scraper (harbor freight steel doesn’t hold a burr) and a quality NR I had tried already. Those got the me this far but wall thickness was too thin to try again. I went after it with 80 grit but also realized some of the papers weren’t cutting anymore and replaced them. It took a while but at least 90% of those areas sanded out. Walls were getting thin enough to just start glowing through so I stopped.

Scraping up the walls is something I need to build on. There is enough chatter up there to spook me out. Maybe I need to support the wall on the outside? Have plenty of ideas from you all to exercise on the next one. I appreciate everyone’s input! I can feel it helping my skill grow.

Here’s the bowl, just off the lathe. 6 1/2 x 2”, 3 oz
check this out.

I’ve done it and it works.
 
Scraping up the walls is something I need to build on. There is enough chatter up there to spook me out. Maybe I need to support the wall on the outside?

If the outside is smooth a common technique is to support the outside of a thin wall lightly with the hand while holding the tool in the other hand. (May not be as easy for tools with long handles.)
 
I do always use a wrench to remove the chuck - I cringe when I see the chuck key used a lever to loosen the chuck, sometimes by striking it with the hand or a piece of wood (Over the years I’ve seen some damaged from that.) I’ve had people say “just put a board between the chuck jaws” and use it for leverage to remove the chuck. That method doesn’t work to remove the chuck without removing the piece from the jaws! (which I do often)
I’ve only used the “board between the jaws” method a couple of times. It’s effective though, but like you often I’m removing the chuck with the piece still intact (ex. to get an upright view of the piece).

I do most often use my chuck key though (cringe away, oof). However, I do it in a way that causes minimal to no damage. Instead of putting in the key and then racking with my hand/board, I put the key in fully, apply pressure toward me, and then give a jerk with my hand. The key is never smashing into the key slot uncontrollably. Also like you mentioned, it’s also important to use just the right amount of force with the snap. Otherwise, wrench is definitely the safest way to go.
Get yourself one of these and never have to use a wrench again. I have been using this for a few years and it is awesome.

 
Get yourself one of these and never have to use a wrench again. I have been using this for a few years and it is awesome.

Oh man, I have to protest those. I had a nylon washer, but absolutely hated it. 😬
 
I have mostly Vickmark chucks, and they all have a hole on the insert for a spanner wrench, but I have never seen one specifically for our chucks.... I frequently use the chuck key to get my chuck off of the lathe. It never takes much force, but most of the time I can't get it off just using my hands.

robo hippy
Reed,
I have a Tommy bar that works but I like the spanner better.
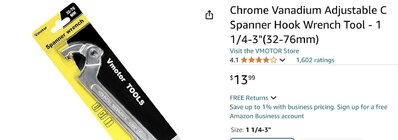
I got a spanner on Amazon a few years ago when somebody posted it on the forum
Similar to this one
IMG_2156.jpeg
 
Have you tried a strap wrench?
Yes, on smaller chucks (rather use the wrench) but the largest one I have won’t fit around the big chuck.


I had a nylon washer, but absolutely hated it.
I won’t use them either. I am known for using a dial indicator on woodturning chuck to check how true they run (and mark the best for certain uses) and when I tried a nylon washer it caused a definite wobble in the chuck. Perhaps there are some better. Perhaps a precision brass washer would be better. But for me, no washer - just steel against steel.

One thing Chris Ramsey pointed out in a cowboy hat demo is how important it is for the mating surfaces where the chuck mounts to be perfectly clean. He carefully cleaned both, removing all traces of sawdust. This may be less important for a chuck mounted and not removed from the lathe until the piece is finished, but for a chuck removed and replace the smallest debris could create some wobble.

BTW, I may remove a chuck with a piece then remount it later for several reasons. One, to set it aside for a while to work on something else (I have a yarn bowl like this waiting now 4 years to be finished). Two, to look at the form from a different perspective, as was mentioned. But mostly, three, to mount the chuck with the piece in a carving and finishing post (stand) to hand scrape then finish sand and even to apply finish. I use the device sold by Best Wood Tools, the best around. These things mount in the banjo and have one lever to lock the piece at a comfortable working angle, and a second lever to allow rotating the piece around it’s axis to lock and work from all directions (important with hand scrapers).

JKJ
 
Yes, on smaller chucks (rather use the wrench) but the largest one I have won’t fit around the big chuck.


I won’t use them either. I am known for using a dial indicator on woodturning chuck to check how true they run (and mark the best for certain uses) and when I tried a nylon washer it caused a definite wobble in the chuck. Perhaps there are some better. Perhaps a precision brass washer would be better. But for me, no washer - just steel against steel.

One thing Chris Ramsey pointed out in a cowboy hat demo is how important it is for the mating surfaces where the chuck mounts to be perfectly clean. He carefully cleaned both, removing all traces of sawdust. This may be less important for a chuck mounted and not removed from the lathe until the piece is finished, but for a chuck removed and replace the smallest debris could create some wobble.

BTW, I may remove a chuck with a piece then remount it later for several reasons. One, to set it aside for a while to work on something else (I have a yarn bowl like this waiting now 4 years to be finished). Two, to look at the form from a different perspective, as was mentioned. But mostly, three, to mount the chuck with the piece in a carving and finishing post (stand) to hand scrape then finish sand and even to apply finish. I use the device sold by Best Wood Tools, the best around. These things mount in the banjo and have one lever to lock the piece at a comfortable working angle, and a second lever to allow rotating the piece around it’s axis to lock and work from all directions (important with hand scrapers).

JKJ
I have never had wobble, the threads are locking the chuck in, how could it wobble? For example, if you put an object between the spindle and chuck, the threads would bottom out on the object, they would not become slanted or off kilter because the threads are solid, would they?
 
Last edited:
Perhaps a precision brass washer would be better. But for me, no washer - just steel against steel.
My thoughts exactly. There is too much compressibility and non-flatness with the plastic washers. For small pieces it may be marginal, but as size increases so does the runout at the rim. Machined would be the way to go, but then you would run into the same removal issues. And like you, and you mentioned Chris Ramsey, I’m pretty anal about keeping my mating surfaces dust/debris free.

BTW, I may remove a chuck with a piece then remount it later for several reasons.
Agree. I’m also pretty anal about marking my piece if removing with the intention of putting back in the chick. I have two sharpie marks on two jaws for registering against marks I make on the shoulder of a piece.

the threads are locking the chuck in, how could it wobble?
My understanding is that even though it seems like the threads are locked in laterally, there is still a tiny bit of space. Otherwise, we would need serious lubrication to thread the chick onto the spindle. And although the space between complementary threads is minimal, it allows for slight movement. The spindle shoulder and the flat machined surface of the chuck creates a zero-space mate situation (much like the reason it’s better to leave a flat surface for your chuck jaws to rest against, rather than just a perfectly sized tenon (of course, wood compressibility is a factor here as well)).
 
My thoughts exactly. There is too much compressibility and non-flatness with the plastic washers. For small pieces it may be marginal, but as size increases so does the runout at the rim. Machined would be the way to go, but then you would run into the same removal issues. And like you, and you mentioned Chris Ramsey, I’m pretty anal about keeping my mating surfaces dust/debris free.


Agree. I’m also pretty anal about marking my piece if removing with the intention of putting back in the chick. I have two sharpie marks on two jaws for registering against marks I make on the shoulder of a piece.


My understanding is that even though it seems like the threads are locked in laterally, there is still a tiny bit of space. Otherwise, we would need serious lubrication to thread the chick onto the spindle. And although the space between complementary threads is minimal, it allows for slight movement. The spindle shoulder and the flat machined surface of the chuck creates a zero-space mate situation (much like the reason it’s better to leave a flat surface for your chuck jaws to rest against, rather than just a perfectly sized tenon (of course, wood compressibility is a factor here as well)).
Well, maybe since I don't work on large work it doesn't affect my work as much.

Thanks for the explanation :)
 
Get yourself one of these and never have to use a wrench again. I have been using this for a few years and it is awesome.


Metal-to-metal contact between the register face on the spindle and the register face on the chuck is essential for precision alignment of the chuck to the axis of rotation. You can't rely on threads for alignment because there is plenty of free play between the threads on the spindle and chuck. Using a plastic washer to prevent the chuck from getting stuck has the unfortunate drawback of no longer having precision alignment. I see it as a bandaid for a bigger problem such as a damaged register face or a bent spindle. If it weren't for my first lathe having a bent spindle I might have considered that unlikely.
 
Scraping up the walls is something I need to build on. There is enough chatter up there to spook me out. Maybe I need to support the wall on the outside? Have plenty of ideas from you all to exercise on the next one. I appreciate everyone’s input! I can feel it helping my skill grow.

Getting a continuous finely tooled curve on the interior of bowls......one that needs no leveling and a minimum of sanding is one of the more challenging aspects of bowl turning.

I turn Big Leaf Maple bowls often, and this can be done with great success.

In my opinion, one of the best single bits of advice you've gotten.....is to use a negative rake scraper. They take some time to develop skills to the point where you have the minimum amount of work left to do when you transition from tools to sanding.

Sharp tools can't be stressed enough, and I probably turned for twenty years before I really knew what sharp was......and, how to consistently maintain that kind of an ultra-sharp edge.

Another thing that will affect the outcome of a very refined tooled surface, is to find the right rpm......one that minimizes the vibration initiated by the edge cutting wood and the static balance. A Oneway bowl steady is a great invention.....I use one on nearly every bowl I make. It helps dampen the vibration, and anything you can do to minimize the vibration is to your advantage.....it will definitely affect the quality of the tooled surface you are capable of. You may not be able to completely eliminate vibration, and there are two types.....static vibration, and that vibration which is caused by the interaction of your tool to wood. The best rpm tends to help with the static vibration a bit more, and the Oneway bowl steady tends to help more with the vibration that initiates from the interaction of tool cutting wood......however, it is a combination of all the elements of the total equation working in concert with one another that gives that final boost of capability.

Refined tool skills cannot be taught......they can only be experienced through observation and adjustments. Some turners may learn faster than others, but everyone needs to gain an understanding of all the things that affect the quality outcome of a sharp tool cutting wood.....it is multi-faceted.

=o=
 
Last edited:
I don't use my grub screws, but I still sand in reverse all the time (and sometimes turn in reverse). I've never had an issue with the chuck coming loose, and my lathe does not have a very slow stop. That said, I do use the snap method when putting on my chuck. Make sure the mating surfaces are clean and then give the chuck a little hand-spin to seat it against the spindle shoulder. Not everyone agrees with this though, but it works for me.

A lot of other good advice here. I would also add that you don't necessarily need a negative rake scraper. A normal round scraper usually works fine, especially if you rotate it so that it is cutting at a somewhat shear angle. Hold your scraper flat against the toolrest, and rotate it counter clockwise until the right edge points up to 1/1:30 on the clock. Works like a charm.

I had to laugh at myself this weekend. I had been sanding in forward and reverse. Started a new bowl and nothing would cut. What the heck? Ah, still in reverse. :D
 
Sounds like you work exactly as I do, sand and turn often in reverse, no screw to lock the chuck to the lathe spindle, and use the snap when mounting the chuck. For years, I’ve been calling it my “calibrated wrist snap” - not too much, not too little.

Even with a heavy blank I also have never had a chuck loosen, although my lathes do have a 5-sec acceleration/deceleration.

I do always use a wrench to remove the chuck - I cringe when I see the chuck key used a lever to loosen the chuck, sometimes by striking it with the hand or a piece of wood (Over the years I’ve seen some damaged from that.) I’ve had people say “just put a board between the chuck jaws” and use it for leverage to remove the chuck. That method doesn’t work to remove the chuck without removing the piece from the jaws! (which I do often)

The only problem I have is one large chuck that has no flats for a wrench. I plan to put it on the milling machine some day and cut some flats.

JKJ

I'm not sure about your chuck, but on the SuperNova 2, I use a screwdriver in the set screw hole to loosen the chuck.
 
Got back to this bowl tonight and followed all this advice. Last session ended in frustration versus ending on a high note tonight!

I have both a round scraper (harbor freight steel doesn’t hold a burr) and a quality NR I had tried already. Those got the me this far but wall thickness was too thin to try again. I went after it with 80 grit but also realized some of the papers weren’t cutting anymore and replaced them. It took a while but at least 90% of those areas sanded out. Walls were getting thin enough to just start glowing through so I stopped.

Scraping up the walls is something I need to build on. There is enough chatter up there to spook me out. Maybe I need to support the wall on the outside? Have plenty of ideas from you all to exercise on the next one. I appreciate everyone’s input! I can feel it helping my skill grow.

Here’s the bowl, just off the lathe. 6 1/2 x 2”, 3 oz

There are basically two ways to hog out a bowl; from center of the bowl to rim, or rim to center. I use the rim to center method as described by Kent Weakly at www.turnawoodbowl.com. He recommends leaving the center mass for stability, reducing it as you move down the side wall. Finish cut only 2" or so at a time. Once you lose that center mass, the sides will flex, so once you finish that top 2", you can never go back up for finishing cuts. Well, you can, but the results won't be good.
 
I had to laugh at myself this weekend. I had been sanding in forward and reverse. Started a new bowl and nothing would cut. What the heck? Ah, still in reverse. :D
That's what is nice about the my toggle switch on my Robust. I never can get it stuck in reverse because each time I turn it off, it resets to the middle position! I then have to select forward or reverse by flicking it right or left.

When I did my demo at the OVWG two weeks ago, I used a Powermatic and started turning in reverse. Someone told me it was in reverse when I asked "Why is it not cutting"?

I am just not used to using another lathe :D

That's a nice feature.
 
I'm not sure about your chuck, but on the SuperNova 2, I use a screwdriver in the set screw hole to loosen the chuck.

All my chucks are Teknatool novas, most new, a few bought used, some original Supernovas with the hateful key, some are the nicer Supernova 2, and the one huge Titan. I had some G3s but I gave them to a long-time student/friend. (I know there are some more expensive chucks that may be heavier-duty, but I stuck with these because all the jaws are interchangeable and they are sturdy enough for what I do.)

I haven’t heard of the screwdriver method but I’ll take a look. Might be good to recommend to a student without a wrench.

JKJ
 
I did have a "Delrin" washer for my chucks and lathes some years back. There was no noticeable run out in the chuck or the bowls, probably because the washer was machined flat. Delrin is capable of that. It eventually got lost in the shavings and I never replaced it.

I may have to redo my thinking on NRSs. I am still of the opinion that they are still scrapers, and you will still end up with some tear out in unsupported grain, which is the side grain in bowls. Maybe I do need to sharpen more frequently. One good thing about them is that as you ease them into what ever it is that you are turning, they nibble off the high spots so you get a more true surface....

robo hippy
 
There are basically two ways to hog out a bowl; from center of the bowl to rim, or rim to center. I use the rim to center method as described by Kent Weakly at www.turnawoodbowl.com. He recommends leaving the center mass for stability, reducing it as you move down the side wall. Finish cut only 2" or so at a time. Once you lose that center mass, the sides will flex, so once you finish that top 2", you can never go back up for finishing cuts. Well, you can, but the results won't be good.
I saw that video and not sure if the physics make sense. More mass is more inertia, helping maintain RPM against a brief slowdown, that might help. But once the wall wood fibers are cut away the center is not directly supporting the walls. It’s not intuitive. Maybe I should try it myself!
 
But once the wall wood fibers are cut away the center is not directly supporting the walls
True but it is the indirect support that you benefit from.
What mass in the bottom of a bowl or hollowform does is strengthen the hold of the faceplate or chuck.
This mass decreases vibration significantly.
Also stair stepping leaves thicker walks close to where you are cutting the final thickness.

Creating a thin wall near the chuck or faceplate mount lets the work flex around the mount.

You can get other vibration cutting walls from things like bevel drag and too much bevel pressure.

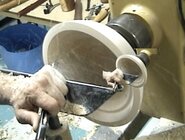
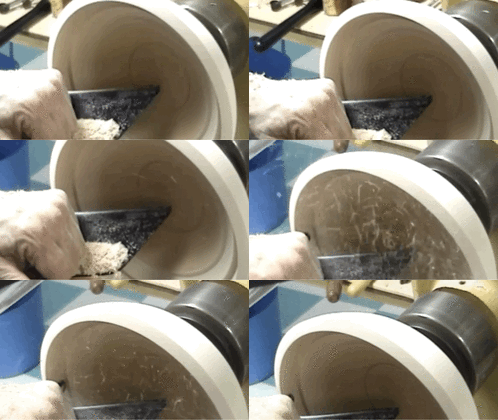
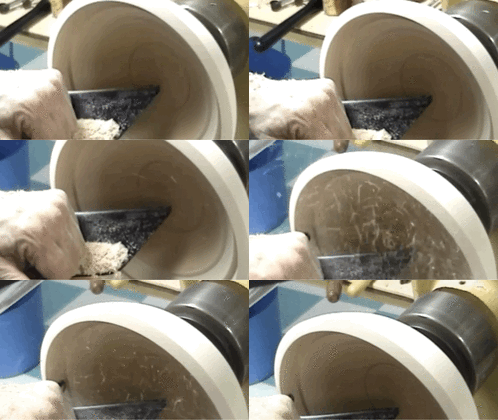
In this clip from a demo of returning a dried 11” sycamore bowl I’m doing the finish cut on the top of the side wall.
The ring in the bottom is from the friction drive of the bare chuck jaws. I’v turned te walls down toward the bottom but have not yet turned the bottom. You can see a few stair steps.
Rim quarter inch.GIF
 
Last edited:
Back
Top