• April 2025 Turning Challenge: Turn an Egg! (click here for details)
  • Congratulations to Kelly Shaw winner of the March 2025 Turning Challenge (click here for details)
  • Congratulations to Ellen Starr for "Lotus Temple" being selected as Turning of the Week for 21 April, 2025 (click here for details)
  • Welcome new registering member. Your username must be your real First and Last name (for example: John Doe). "Screen names" and "handles" are not allowed and your registration will be deleted if you don't use your real name. Also, do not use all caps nor all lower case.

Blade Kerf and getting the needed kerf in the wood?

If your kerf is wider at the bottom than at the top it may be due to the blade being out of alignment to the miter slot. It is important to check the alignment with the blade both vertical and tilted. If you are not familiar with the procedure check out this video.
View: https://www.youtube.com/watch?v=tNfvtStKkFA

This is important whether you are doing through cuts are partial cuts. Another thing, I don’t think 1/8” is enough to prevent flexing (depending on the wood species). If the kerf is only slightly less than the insert thickness you may be wedging the cut open. As far as using clamps rather than fingers that should be better. Do you have sandpaper on the front of your fence? That really helps with preventing shifting.

Thanks for the vid. When I first bought the saw, a simple Ridgid job site fold away one, I watched a bunch of videos and tuned the saw up before its first use. One of those things was to adjust the alignment of the blade to the miter slots. I marked a tooth, used my square (exactly as in the video), and just touched the tooth (no deflection), rotated that tooth back and touched. It WAS out of alignment, very slightly, and I adjusted it until it was as perfect as I could get without a dial indicator. I checked that alignment before starting this project, and also just the other day as part of building a new more advanced crosscut sled. Its still as perfect as I can make it. Now, I only tested with the blade at 90 degrees...so I guess it is possible its out at an angle....but, I don't know how you would normally deal with that. I can't be constantly re-adjusting the blade for every angle.... With these little projects I'm using 3 or 4 different angles for each one...

Speaking as a longtime cabinetmaker, the idea of making two cuts with an undersized blade to get consistent width kerfs makes my head hurt. A drunken sawblade (shimmed to make a wider kerf) can work, but it is a pain to set up precisely without a pair of tapered washers. I would simply use a 1/8" kerf blade and size the material to fit the resulting groove. In my shop I would run the filler material through my drum sander. In a town the size of Aurora I am sure one could easily find someone with a drum or widebelt sander to do the job. Lacking access to a thickness sander I would use a thickness planer with an auxiliary bed or rip the material on the tablesaw using featherboards for consistency.

Fundamentally I agree with you. Just going through a dry season in my life right now, so expenditures are basically impossible. I've been trying to make do with what I have, and I'm certainly lacking in some of the tools department. The nearby Woodcraft does have machines of all kinds, but they charge $65/hr to use them, and minimum of an hour. A couple of my neighbors do woodworking of various kinds, but neither have a drum sander or thickness planer. Tablesaws, bandsaws, miter saws and lathes, though, are aplenty around here. I think one has an oscillating sander, but that wouldn't work for the use case.

Using the table saw to cut to thickness will work, but as I mentioned previously, I had a bunch of 1/8" thick material that I'd originally bought for another purpose, and need to use it for something. Otherwise, I'd cut 3/32" thick inserts from lumber. (Well, and in the future, I guess that's what I'll be doing as well.)
 
I'm still testing. It's looking like I need to add 40% or more to the thickness of feeler gauges that I use to create the second cut. My thought was if you have a contrasting wood that us .100" thick. You can subtract the width of 2 cuts with the bandsaw blade in my case that's. 070". That leaves .030" if space needed for tge second cut. my latest test that's still waiting for glue to dry shows .040" is closer when cutting a celtic knot at 60 degrees. I don't know if that applies with a 45 degree knot.
I'm guessing that the space needed is due to some math formula based on a triangle but I'm not a math person.

Curious how you go about measuring the kerf of your blade. Do you just make a cut, then use the feelers to figure out what the real world kerf is? The teeth on a blade generally just out from the body of the blade in alternating fashion, which makes it difficult to measure the kerf with say calipers on the blade itself... I could probably roughly estimate it with feeler gauges, but I am not sure how accurate that might be, especially if the wood flexes around the cut at all. Or are you just referencing the nominal kerf?
 
I measure the gap I cut with feeler gauges. Probably not dead on, but close within maybe 2 or 3 thousandths. I don't know what I was thinking yesterday when I said you need to add extra to the width of the cut. What you need to do is measure your inlay. In my case, the saw kerf is .035". Double that, which gives me .070". Subtract that from the thickness of your inlay, and that is the correct amount of offset. I will do much better photos and description in a day or so. Here is my setup. I tried putting the feeler gauges at the bottom of the piece, but got inaccurate cuts. By putting the gauges to the side and pushing the longer piece against the short piece, I got a more accurate cut on the second cut. Oops, sorry, these photos are on my good camera.
 
I measure the gap i cut with feeler gauges. Probably not dead on but close within maybe 2 or 3 thousandths. I don't know what I was thinking yesterday when I said you need too add extra to the width of cut. What you need to do is measure your inlay. In my case the saw jerf is .035". Double that whick gives me .070". Subtract that from the thickness of your inlay and that us the correct amount of offset. I will do much better photos and description in a day or so. Here is my set up. I tried putting the feeler gauges at the bottom of the piece but was getting inaccurate cuts. By putting the gauges to the side and then pushing the longer piece against the short piece I got a more accurate cut on the second cut. Oops sorry thise photos are on my good camera.

Thanks. I'll see how using feeler gauges compares to measure, cut, measure again that Mike recommended. I need to star thinking like Mike! Simple solutions! :D Anyway, I'll see if I can get my feelers to agree with the measure/cut/measure approach and see if there is any difference.

I understand what you are saying though. Measure the insert, subtact the blade kerf, and then you can make the necessary number of cuts. The last cut, would need to be adjusted to account for whatever the remnant of the insert thikness is. So if your insert is 0.1 thick, and your blade cuts a kerf 0.035", then you would need to make 0.1/0.035 cuts. That is 2.86, meaning two full-kerf cuts, and then one that is about 86% the full kerf. If you account for glue, though...I wonder if you could just make three full-kerf cuts? That would be an extra 0.0084" wider slot cut into the wood... Or 0.0042" additional gap on either side of the insert. Would that be too much? Or would it be just enough, to allow some room for the glue (your glue line)?
 
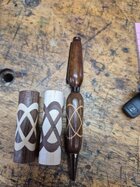
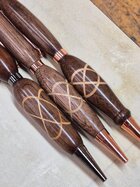
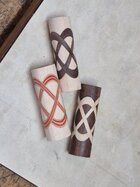
Here is what I'm trying to achieve. That's a bandsaw kerf on the right. The other two are thicker than that but thinner than my table saw kerf. These were cut at 60 degrees. The other photo shows 45, 52.5 and 60 degrees with the vand saw jerf.
 

Attachments

  • 20250421_154022.jpg
    20250421_154022.jpg
    507.7 KB · Views: 15
  • 20250421_091121.jpg
    20250421_091121.jpg
    475.2 KB · Views: 15
Here is what I'm trying to achieve. That's a bandsaw kerf on the right. The other two are thicker than that but thinner than my table saw kerf. These were cut at 60 degrees. The other photo shows 45, 52.5 and 60 degrees with the vand saw jerf.

Gocha. Yeah, its tricky. The first two look excellent. Very slight offset with some of the cuts....thats the real challenge. I guess, from my last reply, maybe the 0.0084" might be enough to cause some offset in the alignment of prior loops a you make subsequent cuts... Hmm. I will be back out in the shop in a little bit. I'm going to try the measure/cut/measure approach and see what that tells me my kerf is, then see how accurate I have to be, to get....well, optimal (?) alignment of all four loops after all four cuts and inserts are glued in. Its interesting, just how tricky this can be. Seems so simple, but in reality, its just...not...
 
Back
Top