• February Turning Challenge: Choose Your Box! (click here for details)
  • Congratulations to Isaac Litster winner of the January 2025 Turning Challenge (click here for details)
  • Congratulations Ricc Havens for "Black Ash" being selected as Turning of the Week for February 10, 2025 (click here for details)
  • Welcome new registering member. Your username must be your real First and Last name (for example: John Doe). "Screen names" and "handles" are not allowed and your registration will be deleted if you don't use your real name. Also, do not use all caps nor all lower case.

Yes, another epoxy/resin/filler question

Joined
May 25, 2021
Messages
80
Likes
137
Location
Glendale, AZ
I have searched the forum to try to find an answer but nothing specific enough for my question.

I am looking for options to use as a filler for intentional gaps on a piece I am working on (inspired from a piece I saw from Mayuko Wood Craft).
First off, I do not have a pressure/vacuum pot and do not plan on getting one.

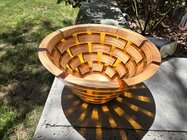
I want to fill gaps as you can see in the photo. The gaps are roughly 3/8" deep and no more than an 1/8" wide. They surround the entire vessel. I will also need to tint/color it black.

At first, I had my heart set on resin. However, reality set in and I realized I do not want to go through the hassle and time to create dams, pour in sections and all that. *Unless someone has an easy suggestion for it.

In my mind, what little is left of it, I think a paste or very thick liquid would be best since the piece is round. The inspirational piece was filled with wood glue mixed with coconut shell charcoal power.

Finally, I would like to finish it with a wipe-on poly gloss.

Thoughts?

Thank you
PXL_20250206_220526376.jpg
 
I have used this System 3 product GelMagic. It's a slightly translucent peanut-butter consistency epoxy you can trowel on. It can be colored with different materials. I find it a bit softer when cured than typical marine epoxy. Like most epoxy fills it is difficult to avoid bubbles, and filling pinholes so they don't show can be time-consuming and aggravating (thus pressure vessels).
 
I have used this System 3 product GelMagic. It's a slightly translucent peanut-butter consistency epoxy you can trowel on. It can be colored with different materials. I find it a bit softer when cured than typical marine epoxy. Like most epoxy fills it is difficult to avoid bubbles, and filling pinholes so they don't show can be time-consuming and aggravating (thus pressure vessels).
Thank you!
 
Sounds like a cool project. I know you said you're not looking to use resin and to not use a pressure pot, but maybe some ideas can be gleened from the process I used for these "similar" resin hybrid bowls I've been making lately .
If you change your mind (and the diameter is <12" ) ... I'm up in Camp Verde and you're welcome to swing by and use my pressure pot anytime :)
 

Attachments

  • 20241107_131957[1]_min.jpg
    20241107_131957[1]_min.jpg
    373.3 KB · Views: 12
  • 20240523_130036_min.jpg
    20240523_130036_min.jpg
    234.7 KB · Views: 10
  • 20241107_131942[1]_min.jpg
    20241107_131942[1]_min.jpg
    359.7 KB · Views: 9
Perhaps I am going to sound like an idiot/simpleton, but what about a ziploc bag? If you want to a tight fit, wrap it with tape. If you want the middle hollow, put a bouncy ball inside.
 
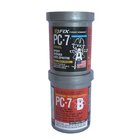
Is black OK? Used this recently on the bottom of some used pottery for leveling and some metals. Thick 2-part paste, spread and press into gaps, cures without shrinking. Sticks to everything, won't run, good working time. Haven't tried it on wood. Maybe read the details in the amazon link. There are good reviews. A good friend has used it forever.

Maybe try it on a test piece.
1738950244187.jpeg


Also available at hardware stores everywhere.

Whatever you are making, I'll bet it will look fantastic!

JKJ
 
Epoxy Dams do not need to be difficult. I have made some using corrugated plastic (think political / advertising signs) and hot glue. Cut the plastic in a strip(s), crease the flutes and it can bend in a fairly round shape. A heavy bead of hot glue (doing the inside and outside) to sit the plastic in and you are good to go. Depending on the diameter I have also seen people use cake pans. Look at a resin like Liquid Diamonds (very viscous epoxy) to fill all the voids. It has a long enough cure time that you can follow-up with a torch occasionally to pop any bubbles on the surface. You could also use some deep pour epoxy for even longer open time to let the air bubbles get to the surface.

As for keeping the pieces in place, a dab of hot glue would work there as well if you are not able to put a support on top.
 
How about Milliput ® (an epoxy putty)? A club member has used it to nice effect and it will probably do what you want. Don't know if it is an economical solution, however ... but that might not matter. I bought some in black & white years ago but never used it. It comes in several colors.
Black Milliput
 
Is black OK? Used this recently on the bottom of some used pottery for leveling and some metals. Thick 2-part paste, spread and press into gaps, cures without shrinking. Sticks to everything, won't run, good working time. Haven't tried it on wood. Maybe read the details in the amazon link. There are good reviews. A good friend has used it forever.

Maybe try it on a test piece.
View attachment 72053


Also available at hardware stores everywhere.

Whatever you are making, I'll bet it will look fantastic!

JKJ
Thanks John - I'll look into it more. It states dark grey though and does not state sandable/finish just paintable.
 
How about Milliput ® (an epoxy putty)? A club member has used it to nice effect and it will probably do what you want. Don't know if it is an economical solution, however ... but that might not matter. I bought some in black & white years ago but never used it. It comes in several colors.
Black Milliput
Thanks Tom. I'd need about a gallon lol
 
Epoxy Dams do not need to be difficult. I have made some using corrugated plastic (think political / advertising signs) and hot glue. Cut the plastic in a strip(s), crease the flutes and it can bend in a fairly round shape. A heavy bead of hot glue (doing the inside and outside) to sit the plastic in and you are good to go. Depending on the diameter I have also seen people use cake pans. Look at a resin like Liquid Diamonds (very viscous epoxy) to fill all the voids. It has a long enough cure time that you can follow-up with a torch occasionally to pop any bubbles on the surface. You could also use some deep pour epoxy for even longer open time to let the air bubbles get to the surface.

As for keeping the pieces in place, a dab of hot glue would work there as well if you are not able to put a support on top.
Thank you
I'll be the first to say resin would look so much better than anything else. I just don't think it's doable.
How would you do it on this piece? The whole thing will be covered in pieces

PXL_20250207_205422450.jpg
 
I kind of like it as is with gaps between the pieces, but there was what looks like glue squeeze out on your first post. An option is a UV curing resin and working in sections. A craft store like Michael's will have it and they have multiple colors.
 
Thanks John - I'll look into it more. It states dark grey though and does not state sandable/finish just paintable.
I can try sanding on a piece we applied a week or so ago to level the bottom of a pot to sit nicely on a pedestal for a stairway landing in my house.
We have a piece about 3" long to experiment with.

Most things can accept finish - this stuff doesn't seem porous or oily to me. What kind of finish did you have in mind?
This stuff may be hydrophobic so a water-based finish might not work. But if it accept shellac, you can usually put any finish over that.

PaulM_pot_20250205_190403.jpg

JKJ
 
Jim - Thats a really interesting concept... How thin will the small pieces be? Will you turn away the segmented "interior" substrate or leave it so the little blocks stay attached to it?

If you want to use typical 2-part epoxy (liquid diamonds, Mas, Total Boat, West Systems) there is a unique type of tape called Butyl Tape that will allow you to seal the entire piece. It's used for sealing the roofs of RV's and it sticks like grim death. You have to turn it off after the epoxy dries and it is a MESS but it will work for applications like this.

Gently wrap the piece with strips of Butyl tape make sure to overlap all the edges and double wrap it if you think there even might be the slightest chance of a leak. Resin ALWAYS finds a way out if there is one. The tape is cheaper than the resin...

Seal the bottom with butyl tape and pour in the resin from the top. Because there looks to be so much space between the little blocks, air bubbles should rise through the maze to the top. But use a deep pour epoxy so its quite watery.

The tape, when applied will "dent" into the lines between the pieces so the wood will be proud of the resin when it cures. This is my only concern for you. Is there enough meat on the pieces to avoid making the walls too thin.... Any voids left in the maze of resin can be filled after the fact, bit by bit.

The other way I would approach it might be to use a thickener in the epoxy which turns the epoxy into a more peanut butter consistency. Cab-O-Sil works well and because you are the one adding the thickening agent, you decide how thick or thin you want it to be. With enough thickener, you can apply the resin to vertical surfaces and it won't sag/drip.

You could try my first recommended way and then fill any voids left behind with thickened epoxy.

You've created a fun challenge for yourself and it is DEFINITELY doable.
 
I would try knife grade polyester resin. It is used extensively in the granite industry one brand is Akemi. The natural color is nearly transparent tan. We usually added color to it starting with white or black to make it less transparent then mix other colors accordingly. It uses a cream hardener similar to Bondo. The company we bought was called Granquartz.
 
I have used this System 3 product GelMagic. It's a slightly translucent peanut-butter consistency epoxy you can trowel on. It can be colored with different materials. I find it a bit softer when cured than typical marine epoxy. Like most epoxy fills it is difficult to avoid bubbles, and filling pinholes so they don't show can be time-consuming and aggravating (thus pressure vessels).
I have searched the forum to try to find an answer but nothing specific enough for my question.

I am looking for options to use as a filler for intentional gaps on a piece I am working on (inspired from a piece I saw from Mayuko Wood Craft).
First off, I do not have a pressure/vacuum pot and do not plan on getting one.

I want to fill gaps as you can see in the photo. The gaps are roughly 3/8" deep and no more than an 1/8" wide. They surround the entire vessel. I will also need to tint/color it black.

At first, I had my heart set on resin. However, reality set in and I realized I do not want to go through the hassle and time to create dams, pour in sections and all that. *Unless someone has an easy suggestion for it.

In my mind, what little is left of it, I think a paste or very thick liquid would be best since the piece is round. The inspirational piece was filled with wood glue mixed with coconut shell charcoal power.

Finally, I would like to finish it with a wipe-on poly gloss.

Thoughts?

Thank you

View attachment 72037
Check out the products at https://www.smooth-on.com/

Also Google wood flour. Mix that with any harder to make a filler.
 
Jim - Thats a really interesting concept... How thin will the small pieces be? Will you turn away the segmented "interior" substrate or leave it so the little blocks stay attached to it?

You've created a fun challenge for yourself and it is DEFINITELY doable.
John, thank you very much for the in-depth feedback and suggestions. You have given me a lot to think about!

The segmented body will stay and the inside is finished and will stay natural. The pieces on the outside are 3/8" thick.

Of all the resins you suggested, any one better about the bubbles?
Also, does the thickener affect the color?

Thanks again
Jim
The “deep pour” epoxies will be less viscous and flow better, but take longer to cure. Like maybe a week in some cases.

You can make any epoxy “thinner” and flow better by warming the jugs individually in quite warm water before you combine the parts. Something around 130 degrees. This will “loosen” any epoxy you choose and allow bubbles to flow more easily to the top. Most two part epoxies can also be thinned up to about 10-15% with acetone without too much worry. It will make the bond weaker but you don’t need to concern yourself with the strength of the bond for the most part.

Honestly most brands these days are pretty similar. MAS, Total Boat and System 3 are all very good.

The thickener doesn’t affect the colorability, but it does make the epoxy opaque. If you don’t want the final color to be translucent, powders work well and acrylic paints can be used in small amounts. Too much paint affects the final cure.

Since you only have 3/8” thickness to play with, I’d be tempted to try the thickened epoxy method. I’d be worried about the indentations caused by the butyl tape in the maze which would potentially sacrifice too much depth and leave you with a lot of leveling to do. But you can always level it with the thicker epoxy after the fact I suppose.

Shoot a coat (or two) of shellac over the piece before you use the epoxy…. Epoxy can bleed into wood and cause unhelpful/unwanted discolorations. Another option is painting the entire piece (inside the maze too) with a layer of ModPodge as a sealant then doing the epoxy.

Hope this helps
 
Thickening liquid epoxy with fumed silica (Cabosil) to a non-sagging consistency makes it extremely hard. Thickeners like cellulose fibers or microballoons make sanding easier but are not that effective at preventing sagging. I think that if you want to avoid damming you are better off using a product that is formulated with a putty-like consistency.

Damming has never worked that well for me on curved surfaces. I think the most effective way to use liquid resin is in a pot, but that can be very wasteful. You could turn a wooden receptacle slightly larger than your workpiece and turn it away after cure. If you coated the inside with wax you might be able to split it off.

Be careful using standard epoxy resins for large pours, the process is exothermic and you can wind up with a stinky firebomb. Casting resins are designed for deep pours and slower cure times to avoid this.

I've used that butyl tape on dust piping and it is the most tenacious goop ever. I can well believe it would make an effective dam, but removing it could be a real tarbaby experience.

If you tint your resin, measure the proportion of additives precisely, so that if you need to fill any resulting voids the new mix will blend in with the initial one.
Great info Kevin, thank you!
 
The “deep pour” epoxies will be less viscous and flow better, but take longer to cure. Like maybe a week in some cases.

You can make any epoxy “thinner” and flow better by warming the jugs individually in quite warm water before you combine the parts. Something around 130 degrees. This will “loosen” any epoxy you choose and allow bubbles to flow more easily to the top. Most two part epoxies can also be thinned up to about 10-15% with acetone without too much worry. It will make the bond weaker but you don’t need to concern yourself with the strength of the bond for the most part.

Honestly most brands these days are pretty similar. MAS, Total Boat and System 3 are all very good.

The thickener doesn’t affect the colorability, but it does make the epoxy opaque. If you don’t want the final color to be translucent, powders work well and acrylic paints can be used in small amounts. Too much paint affects the final cure.

Since you only have 3/8” thickness to play with, I’d be tempted to try the thickened epoxy method. I’d be worried about the indentations caused by the butyl tape in the maze which would potentially sacrifice too much depth and leave you with a lot of leveling to do. But you can always level it with the thicker epoxy after the fact I suppose.

Shoot a coat (or two) of shellac over the piece before you use the epoxy…. Epoxy can bleed into wood and cause unhelpful/unwanted discolorations. Another option is painting the entire piece (inside the maze too) with a layer of ModPodge as a sealant then doing the epoxy.

Hope this helps
Again, thank you for the info. As much as I would love to have glass like black colored resin as the fill-in, I will take what I can get at this point. *Any future pieces like this I will plan out differently.
As stated, my goal would be a black glass like look. I do not want clear due to glue squeeze out from attaching the pieces. I tried to clean up the best I can but...
I was also planning on putting a coat of sanding sealer on the wood pieces. They are all end grain facing out.

Others have mentioned using fillers so I want to look into that also. Otherwise I guess it will be thickeners.

Thanks again!
 
Jim, you can fill your resin and make it thick like peanut butter. There are fillers like cabosil or you can use wood dust, chalk etc. Then you can trowel the resin on.
I have a bunch of examples of this in SWT gallery.
Thanks Steve! I'll try to search for them. I assume that the fillers will dull the resin to a flat sheen? Would it be better to color the resin with a pigment or use a filler the color I want? (Black)
 
Thanks Steve! I'll try to search for them. I assume that the fillers will dull the resin to a flat sheen? Would it be better to color the resin with a pigment or use a filler the color I want? (Black)
I've done both - wood dust or cabosil filler + pigment or colored chalk. Pigments seem best if you want an intense dark colour. The fillers will make the resin opaque rather than translucent but they can all be made into a gloss finish. I usually spray lacquer or add WOP over the resin.
 
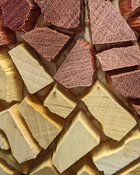
Here are a few examples....... These BOC boxes have epoxy filled with wood dust. Added black pigment. Finished in Satin WOP.
View attachment 72091

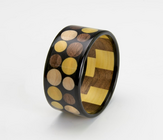
This bangle is Epoxy filled with black chalk. Finished in CA:-

View attachment 72092

This is spray lacquer over epoxy filler....

View attachment 72093
Beautiful pieces Steve, thanks for sharing
When you say resin filled with - you mean mixed in after mixing the resin, or something else?
I think I will go with resin colored black with cabisol. Any tips on mixing everything? Also, do you need a lot of cabisol? It comes in 4oz but reviews state only 1oz of product.
Yup, I mix the resin and hardener until it is thoroughly mixed then add color and mix that, then start mixing in your filler and mix in until you get peanut butter.
This will go on kinda lumpy. Expect a big mess. Turn / sand it off when hard and plan on needing to fill some voids with a second application. Make sure to make it thick enough that it sticks in place.

It seems like you need a bunch of cabosil. I have a gallon tub which should be plenty for any project this size.......but I'm not sure what the density is, so in ounces, i'm not sure. You can always have a bucket of wood dust on hand in case you need more. You can mix them both. I'm sure you know where to find wood dust :)
 
I’ve only worked with West System Epoxy. Mostly for boats but some artistic projects.
Bubbles: Wood is very porous air bubbles appear as the air is driven from the wood into the epoxy as well as bubbles formed during epoxy or resin mixing. To help reduce bubbles from within the wood I’ve found a coat of epoxy on each piece, all sides, before assembly works well. To reduce bubbles caused by mixing letting the epoxy sit for a minute or two (keeping in mind the open time) before application helps. A solid additive to the epoxy, for thickening, easier sanding, stronger bonds, or color usually creates more bubbles, for me, than epoxy alone. A liquid tint/pigment doesn’t add bubbles to my work.
If the finished product is to have opaque epoxy I would do the following, in regards to bubbles. First seal each piece separately all around with one coat of full strength epoxy and tacking them to my base. After letting that coat tack up, to masking tape tackiness giving most of the bubble time to exit I’d follow up with the filler pour. Since the work will need to be sanded I’d make it easy on myself and use a sanding or fairing additive (West would be their 407 or 410). If you don’t care for the texture of fillers, do another coat of just plain epoxy over it and work a bit harder with the sanding part.
If the finished work is to be transparent or translucent bubbles in the work are even more of a concern. I would fully cover each piece with a sealer coat separately, twice, letting it fully cure after the first coat. Tack it to the base with the second coat. For the most clear end product I like doing the bulk of the pour clear epoxy only. After beginning to harden, but while the layers will still adhere without blending (too much) I’ll add a tinted layer. Tinted very lightly if I plan on adding additional coats, varying the tint concentration and even color with subsequent layers and adding these layers so the epoxy can either mix a bit or not.
Bubble management with each layer. A light touch with a torch helps. Physically popping bubbles might be necessary with a needle, syringe, toothpick whatever. Make sure it’s clean, clean, clean. A speck of dirt might ruin the whole thing. Contaminants like water, soaps, oil, silicone or other chemicals might cause fisheyes. Clean with the proper thinner and fully air dry or dried with a clean, lint free, unscented, no softeners paper towel.

Dam
I’d use poster board, maybe covered with packing tape on the backside for the base. A wall or dam could be made with plastic or cardboard (covered with packing tape). Depending on the size of the piece I’ve cut a ring from a quart yogurt cup, plastic paint gallon & 5 gallon buckets. I used an old leather belt for a ring one time. One of my goals is to use what I’ve got on hand, not to spend additional money.
The epoxy at the base and edges is never as smooth and clean as I need it always needs to be scraped and sanded.

Or trowel in some Bondo, ThinSet, or grout if you can. All have worked for me.

Experiment and have fun.

Kevin
 
If you have access to a fairly large 3D printer perhaps you could model and make a fairly close fitting mold? I'm not sure how big that piece is but a multi piece mold with taped seams seems like it would work but I may be delusional. This would be easy to pour into with minimal waste. Hmmmmmmm this is giving me some ideas on using resin.
 
If you have access to a fairly large 3D printer perhaps you could model and make a fairly close fitting mold? I'm not sure how big that piece is but a multi piece mold with taped seams seems like it would work but I may be delusional. This would be easy to pour into with minimal waste. Hmmmmmmm this is giving me some ideas on using resin.
Or turn it out of wood.
 
Experiment and have fun.
I remember Al Stirt using plaster gause wrap ( for broken bone casts )to make curved guides for marking spiral layouts and such
Plaster is in the gause. Wet it form it dry it use it to mark the layout.

This could make a close fitting form. Plastic on the piece to protect it then wrap the cast. Just need to leave an opening to get the form out.

Anyone tried this?
 
Last edited:
P.s. you dont need a fancy deep fill resin for this. I use left over boat laminating resin with a fast hardener. About the opposite of a deep fill resin.
Steve, how much do you think I should mix at a time? I understand it is subjective to the amount of thickener/temp/etc, but should I try to make enough to fill it all - or a little at a time?
*The resin I have states 40 min work time (?)

Thx
 
Steve, how much do you think I should mix at a time? I understand it is subjective to the amount of thickener/temp/etc, but should I try to make enough to fill it all - or a little at a time?
*The resin I have states 40 min work time (?)

Thx
I mix my best guess at enough to do the whole thing.... but it's OK to mix small amounts too if you're not sure on consistency etc or want to take your time or practice. My method of applying the goop is crude and quick, just a couple of minutes to apply it. I just use a giant popsicle stick and shove it in the gaps. Make sure to mix it thick enough that a big dollop of it will stay attached to your stick and not drop off. I apply it with the vase on the lathe - inevitably some of the epoxy will end up on the underside and you don't want it to sag out of the gaps. My pattern pieces are usually only about 3mm thick too so the depth of the epoxy is only 3mm.
 
Back
Top