• December Turning Challenge: Tree! (click here for details)
  • Congratulations to José Esteban Cruz"Rocking Horse" being selected as Turning of the Week for December 16, 2024 (click here for details)
  • Welcome new registering member. Your username must be your real First and Last name (for example: John Doe). "Screen names" and "handles" are not allowed and your registration will be deleted if you don't use your real name. Also, do not use all caps nor all lower case.

X Y cutter for wood lathe

Joined
Aug 14, 2007
Messages
5,777
Likes
3,090
Location
Eugene, OR
I am thinking a NRS for truing up the top and bottom of the box, and a straight/square cutter for the recess and tenon. It will take some time to play around with it and find out what works best.

As for size, I do have a big leaf maple box that is 8 inches high, and 5 or so inch diameter. After several years, it has moved a tiny bit. I can still twist the lid all the way around. I would worry that if I moved to a different climate, it would move enough to cause removal problems. Since it was made from one piece of wood, I figure the top and bottom will move in the same way, so while, eventually, I may not be able to spin the lid all the way around, it still should come off. I do have one that some one made and gave me, about 1 1/2 inch diameter, and the lid does come off, but it gets kind of snug. I think the maker was in New Orleans.

robo hippy
 
Joined
Dec 5, 2015
Messages
897
Likes
437
Location
Seattle, WA
Jeff Lyon, regarding the X-Y slide assembly you would like to buy from me and have shipped from Seattle to Ontario.

Maybe some other members here have more experience with shipping to Canada than me. I have sold to Canadians in British Columbia, but those sales were shipped to addresses near the border still in the USA. Apparently the buyers came across the border and crossed back with the goods some how dealing with customs.

So far I have a quote for a wooden "export" crate at $290. The UPS store offered to crate the slide in a cardboard box padded with packaging peanuts for around $25. To me that seemed totally ridiculous given the unconstrained 40 pound weight. UPS shipping will be over $130. The total price would be $500+. If you want it at that price, okay.

Unless better options come up I don't want to spend any more time on this.
 
Joined
Jul 19, 2018
Messages
1,862
Likes
2,614
Location
Ponsford, MN
I am thinking a NRS for truing up the top and bottom of the box, and a straight/square cutter for the recess and tenon. It will take some time to play around with it and find out what works best.

As for size, I do have a big leaf maple box that is 8 inches high, and 5 or so inch diameter. After several years, it has moved a tiny bit. I can still twist the lid all the way around. I would worry that if I moved to a different climate, it would move enough to cause removal problems. Since it was made from one piece of wood, I figure the top and bottom will move in the same way, so while, eventually, I may not be able to spin the lid all the way around, it still should come off. I do have one that some one made and gave me, about 1 1/2 inch diameter, and the lid does come off, but it gets kind of snug. I think the maker was in New Orleans.

robo hippy

The larger the diameter the courser the thread and the more tolerance you can have.
DSC01500.JPGDSC01501.JPG This piece was made around 1995 of walnut 5" diameter X 12" high with a 94 cubic inch internal volume the first pic shows the 2.25"-6 thread and a pith about 1.25" below the edge of the opening. The second photo is of the opposite side with lid screwed in place and the obvious grain match between the lid and body. The Urn has been in Minnesota since it was made meaning that it survived humid summers and winters cold outside and dry inside. The thread has never bound up or had any tight spots similar to what you mentioned, but I am familiar with that problem. The 6TPI may seam a little drastic but it is hard to argue with success. I have made larger openings successfully using 10 TPI, but the real key to success is it should rattle when loose
 
Joined
Aug 14, 2007
Messages
5,777
Likes
3,090
Location
Eugene, OR
Don, I have not experimented with anything other than 16tpi. My main question about the 6 tpi would be lining up the grain. When timing the threads on a 16tpi box, at most you have to take off about 1/16 of an inch. With 6 tpi, that works out to 1/8 inch+. That might require remounting and cutting more threads. Any suggestions? I would guess you want more wall thickness than on the 16tpi threads as well.

robo hippy
 
Joined
Jul 19, 2018
Messages
1,862
Likes
2,614
Location
Ponsford, MN
Don, I have not experimented with anything other than 16tpi. My main question about the 6 tpi would be lining up the grain. When timing the threads on a 16tpi box, at most you have to take off about 1/16 of an inch. With 6 tpi, that works out to 1/8 inch+. That might require remounting and cutting more threads. Any suggestions? I would guess you want more wall thickness than on the 16tpi threads as well.

robo hippy
The 6TPI is .1667" per thread so the worst case would be having to take off say about .164" or 21/128" so with grain detail anything different then on my example it probably wouldn't work and that is why I said 6TPI is a little drastic. Recently I made a miniature urn with a 7/8"-16 thread but like you say anything larger then that is a mistake waiting to happen unless maybe if the environment in your location is the same year long. Another way to make a grain match better is to part off the lid blank with a 1/16" parting tool then attach a different wood for the male thread and even then swirly grain may prevent a match.
 
Joined
Aug 14, 2022
Messages
12
Likes
7
Location
Port Hope, ON
Back again Jeff, I had asked a crating company about making a wooden box. They just got back to me. To ship to Canada it needs an "export" crate. An export crate has to be made of wood that's certified to have no insects or other nasty things in the wood. Rough cost would be $290 with a three week lead time. Yikes.
Hi Doug, my apologies for the slow reply. I just got home from a weekend away with my son. The price for wood crating seems a bit over the top. I haven't run into the issue about certified wood before though, any wood packaging that comes from the US to Canada just needs to be made of a processed wood like plywood or MDF or be less than 1/4' thick if its regular cut lumber. The import rules are more strict if coming from Mexico or other continents, then any wood needs the certification. I know I was the one to ask about a wood box, perhaps that's unnecessary!
Seeing as though it's only 30-40 pounds it could be bubble wrapped and put in a heavy cardboard box. I've had machinery items weighing over 90 pounds that were packaged and shipped by UPS come from USA using cardboard boxes, it cost quite a bit more because it was a "heavy" shipment. Anything under 70lbs is considered a regular weight package. The cardboard boxes they use are certified for a given weight so it shouldn't be a problem.
It's ok if there's a lead time for them to box it up. This is an important find for me and I'm not worried about the timeline for it to get here, it takes as long as it takes and I know UPS isn't exactly cheap no matter what they are boxing big or small. I'd still like to go ahead with it if that's ok. I appreciate you taking the time to look into a wood crate, if I'd have known it would be so much I wouldn't have wasted your time
inquiring about it. Let me know how you'd like to proceed when you have the time. Thanks Doug.
 
Joined
Aug 27, 2018
Messages
11
Likes
14
Location
Redmond, Washington
There's no reason to obsess about a dead flat bottom when attaching a piece to a waste block. Just make a small tenon (can be in the waste block or the piece). With medium CA glue and a proper curing time, you would need to take pretty large cuts to break the piece off. High quality double edged tape also works well.
 

hockenbery

Forum MVP
Beta Tester
TOTW Team
Joined
Apr 27, 2004
Messages
9,051
Likes
5,583
Location
Lakeland, Florida
Website
www.hockenberywoodturning.com
There's no reason to obsess about a dead flat bottom when attaching a piece to a waste block.
Agree - Making dead flat is impossible and getting close is not worth the effort for me when making Concaves is easy and superior.
Using a tenon will give a strong bond. However makes it harder to release.

When mounting a glue block or face plates I turn a slight concave. This give a tight fit on th rim.
Also when using CA on the glueblock I can release the finished piece by string the glue with a flat chisel. Breaks the glue.
Lyle has a nice video

View: https://www.youtube.com/watch?v=y8b35iq4LTA
 
Last edited:
Joined
Aug 14, 2007
Messages
5,777
Likes
3,090
Location
Eugene, OR
Well, there are ways to get close. The reason I want dead flat glue joints is the same reason I want exactly matching edges when gluing up a solid wood panel for a table top. That gives you the strongest possible glue joint. I generally put a small round over on the bottom of the box bottom before sanding, finishing, and parting off. This is in case my remount to true and clean up the bottom is not spot on. It is very difficult to get the remount always spot on. If I leave the bottom slightly concave, I run the risk of the glue joint failing because it was only on the edge. A thicker CA glue can work, but depending on time, the inside may not be cured. I do like to spin the blank around for a good glue spread, and then use circles I have made on the waste block to get it as close to centered as possible. That won't work if I have accelerator on one face, and glue on the other. I do know of the tenon/recess idea on small blanks like this, and that doesn't seem to offer any efficiency improvements. I don't think it would be faster than turning a dead flat surface. At present, I use a NRS for getting it dead flat. Some times I have to remove a dome in the center, some times I have to trim down the rim to eliminate a concave surface. Just looking for a faster way to get it done. This is why I am considering an X/Y jig. It would take all of the guess work out of flat bottoms and parallel sides. A 2 for 1 type of tool. Some times it is a blessing and some times it is a curse, this need I have to experiment....

robo hippy
 
Joined
Aug 20, 2006
Messages
28
Likes
11
Location
London, Ontario
Well, considering that I ALWAYS have to 'experiment' I am thinking that with making the threaded boxes, having an X Y jig that I can put a cutter on would save me a lot of time when making the threaded boxes. I want my blanks to have dead flat top/lid and base for gluing onto waste blocks. I also want to be able to cut the sides of the recess and tenon to dead parallel before cutting the threads. I am figuring that it may even be possible to cut the recess and tenon threads spot on the first time by measuring the offset. Difference should be in the 0.06 range, inches that is. Any ideas? I have a bunch of possibilities for cutting material from tantung to M42 HSS. Kind of hoping there is some thing out there that would go on a 12 inch lathe. Hope I don't need a third mini lathe to do this with.... Who knows, I may find another use for a third mini lathe if I get one....

robo hippy
 
Joined
Aug 20, 2006
Messages
28
Likes
11
Location
London, Ontario
Reed, Something like this might work. I have assembled a platform for my Oneway that allows me to mount the cross slide from my Rose Engine to do whatever I might want to do. It provides precise x and y movements and the Rose Engine tool post is vertically adjustable to provide z axis movement if required. Just about any kind of tooling can be mounted; for example I mounted a Rotozip with a carbide end mill to do some cutting. You could mount a fixed parting tool just as easliy. This is probably overkill for your needs but a simpler version could easily be built. The cross slide is small and relatively inexpensive (I think I bought it from The Little Machine shop). An ordinary quick change tool post could be attached instead of the type I have. The slides were made by a company called Igus and you can buy in any length required. The saddle is sold separately. I have attached 2 pics; one being the platform for my Oneway and the other showing the Rose engine cross slide attached. I hope this might help.
 

Attachments

  • Screen Shot 2023-02-04 at 12.02.35 PM.png
    Screen Shot 2023-02-04 at 12.02.35 PM.png
    2.9 MB · Views: 37
  • Screen Shot 2023-02-04 at 12.03.34 PM.png
    Screen Shot 2023-02-04 at 12.03.34 PM.png
    2.8 MB · Views: 37
Joined
Jan 3, 2012
Messages
457
Likes
384
Location
New City, NY
@Doug Rasmussen @robo hippy

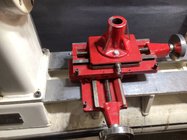
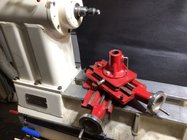
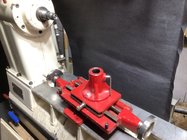
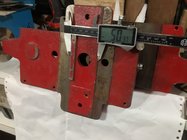
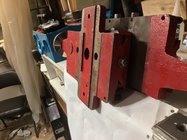
I got lucky at a garage sale! I don’t know where this is from but I think it’s from a brake lathe. No company name Ideas anyone?

It’s all metric. It works smoothly and is very tight. Its base has a groove that does allow it to sit flush so I will have to grind it away and I will need to fit the base with some Oneway clamp blocks. It will need a 25mm tool post and a tool holder and I’ll have a crude but workable metal lathe carriage. I’m thinking of reaming it to fit a 1” post. So I can use it as a tool rest if the situation calls for it.

I will add a router and drill holder. This will be fun.

EA86C92A-C002-4FCD-9ACB-51AFC34756C9.jpegWWW92391FCD-9EFB-4B9D-BF57-6701E00FCD85.jpegWWWB2B3DC86-D921-4F1F-BA93-975E77AFCC1D.jpeg
 
Joined
Jan 3, 2012
Messages
457
Likes
384
Location
New City, NY
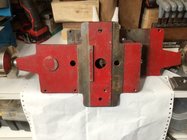
What do you mean by a groove? Grind it away sounds like a very inaccurate way of revising the mount. How about posting a picture of the underside.
It does sound crazy, but I was thinking about either asking my friend if he could mill the grove down to fit my 1 3/4” Oneway bed or get rid of it completely. I was also thinking of mounting it on a steel plate to extend its cutting range .I do have an enco 18x6 XY table that I may wish to place it on. The total height would be just under 12” … At the very least I’m going to try and get it milled from 2 inches(50mm) to 1 3/4 wide and redrill the 2 8mm holes to 1/2 to accept the 1 3/4 clamp block..
any thoughts are welcome. I just got this thing and I’m thrilled with its potential.


D9210337-CFAB-4FDF-8702-5B3B35CF512D.jpeg
0474D211-5EF4-4C3B-98A8-EA65D0F48D3D.jpeg65AA66FA-63D6-4AAA-8BBD-6320529BFED2.jpeg
The 50mm grove or slot is the part that needs to be addressed. The unpainted area on either side is the flat side that goes to the bed and should not be ground. The milling
would be to that level. If milling isn’t an option, then plan b is to purchase 2 steel plates and install them on both sides so that the tool will sit flat on my lathe.
 
Last edited:
Joined
Aug 14, 2007
Messages
5,777
Likes
3,090
Location
Eugene, OR
Not sure what needs to be done. If the existing groove/tenon thing is too wide, maybe attach 2 bars like the one that stands proud of the surface, and are parallel. Might be able to do the same if the tenon is too narrow as well. I would have bought that one....

robo hippy
 
Joined
Jul 19, 2018
Messages
1,862
Likes
2,614
Location
Ponsford, MN
It does sound crazy, but I was thinking about either asking my friend if he could mill the grove down to fit my 1 3/4” Oneway bed or get rid of it completely. I was also thinking of mounting it on a steel plate to extend its cutting range .I do have an enco 18x6 XY table that I may wish to place it on. The total height would be just under 12” … At the very least I’m going to try and get it milled from 2 inches(50mm) to 1 3/4 wide and redrill the 2 8mm holes to 1/2 to accept the 1 3/4 clamp block..
any thoughts are welcome. I just got this thing and I’m thrilled with its potential.


View attachment 50252
View attachment 50250View attachment 50251
The 50mm grove or slot is the part that needs to be addressed. The unpainted area on either side is the flat side that goes to the bed and should not be ground. The milling
would be to that level. If milling isn’t an option, then plan b is to purchase 2 steel plates and install them on both sides so that the tool will sit flat on my lathe.
If you have a friend with a milling machine it shouldn't be hard to mill that tenon down to 1 3/4". Note that the spacing of the ways on your lathe is probably over 1.75"so that is an opportunity to get a good close fit. Your friend with the milling machine should also be able to advise the best way to clamp it in place and ream out the tool post.
 
Joined
Jan 3, 2012
Messages
457
Likes
384
Location
New City, NY
The easy way is to make a wooden plate to go over the protrusion and on the downside a bar to fit lathe bed
That’s a good idea but I may use the xy slide to do some basic metal turning operations. In those situations, a wood interface may cause too much vibration while cutting metal. Steel plates would be better. I’m worried about the height of the post as well. This is a trial and error project for me.
 
Back
Top