Howdy folks, I have quite a few pieces I haven't finished yet simply because I need to remove the tenon and/or get rid of chuck jaw marks. I've heard of people wetting the marks and using a heat gun to remove them, but wondering what your favorite methods might be to simply and quickly finish the bottom. Thank you!
-
It's time to cast your vote in the December 2025 Turning Challenge. (click here for details) -
Congratulations to Pat White for "Sicilian Mosaic" being selected as Turning of the Week for December 29, 2025 (click here for details) -
Welcome new registering member. Your username must be your real First and Last name (for example: John Doe). "Screen names" and "handles" are not allowed and your registration will be deleted if you don't use your real name. Also, do not use all caps nor all lower case.
You are using an out of date browser. It may not display this or other websites correctly.
You should upgrade or use an alternative browser.
You should upgrade or use an alternative browser.
What is your favorite (and easiest) method for removing chuck jaw marks from a tenon?
- Thread starter Maggie Shapiro
- Start date
If the tenon is almost exactly the same size as the closed jaws, it is not an issue. Tomislav just did a video about that if you are familiar with him. Most of the time I use a recess anyway, except on spindles.
robo hippy
robo hippy
Most often I would turn the tenon off. If it is to be part of the foot, then it gets shaped and the marks would be turned away.
- Joined
- Apr 27, 2004
- Messages
- 9,309
- Likes
- 6,082
- Location
- Lakeland, Florida
- Website
- www.hockenberywoodturning.com
wondering what your favorite methods might be to simply and quickly finish the bottom.
I plan the finished bottom before I put the tenon on. I most often turn the tenon away
I use a bowl gouge
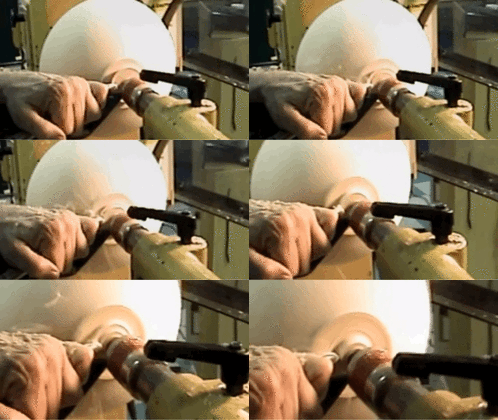
then a spindle gouge.
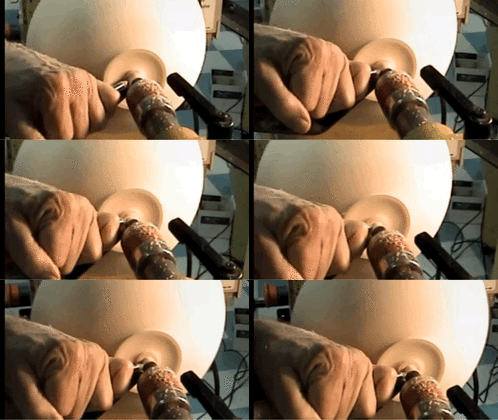
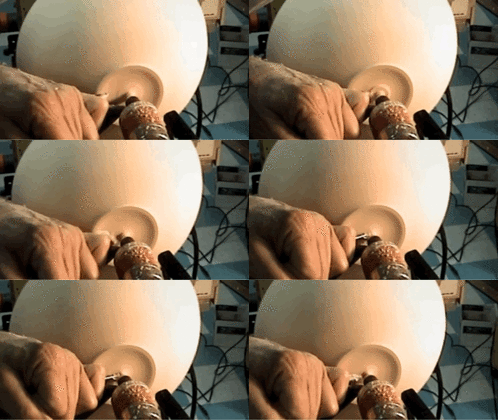
I rotate the bowl by hand to cut the last away leaving a tiny nub to sand off in seconds

In the seed jars i have a tenon on both halves.
I use the wood in the top tenon for the finished opening which I turned in the top before hollowing. So I cut away the tenon to blend the opening to the form
I use the wood in the bottom tenon for the foot. I have already turned the bottom of the foot so I turn the edge of the foot into the form
This might give you ideas on using the wood indside actenno
I turned one of these for after dinner entertainment at SWAT-2017 along with Trent Bosch. Trent turned a traditional hollow form in an informal race and finished first. A fun time. Since then I have done several of these in club demos and also did a club workshop where students turned them.
Could be a great addition to your turning repertoire - a form pleasant to hold and one that amazes folks with its small opening.
The Anasazi used ceramic seed jars with small holes that let seeds in and kept mice out.
Usually the were painted and modern day Pueblo artists are keeping the forms...
Could be a great addition to your turning repertoire - a form pleasant to hold and one that amazes folks with its small opening.
The Anasazi used ceramic seed jars with small holes that let seeds in and kept mice out.
Usually the were painted and modern day Pueblo artists are keeping the forms...
- hockenbery
- Replies: 2
- Forum: Tutorials and Tips
Last edited:
wondering what your favorite methods might be to simply and quickly finish the bottom. Thank you!
I support with the live center in the tailstock and turn away the tenon. What tiny bit I can't remove cleanly because of the support, I remove off the lathe with a chisel if needed, then smooth with a hand scraper. If unsure of the method there are probably plenty of turners near you who could show how.
But to answer your question about how to "simply and quickly" finish the bottom, I use another method you might try for a future piece. I've simply quit using tenons on bowls and bowl-like things made from dry wood. Since there is no tenon I never have to turn it away. Instead I use a recess in the bottom. The following is my basic procedure:
- Mount the blank by a flattened top, face off the bottom as needed. I hold the piece on the lathe with a screw chuck.
- Mark the foot diameter and make the wood inside the foot slightly concave so the piece will sit flat.
- Turn the entire outside of the piece from the foot to the rim.
- Form a recess in the bottom. For the recess I actually turn a narrow ring, the outer diameter a tiny bit bigger than the closed chuck jaws (say 2-1/16" for 50mm jaws), the inner diameter small enough the clear the inside of the closed jaws. For good wood the recess can be shallow, an 1/8" or less, and should have straight or nearly straight sides. Don't try to match the dovetail on the chuck jaws. (If the recess is a narrow ring wide enough for the closed jaw to fit, it leaves nub of wood inside the ring recess that can be shaped, decorated, or mostly removed - lots of options.)
- The bottom of the recess ring should be made perfectly flat or slanted down slightly towards the center to allow clean contact with the jaws when the piece is reversed later. I use a sharp parting tool as a gentle scraper and small negative rake scrapers for this.
- Smooth and sand everything, the outside form and inside the foot. (Hint: small negative rake scrapers are perfect for smoothing anything inside the foot. Large curved NRS are great to remove tool marks from the outside of the form.) Note: I remove the screw chuck from the lathe and mount it in a carving/finishing stand for smoothing/sanding by hand.
- Make sure the outer circumference and flat of the recess ring (the "outside corner") is clean with no debris.
- Apply finish to the entire bottom of the piece, inside and outside the foot. Let the finish dry/cure. (Note: the finish can be applied later, when the top is done but I prefer doing it this way. If finishing with a spray I might do things a bit differently.)
- When the bottom is done, remove the screw chuck from the wood, turn the piece around, and expand the chuck into the recess. (Apply pressure firmly by hand to the center to seat it nicely while expanding the chuck jaws.)
- Turn the inside and rim, smooth and apply finish.
The recess remains in the bottom and with a bit of detail I think it looks great. I watch people's expressions when they turn the piece over and see the bottom. They seem pleased. If they don't like it I'll give it to someone else. So far that hasn't happened.
The recess ring is also a a good place to write a signature (someone else's if you don't like the piece), species, date, etc. Since the diameter of the recess is almost identical to the jaws there will be no marks. If worried about the steel jaws making marks on the recess or flat of the ring, cover the jaws with scotch tape before mounting the piece in the chuck.
What the bottoms of some of my pieces look like:
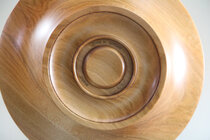
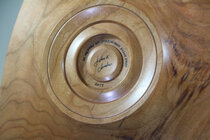
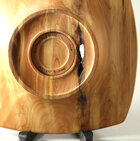
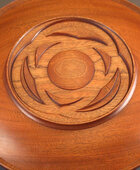
This is the method I teach in my shop. I've done a number of demos on this method and I know a bunch of people have used it.
(I should write a document specifically on this someday with photos and everything. I did write a doc that includes this but it's not the focus.)
Sorry, I've posted some of these pictures before but couldn't find the thread.
JKJ
John, love the multi-axis foot. Very nice look.What the bottoms of some of my pieces look like:
Gregory
Wonderful description and some beautiful bottoms! One question—why make the recess walls straight and not dovetail since the jaws are dovetailed? Won’t there be less contact?This is the method I teach in my shop
John, love the multi-axis foot. Very nice look.
Gregory
Thanks. That's my implementation of a Frank Penta idea.
Wonderful description and some beautiful bottoms! One question—why make the recess walls straight and not dovetail since the jaws are dovetailed? Won’t there be less contact?
Thank you for the kind comment.
The danger is making the dovetail angled too much so the sides of the jaws contact the top first, at the surface of the wood, where the wood is weakest. No such problem if the recess angle ls angled less, a bit straighter than the dovetail on the jaws. But it turns out vertical sides on the recess hold just as well since the angle of the dovetail concentrates all the forces right at the bottom, compressing the wood slightly there. Since the rim of the dovetail is tight against the bottom, the wood is very strong there and there is no chance the piece will come out off the lathe (unless the turner is REALLY good at violent catches!)
Here's a little sketch. The jaws are represented by the red lines.
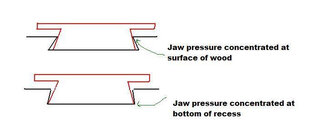
(In addition to the angle, remember for the most holding power the diameter of the recess should be as close as possible to the outer diameter of the closed jaws in order to have the maximum contact all the way around. Most know that as the recess diameter increases from the minimum, the jaw contact length and holding power decreases. A vertical side on the recess can help a bit since the jaws don't have to be expanded as much!)
BTW, the piece pictured with the multi-axis base in my post was a nearly 20" diameter heavy sapele platter. The recess was less than 1/8" deep (and comprised only the inside of the three little curved triangular pieces - note the insides of the three make a circle). It held great for turning the top of the platter.
JKJ
Fascinating. I’ve never seen this recommendation or explanation. Would you recommend and say the same—straight sides—on a tenon?The danger is making the dovetail angled too much so the sides of the jaws contact the top first, at the surface of the wood, where the wood is weakest. No such problem if the recess angle ls angled less, a bit straighter than the dovetail on the jaws.
Fascinating. I’ve never seen this recommendation or explanation. Would you recommend and say the same—straight sides—on a tenon?
Many of the Nova jaws I have don't have a dovetail on the inside but what some call a small "beak", the jaws are otherwise straight inside. I put straight sides on the tenon and rely on the beak to indent and bite into the wood of most species, wet or dry. If the wood is very hard like dry dogwood or persimmon, I think it's sometimes good to put a very slight groove at the base of the tenon to let the jaws bite in a bit. I don't think this is needed on green wood since it can be more compressible. But as mentioned, I rarely turn green wood.
If the inside of the jaws are dovetailed instead of "beaked" I might cut a "mild" dovetail on the tenon, again being careful not to make the angle too much or the same problem of crushing the wood at the end can happen.
The best holding is as with the recess with the diameter close to but a bit bigger than the closed jaws. However, if the tenon diameter is too big one advantage over the recess is the four jaws will the grab the wood with 8 sharp corners instead of with 4 too-small curves.
Another thing, which I think everyone knows, is to make the tenon short enough so the ends of the jaws bear on a flat turned at the base of the tenon and not long enough to bottom out inside the jaws.
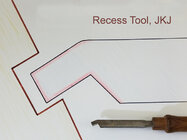
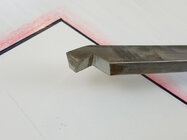
But as mentioned, I rarely use tenons (except on spindles and end grain work). One big exception is roughed out (twice-turned) bowls. Since the wood warps and goes out of round as the rough bowl dries, so will the recess or the tenon. However a tenon is easier to make round on the lathe! Harder to make a dried, warped recess round when held between centers. I made a custom tool to make recesses when there is limited space, for example, with the tail stock in the way. This has helped a lot, lets me sneak past the bulky live center to clean up a recess or cut one on a new blank, with either straight or slightly dovetailed sides.
The caveat with all this is my experience in turning bowls, especially from green wood, is limited compared to many, some with very different opinions. But I've never had a bowl or platter come off the lathe. I was at a class once when a guy pried a bowl off his lathe multiple times. Fortunately, it was a small bowl and no one got hurt. (he had a problem with tool control)
JKJ
Very nice thank you so much for the info and for the link to the post on the seed jars!I plan the finished bottom before I put the tenon on. I most often turn the tenon away
I use a bowl gouge
View attachment 71396
then a spindle gouge.
View attachment 71397View attachment 71399
I rotate the bowl by hand to cut the last away leaving a ting nub to sand off
View attachment 71398
In the seed jars i have a tenon on both halves.
I use the wood in the top tenon for the finished opening which I turned in the top before hollowing. So I cut away the tenon to blend the opening to the form
I use the wood in the bottom tenon for the foot. I have already turned the bottom of the foot so I turn the edge of the foot into the form
This might give you ideas on using the wood indside actenno
I turned one of these for after dinner entertainment at SWAT-2017 along with Trent Bosch. Trent turned a traditional hollow form in an informal race and finished first. A fun time. Since then I have done several of these in club demos and also did a club workshop where students turned them.
Could be a great addition to your turning repertoire - a form pleasant to hold and one that amazes folks with its small opening.
The Anasazi used ceramic seed jars with small holes that let seeds in and kept mice out.
Usually the were painted and modern day Pueblo artists are keeping the forms...
- hockenbery
- Replies: 2
- Forum: Tutorials and Tips
I support with the live center in the tailstock and turn away the tenon. What tiny bit I can't remove cleanly because of the support, I remove off the lathe with a chisel if needed, then smooth with a hand scraper. If unsure of the method there are probably plenty of turners near you who could show how.
But to answer your question about how to "simply and quickly" finish the bottom, I use another method you might try for a future piece. I've simply quit using tenons on bowls and bowl-like things made from dry wood. Since there is no tenon I never have to turn it away. Instead I use a recess in the bottom. The following is my basic procedure:
Remove from the chuck and the piece is done: the bottom, the top, the whole piece. Sign and give it away.
- Mount the blank by a flattened top, face off the bottom as needed. I hold the piece on the lathe with a screw chuck.
- Mark the foot diameter and make the wood inside the foot slightly concave so the piece will sit flat.
- Turn the entire outside of the piece from the foot to the rim.
- Form a recess in the bottom. For the recess I actually turn a narrow ring, the outer diameter a tiny bit bigger than the closed chuck jaws (say 2-1/16" for 50mm jaws), the inner diameter small enough the clear the inside of the closed jaws. For good wood the recess can be shallow, an 1/8" or less, and should have straight or nearly straight sides. Don't try to match the dovetail on the chuck jaws. (If the recess is a narrow ring wide enough for the closed jaw to fit, it leaves nub of wood inside the ring recess that can be shaped, decorated, or mostly removed - lots of options.)
- The bottom of the recess ring should be made perfectly flat or slanted down slightly towards the center to allow clean contact with the jaws when the piece is reversed later. I use a sharp parting tool as a gentle scraper and small negative rake scrapers for this.
- Smooth and sand everything, the outside form and inside the foot. (Hint: small negative rake scrapers are perfect for smoothing anything inside the foot. Large curved NRS are great to remove tool marks from the outside of the form.) Note: I remove the screw chuck from the lathe and mount it in a carving/finishing stand for smoothing/sanding by hand.
- Make sure the outer circumference and flat of the recess ring (the "outside corner") is clean with no debris.
- Apply finish to the entire bottom of the piece, inside and outside the foot. Let the finish dry/cure. (Note: the finish can be applied later, when the top is done but I prefer doing it this way. If finishing with a spray I might do things a bit differently.)
- When the bottom is done, remove the screw chuck from the wood, turn the piece around, and expand the chuck into the recess. (Apply pressure firmly by hand to the center to seat it nicely while expanding the chuck jaws.)
- Turn the inside and rim, smooth and apply finish.
The recess remains in the bottom and with a bit of detail I think it looks great. I watch people's expressions when they turn the piece over and see the bottom. They seem pleased. If they don't like it I'll give it to someone else. So far that hasn't happened.
The recess ring is also a a good place to write a signature (someone else's if you don't like the piece), species, date, etc. Since the diameter of the recess is almost identical to the jaws there will be no marks. If worried about the steel jaws making marks on the recess or flat of the ring, cover the jaws with scotch tape before mounting the piece in the chuck.
What the bottoms of some of my pieces look like:
View attachment 71415 View attachment 71416
View attachment 71417 View attachment 71418
This is the method I teach in my shop. I've done a number of demos on this method and I know a bunch of people have used it.
(I should write a document specifically on this someday with photos and everything. I did write a doc that includes this but it's not the focus.)
Sorry, I've posted some of these pictures before but couldn't find the thread.
JKJ
Ah wow nevermind you answered my question!! Thank you I'm going to give this a go!Thanks. That's my implementation of a Frank Penta idea.
Thank you for the kind comment.
The danger is making the dovetail angled too much so the sides of the jaws contact the top first, at the surface of the wood, where the wood is weakest. No such problem if the recess angle ls angled less, a bit straighter than the dovetail on the jaws. But it turns out vertical sides on the recess hold just as well since the angle of the dovetail concentrates all the forces right at the bottom, compressing the wood slightly there. Since the rim of the dovetail is tight against the bottom, the wood is very strong there and there is no chance the piece will come out off the lathe (unless the turner is REALLY good at violent catches!)
Here's a little sketch. The jaws are represented by the red lines.
View attachment 71428
(In addition to the angle, remember for the most holding power the diameter of the recess should be as close as possible to the outer diameter of the closed jaws in order to have the maximum contact all the way around. Most know that as the recess diameter increases from the minimum, the jaw contact length and holding power decreases. A vertical side on the recess can help a bit since the jaws don't have to be expanded as much!)
BTW, the piece pictured with the multi-axis base in my post was a nearly 20" diameter heavy sapele platter. The recess was less than 1/8" deep (and comprised only the inside of the three little curved triangular pieces - note the insides of the three make a circle). It held great for turning the top of the platter.
JKJ
John - I also have issues with access to the recesses because I have a Jet 1221 midi lathe and the tailstock is almost always in the way. Do you ever sell your tool inventions (and would you want to sell me one)? Thanks this tool was a great idea.Many of the Nova jaws I have don't have a dovetail on the inside but what some call a small "beak", the jaws are otherwise straight inside. I put straight sides on the tenon and rely on the beak to indent and bite into the wood of most species, wet or dry. If the wood is very hard like dry dogwood or persimmon, I think it's sometimes good to put a very slight groove at the base of the tenon to let the jaws bite in a bit. I don't think this is needed on green wood since it can be more compressible. But as mentioned, I rarely turn green wood.
If the inside of the jaws are dovetailed instead of "beaked" I might cut a "mild" dovetail on the tenon, again being careful not to make the angle too much or the same problem of crushing the wood at the end can happen.
The best holding is as with the recess with the diameter close to but a bit bigger than the closed jaws. However, if the tenon diameter is too big one advantage over the recess is the four jaws will the grab the wood with 8 sharp corners instead of with 4 too-small curves.
Another thing, which I think everyone knows, is to make the tenon short enough so the ends of the jaws bear on a flat turned at the base of the tenon and not long enough to bottom out inside the jaws.
But as mentioned, I rarely use tenons (except on spindles and end grain work). One big exception is roughed out (twice-turned) bowls. Since the wood warps and goes out of round as the rough bowl dries, so will the recess or the tenon. However a tenon is easier to make round on the lathe! Harder to make a dried, warped recess round when held between centers. I made a custom tool to make recesses when there is limited space, for example, with the tail stock in the way. This has helped a lot, lets me sneak past the bulky live center to clean up a recess or cut one on a new blank, with either straight or slightly dovetailed sides.
View attachment 71430 View attachment 71431
The caveat with all this is my experience in turning bowls, especially from green wood, is limited compared to many, some with very different opinions. But I've never had a bowl or platter come off the lathe. I was at a class once when a guy pried a bowl off his lathe multiple times. Fortunately, it was a small bowl and no one got hurt. (he had a problem with tool control)
JKJ
John - I also have issues with access to the recesses because I have a Jet 1221 midi lathe and the tailstock is almost always in the way. Do you ever sell your tool inventions (and would you want to sell me one)? Thanks this tool was a great idea.
Oh, like many other people, I have some custom tool designs I make as I think of them! I could probably make another one when I get some time and if I can find the tool to grind. (I keep a box of old tools people gave me or I bought for cheap, mostly to experiment with.) Things are pretty busy now.
I think I ground that one from an old 1/2" scraper using CBN wheels with 90-deg edges. I rough grind with 60 grit and then go to 600 grit.
I've never been much interested in selling things, tools, woodturnings, ideas, whatever. I have accidentally made a few thousand $ here and there but it's not a goal. I'm having too much fun, I don't want this to turn into a job! Besides, I'd rather contribute with ideas, demos, etc. After a couple of years where I did no turning due to illness, I'm finally doing demos and classes again.
Same with teaching. I currently have a bit of a waiting list. Maybe I should charge big dollars and discourage some! (HA! When people ask me how much I charge for lessons I tell them a good story or a good joke.)
I think teaching anything is my favorite thing in life, woodturning, welding, music, beekeeping.
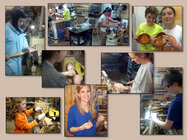
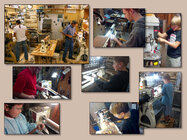
Just for fun, here are just a few photos of woodturning students from over the years, some of the girls and the guys. If nothing else, each gets an understanding of how woodturning works.
I always start with the skew (if they are old enough), even if they've never seen a lathe before. Young kids get to "help" make something.
The young woman in the upper left came all the way from Italy for a woodturning lesson! (Just kidding - she came to visit but I always offer the turning. She took home a ring keeper made from some wonderful Australian wood.)
JKJ
I either remove the tenon completely or cut it down to 1/8” to 1/16”. On smaller bowls I use Cole jaws and larger bowls a vacuum Chuck.
I love this!! I feel like everyone should take turning lessons. It's one of the best things I've ever done for myselfOh, like many other people, I have some custom tool designs I make as I think of them! I could probably make another one when I get some time and if I can find the tool to grind. (I keep a box of old tools people gave me or I bought for cheap, mostly to experiment with.) Things are pretty busy now.
I think I ground that one from an old 1/2" scraper using CBN wheels with 90-deg edges. I rough grind with 60 grit and then go to 600 grit.
I've never been much interested in selling things, tools, woodturnings, ideas, whatever. I have accidentally made a few thousand $ here and there but it's not a goal. I'm having too much fun, I don't want this to turn into a job! Besides, I'd rather contribute with ideas, demos, etc. After a couple of years where I did no turning due to illness, I'm finally doing demos and classes again.
Same with teaching. I currently have a bit of a waiting list. Maybe I should charge big dollars and discourage some! (HA! When people ask me how much I charge for lessons I tell them a good story or a good joke.)
I think teaching anything is my favorite thing in life, woodturning, welding, music, beekeeping.
Just for fun, here are just a few photos of woodturning students from over the years, some of the girls and the guys. If nothing else, each gets an understanding of how woodturning works.
I always start with the skew (if they are old enough), even if they've never seen a lathe before. Young kids get to "help" make something.
The young woman in the upper left came all the way from Italy for a woodturning lesson! (Just kidding - she came to visit but I always offer the turning. She took home a ring keeper made from some wonderful Australian wood.)
View attachment 71463
View attachment 71462
JKJ
I love this!! I feel like everyone should take turning lessons. It's one of the best things I've ever done for myself
I love to introduce people to the lathe - I start by showing them things from my display cabinet in my little office then we go play with the wood. They may never turn anything again but that's not important - a least they know how it's done!
One friend came for me to make a custom magic wand for her to take to another friend in Florida and she was amazed. Her only previous experience with a lathe was when making lab equipment with a metal lathe and mill decades before when working on her doctorate degree. She assumed wood was turned the same way, by cranking two wheels to move a cutting bit! (like drawing with an Etch-A-Sketch.) She went away with a new perspective! Certainly not a waste of an afternoon on my part!
I have a devious way of getting people involved when they call wanting know if I can make something for them, and ask how much it would cost. I say sure and give them a price. Then I say if they come to the shop, help pick out the wood, see how it's mounted and shaped, and maybe even hold a tool and make a few simple cuts, help sand and finish - then the cost is zero! So far they've always fallen for that. Again, they go away knowing how it's done. Who knows, maybe some day they'll decide to get a lathe!
What is really rewarding is to offer a lesson to someone who had never even seen a lathe, then they end up getting of their own and make lots of amazing things! I have a box of tools and wood ready for the next time we go visit one such friend, now in another state. When I ask, she gives me a "shopping list".
JKJ
One friend came for me to make a custom magic wand for her to take to another friend in Florida and she was amazed. Her only previous experience with a lathe was when making lab equipment with a metal lathe and mill decades before when working on her doctorate degree. She assumed wood was turned the same way, by cranking two wheels to move a cutting bit! (like drawing with an Etch-A-Sketch.) She went away with a new perspective! Certainly not a waste of an afternoon on my part!
My brother is a trained machinist. When he has happened to walk in on me while I'm turning, he just stands and looks. He clearly has the feeling that "that just ain't the right way to do it". Seeing handheld tools makes him twitchy. I've offered to let to try it -- he has yet to take me up on it.
Seeing handheld tools makes him twitchy. I've offered to let to try it -- he has yet to take me up on it.
The most amazing set of videos I've ever seen is the series by machinist Chris/Clickspring, making a brass clock, every piece, astounding work.
I watched all 24 videos in the series in fascination. Incredible machining, hand work, cutting the gears, screws, perfect polishing, bluing, everything. Anyone who appreciates high-end craftsmanship might enjoy watching these. The guy is a wizard!
One interesting thing is in video #10 (Making a bezel for the chapter ring), starting around 6:25 he uses a tool called a "graver" with a handle, held in his hand [gasp!] to shape a curve on a brass ring. He said "I finished the final profiling by hand using this HSS graver ... I just can't get enough of this free hand turning." The graver looks like a small scraper. Oh the joy of turning freehand!
He talks more about the gravers in video #12 about making pivots, starting about 3:50 here (and in some other videos too)
Show these to your brother!
I couldn't begin to make a clock, but these videos confirmed my passion for turning metals on the wood lathe. Turning brass is so easy and fun. (I don't know the type of brass he used but I use 360 Free Machining brass.)
JKJ
This is exactly what happened to me. Two years after I retired, I ran into a fellow retired teacher (he was a tech teacher while I spent my days in the academic wing). As we talked, I explained that flat board work was losing its appeal. He invited me to try his lathe. I did and I quickly acquired a strong attraction to the turning process. Twenty six years later, I still spend much of most days in my shop at my lathe. We are still good friends. I still have such an appreciation for his invitation to try his lathe. I've had a very satisfying retirement thanks, in large part, to his invitation.What is really rewarding is to offer a lesson to someone who had never even seen a lathe, then they end up getting of their own a
This is a timely topic for me, too. My first lathe chuck with jaws arrived today. I look forward to using it.
Adam
Adam
