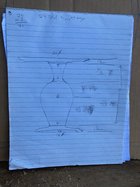
My follow along project is going to be a lathe turned end table. I made a matching pair for our living room and my wife liked them so well she asked for one in the bedroom. After discussing what she wanted and a few hand sketches I looked at a vase she has in the living room and got the idea for the general shape. So here are the hand sketch and a cardboard full size display with a couple different sizes sketched in it. As you see I don't do computer drawings, the hand sketch was just to get an idea of proportions and some measurements. The cardboard drawing is full size except the top isn't accurate. I'm shooting for 21" diameter for it. Total height has to be 24" maximum since it goes in front of a window with shutters that open, so that's where I started to get dimensions and proportions. I hope this inspires someone else to make some tables.

-
Beware of Counterfeit Woodturning Tools (click here for details) -
Johnathan Silwones is starting a new AAW chapter, Southern Alleghenies Woodturners, in Johnstown, PA. (click here for details) -
Congratulations to Jim Hills for "Journey II" being selected as Turning of the Week for May 6th, 2024 (click here for details) -
Welcome new registering member. Your username must be your real First and Last name (for example: John Doe). "Screen names" and "handles" are not allowed and your registration will be deleted if you don't use your real name. Also, do not use all caps nor all lower case.
You are using an out of date browser. It may not display this or other websites correctly.
You should upgrade or use an alternative browser.
You should upgrade or use an alternative browser.
Vince Vogel End Table Project
- Thread starter Vincent Vogel
- Start date
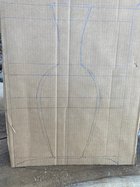
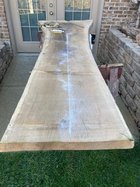
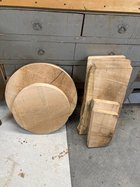
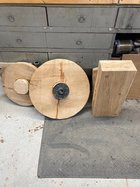
Got my wood gathered and the parts rough sawed. Put a chalk line down the middle of the slab since it wasn't the same width all the way. Then I had to lay it out several different ways to utilize it in the best way and work around cracks and soft sapwood. Now it's in managable pieces the slab was pretty heavy.
Attachments
Nice, Vince. Looking forward to seeing this come to life. I like the idea of making a full-size model.
Did some glue up on the spindle and installed glue blocks on the top and bottom plates. The glue blocks go on the opposite side of the recess for the spindle when it's attached to top and base, so you have to choose which side is the top and bottom of the plates at this point (choosing the grain pattern you like the best). I let the glue dry overnight clamped even though I used ca for the glueblocks.
Attachments
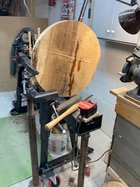
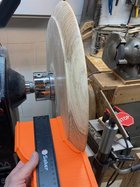
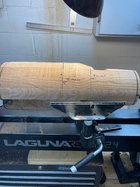
The top is ready to turn and mounted on lathe. I know everyone here probably knows how to mount a faceplate to a glueblock but just in case there's someone who's never done it here's an explanation of how I do it. I have a dimple in the round stock from my divider to mark the circle, then drill a 11/64 hole in the center of the glueblock which will accept a 5/32 transfer punch to align glue block to center of the plate. Then I glued and clamped the glue block overnight. Put the 5/32 transfer punch back in the hole and use centering device to center faceplate. Use transfer punch that will fit the screw holes in faceplate and punch a mark, then drill a pilot hole for your screw and install one screw. Then mark the rest of the holes in faceplate with transfer punch, drill pilot holes and install screws in a sequence opposite of each other. I put an index mark on faceplate and glueblock in case I have to remove faceplate for some reason, but try not to remove it until I'm completely done with it. I use 1 1/4" construction screws which leave 7 threads to go into the glueblock. Length will depend on thickness of your faceplate.
Attachments
Any specific reason you use ca over something like titebond wood glue?Did some glue up on the spindle and installed glue blocks on the top and bottom plates. The glue blocks go on the opposite side of the recess for the spindle when it's attached to top and base, so you have to choose which side is the top and bottom of the plates at this point (choosing the grain pattern you like the best). I let the glue dry overnight clamped even though I used ca for the glueblocks.
Don't know if it's right or wrong, but my reason is it's easier to remove and save the glueblock when done. The ca glue line fractures if you take a wood chisel and drive it into the joint going around the block. Titebond or similar glue fractures the wood on either side of the glueline if you try to separate it which either ruins your workpiece or the glueblock. I guess you could use a parting tool to remove the glueblock. You are correct I could have used titebond since this is dry wood. I let my glueblocks dry overnight no matter what glue I use if at all possible.Any specific reason you use ca over something like titebond wood glue?
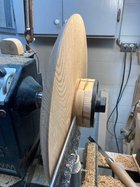
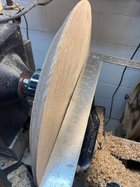
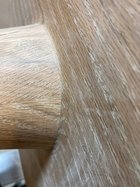
Decided on a 20" diameter, laid out the edge treatment (cove and bead), got the bottom shaped, and flattened the top so the total thickness is 1 1/2". The edge treatment is 1 1/2" wide from the edge and 3/4" to center of it on thickness. The lines are just sort of guidelines . The outside edge is 1/8" wide. Since everything is shaped and flattened I will remove the glueblock next so the top can be flattened the whole way.
Attachments
Last edited:
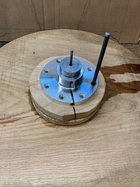
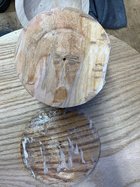
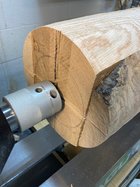
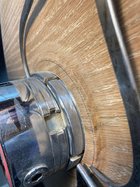
Got the glue block off today and finished flattening the top side. The photo's should help explain using the ca glue for glue blocks. I had to go the whole way around it to get it to release. Results photo shows damage to glue block removing it. I just refaced it and ready to use again. Used gouges and two flat scrapers then sanded with 180 for the top. Will have to post the finished photo tomorrow, forgot to take one today. Does anyone know if Oneway talon chuck jaws will fit a Nova supernova 2 chuck. I would like to have a set of their number 3 jaws if they fit, then I could leave the chuck mounted to the top while I do the bottom with another chuck.
Attachments
Having a glue block that small on such a large radius piece is problematic to part off! Your solution to “chisel” it off is one way of going. I would suggest renaming it a waste block and turning it away. I note this due to my own inability to introduce hammer/ mallets into the process w/o collateral alignment issues from the pounding! Waste blocks are easy to come by in my shop!
I sometimes do use them as wasteblocks, especially if the work piece is something fragile such as a thin bowl. Everything here was heavy duty so I went at it with a hammer. You have to be careful not to miss.Having a glue block that small on such a large radius piece is problematic to part off! Your solution to “chisel” it off is one way of going. I would suggest renaming it a waste block and turning it away. I note this due to my own inability to introduce hammer/ mallets into the process w/o collateral alignment issues from the pounding! Waste blocks are easy to come by in my shop!
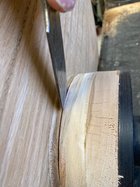
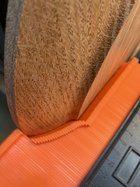
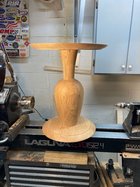
Top is finished as far as I'm taking it until the spindle is done. Bottom is also as far as I'm taking it until the spindle is done. I'm going to try and blend the spindle into the top and bottom so there isn't a seam, we'll see how that goes. First photo is me using this gizmo the kids got me to make a pattern of the edge treatment so I can make the bottom match. Second photo is the bottom edge treatment done ready to sand. Spindle is on lathe between centers ready to make it round.
Attachments
I sometimes do use them as wasteblocks, especially if the work piece is something fragile such as a thin bowl. Everything here was heavy duty so I went at it with a hammer. You have to be careful not to miss.

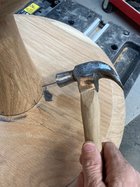
Like this? Thankfully, a tiny hammer!!
Ouch! That’s pretty bad for a little hammer. I used to do body work so I’m used to using a hammer.
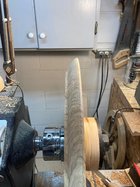
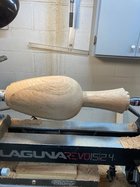
First photo is spindle mounted in lathe with index mark and diameter mark for the bottom. I always use an index mark on spindles, chucked pieces and glueblock/faceplate pieces in case I have to remove the item from holding device and put it back on and have it run true. Second photo is the spindle turned to round and put the dimension lines on it. I use a parting tool to get the diameters close to my drawing, I leave a little extra material. Third photo is turned to fiinish but not sanded, All dimensions ended up pretty close to the full scale drawing, I adjusted them until my customer was satisfied. Tenons were also sized to fit the recess in the top and base snugly to keep everything centered nicely. Fourth photo is the bottom of base showing about 1/8" convex bottom so it will sit on carpet without rocking, If it sits on a hard surface you could put three felt pads on the edge of base to serve same purpose.
Attachments
Looking good, Vince! That's a beautiful curve you've turned. What drive center are you using?
I hope your "customer" is getting excited!")
I hope your "customer" is getting excited!
It's a Nova jumbo drive center. It threads directly to your 1 1/4" spindle, it's about 2 1/4" diameter. What I like is the four spurs are removable so they can be sharpened and the center point is removable/adjustable for depth. I use it for anything heavy and for starting my bowls between centers but I take two spurs out for that so it digs in really well and you can move the blank around to balance the grain and weight easily. I set base and top on the spindle and my "customer" approved. Next step is to sand everything to 320 grit. I won't post pictures of sanding, I think everyone knows how to do that.Looking good, Vince! That's a beautiful curve you've turned. What drive center are you using?
I hope your "customer" is getting excited!
Awesome--thank you for the information! That's a great feature, being able to remove the spurs themselves. So nice.
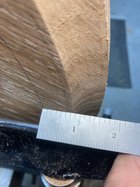
First photo is accurately laying out the edge which will meet the top and bottom of the spindle, I used the calipers to measure the spindle and transfer the measurement to the top and bottom plates. Second photo is the finished product of the top of spindle fitting to the underside of the top plate. I did this to both top and bottom ends of spindle/plates. I think I got them close enough for hand sanding, had to make a light cut and try, then remount and cut again until they fit correctly. Third photo is the stand ready for final assembly.
Attachments
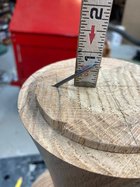
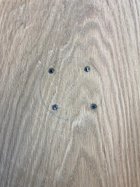
Today I got it final assembled. First photo is the screws in the bottom plate, this is the part that sits on the floor so they won't be seen. I scribed a circle the diameter of the tenon and moved in a little, pre-drilled the holes and used wood glue also. Second photo is the top of spindle drilled to accept nails to hold the top plate. I had 1 1/4" thickness to work with on top plate so as you see the nail is only 3/4" above surface, I had to trim one nail to length. Third photo is driving the nails in after applying wood glue. (you have to be really really careful here Russ so you hit the nail and not the wood). I used a nail set to seat the four nails about 1/8" below surface then mixed up some wood glue and sanding dust I saved to fill the nail holes. So I will let the glue dry for a day and dye it tomorrow.
Attachments
Forgot to mention in yesterday's post I had to re-flatten the top. Over the last 10 days it relaxed a little. Had to take 1/32" off to make it flat again. This is the only piece I've had this happen to. The last two tables I made were fine and the bottom is fine. All the wood came from the same log, cut and stickered inside my garage for 6 years. I put the second coat of USMC black on today. First coat didn't give an even black. I poured some dye in a container and saturated the rag instead of the foam brush because last time I did this the foam brush fell apart before I got done. I will wait a few days to put the conversion varnish on.
Attachments
That looks so nice with the black dye job! Did you ever end up putting on the varnish?
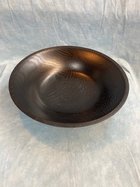
I haven't done the conversion varnish yet. My "customer" wants a black bowl so I'm making one with the scraps left from this project. It will basically be a bowl from a 2" thick board glue up. I want to spray the conversion varnish at the same time on both items because the conversion varnish is catalized and I don't want to mix it twice and end up wasting it. Once catalized it only has a 12 hour pot life at 70 degrees. I will probably do them next week and post the pictures a couple days after I spray them because it's called dull rubbed effect and takes a day or two to go from shine to dull. This is the same finish a lot of cabinet/furniture makers use (kitchen cabinets).
Makes sense!
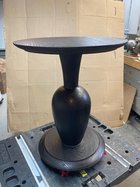
Here is the finished product in it's resting place. I like how the open grain of the oak still shows after the finish. The finish is Three coats of water white clear catylized conversion varnish that is sprayed with a HVLP gun over the usmc black dye.
Attachments
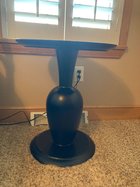
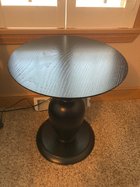

Sweet looking table/ finish Vincent! Nice follow along project!!Here is the finished product in it's resting place. I like how the open grain of the oak still shows after the finish. The finish is Three coats of water white clear catylized conversion varnish that is sprayed with a HVLP gun over the usmc black dye.
Alan Weinberg was asking about a detailed description of the finish I used on the tables so here goes. After letting the usmc dye dry for a couple days I sprayed the tables with sherwin williams conversion varnish, dull rubbed effect is the sheen. As stated above it is water white clear with a 3% catalyst added which gives it a 16 hour pot life at 70 degrees. Use tack rag to clean surface then spray first coat, I used a hvlp gravity feed paint gun for automotive finishes set at 40 psi. Wait 1/2 hour, scuffed with 360 paper and tack rag again. Spray second coat. Wait 45 minutes, scuff and tack rag again, spray third coat. Let it set overnight at 70 degrees F. I took it into the house and let it sit for a couple days before putting it into service. The directions say it's impervious to most anything in the kitchen and house. It's not scratch proof but holds up well to general use. As I said before this finish is used on kitchen cabinets and furniture. If anyone else has questions please ask.
Last edited: