• Congratulations to John K. Jordan winner of the June 2025 Turning Challenge (click here for details)
  • Congratulations to John Shannon"Cherry Bowl" being selected as Turning of the Week for June 30 2025 (click here for details)
  • Welcome new registering member. Your username must be your real First and Last name (for example: John Doe). "Screen names" and "handles" are not allowed and your registration will be deleted if you don't use your real name. Also, do not use all caps nor all lower case.

Vari-grind setup and CBN wheels

Joined
Dec 31, 2023
Messages
87
Likes
42
Location
Atkinson, NH
I got a good deal on a used slow speed grinder with the basic Oneway wolverine setup and two aluminum oxide wheels. The grind angle for my current jig is set by adjusting the distance between the tip of the gouge and the jig. I made depth gauges for different grind angles and it is fast and repeatable. Seems that the varigrind uses a fixed distance between the jig and the tip of the tool and the grind angle is set by adjusting extension of the v-arm. What are the options for quickly and repeatably setting the v-arm to different extension distances corresponding to the grind angles I use (assume it will be used with a CBN wheel that will not be reduced in diameter with use)?

My other questions are about CBN wheels. Having used 1" sanding belts for years I understand the advantage of a wide wheel. Some wheels also have abrasive on the edges. What sort of sharpening is done with the edges of the wheel? What are the advantages/disadvantage of rounded transition (radius edge) versus square?
 
I use PVC pipe to repeatably set the "V" arm extension. See attached photos. Adjust "V" arm without PVC pipe until you have desired grind. Cut PVC pipe to length required to repeat "V" arm extension. Next time you want to duplicate grind slide PVC pipe on to "V" arm, slide "V" into base until PVC pipe touches base and lock down "V" arm as shown in photos. - John
 

Attachments

  • DSC_0005.JPG
    DSC_0005.JPG
    377.2 KB · Views: 33
  • DSC_0006.JPG
    DSC_0006.JPG
    336 KB · Views: 32
The V-arm can be set via PVC as @John King shows, or with a similar stick or whatever else to set the offset.

You can also use a stop collar or hose clamp to set the position (although this just sets one position per v-arm).

I feel like a set of gauges like @john lucas shows in his video are better. (commercial version is called Raptor, but making your own is easy and you aren't stuck with someone else's idea of the best angle). As John says, these sort of gauges are better because they measure from the arm to the wheel, so they compensate for variations in wheel diameter and grinder setup - and also let you take your settings to someone else's grinder.

Once I found the positions I like for my v-arm I got tired of moving it when I changed gouges. So I got some 3/4" square bar and put a bloc on it with multiple holes- one for each distance setting. See https://dlwoodturning.com/multi-position-wolverine-arm/

For the varigrind arm, you can make some setting gagues or simply drill a 1/8" hole thru the 2 pieces - use a drill bit to align the holes and get back to that setting.


The CBN wheels with grit on the side is useful for things you don't want a hollow grind on (like flattening the top of a scraper). Also useful for something like the side of a box scraper, where sharpening that on the face of the wheel, holding the tool sideways, is very awkward.
The radius edges are mainly helpful for the small HSS tips on hollowing tools - you can move the cutter around the radius corner rather than swinging the handle of the tool thru like 180º (Trent Bosch has a video illustrating what I mean - he's using the corner of a stone wheel, but same thing). If you don't need that, then the radius actually gets in the way of using the side of the wheel for things like box scrapers.
 
I use PVC pipe to repeatably set the "V" arm extension. See attached photos. Adjust "V" arm without PVC pipe until you have desired grind. Cut PVC pipe to length required to repeat "V" arm extension. Next time you want to duplicate grind slide PVC pipe on to "V" arm, slide "V" into base until PVC pipe touches base and lock down "V" arm as shown in photos. - John
I use basically the same method as Brian. However, I simplify changing nose angle a bit by slotting each of the PVC pieces length-wise so they can be popped on and off the V-arm without removing the V-arm from the base. The slots can be cut with the CAREFULL use of a bandsaw.
 
I use PVC pipe to repeatably set the "V" arm extension. See attached photos. Adjust "V" arm without PVC pipe until you have desired grind. Cut PVC pipe to length required to repeat "V" arm extension. Next time you want to duplicate grind slide PVC pipe on to "V" arm, slide "V" into base until PVC pipe touches base and lock down "V" arm as shown in photos. - John
A related tip: If the two wheels are the same diameter mount the two bases so that a given V-arm protrusion produces the same bevel angle on both wheels. This facilitates switching from wheel to wheel and requires only one set of pipes.
 
I also use 1"(?) PVC pipe. But, I just put one end in the pocket and slide it in until the the other edge butts up against the base where the arm slides into the base and lock it down. Does that make sense? No need to remove the arm or make dangerous cuts on the PVC pipe. I used to have 3 or 4 lengths but now I pretty much only use one for gouges. Being lazy ... I bought a second Varigrind jig - I set one for bowl gouges and one for spindle gouges and rarely ever have to change the arm position length.

Re: the AO wheels - I doubt you will ever notice the minute change of angle of your tool bevel to the shrinking diameter of your wheel.
 
I got a good deal on a used slow speed grinder with the basic Oneway wolverine setup and two aluminum oxide wheels. The grind angle for my current jig is set by adjusting the distance between the tip of the gouge and the jig. I made depth gauges for different grind angles and it is fast and repeatable. Seems that the varigrind uses a fixed distance between the jig and the tip of the tool and the grind angle is set by adjusting extension of the v-arm. What are the options for quickly and repeatably setting the v-arm to different extension distances corresponding to the grind angles I use (assume it will be used with a CBN wheel that will not be reduced in diameter with use)?

My other questions are about CBN wheels. Having used 1" sanding belts for years I understand the advantage of a wide wheel. Some wheels also have abrasive on the edges. What sort of sharpening is done with the edges of the wheel? What are the advantages/disadvantage of rounded transition (radius edge) versus square?
Use the Craft Supplies raptor set up tools. I use them every time and they are very repeatable.

 
I have seen all sorts of methods from lines scratched on the arm that goes into the base to small pieces of angle iron or shim sticks cut to length. I would have all of them with a hole drilled into them, and place them on an idiot string so they can't get lost in the shavings.... The nice thing about the CBN wheels is that they never change shape. I don't have any with the side grind option. I do have some with the rounded edges, but don't like them and when they wear out, I will replace them with straight edged ones. Only use I would have for the side grind option in my shop would be for my bench chisels and plane irons.

robo hippy
 
Hello! I don’t have much experience, but I do have the 1/2 HP low-speed Rikon grinder with a white wheel stone. I use it for my skew, beading, and roughing gouges, along with a homemade jig one side 40° and the other 50°. However, I think the Raptor jig could be a nice option.
I have to make one for my bolw gouge the pvc pipe as a spacer looks great idea.

I’ve been using it this year, and it’s still working well. I’m also mindful that the wheel’s diameter will eventually shorten. Sharpening is very easy—just two touches are usually enough to refresh the edge.
 

Attachments

  • IMG_7176.jpeg
    IMG_7176.jpeg
    418.8 KB · Views: 13
  • IMG_7175.jpeg
    IMG_7175.jpeg
    456.8 KB · Views: 12
You got some great answers and it's been a while since this thread was active, but I'll just add that I posted another alternative: Simple jigs for setting angles with the oneway wolverine grinding jig. The method works for composite wheels that shrink and is not restricted to a particular Vari-Grind jig setting or gouge protrusion. So you can use it for Ron Brown's approximation to a 40/40 grind as well as a grind with swept back wings.
 
I use PVC pipe to repeatably set the "V" arm extension. See attached photos. Adjust "V" arm without PVC pipe until you have desired grind. Cut PVC pipe to length required to repeat "V" arm extension. Next time you want to duplicate grind slide PVC pipe on to "V" arm, slide "V" into base until PVC pipe touches base and lock down "V" arm as shown in photos. - John
Hi John,
Are you using full pipe that requires removing the V-Arm or are they cut in half to fit over the arm without removing?
 
Apologies if I post too many links to Carl Ford's blog, but I have found so many of his tips helpful and use them daily. This grinder setup keeps me working quickly every day:
 
Apologies if I post too many links to Carl Ford's blog, but I have found so many of his tips helpful and use them daily. This grinder setup keeps me working quickly every day:
That’s great, thanks for all valuable information
 
I got a good deal on a used slow speed grinder with the basic Oneway wolverine setup and two aluminum oxide wheels. The grind angle for my current jig is set by adjusting the distance between the tip of the gouge and the jig. I made depth gauges for different grind angles and it is fast and repeatable. Seems that the varigrind uses a fixed distance between the jig and the tip of the tool and the grind angle is set by adjusting extension of the v-arm. What are the options for quickly and repeatably setting the v-arm to different extension distances corresponding to the grind angles I use (assume it will be used with a CBN wheel that will not be reduced in diameter with use)?

I'm late to this party. I cheat with the varigrind setup. I buy a separate jig for my common grinds and set each once. I know, that's a bit extreme but I'm more than a bit lazy...
To sent the length, I take an existing ground, paint the ground bevel with a blue Sharpie, mount it in the jig for that grind, then slide the v-arm back and forth until rotating the 600-grit CBN wheel a TINY bit by hand removes the blue color all the way from the heal to the tip. Lock it down and sharpen. I've been sharpening this way for lots of years. (Note, I use the jigs for bowl gouges - I sharpen all my spindle gouges on a Tormek with a 10" 1200 grit CBN wheel.

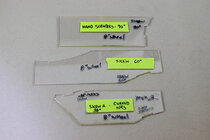
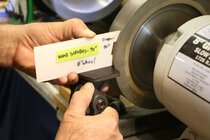
Also, I use the platforms with grinding skews, NRS, and some other tools. (I almost always use the mini platforms) To set the angle of the platform for different uses I made a set of setting gauges from plexiglas, now spray-painted white on the back for visibility. I simply hold the flat of the plastic against the platform and adjust the v-arm distance and platform angle, then grind. Works for me.

Some angle-setting gauges (before adding the white paint)
_scrapers_IMG_7811.jpg

Setting up the platform to grind hand scrapers at 90-deg:
template_angle_IMG_7898.jpg


Some wheels also have abrasive on the edges. What sort of sharpening is done with the edges of the wheel? What are the advantages/disadvantage of rounded transition (radius edge) versus square?

I buy all my CBN wheels with square corners and 1" of grit down the flat sides. I find the flats useful for many things (making certain tools, cleaning up flats on mangled screwdrivers, modifying allen wrenches, etc.)

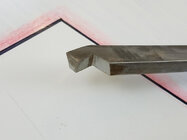
Here's just one example. I made this tool specifically to cut a recess for the chuck on a flat blank squeezed between the open jaws of a chuck on one side and a live center in the tail stock. The live center got in the way of most tools, so I ground this from an old tool. The square corner with side grit on coarse and fine CBN wheels let me easily shape the tool then sharpen it, with good relief to turn the recess with a slight dovetail if desired while staying clear of the live center. It would have been more challenging to make the tool another way, would prob have to change the design.
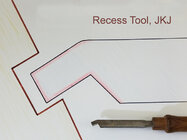
Dovetail_A.jpg

Dovetail_B.jpg

BTW, I keep a box of old tools with handles, either bought cheap or given to me. I make a variety of special tools from them. Also good to send a student home with a sharp tool they don't have. Be aware of one thing about old tools. Some are only hardened for the first few inches! (Cheapskate mfgrs!) I test each one for hardness with a small triangular file and mark the useful part of those that got cheated.

Also, the only advantage I know of for the rounded edges is to sharpen hollowing scraper-type bits that are permanently bonded to long boring bars. For a straight one, you can use the radius on one side of the wheel to sharpen 1/2 of the bit, then switch to the other side of the wheel to sharpen the other side. With the radius, you'd have to swing the entire tool like you do a gouge, perhaps difficult with a long bar! I don't use such tools (mine have removable bits sharpened with the little Jordan jig.)

JKJ
 
I used to mark the v arm where it met the clamp housing. Now I just use a spacer stick between the v arm pocket and the face of the wheel. I can use it on either side of the grinder or on any grinder regardless of where the clamp housing is in relation to the wheel, and it works for ceramic wheels with changing diameters. You can scribe marks or drill holes through the varigrind jig to set various leg angles.
 
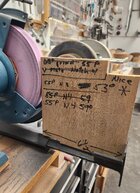
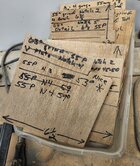
Lot of ways listed to set the v arm. Here is a picture of my way. Really simple, and very fast, only takes a couple seconds. I have boards in 1/4" increments, and a couple in 1/8" also.
Truth be told I could throw out every board under 6" and over 7".
The settings listed are meaningless now as I change out what I like at times.
I have two varigrind jigs with stops at a #3 and #4 setting on one, and the other at a #1 and #2 setting. I drilled and tapped them for some allen head cap screws where the arm bumps up to them.
I was teased by a fellow turner the other day for not switching to cbn wheels. I will soon, as I bought some at the Atlanta symposium but still haven't put them on yet, ha ha.
1000004608.jpg1000004607.jpg
 
Way too complicated. I have the Vari grind bolted at the same setting Doug Thompson has in his handout. I extend gouge 1 3/4 for bowl gouges and 2 for spindle and detail. V extension about an inch longer for bowl gouge than spindle. Don't have a measurement on that. I did pick up a tip as I had used PVC spacer to set this distance before but now I have drilled a hole in the bar receiver and two in the bar to correspond to bowl and spindle. I use a nail in the holes to set distance and used colored tape to designate which is which.
 
Back
Top