• April 2025 Turning Challenge: Turn an Egg! (click here for details)
  • Congratulations to Kelly Shaw winner of the March 2025 Turning Challenge (click here for details)
  • Congratulations to Ellen Starr for "Lotus Temple" being selected as Turning of the Week for 21 April, 2025 (click here for details)
  • Welcome new registering member. Your username must be your real First and Last name (for example: John Doe). "Screen names" and "handles" are not allowed and your registration will be deleted if you don't use your real name. Also, do not use all caps nor all lower case.

Turning Stave Drums on a Lathe

Joined
Feb 27, 2006
Messages
55
Likes
7
Location
Hatteras Island NC
I am primarily a bowl turner. I own a Nova DVR 3000 which has a 16" swing.
I've turned 4-500 bowls from 3" to as big as the Nova would handle (15"+-)
Pretty comfortable with a bowl gouge and/or a carbide cutter. Even some hollowing tools
I've got all the gadgets and tools a woodturner would acquire over 20+ years of turning.

I have a friend who is a drummer and a drum builder. He's already glued up his first stave blank.
So he wants my help because I have a lathe and obviously know how to do such a thing.
Ha!

So I've searched forums and watched some youtube videos
Some ideas but more questions

Turning stave drums presents some issues.
Holding both ends of a 14" (dia) by 8" hollow drum securely on the lathe comes first to mind.
Tailstock end: I guess I need some kind of "faceplate" for the tailstock end. Plywood?
On the drive end: I have a Longworth chuck that could grab one end. Or perhaps make an expansion for a set of cole jaws?
I'm concerned it may not have the holding power for the inside cuts we would need to make, even at low rpm
I'm thinking some kind of steady rest would almost be mandatory.

If anyone on the forum has done such a thing (or similar) and would be willing to pass on some good ideas, they would be most appreciated

Thanks
 
Longworth or Cole jaws will work to drive the drum for the tail stock end make a large cone actually a thick bevel edged platter to center the tail stock end of the drum Turn the outside to shape install steady rest about 1/4 of the length of drum from the tail stock remove the tail stock and turn inside to final thickness. Caution: make sure that toolpost is between tail stock and steady rest before removing tail stock. It is possible to hollow half way then reverse the drum and hollow the other half.
 
I would probably make the glued up blank a little long and hot melt glue the blank to wooden faceplates, top and bottom. After turning and sanding the outside I would start a parting cut on the tail stock end and finish with a saw. Bring up the steady rest, face off the just cut surface, hollow the inside and then repeat the parting cut and saw on the headstock side.

I am confident that there many other alternative processes.
 
Hot melt glue to a faceplate and support with a steady rest for hollowing. I made X shaped braces to turn the outside if my project ( not a drum but similar in shape). Then made a jam chuck out of a large wooden faceplate. Hot glued it to the faceplate and used my steady to support it for hollowing.
 
Yup I concur on the hot glue to faceplates either end (and hopefully the drum is a bit longer than it needs to be finished at) important thing is squared up ends to sit squarely in the faceplates (hard part will be getting the drum centered in faceplates) I turned a set of table legs from a staved glue-up (paper joints between every quarter of the staved drum, so I got 4 quarter round legs) - what I did was turn the faceplates flat and JUST the exact diameter of the largest diameter of the drum which made centering the drum on faceplates easy, then hot glued the drum to faceplates. As an added security thing (since I had paper joints in the form) I also wrapped heavy duty zip ties around either end (It was long enough that I could start a parting cut just inside of the ties once the rounding was finished) Other than that, no problems.
 
I am primarily a stave drum builder, but also do a lot of bowl turning. I use a router setup to round the outside of the shell. I have a video of that process on my instagram- @davis_co_drums. I think the most common way that people turn drum shells on a lathe is to make the shell 2-3" deeper that you need and screw the shell to a very stout and true plywood face plate. Then you can turn the inside and outside and have plenty of clearance since one end is open. Try to find sugar drums on instagram. he has some videos of his process. Ive also seen a few people must the drum shell between centers and build a bridge over the shell for a router to ride in. then you can get a much straighter and more precise diameter, which is pretty important. If the shell is the wrong size, even by a 16th or so, standard lugs won't work very well, and you'll get tension rod splay which looks terrible.
 
Well, I was going to say pretty much what Isaac said, mostly make the staves longer than you need so you can cut it off. You can make a number of different 'face plates' for mounting the bottom end of the drum. You would need some thing similar for turning the top side and the outside of the drum. A steady rest for sure. I guess you could use a router set up, or if you are competent with spindle turning, you could do it by hand.

robo hippy
 
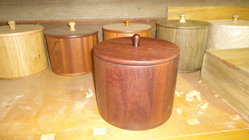
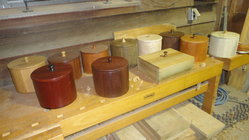
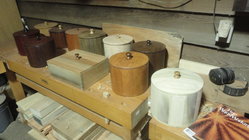
Is this what you had in mind? 12 sides glued up and hen turned round. I center them with jumbo-jaws and put usually 4 flathead screws through the back.

DSC01851.JPGDSC01854.JPGDSC01855.JPG

here's a short one made of koa. I have made them up to 30" in diameter or but now stick in the 10-14" diameter range.

last of the koa.jpg
 
As I use mostly scraps, I don't start until I have enough wood so step 1 is to gather up the material.

2. I cut the rough staves to length* and width a little oversize
3. on the jointer, I flaten one side
4. on the planer, I plane to desired thickness
5. I saw them to width and length, the length usually 2x needed*
6. *after doing hundreds of these, I finally got a 15deg shaper cutter so the staves go together, I bevel both sides leaving about 1/8" in beveled at the base.
7. then using air conditioning duct clamps, I glue the pieces up and squeeze them with the clamps. warning: If the glue instruction say wait 24 hours before stressing joints
they mean it. Having one of these blanks come unglued is like shrapnel flying around.
8. when the glue is dry, I use a set of jumbo jaws with buttons inside and center the work-piece. 4 screws, about 3/4' inches through the jumbo plates is enough (pilot drill the holes)
9. turn away outside first, and sand about a 1-2 inch area where your steady rest will go, 120 grit ok. This will make hollowing out the inside much more bearable, as with some woods, there is a sort of resonance that has to be dampened or else the piece becomes unstable and unscheduled events may transpire.
10. using a glue block, make a bottom piece fitted to the pre-finished inside. Glue it up square to the axis of rotation.
11. using a sacrificial glue block, make a top. leave it loose as the shrinkage is along the circumference and can make the top nearly impossible to remove with out damage. If you Have a heated/ac shop and the finished piece is going in you house at the same humidity, no problem. Of all the hundreds I have made (I give them all away) I have exactly one (19) in my house.

* I do not run any piece thru my shaper less than 12 inches or so, 16: being the usual, so it feeds true and safe (I climb cut on the shaper....not for beginners)

I used to bevel the staves on the table saw. Getting a precise 15deg is difficult as even a .5deg error times 12 staves will not draw up when gluing. What I used to do is glue them up in halves leaving a joint on opposite sides unglued, clamp loosely and use wedges in the unglued joing to force the other staves into alignment. the I onl have to fit two joing together and all the glue lines will look good.
there are all kinds of ways I suppose

Hope this helps
 
you don't really need a jig to cut the staves, you can just rip them on the table saw. Check out https://uniontownlabs.org/tools/stave/ great tool for figuring out your staves.
that's nice, but since I am making one at a time out of otherwise firewood and giving it away, I do not care about economy.

I use either 6, 8, or 12 sides mostly. when you start out, it is good to draw a full size sketch and see what works
 
I used to bevel the staves on the table saw. Getting a precise 15deg is difficult as even a .5deg error times 12 staves will not draw up when gluing. What I used to do is glue them up in halves leaving a joint on opposite sides unglued, clamp loosely and use wedges in the unglued joing to force the other staves into alignment. the I onl have to fit two joing together and all the glue lines will look good.
there are all kinds of ways I suppose
I have never made a drum but I have made many staved turnings similar to my avatar and a visual piece like that requires tight joints not just for strength but appearance.
The method I use is to:
1. flatten a board no more then 8" wide on the (8") jointer and joint at least one edge.
2. run the piece through the planner and the drum sander to eliminate planer snip.
3. Set the saw for the require angle check by making a cut on a scrap and checking with a digital compass.
4. Set the rip fence to remove the minimum required to bevel one edge of the board.
5. Hold the bevel against the jointer table and make a very light cut.
6. Flip the board and after noting the position of the fence move it to the desired stave width then note the difference for subsequent cuts.
7. When all staves are cut dry fit all of them at together and mark on the ends any joints for trimming that are open on the outside trim the inside edge and vice versa.
8. Make a push block for the jointer to hold the stave flat against the table and make a long shim from card stock and tape it down to the jointers infeed table.
9. With the open edge of the stave just barely riding the shim and the tight edge on the table make a very light cut no more then the thickness of the shim.
10. Next put the trimmed staves back into the same position in the dry fit and repeat if necessary.


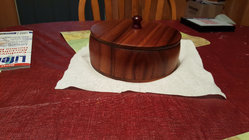
101_1355.JPG
 
I have never made a drum but I have made many staved turnings similar to my avatar and a visual piece like that requires tight joints not just for strength but appearance.
The method I use is to:
1. flatten a board no more then 8" wide on the (8") jointer and joint at least one edge.
2. run the piece through the planner and the drum sander to eliminate planer snip.
3. Set the saw for the require angle check by making a cut on a scrap and checking with a digital compass.
4. Set the rip fence to remove the minimum required to bevel one edge of the board.
5. Hold the bevel against the jointer table and make a very light cut.
6. Flip the board and after noting the position of the fence move it to the desired stave width then note the difference for subsequent cuts.
7. When all staves are cut dry fit all of them at together and mark on the ends any joints for trimming that are open on the outside trim the inside edge and vice versa.
8. Make a push block for the jointer to hold the stave flat against the table and make a long shim from card stock and tape it down to the jointers infeed table.
9. With the open edge of the stave just barely riding the shim and the tight edge on the table make a very light cut no more then the thickness of the shim.
10. Next put the trimmed staves back into the same position in the dry fit and repeat if necessary.


View attachment 48031
Mr Don. Do you have any photos of your table saw and jointer set up. cant quite visualize the process. thanks.
 
Mr Don. Do you have any photos of your table saw and jointer set up. cant quite visualize the process. thanks.
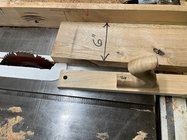
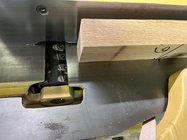
The method I previously described is not practical for 4" wide staves so I revised my method. The material that I used for 14" diameter coopered drum was some very low quality 8 1/4 red oak with lots of blemishes. The finish dimension of the stave is about 4" wide by 1 1/2" thick by 17" long and tried to cut them 6" wide with the excess width being scrap or if that was not possible I glued junk wood onto one edge. The first picture is the saw set for 15 Degrees with the 1st blank ready for the first cut. The 2nd pic is the completed first cut with the scrap. Note: the saw blade is set to no more then 1/4" above the work piece and I didn't have any loose clothing to get caught in the saw.
stave1stcut.jpg
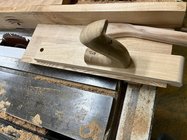
The second cut is made with the work piece flipped but the same square edge will ride against the rip fence. The 2 pictures show ready to start the cut and a partial cut. The push stick is used to push the scrap thru and the plane handled pusher moves the stave thru.
stave2ndcut.jpg

The next step is to joint the edges if necessary. The staves in this case are large enough that they can be safely held against the table for jointing with out any block to hold them. The guard must be released.

stavejointing1.jpg

The next step would be to dry fit the entire 12 stave assembly and check for open joints then mark for trimming the angle if necessary. The paper strip on the infeed table is about 10 thousands inch and that will reduce the angle which in this case was all that was necessary to get all joints tight. Again release the guard.
stavetrimangle.jpg
 
Hear is the glue up.
staveglue up.jpg
I used red oak because I had it but that doesn't mean it is a good choice. What factors do you consider for a drum? I only did this because I liked the challenge.
 
Lots of great ideas. We are making some progress.
Currently we're at expanding a set of Cole Jaws (Oneway Super Jumbo) into the drum and a beveled plate on the tail stock.
Also have a steady rest.

The thought of screwing/gluing onto the drive system is also attractive.
Do you think that would remove the need for the tailstock plate?
Still would use the steady.
 
As a good friend often opined: "should (and shouldn't) are funny kinds of words."

I will report back and let all know whether it should or not
 
Back
Top