• It's time to cast your vote in the November 2024 Turning Challenge. (click here for details)
  • Congratulations to David Bartell for "Place your Burdens Here" being selected as Turning of the Week for November 25, 2024 (click here for details)
  • Welcome new registering member. Your username must be your real First and Last name (for example: John Doe). "Screen names" and "handles" are not allowed and your registration will be deleted if you don't use your real name. Also, do not use all caps nor all lower case.

Tip: protectors for the ends of tools

Joined
Feb 2, 2016
Messages
504
Likes
435
Location
Clinton, TN
Quick tip.

I keep many tools without handles in a shallow drawer behind me when I'm at the lathe, and in other places.

I make custom inserts for tool handles, mount the bare tools in the handles when needed, then often hang them on a wall.
But when in the drawer, the sharpened tools are vulnerable to damage. This is especially true for the extremely sharp cutters on the Hunter tools.
In addition to damage in the shop, the tools can really get damaged when transporting to and from a demo or class.
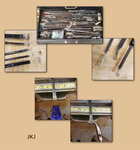
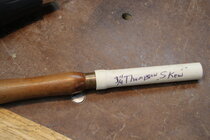
tool_protectors.jpg

To protect the ends I make cheap but effective protectors from plastic tubing. I once went to the hardware store
and bought 3' of every size of clear plastic tubing they had - so handy for many things!

To make the tool tip protectors I cut off a short piece of tubing that will fit snugly on a tool. Heat the end with a
small heat gun until the plastic softens, then squeeze the end together with some pliers.
Sometimes I don't even bother with closing up the ends but just use the piece of tubing.

These work well!

JKJ
 

Tom Gall

TOTW Team
Joined
Feb 20, 2013
Messages
1,099
Likes
2,135
Location
Hillsborough, NJ
@John K Jordan I also use plastic tubing but don't bother to heat the ends. For shorter tools (tool length from handle) I just cut a length a little longer than the tool and slide it on until it hits the ferrule. On longer tools (i.e. gouges) usually a 4-6" long piece will do the trick. Because the tubing comes off a spool there is always a curve, which gives enough friction to keep it it place. Of course, the ID of the tubing should be a little larger than the tool diameter. Easy on - easy off. For some larger tools (i.e. SRG's, etc.) I've used the black foam pipe insulation and use duct tape on the ends - similar purpose to your heat & crimp mentioned above.
 
Joined
Mar 5, 2018
Messages
124
Likes
130
Location
Quorn, Leicestershire, United Kingdom
I use lengths of bicycle inner tube and the wider mountain bicycle inner tube
I cut a length longer than the metal shaft of the tool Seal the end with superglue then stretch the open end over the first couple or inches of the handle
You can put a piece of masking tape over the glued end to improve its appearance you could even colour code
 
Joined
Jul 30, 2021
Messages
266
Likes
81
Location
Aurora, CO
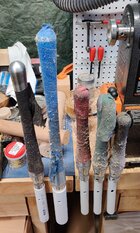
Late last year, I cut up lengths of various sizes of PVC pipe. Drilled holes into one side, smaller holes into the other. Screwed em into the side of my bench:

IMG_20241111_141752.jpg

The think that spurred me on to do this, was a near terrible accident. I had one of those Rockler rotating tool holders that you clamp to the end of your lathe. The tools fit into one of two sized notched holes around the perimeter of a disc. I'd lightly scraped myself a couple of times on sharp gouges, but generally my hands were above the level where injury could occur. Oh, I guess it was early 2023, my father was over, and something fell onto the ground, right under this tool holder. I warned him that the tools were sharp and not to bother with it, but...he went to pick up whatever it was, and just as I had worried, his head came STRIAT UP! Right into the tools. I saved him, by sacrificing the untainted beauty of the back of my right hand. ;P I have a smallish crescent-shaped scar where the gouge that would have pierced my fathers head, pierced right between my index and middle finger.

After that, I first tried to find something to stick over the ends of the tools. That ended up being "fiddly" and was constantly interrupting my turning, as I had to find one of the little plastic covers (and some I kind of custom-formed out of hot glue even!) and fit it onto the end of the tool. I didn't like the constant interruptions, and eventually came up with the setup above (and I have more of that spread around my shop.) In some cases, I used larger PVC to hold things like my buffing wheels, already assembled onto the shafts that attach to my lathes. Sometimes I used a large PVC pipe with a cap to serve as a bowl for little things...screws, or whatever. I actually have been planning to add two more to the same workbench pictured above, to hold my tubs of Acks abrasive paste and finishing polish (which are always getting lost or knocked off my bench.)

I find this approach to be immensely useful, and the great thing about it is the sharp gouge ends are never exposed, and I don't have to waste time looking for some kind of cap to put on them. I just pull out a tool, use it, and slip it back in when I'm done. No time wasted! There was another benefit, too. The Rockler tool holder always had to be removed from the lathe, whenever I needed to take the tailstock off. Which ended up becoming a huge chore, since I had to pull out all the tools, take anything else off of it (the center area of the tool holder was slightly depressed, so it ended up gathering a lot of other stuff. Finishes, drill bits, pen blanks, other small pieces of wood I was turning, etc. Handy, but, taking off the tailstock became a hateful chore. With the pipe approach, all my tools are still readily available and handy, without any hassle.
 
Joined
Jan 20, 2011
Messages
528
Likes
645
Location
Traverse City, MI
I had an old piece of gardent hose in the back of my barn. It just happened to be 5/8" ID and short (~2") pieces stuck on the ends worked great for the big gouges. On smaller diameter tools, a full length piece had enough of a bend to it, to hold it in place.
 
Joined
Feb 26, 2019
Messages
1,915
Likes
1,506
Location
Lebanon, Missouri
Heat the end with a
small heat gun until the plastic softens, then squeeze the end together with some pliers.
Been using the same for years, but never thought of heating it and pinching the end. Will have to give it a try. I’ve also used rubber hose (automotive use) when it was the right size for a tool.
 
Joined
Feb 26, 2019
Messages
1,915
Likes
1,506
Location
Lebanon, Missouri
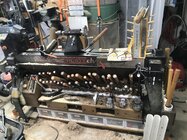
I only use tubing/hose to guard tool tips when traveling with tools. Regarding pvc pipe and storing tools handle up vs tip up, I decided when I started turning all tool tips would be covered, due to either my own or others potentially falling into them, etc. I do use a rack, at the end of the lathe, to hold a few tools currently being used.


1732650179966.jpeg
 
Joined
Jul 30, 2021
Messages
266
Likes
81
Location
Aurora, CO
I only use tubing/hose to guard tool tips when traveling with tools. Regarding pvc pipe and storing tools handle up vs tip up, I decided when I started turning all tool tips would be covered, due to either my own or others potentially falling into them, etc. I do use a rack, at the end of the lathe, to hold a few tools currently being used.


View attachment 69168

Curious, what are those half-cut pieces of pipe free-standing near the lower-right corner?

Also really like the setup you have here. I was planning on maybe drilling some holes in my powermatic legs for chuck hangers, but, I like the idea of putting my chucks on a piece of wood instead. That way there is no damage to the lathe in any respect. You don't happen to have any plans for how you build this whole setup, do you? (The part underneath the lathe there, with all the tools, chucks, and the drawers.) I'd probably need to adjust for my lathe, yours looks longer than mine, but it would be nice to get the rest of my tools off the walls, and into a rack like that.
 

Tom Gall

TOTW Team
Joined
Feb 20, 2013
Messages
1,099
Likes
2,135
Location
Hillsborough, NJ
Curious, what are those half-cut pieces of pipe free-standing near the lower-right corner?
Not Doug here ... but probably lathe bed tool holders. Mine are magnetic - here is a link from several years ago.
 
Joined
Feb 26, 2019
Messages
1,915
Likes
1,506
Location
Lebanon, Missouri
Curious, what are those half-cut pieces of pipe free-standing near the lower-right corner?

Also really like the setup you have here. I was planning on maybe drilling some holes in my powermatic legs for chuck hangers, but, I like the idea of putting my chucks on a piece of wood instead. That way there is no damage to the lathe in any respect. You don't happen to have any plans for how you build this whole setup, do you? (The part underneath the lathe there, with all the tools, chucks, and the drawers.) I'd probably need to adjust for my lathe, yours looks longer than mine, but it would be nice to get the rest of my tools off the walls, and into a rack like that.
The 1/2 cut pipes have magnets underneath, to set it on the bed to hold tools.

Glad you like the setup. As for plans, I made some not-to-scale hand dwgs as I thought through the design, but did not save them (built it ~6 yrs ago). If you look at the lower right end of the lathe, you can see that the pvc pipes run through a box. I used cheap luan ply to hold the pipes, laying out where the pipes would pass through, then drilled out the holes with forstner bits. The top and bottom ply have the same hole pattern. The box has a groove at the top and bottom to position the ply. The ply pices are put in place when the box is glued up, and have a bit of float. I used various sizes of pipe, depending on the tool. PVC couplers are cut in two, then pressed onto the pipe ends sticking out the top and bottom of the box, to hold them in position. The top end pipe/coupler was routered with a radius bit. I dont glue the couplers, friction holds them in place. Most of the tools hit just outside the ferrule on the front of the handle, some rest on the front of the ferrule.

The tool box under the lathe is attached to an upper wood shelf bolted to an upper x piece on the lathe leg. The box itself is “square”, and mounted at an angle. There is a piece of ply attached to the angled tool box, that runs up inside the bed to the front of the lathe, and angles to the back of the lathe, to catch chips the drop down the gap slide them to the backside of the lathe. The whole thing had to be assembled (from subassemblies) in position, and has to be removed the same way.

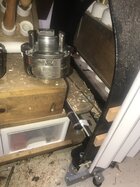
The drawers below sit on a separate wood shelf between the legs. See photo below. Let me know if you have other questions. I can always take more photos.


1732739071034.jpeg
 
Joined
Jul 30, 2021
Messages
266
Likes
81
Location
Aurora, CO
The 1/2 cut pipes have magnets underneath, to set it on the bed to hold tools.

Oh, that's awesome... I never thought of that, but I've used pipes all over my shop! I need to do that, though, man, I set my tools on the bed all the time, and I hate it every time!

Glad you like the setup. As for plans, I made some not-to-scale hand dwgs as I thought through the design, but did not save them (built it ~6 yrs ago). If you look at the lower right end of the lathe, you can see that the pvc pipes run through a box. I used cheap luan ply to hold the pipes, laying out where the pipes would pass through, then drilled out the holes with forstner bits. The top and bottom ply have the same hole pattern. The box has a groove at the top and bottom to position the ply. The ply pices are put in place when the box is glued up, and have a bit of float. I used various sizes of pipe, depending on the tool. PVC couplers are cut in two, then pressed onto the pipe ends sticking out the top and bottom of the box, to hold them in position. The top end pipe/coupler was routered with a radius bit. I dont glue the couplers, friction holds them in place. Most of the tools hit just outside the ferrule on the front of the handle, some rest on the front of the ferrule.

The tool box under the lathe is attached to an upper wood shelf bolted to an upper x piece on the lathe leg. The box itself is “square”, and mounted at an angle. There is a piece of ply attached to the angled tool box, that runs up inside the bed to the front of the lathe, and angles to the back of the lathe, to catch chips the drop down the gap slide them to the backside of the lathe. The whole thing had to be assembled (from subassemblies) in position, and has to be removed the same way.

The drawers below sit on a separate wood shelf between the legs. See photo below. Let me know if you have other questions. I can always take more photos.


View attachment 69235

Thanks. I've got pipe attached to the outsides of most of my workbenches. I've never put in the couplers like that, though... I like that, allows the tools to sit more snugly. If I am seeing correctly, it looks like you also may have cut slots in some of them, to allow flat tools like scrapers and skews to fit nicely? Love it! I have some shop upgrade work to get to after this black friday/cyber monday season.
 
Joined
Oct 9, 2013
Messages
6
Likes
5
Location
Kansas City, MO
Quick tip.

I keep many tools without handles in a shallow drawer behind me when I'm at the lathe, and in other places.

I make custom inserts for tool handles, mount the bare tools in the handles when needed, then often hang them on a wall.
But when in the drawer, the sharpened tools are vulnerable to damage. This is especially true for the extremely sharp cutters on the Hunter tools.
In addition to damage in the shop, the tools can really get damaged when transporting to and from a demo or class.

View attachment 67835

To protect the ends I make cheap but effective protectors from plastic tubing. I once went to the hardware store
and bought 3' of every size of clear plastic tubing they had - so handy for many things!

To make the tool tip protectors I cut off a short piece of tubing that will fit snugly on a tool. Heat the end with a
small heat gun until the plastic softens, then squeeze the end together with some pliers.
Sometimes I don't even bother with closing up the ends but just use the piece of tubing.

These work well!

JKJ
My son-in-law likes to do 3d printing and has made covers that fit perfectly over the ends.
 
Back
Top