• Congratulations to Isaac Litster winner of the January 2025 Turning Challenge (click here for details)
  • Conversations are now Direct Messages (click here for details)
  • Congratulations to Alan Weinberg for "Elm Burl Bowl" being selected as Turning of the Week for January 27, 2025 (click here for details)
  • Welcome new registering member. Your username must be your real First and Last name (for example: John Doe). "Screen names" and "handles" are not allowed and your registration will be deleted if you don't use your real name. Also, do not use all caps nor all lower case.

Tenon busting while hollowing tragedys

Joined
Sep 8, 2015
Messages
28
Likes
0
Location
Cary, NC
Hi Woodturners.

I am getting depressed about the number of natural bowls that I am losing due to tenons breaking off in my chuck.
About half of my attempts are doing so so let me describe my turning environment as best as I can.
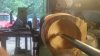
The wood is red oak, not positive about the 'red' but definitely oak. I soak it in a large tub filled with water
and dish detergent to soften it up. Maybe this is part of my problem but the wood is 'just cut' very green in any case.
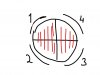
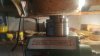
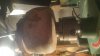
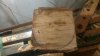
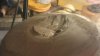
I have a conventional G3 Nova chuck and do my best to create a tenon where I am clamping it within the last 1/4 inch
of the chuck. This always happens when I am hollowing and it can happen right at the start, at the end, or any time in between.
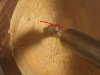
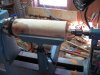
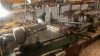
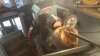
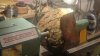
It doesn't even seem to take a catch to make it snap off. I am using a homemade Lyle Jameison-esque hollowing setup with a
Harrison Specialties laser. Using a round or square carbide bit. The round one is very small and cuts very well. The square
cutter I am avoiding now because it has a larger chance of catching because of its size and 4 sharp right angle points.

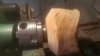
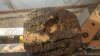
Is there anything I can do to reinforce that tenon joint. The consistent thing is that I end up with pretty much exactly the tenon
remaining in the chuck and my bowl has flung itself somewhere in my garage for me to hunt for. Sometimes I can recreate
a new tenon by reverse mounting but usually I have already drilled a 1" hole to the final depth which precludes doing that.
I check the tightness of the chuck as I am turning as I think that the heat of turning can make the wood twist and shout while
I am hollowing. I am doing all the turning in one continuous session. I don't hollow half of the bowl and then return the following day
to finish it.

This should probably be a separate post but a related question I have is on how to keep the bark on. The best I get normally is half
or less after I am finished turning. I have a feeling that my soaking in water before I turn has alot to do with that. I really like having the
exterior bark showing on the finished bowl and wonder if there is any way to keep it on there.

Thanks very much,
Jim Lee
 
Jim,

I hollow natural edge bowls with a bowl gouge..
I use the tail stock in the initial hollowing.
The scrapers will put more pressure on the bowl and its mounting than the gouge. A big catch will often break a tenon.

I do some natural ended hollow forms with tenon mounts using the Jamison handle an scraper tips.
The tenons hold.

Be sure to make a flat place where your tenon meets the bowl to contact the tops of the jaws.
If the tops of the jaws are not in contact with the bowl it can rock back and crack the tenon.

This is a video of a demo I did last year of natural edge crotch
http://www.youtube.com/watch?v=8jVoI12Kfug

It shows making a tenon. There are a few extra things in the crotch but tools usage is the same.
I do an advanced cut on the hollowing.
I would recommend you use the bevel riding cut I show at the beginning of the hollowing.

Al
 
Last edited:
Jim,
I wanted to follow up with my thoughts that you have a couple of problems.
One is the tenon shape may be off a bit.
In which case the bowl can sort of rock until it splits the wood at the top of the tenon. Many oaks split really easily. So a good tenon is more important than it is with other woods.

1. Do you have the nova jaws that have the straight sides with a tiny dovetail at the top of the jaws? I these nova jaws hold better if the tenon is turned with straight sides and a tiny grove to match the dovetail. The groove can be made with a spindle gouge or the point of skew etc. Don't make the groove too big it needs to be. A tight fit with the tiny dovetail. The tenon length should be a bit less than the height of the jaws. Also make a flat where the tops of the jaws rest.

2. Have you roughed out lots of cut rim bowls? Natural edge bowls with the interrupted cut are a bit more difficult than the cut rim bowls. The natural progression is to get good with cut rim bowls and the begin natural edge bowls.

I suggest you find a turning club near you.
They may have mentors or classes that would give you a good start. Our club is having a turning day in October.
Natural edge bowls will be something some folks do.

Have fun Al
 
Last edited:
I have several questions. The first of course is how large is the tenon. You say 1/4" long which is probably OK. The important thing is to have a square shoulder where the tenon meets the bowl. This helps keep the bowl from rocking in the chuck as you turn. Tightening the chuck periodically when turning wet wood is a good idea because the jaws compress the wood and the forces applied with the cutter tend to rock the bowl which makes the jaws bite in more and then they appear loose.
You say your using a Jamieson style rig. Are you cutting at or above the center line. If your cutting below the center the wood will try to pull the cutter into the wood deeper which would make it catch. I typically use a tenon larger than 2" but not much. Ideally you want the tenon to be just a little larger than the size of the jaws when they are closed. Really large opening of the jaws leaves only the corners of the jaws biting in.
If your using scrapers you should be using the square on the outside and the round one on the inside. You should also be cutting downhill with the grain. ON a side grain bowl where the grain runs perpendicular to the bed you should be cutting from the foot to the lip on the outside and from the lip to the bottom on the inside. This will not only give you cleaner cuts but will reduce the forces on the wood.
 
What diameter is that carbide cutter? Some of those things are TOO BIG! I've seen some 3/4" diameter cutters on those styles of tools, and it's just too much area to control. Look at the size that Lyle uses. Carbide scrapers may have their place, but a fine cut has way less cutting force than the same size scraper.
 
I do not know what effect your presoaking has, but I see it as a waste of time in fresh cut wood as "it ain't gettin no wetter". To address the bark as everything else has been spoken well. Most people use thin CA on the bark edges to help hold it in place. If it does come off pick up some off the floor and glue on then done. The time of year also helps this as winter cut wood with less water will hold bark better. Then when the bowl dries the bark wants to stay the same size and may pucker. For this you can cut a small section out and glue the edges down. As John says you can also let it come off and use a sharpie to color.
 
Ground Hog day hollowing...again

If I was depressed about hollow forming yesterday I am very depressed today.
Two days and two half hollowed bowls with tenons firmly in the chuck and the bowls in
various places on the floor of my work space.

What is most troubling is that I have done hollow form successfully many times before. More or less successfully.
I just spent a full week last month at the John C. Campbell Folk place taking a class on hollow form bowl(ing) taught
by Rudy Lopez. I did 3 hollow forms that did not explode on me. One of which I was actually impressed with.
I was surrounded by 7 other turners making all kinds of crazy hollow forms. Most were amazing.

I am getting Ground Hogged at the very same point. I have a oak natural bowl with about another 3/4 of an inch to hollow.
I am using either a 10mm round carbide bit of a 1/4 inch HSS bit that I created from a square 1/4 inch blank from Graingers.

I am hoping that pictures do tell a story. At least a better story than I can tell in text here.
I am putting all my pictures from yesterday and today's losing battles on Google Photo as I understand there is a limit on
putting photos here. I encourage absolutely anyone who has any interest in my struggles to look at my pics and feel free
to judge. Feel very free to judge about anything you see.

I am, therefore I think, I gotta get out of this Ground Hog Day Hollowing nightmare.

I am uploading the photos as I type. I will return with the link.

Please stay tuned.

Jim Lee

On the photos you can reduce the size of the photo. If you are a AAW member you can get much more space by sending a note to that effect to Steve Worcester,
 
In general I believe that with green wood there is the tendency to over tighten the chuck, crushing the wood fibers and weakening the tenon. To avoid this I tighten the chuck with my left hand which does not have too much strenght being right handed.
The other thing to remember is to check the chuck every few minutes while turning becouse the wet fibers are easily compressed.
Also I put the bowl or log so that the jaws grip the wood at 45 degrees to the fibers increasing the surface of contact when the tenon ovalizes.
I attach a sketch of the kjaws position and of a log 17 x6inches that I hollowed free hand with a Vicmarc 150 chuck. The tenon was 5 inch x 3/16.
Obviously, as said the tenon must be well done with straigt shoulders.
 

Attachments

  • image.jpg
    image.jpg
    68.9 KB · Views: 29
  • image.jpg
    image.jpg
    178.9 KB · Views: 36
  • image.jpg
    image.jpg
    141.9 KB · Views: 34
  • image.jpg
    image.jpg
    130.5 KB · Views: 36
Pictures?

I've been following the thread and I think that some pictures would help. I am not clear on whether you are making a hollow form or a bowl. I think that the grain orientation is cross grain given your description of the failures with the tenons, but perhaps not. I believe that you mentioned using a Jamieson-like hollowing rig, but of course it doesn't have to be for hollow forms only ... it could be used on the interior of a bowl if desired. In the beginning when even the smallest success is a major morale booster all is fair game. I think that my second bowl was mainly "turned" with 60 grit sandpaper (and maybe a little help from a scraper until I felt that I had no confidence in my control over it. :rolleyes:

One of the problems with high intensity all day classes that last a week is information overload. And, if most of what you experienced was brand new to you then there really was a lot to absorb. From what I have read and heard about knowledge retention is that about fifteen to twenty percent retention in such a situation is typical. It could be that the class lacked sufficient repetition or emphasis of some of the salient key points. Did the instructor provide sufficiently detailed printed material to go along with the class so that you would be able to refer back to it as needed? Was the class size sufficiently small so that you could get individual attention to your satisfaction (most instructors limit class size to six unless there are docents to assist the primary instructor)?

The Great Bowl Chase and Ground Hog Day seem to be two of the compulsories in learning to turn. :rolleyes: Your anxiety is probably feeding the problem as you attempt to force success without knowing for certain which buttons to push to make that happen. More than likely, you are very tense as you dread the next great catch from Hell. Sure enough it happens ... because you are tense. I have a David Ellsworth DVD that helped me get over being tense. Before beginning to turn a piece he suggests some "loosening up" exercises. When I first started turning I would get so rigid that I would be like a statue. Being that tense is very fatiguing.

You might consider setting the red oak aside and getting a more user-friendly piece of wood if you can locate some fairly freshly cut green wood that is more tolerant of newbie turners -- perhaps maple, box elder, birch, or Bradford pear or most anything that you spot sitting next to the curb (if you don't know what it is, that's OK, give it a spin.

How much spindle turning have you done so far? It really needs to be the first turning skill that you learn since it is the foundation for the rest of woodturning skills.
 
Last edited:
One other thought

One more thought ... if you are using a hollowing rig then, be sure that you are taking very light gentle cuts. Because you are not getting any force feedback where the rig is taking all the load, it is very easy to be too aggressive in the cuts that you are taking. There are some pretty high forces created when hogging wood and I can see where they could easily cause a tenon to break.

You can post pictures directly to the forum. See the FAQ's if you aren't familiar with using vBulletin forum software.
 
Jim,

Photos will help.
Are you doing hollow vessels, or natural edge bowls?

In using the jamieson system. You want to be sure to set the back rest so that the hollowing bar angles down slightly from level.
Also be sure that the cutters are tilted down slightly.

I can't see you google album photos - permission denied


Al
 
I think your Chuck/Jaw choice is simply your problem. The standard G3 Chuck comes with two inch jaws from what I read. Oak being more porous grain than some woods isn't helping. Someone with lots of experience may get by with it but others not so much. You didn't say what size piece you're turning but anything over 5 inch and a two inch tenon will be suspect to giving way. Someone mentioned putting 1/2 of each jaw on end grain and the 1/2 on side grain (45 degree) which will help. I would suggest purchasing 3" of 4" jaws to handle the stress you're putting on the tenon while hollowing.
 
I do most of my hollow forms mounted on a faceplate and hollowed through the face grain leaving a natural edge opening.

For face grain hollow forms the faceplate provides a superior hold to a chuck.
I do use a chuck from time to time and I have to slow the hollowing and take smaller cuts to minimize vibration.
The chuck mounted form will have vibration with a cut I can take with a faceplate with no vibration so I back off until he vibration goes away or is minimized.

The smaller the form the less vibration. Everything in hollow forms goes up exponentially as the diameters and heights increase.
As Dale points out a 6-7" diameter hollow form will hold quite well on a chuck with little vibration.

A 10-12" diameter hollow form will take 4 times as long to hollow as the 6" and it will have 4 times the vibration with the same mounting.
Vibration in a hollow forms cause one part to cut less and another part to cut more.
The deep cut has more stress the shallow cut less these make the vibration increase.
Eventually a too big of a cut will stall making the wood stop spinning and snap the tenon.
Once vibration starts take a shallow cuts to level the inside surface.

The larger chuck jaws will reduce the vibration with the wider footprint. The bigger tenon for the chuck reduces vibration.
Your success in the class is likely related to the smaller forms used in the class.
classroom hollow forms likely of a 6-7" diameter, this size holds really well on the chuck.
The 10-12 will hold on the chuck but you have take very light cuts.
Rudy is a super teacher so you chose well!

Try a smaller hollow forms start with a 7" diameter. The move up gradually to a 8", 9", 10" .....
If the form start making noise you did not hear at 7" take smaller cuts.
Consider using a faceplate

Work safely,
Al
 
Pictures will tell the tale, but I have a guess.
It sounds like the tenon is popping off along the grain.
Is all of the wood from the same tree, and is there evidence of ring shake?
Oak is not well known for this, but still a chance.
 
Pictures..

Here are some of the pictures.
 

Attachments

  • Shows mount on chuck.jpg
    Shows mount on chuck.jpg
    515.1 KB · Views: 59
  • Shows tenon and bowl.jpg
    Shows tenon and bowl.jpg
    513.3 KB · Views: 59
  • Hollowing Setup.jpg
    Hollowing Setup.jpg
    539.7 KB · Views: 58
  • The Remains of the day.jpg
    The Remains of the day.jpg
    509.6 KB · Views: 57
  • Tenon in chuck.jpg
    Tenon in chuck.jpg
    492.5 KB · Views: 62
This Google photo link should work now that I have shared the files

Google photo link below:
https://goo.gl/photos/JBgN35AHDFtHvKiE6

Let me see if I can slide some more photos in this message.
 

Attachments

  • Marking 7inches.jpg
    Marking 7inches.jpg
    522.1 KB · Views: 43
  • Forstner Bit on bark side.jpg
    Forstner Bit on bark side.jpg
    568.9 KB · Views: 40
  • Initial mounting.jpg
    Initial mounting.jpg
    510.4 KB · Views: 36
  • Hollowing with bowl mounted.jpg
    Hollowing with bowl mounted.jpg
    508.6 KB · Views: 40
  • Remains of the Day.jpg
    Remains of the Day.jpg
    495.3 KB · Views: 41
a few guesses

Pictures will tell the tale, but I have a guess.
It sounds like the tenon is popping off along the grain.
Is all of the wood from the same tree, and is there evidence of ring shake?
Oak is not well known for this, but still a chance.


Mark, another beginner here. I suspect first and foremost that the tenon is too small for the job. At this point I suspect you are overtightening the chuck on the tenon too and very possibly the tenon isn't fitting the jaws well. I broke some tenons off with my chuck jaws, the lightest touch turning just finished the job. Another thing, I also think you are working with an oak that likes to split, makes great firewood. Might need to dedicate it to small stuff and end grain turning or do like me and have a nice bonfire with all of the easily split wood.

I suggest turning some bowls with your hollowing rig so you can see what is going on. Use a sharpie in a color you can see to put a mark on your chuck. Put a witness mark on your wood to match with a pencil. Then tighten the chuck moderately and turn. Only tighten more if you get slippage and only tighten moderately. Your tenon should be at least forty percent of the diameter of a bowl. Turning a hollow vessel or deep bowl it needs to be bigger than that.

I fall more out of love with my chuck all of the time and it is a pretty good one. It is quick and easy but that doesn't make it the best way to hold wood. One of my first purchases other than a lathe was a chuck. With hindsight I wish I had waited six months or a year to buy one. I also chose an easily splitting wood to try to learn on. I didn't know the 40% rule and working on my back porch I watched wood bouncing across my back yard a handful of times before realizing that I needed to do more than power up a lathe and start turning.

Already been said as have most of my suggestions but doublecheck that your cutting edge is on centerline and you don't have flex or movement in your hollowing rig letting the cutting edge get below centerline.

I don't see the pictures either, I would have to join google which I have no intention of doing.

Good luck, relax at the lathe, and have fun. These guys(and gals) will get you going.

Hu
 
Thanks to all for the attention

Thanks to all for the attention. I really appreciate it.

I am currently cogitating on Sergios comment about the amount of clamping pressure I am puttin on the tenon.
I do crank on that.
"In general I believe that with green wood there is the tendency to over tighten the chuck, crushing the wood fibers and weakening the tenon. To avoid this I tighten the chuck with my left hand which does not have too much strenght being right handed. "

Jim Lee
 
Too small tenon for the size of the blank. A two inch chuck is good for small peppermills...
 
Google photo link below: https://goo.gl/photos/JBgN35AHDFtHvKiE6 Let me see if I can slide some more photos in this message.

You will get there!!!

A couple of things to consider.

Your tenon needs some work

1. The surface where to tops of jaws rest should be flat and as smooth as you can get it. See photo arrow. The top of your jaw does not touch the bowl

2. The tenon is touching the bottom of the jaws. My see arrow in photo
These two elements go together. The ton on cannot bottom out inside the jaws and the tops must rest against the bowl. Preferably on a flat smooth surface.

3. It appears that you did not turn the whole outside round. Extra wood sticking out around the rim will increase vibration.
This might be something you do much later for an artistic flair when you can work with the vibration.

4. It appears that your cutter is angled with the right side higher than the left. When you come into the engrain across the bottom the wood will want to climb onto the edge rather than being cut. Be sure it is level left to right.

5. A smaller cutter will make turning slower but will remove less wood making less vibration.

Have you tried hollowing with a gouge?
I find hollowing an open bowl much easier with a gouge.

6. Try modifying the shape. The steep walls and wide bottom make it harder to hollow. A hemisphere shape is easier to hollow as all the cuts are across the grain to the bottom center.
 

Attachments

  • image-2078135864.jpg
    image-2078135864.jpg
    325.1 KB · Views: 39
Thanks to all for the attention. I really appreciate it. I am currently cogitating on Sergios comment about the amount of clamping pressure I am puttin on the tenon. I do crank on that. "In general I believe that with green wood there is the tendency to over tighten the chuck, crushing the wood fibers and weakening the tenon. To avoid this I tighten the chuck with my left hand which does not have too much strenght being right handed. " Jim Lee

Maybe?..???

I use both dovetail jaws and the ONEWAY jaws for bowls and some hollow forms.
I tighten as hard as I can.
My tenons don't pop off

It might help to look at the tenon I turn for a natural edge bowl.
Fast forward to 25:30
View: https://www.youtube.com/watch?v=8jVoI12Kfug


Notice the secondary tenon with the flat top for the tops of the jaws to sit upon.

Fast forward to 29:30
I put it in the chuck then about 30:00 I crank down on it pretty hard with two hands.
This is live oak! I can't hurt in. :)


Al

Al
 
Al, it appears that both of us have been doing some pixel peeping. I saw the same thing in that image. I also saw that there wasn't a clean shoulder and that the end of the tenon bottoms out in the chuck. All of those are bad things. I see what appears to be a catch while working on the exterior near the tenon. Even if that one didn't launch the piece, it could have contributed to the tenon breaking.


Tenon in chuck.jpg

Not that it matters a great deal, but I'm not sure about the wood being red oak. Of course, identifying wood based on a picture is risky, but since red oak is strongly ring-porous and has pronounced medullary rays I would expect that those traits might be more evident. However, the shot of the severed tenon below looks like it might show indications of medullary rays.

You didn't say what tool you used o the exterior, but if it was a bowl gouge, then it was being used with the nose digging into the wood rather than gliding on the bevel of the tool. Oak should cut fairly cleanly when riding the bevel.


Remains of the Day.jpg


The image below is less certain as there is no indication of medullary rays.


Marking 7inches.jpg


In the final image, it appears that the tree has been dead for a while. While white oak will last for a hundred years after the tree dies, red oak decays quite rapidly. The cambium layer definitely is from a tree on its way down and not a living tree. The main thing in the image is that the cutter appears to be cutting below center although it is hard to tell if it is far enough below center to have a big impact.


Hollowing-with-bowl-mounted.jpg


In summary, I would recommend:
  • Use a faceplate for hollow form turning rather than using a chuck. If you use a chuck, I would suggest using a better and larger one ... something like a Oneway Talon with #4 dovetail jaws or a Vicmarc 100 with 148 mm dovetail jaws. I would NOT recommend using a larger Oneway Stronghold or a Vicmarc 120 chuck on your Harbor Freight lathe.
  • Make a clean tenon and shoulder and insure that it doesn't bottom out in the chuck. For a hollowform, the tenon size should be close to the starting cylinder size of the piece.
  • When hollowing with a captive bar rig take light cuts, and check the cutter frequently for sharpness. The cutter should be making contact with the wood at or above center, but never below center. The back end of the hollowing rig should be elevated higher than the cutter.
  • On hollowforms, cutting is more consistent and the warping will be less if you orient the grain along the spin axis. Unless the wood is very stable like mesquite, do NOT include the pith. Turning a piece that has branches runs the risk of splitting around the piths of the branches.
  • Work on tool usage for getting cleaner cuts -- this includes both technique and sharpening.
 
Looks like dovetail jaws on the chuck. Are you tapering the tenon before clamping? I mentioned it before, but that is a lot of cutter. Looks like a scraper as well. Most folks use a Hunter style cutter that is less than 1/4" diameter, or 3/16" square HSS.
 
I cannot see what cutter you are using , but it appears to be a Hunter carbide or some other round carbide. If it is Hunter then then cutter should be angled at 45 degree and not level. You appear to have it angled, but not at 45. If you use these carbides flat as Al said you will get a catch that is definately strong enough to break the tenon.
 
It's not a Hunter tool cutter. They are cupped. This one is flat on top. Speaking of tenon size. For beginners yes a bigger tenon is a plus. I've turned lots of 12 to 14" bowls using my Vicmarc chuck with 2" jaws. In fact I rarely use the larger jaws. The only tenon failures I've had were because the wood had a defect of was punky. Of course I use a gouge and cut downhill with the grain which is the least amount of force on the bowl.
 
I cannot see what cutter you are using , but it appears to be a Hunter carbide or some other round carbide. If it is Hunter then then cutter should be angled at 45 degree and not level. You appear to have it angled, but not at 45. If you use these carbides flat as Al said you will get a catch that is definately strong enough to break the tenon.

Gerald,
To me the scrapper is angled backward at about 15 degrees.
The holder has a dropped nose angling the cutter down.
Will it catch at that angle with the top level?

If the tip is angled forward at 45 degrees it will cut more efficiently.
Will this make a catch if pulled backward instead of being pushed forward?


Al
 

Attachments

  • image-3895026658.jpg
    image-3895026658.jpg
    373.7 KB · Views: 28
  • image-3028717722.jpg
    image-3028717722.jpg
    339.8 KB · Views: 28
Last edited:
... Will this make a catch if pulled backward instead of being pushed forward?

It's one thing when shear scraping inside a bowl and you angle the scraper downward a bit and roll it up on its left edge and then pull it towards you starting at the center bottom and ending up at the rim, but this isn't a bowl ... and, in fact it is almost like an inverted bowl ... widest at the bottom and narrower at the top. This means that on a pull cut that you would be using the part of the scraper that is slightly aft of mid-port side. Combining that with using the scraper below centerline might prove to be interesting.
 
Looking at the cutter closer it appears to be a cupped cutter similar to the Hunter cutters. They will catch big time when cutting flat whether it's tilted left or right. On those cutters you either have to tilt it forward to about 30 degrees or you have to rub the bevel. That's the problem he's having. The cup part of the cutter wants to pull it into the wood deeper. We experimented with tilted down angles from 15 degrees to 45 degrees and the 30 degree worked the best. Here are some videos showing the use of the Hunter Hercules, Osprey and the original #4 Hunter which is mounted flat like the cutter he's using. What started my whole series of videos on the Hunter tools was people using them flat and getting catches. I could see instantly that you could use that tool differently and it would be a really sweet tool.
https://www.youtube.com/watch?v=nfp2kvhH6Mo
https://www.youtube.com/watch?v=vzrLN8SQ8ms
https://www.youtube.com/watch?v=FnFdDo0jxGU
 
John, Gerald,

I don't have experience with the large Hunter types on a fixed shaft.

The tool tip appears to be angled down.
I can't tell the angle 15 degrees? A true hollowing tool has to cut on both sides of the tip.
I have used the small hunters a bit in hollowing and the cut/ scrape in the level position on both sides.

I can see where angling the cutter would yield a better (maybe bevel riding) cut in the push cut.
I have been using this bevel riding cut ( thanks John) on a hand held Hunter tool.
On the fixed shaft too If it is angled and pulled backward by mistake will it
A. catch or
B. just not cut because the cutting edge is away from the wood?

With a traditional scraper angled along the shaft axis a push works great. But a backward pull risks contacting the bevel with results in a big catch.

Al
 
Last edited:
John, Gerald,

I don't have experience with the large Hunter types on a fixed shaft.

The tool tip appears to be angled down.
I can't tell the angle 15 degrees? A true hollowing tool has to cut on both sides of the tip.
I have used the small hunters a bit in hollowing and the cut/ scrape in the level position on both sides.

I can see where angling the cutter would yield a better (maybe bevel riding) cut in the push cut.
I have been using this bevel riding cut ( thanks John) on a hand held Hunter tool.
On the fixed shaft too If it is angled and pulled backward by mistake will it
A. catch or .......

Al, Watch the Hunter videos that John posted. The Hunter cutter can be used with a push or a pull cut and if angled properly at the beginning will still be angled properly at the end of the cut on a side wall.
 
Al, Watch the Hunter videos that John posted. The Hunter cutter can be used with a push or a pull cut and if angled properly at the beginning will still be angled properly at the end of the cut on a side wall.


Gerald, with the interior being angled inwards as the cutter approaches the opening at the top and with the front of the cutter tilted down AND cutting below centerline ... wouldn't the cutter be cutting somewhat on the back side ... where the edge is angled up ... it looks might there could be a tendency for the cutter to self feed into the wood. I think that I would at least want to get the cutter up higher so that it is slightly above center.

BTW, per John's comments about carbide cutters with raised edges, I have a Rolly Munro hollowing tip that uses a raised edge carbide cutter and is held level. The thing that keeps it from self feeding is the guard on top that allows you to choose how much of the cutter to expose. It is really nice to be able to take fine shavings without being super critical on cutter orientation.[/quote]
 
In basic hollowing through the face grain, I would cut on the left side of the cutter near the rim, right side of the cutter along the bottom.
The cut position in the cutter moves from left to right across the center as I cut down the wall.

Gerald and John are saying the cutter shown is cupped an can only be used tilted facing the cut.
A cutter with this property is not useful for general hollowing in a captured system which fixes the orientation of the cutter.
Jim,
is your cutter cupped?

The form shown in the photos is like an open bowl and could be hollowed with a gouge or using the tool shown in the videos with the cutter tilted forward.
John' videos are terrific BTW.

Jim, if you orient the cutting tip like John shows and take the light cuts you should be able to cut from rim to bottom center with your tool in the captured system.
Be sure to cut at center or you will leave a bump in the bottom.
The cutter will work best removing an 1/8 inch or less of wood at a time. Take a lot of light cuts and you will get a lot of good practice doing the cut.
I would use a bowl gouge to hollow an open bowl, your trapped system A hand held scraper or hand held carbide would do the job too.

The bowl gouge can remove a 1/2 to 3/4 inch of wood at time making quick work of opening the inside.
Then the finish cuts with the gouge take a 1/4, 1/8, 1/16, 1/32.... And you have a clean finish
Or you could use a combination of the gouge to cut the wall down to 3/4" thick then finish from there with the carbide.

I believe that your tenon size and lack of a flat for the tops of the jaws and angle of the cutter are working together to break the tenon.
The cutter is either catching or creating excessive stress with " mini catches" and the bowl is able to vibrate on the tenon until it cracks.
 
Last edited:
Big carbide is tough to control.

Using the bigger cutter will take more finesse, but I think the issue is as others have pointed out, the tenon sitting against the bottom of the chuck and the top of the jaws not sitting flush.
I make the tenon with a wide flat space for the top of the jaws to sit flat against and then about 1/8" shallow to the bottom of the chuck. I also chuck jaws are too small. Bigger is always better. More wood to avoid the shearing of the tenon. The only time I have sheared a tenon is in Ash, with a lot of space between annular rings, and using a coring tool too aggressively.
I don't use a hollowing rig for bowls. Not that it wouldn't work, I don't think I can get as clean of a cut with the rig as i can with a bowl gouge.
 
I think that it is a flat topped cutter.

View attachment 8845

Bill, I think it is a Hunter cutter. The cutter on Easy Wood tools are flat on top with not that much thickness and do not have the side angle like the hunter tools do. Also the side looks polished like a Hunter is .
 
Back
Top