• It's time to cast your vote in the November 2024 Turning Challenge. (click here for details)
  • Congratulations to David Bartell for "Place your Burdens Here" being selected as Turning of the Week for November 25, 2024 (click here for details)
  • Welcome new registering member. Your username must be your real First and Last name (for example: John Doe). "Screen names" and "handles" are not allowed and your registration will be deleted if you don't use your real name. Also, do not use all caps nor all lower case.

Techniques for turning long tapers

Joined
Jan 8, 2021
Messages
342
Likes
455
Location
Wrentham, MA
Working on a table, which requires 3 legs, which are 28" long and taper from 1 7/8" at the top down to 3/4" at the bottom. Looking for hints and techniques to improve speed and efficiency. The first leg is done, but it seemed to take an eternity. My basic approach - blank is Curly Soft Maple and is 32" long, started between centers and roughed it round at 2" with a tenon at the top end. Routed the mortises in each leg (60* apart, as table is triangle). The taper starts at the lower end of the tenon and goes down to the bottom of the leg. With a parting tool and calipers, cleaned the top of the leg to just past the mortises to 1 7/8", and sized the bottom to 3/4". The taper is 26", so at halfway point, 13" determined that the diameter is 1 5/16" and sized it accordingly with parting tool and caliper.

Started with the lower half and established the taper between the mid and bottom, using first a SRG, then a skew. Found the skew was giving better results, so went with it. Started with the bottom 6" inches or so, and worked the taper down from 2" diameter, then moved up another 4" doing the same. Then moved to the mid point, and reduced the diameter to roughly 1 3/8". Here is where I struggle. The rough taper is established over a 13" distance, and the challenge is to smoothly plane down the surface with the skew. My focus is on the top of the silhouette, and not on the bevel, but I'm struggling to extend the focus to a longer plane to guide me. The cut quality is not the issue, as I'm stopping frequently to hone, but the result is a bit choppy and undulates a bit.

At this point, I laid a straight edge on the taper to start to identify high spots, marked them, and then smoothed them down with light, smoothing cuts, similar to the approach used with a hand plane. Then followed essentially the same method for the top half.

Anything jump out to work on - I'd like to be able to make longer cuts which are less undulating as you look down the leg and reduce the amount of time finding and cleaning up high spots.

Thanks
 
Joined
Jun 1, 2006
Messages
335
Likes
165
Location
Freelton, ON
You did not mention the size of your SRG. I have a 1 1/4” SRG and the freshly sharpened wing, about 1/2” long, is far easier to use than a skew in this application with adequate finish. I made four stools a number of years ago and was knocking off the legs in probably 15 minutes by the time I finished the 16th. The use of the straight edge is good for evaluating. I finish off with a 2-3” wide strip of cloth backed 120 sandpaper looped over the spindle and it evens out any unevenness. We had a cane project at our guild and I did make a long toolrest out of hard maple to speed things up. Also use a Oneway spindle steady rest to deal with whipping.
 
Joined
Feb 28, 2021
Messages
1,397
Likes
1,232
Location
Roulette, PA
Website
www.reallyruralwoodworks.com
What I usually do for long tapers, I use the longest tool rest I have and lightly draw a center line with a pencil (using tool rest as a guide, oh yeah with spindle indexing pin in place as well, for next step) and then using indexing, rotate 90 degrees so that center line is straight up, then I'll measure approximately from that center to try and align my tool rest to fairly closely follow the taper , then it's simply a matter of using fingers against tool rest as a depth stop and follow tool rest the length of the cut until my cut *just* cleans up the depth cuts made with parting tool. Once I get fairly close to done, it's pretty easy to see and adjust taper to go evenly from one depth mark to the other. Works with skew, SRG, Bowl Gouge, Scrapers, whatever tool I'm using. As long as tool rest is nice and smooth and tool glides along easily, it comes out pretty nicely. Granted I have not yet done a long taper (Most of my legs I'll have beads and coves at some part of them anyhow, and others I just do square legs with a hand plane - Shaker style.)
 
Joined
Nov 15, 2020
Messages
594
Likes
460
Location
Huntington, VT
This may get a laugh. Years ago I made a rolling pin and was struggling with making a smooth cylinder, so I resorted to using a jack plane. It worked.

If you have two banjos it's easy enough to make a wooden rest as long as your workpiece and set it to the appropriate taper.
 
Joined
Aug 8, 2024
Messages
26
Likes
17
Location
Blairstown, NJ
Imho, long tapers are easiest with a skew (1" is my preferred tool). Part down only the top at its thickest and the bottom at is thinnest and just connect the two points with the skew...I understand that a lot of folks prefer the long point down for long tapers but I prefer holding the tool with the short point down (in either direction) with some exception but not on tapers. It really makes very short work of the task.
 
Joined
Jan 8, 2021
Messages
342
Likes
455
Location
Wrentham, MA
You did not mention the size of your SRG. Also use a Oneway spindle steady rest to deal with whipping.

It is 1". The skew i've been using is also 1" or so, it might be a hair bigger but not much. Did not use a steady rest, as the top of leg is held in place with a chuck, and the whipping was resolved with better tool positioning and control. Actually, that was one of the best parts about not using a steady rest, instant feedback on the quality of cut and the sharpness of the skew.

The longer toolrest suggested is a great idea - only have a single banjo, but will start looking for another, and might even be able to make a wooden one for this sort of thing, if I make this a habit.
 
Joined
May 4, 2010
Messages
2,588
Likes
2,027
Location
Bozeman, MT
Kirk, I think you're doing everything right. As with most turning projects, the second one will take half the time of the first, and so on. By the time you've done 7, you'll be a whiz. Then you'll remember you only needed 3. 😲
(BTW, if you were going for speed, some unfigured, softer wood would probably have made a difference.)
 
Joined
Feb 2, 2016
Messages
498
Likes
427
Location
Clinton, TN
Anything jump out to work on - I'd like to be able to make longer cuts which are less undulating as you look down the leg

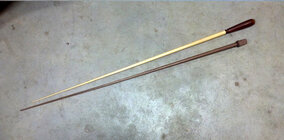
Kirk, I've done a lot of long, thin, tapers. When I do a demo on thin spindles I always take these to pass around as examples. Sorry for the lousy photo.


pointers_B_IMG_20140311_113.jpg
These are extra thin but the same principles apply.

They are over 24" long and taper from about 1/2" down to about 1/16". Like my piano teacher always said, "everything's easy once you know how!"

I added a handle to one - maybe a blackboard pointer except blackboards are rare now. I made it from a piece of shelving pine from Home Depot.

The other is from walnut. I made both with a short 2MT on the end for holding and to keep chuck jaws away from my fingers. Turned them with a skew, don't remember, 1/2" or 1", doesn't matter. I've also used a spindle roughing gouge with the vertical sides but I can make cleaner cuts with a sharp skew.

I don't use any steady rest except for my left hand. I describe all of this in a document I uploaded here in the Tutorials&Tips sub forum.
The doc describes short, thin spindles, but the techniques apply to most thin spindles.


A "cheat" you can do to flatten straight tapers (which I didn't need on those, is to glue some sandpaper to a piece of plywood and use it to flatten while the lathe is spinning..

I've also turned long but thicker spindles the same way, with the skew and the left hand steady rest method. A long tool rest would be helpful but not necessary. I don't have a steady rest but if I did I think it would get in my way.

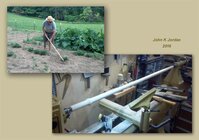
This was a new handle for my favorite shuffle hoe. It looks like I turned this one between centers which I usually avoid since that increases the chance of flexing - better to hold one end tight some way.. I think I used a sanding board on part of this handle. Hickory.

handle_shuffle_hoe_comp.jpg

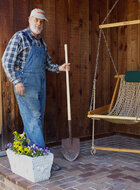
shovel_handle.jpg
It's handy to make handles!


JKJ
 
Last edited:
Joined
Nov 24, 2010
Messages
452
Likes
350
Location
Lexington, KY
The longer toolrest suggested is a great idea - only have a single banjo, but will start looking for another, and might even be able to make a wooden one for this sort of thing, if I make this a habit.

Definitely make a second banjo. About all it takes is some scrap wood and a bolt. That's what I did when I was turning baseball bats and now Windsor chair legs and back posts. No need to buy one.
 
Joined
Mar 21, 2023
Messages
105
Likes
355
Location
Wichita Falls, TX
Just making four legs, calipers and a parting tool to establish progressive diameters as you did is efficient enough. If you were making a lot more, setting up a router jig on you lathe would be a greatt solution.

Tim
 
Joined
Dec 5, 2015
Messages
886
Likes
431
Location
Seattle, WA
Entasis? I'm not sure if this applies to tapered table legs, it does to structural columns. Our very old, family hand me down, dining room table has legs with a straight section with fluting. Recently I noticed the straight sections are not straight even though to the eye they appear to be. They have a definite convex curve I'd never noticed previously.

I suppose it depends on whether you want a thin spindly look to the legs or a show of strength.
 
Joined
Oct 23, 2015
Messages
226
Likes
369
Location
Springdale, Arkansas
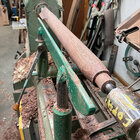
I turn 28-1/2" stool legs almost exactly as Mike Brazeau in reply #2 with a couple of small exceptions. I use 4" wide cloth backed sanding belts to sand. With practice I no longer need to use my Oneway spindle steady. A completely finished leg with tenon is less than 15 minutes on a slow day.

I found a long tool rest does help. Set it to the approximate leg taper and go to town. The 4" wide sanding belt will quickly eliminate any small whoops faster than more tool work. Pictured is my shop made tool rest right after I got it complete turning a fat leg. A wood tool rest will also work.
IMG_E5696.JPG
 
Joined
Aug 14, 2007
Messages
5,738
Likes
3,071
Location
Eugene, OR
Well, until you master the skew, you may have to resort to the "80 grit gouge" on a board. A long tool rest really helps so you don't have to move it around so much. You could easily make one out of plywood and put a piece of A drill rod on the top. The air tempered drill rod is considerably harder than the W or O (water/oil), but not as hard as the hardened stuff, and I have no idea how to do that. A couple of big wing nuts and make your own base plates and you have a longer rest. You could get fancy and try to make the top to arc like you want your table legs, and the drill rod will bend a bit. Epoxy the drill rod to the top of the plywood base.

robo hippy
 
Joined
Aug 14, 2009
Messages
2,337
Likes
1,420
Location
Peoria, Illinois
Long tapers are a skill that needs to be learned. It won't happen right away. I use an 11" long sanding block to help guide my final cuts. With an 80 grit abrasive, it identifies the high spots really quickly. Then touch up with the skew and then make your final cut. One way to bypass some skills is to use a Porter Cable 371K - 2 1/2" x 14" belt sander to blend all the high and low spots.
 
Joined
Jan 8, 2021
Messages
342
Likes
455
Location
Wrentham, MA
Thanks for all the suggestions and support. Completed the other 2 legs today, and the third one ended up only taking about 30 mins, which is significantly better than the first. The longer rest will be a huge help in the future should I decide to make more of these.
 
Joined
Feb 2, 2016
Messages
498
Likes
427
Location
Clinton, TN
The longer rest will be a huge help in the future should I decide to make more of these
I don't know if it was mentioned here, but some have made long tool rests from a long piece of hardwood, straightened and beveled some, fastened to the banjo on one end and to the lathe bed with perhaps several shop-made wooden bracket. I saw one long enough to turn columns for porch.
 
Back
Top