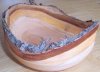
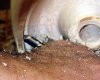
I turned some fresh cherry last night, and made my first NE bowl. I think it turned out okay, but I have a bunch of tearout in the cambium layer (see attached). The wood is still really wet, it was spraying me as I was turning it. I was using freshly sharpened tools and trying to take a good shearing cut, I even increased the speed thinking maybe I could get a cleaner cut - is there anything I should be doing different when trying to turn NE?

-
Beware of Counterfeit Woodturning Tools (click here for details) -
Johnathan Silwones is starting a new AAW chapter, Southern Alleghenies Woodturners, in Johnstown, PA. (click here for details) -
Congratulations to Jim Hills for "Journey II" being selected as Turning of the Week for May 6th, 2024 (click here for details) -
Welcome new registering member. Your username must be your real First and Last name (for example: John Doe). "Screen names" and "handles" are not allowed and your registration will be deleted if you don't use your real name. Also, do not use all caps nor all lower case.
You are using an out of date browser. It may not display this or other websites correctly.
You should upgrade or use an alternative browser.
You should upgrade or use an alternative browser.
Tearout Question
- Thread starter jimbob91577
- Start date
Jimbob,
What kind of gouge are you using?
Are you doing a pull cut or entering the bowl from the rim? (for a natural edge you would normally enter from the rim)
When I do a Natural Edge I normally do it with my Ellsworth Gouge. Basically a fingernail gouge. I prefer to do the finishing cuts with a 3/8 inch. I usually get a Very smooth entry and cut with this. If I have any trouble though I will switch to a square end bowl gouge, 3/8.
Either way, the entry is key. I usually enter with the flute facing my right, on about a 10 oclock/4oclock angle. The bevel will be parallel to the direction I want to travel in as I enter. I can get tiny thin shavings and a smooth surface entering like this. Once I am past the wings I can rotate the gouge to its normal position and sweep on through to the bottom.
Dave
john lucas
AAW Forum Expert
David is correct however the Cambium layer can be particularly difficult to cut tearout free. I often soak the cambium layer with Thinned lacquer or thin CA glue. This not only helps keep the bark on but also reduces tearout. It can cause the sandpaper to clog so I I try to keep it just on the cambium layer if possible.
- Joined
- Mar 7, 2007
- Messages
- 153
- Likes
- 5
I always use thinset CA to keep the bark in tact on NE work. This helps to keep from searching for that missing piece of bark which flies off into space when you do not want it to. There may be an alternative to using CA in the cambium layer which does not sand as well. This is to apply a 50% solution of Myland's cellulose sanding sealer mixed with Acetone for quick drying. This allows the cellulose sealer to penetrate into the tearout areas of the Cambium and dries very quickly with the acetone. You should be able to shear cut through with very little tearout.
I have been using this method routinely during finishing by applying it between grits of sandpaper. I know it works in tearout zones there. I was told by another very experienced turner just yesterday about using this during the gouge cutting process in tearout zones. I have not yet tried it but will the next time I encounter the problem. Should you try it here, please let us know how it worked.
I have been using this method routinely during finishing by applying it between grits of sandpaper. I know it works in tearout zones there. I was told by another very experienced turner just yesterday about using this during the gouge cutting process in tearout zones. I have not yet tried it but will the next time I encounter the problem. Should you try it here, please let us know how it worked.
Last edited:
David:
The technique used was as you described it using a 3/8" Pinnacle (Elsworth Grind) bowl gouge. Shavings were coming out beautifully.
The tearout occurs in both tearout zones both on the inside and outside of the bowl.
On the outside I used a pull method to shape the bottom of said bowl until I started reaching the wings, in which case I switched to the push method. On the inside, It was strictly push method keeping the butt end of the gouge low and quite far away. As I got past the wings I sweapt back to make the bottom curve of the bowl but kept the angle somewhat low to get good shear shavings. For what its worth - the bottom (heart & sap wood) of the bowl is smooth with no tearout.
I also experimented using a heafty bowl scraper on the inside, but to no avail.
John & Bill:
I'll attempt at using thin CA glue next time, however, with the wood being so wet, won't the CA glue simply harden the surface and as I shear away the CA glue, won't it expose the loose wet fibers underneath?
Also does it matter how thick the cambium layer is - in this case it is about 3/8 - 1/2" in thickness.
john lucas
AAW Forum Expert
David your are correct. I should have said that I put the CA on just before the final few passes. Thinned lacquer penetrates a lot deeper and sometimes goes all the way through. It takes quite a bit longer to cure but has the advantage of hardening most of the layer. It doesn't necessarily hold the bark on.
Another trick I use is to use the gouge the I have sharpened in a Stewart Battey grind. It is sharpened to 40 degrees and cuts very cleanly. I also have a Thompson detail gouge that has a lot of metal under the flute and is also sharpened about 40 degrees. Either one of these will cut the cambium layer much more cleanly. You have to slow down and let the tool cut which can be hard when your cutting air like a natural edge bowl. You have to make yourself slow down and not push the tool
Another trick I use is to use the gouge the I have sharpened in a Stewart Battey grind. It is sharpened to 40 degrees and cuts very cleanly. I also have a Thompson detail gouge that has a lot of metal under the flute and is also sharpened about 40 degrees. Either one of these will cut the cambium layer much more cleanly. You have to slow down and let the tool cut which can be hard when your cutting air like a natural edge bowl. You have to make yourself slow down and not push the tool
David:
The technique used was as you described it using a 3/8" Pinnacle (Elsworth Grind) bowl gouge. Shavings were coming out beautifully.
The tearout occurs in both tearout zones both on the inside and outside of the bowl.
On the outside I used a pull method to shape the bottom of said bowl until I started reaching the wings, in which case I switched to the push method. On the inside, It was strictly push method keeping the butt end of the gouge low and quite far away. As I got past the wings I sweapt back to make the bottom curve of the bowl but kept the angle somewhat low to get good shear shavings. For what its worth - the bottom (heart & sap wood) of the bowl is smooth with no tearout.
I also experimented using a heafty bowl scraper on the inside, but to no avail.
John & Bill:
I'll attempt at using thin CA glue next time, however, with the wood being so wet, won't the CA glue simply harden the surface and as I shear away the CA glue, won't it expose the loose wet fibers underneath?
Also does it matter how thick the cambium layer is - in this case it is about 3/8 - 1/2" in thickness.
Jimbob,
After reading your reply I pondered this a bit, trying to think what else I do. I don't have a NEB underway at this point to double check what I am doing.
But....after thinking about it I have a feeling my tool position may be a bit different than yours. For the inside of the bowl.... My gouge is level with the ground, where you mention it being quite low. With the Ellsworth I start the cut in that 10 and 4 position I mentioned, and then as soon as I have enough of a ledge cut to support the bevel I roll the tool to the left until it is 9 and 3 oclock. Basically flute straight up. My bevel is parallel to the direction of travel regardless of the flutes position. I also tend to start doing finishing cuts like this well before I am close enough to need it. That way I can see if I am successfully getting rid of the tear out or not, and have lots of wood left to experiment with other cuts if it doesnot work. Patience is also needed. When I started doing this I found I didn't do enough of these really fine cuts to noticeably affect the tear out. I was taking such fine cuts I needed to do it many times to have an effect.
For the outside of the bowl I use a shearing cut. (I think that is what David E calls it) That has the handle low and the cutting edge angled about 30 degrees or so. I use very light pressure and get a very fine cut. Again, it takes many passes to clean up tear out. I also will try it in both directions since one direction is usually much more effective. I have often been surprised which direction was best. Not always the one I thought.
Dave
- Joined
- May 16, 2005
- Messages
- 3,540
- Likes
- 15
First, let me say that is the most interesting cherry bark I have ever seen. Not at all like ours here, but remarkably similar to birch, with the thick fibrous underbark and papery surface. The cambium, to be precise, is that thin layer of stem cells between the bark and sapwood. Your underbark has no lignin holding it firm, so it'll crumble and peck just like white punky areas in spalted pieces. Dry, it'll cut fine. I use CA to firm it when I think the bark will stay, which helps stop the peck and keeps the bark on through customer handling. Apply between the hog and smooth passes, making sure to either spritz or wait a few minutes when dealing with acid wood like cherry before turning the lathe back on.
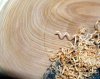
In my experience, cutting across annual rings narrowly is prone to peck-out regardless the wood. As you start to broaden near the base of the piece, it cuts similar to cutting into the broadening figure on a heart-up piece. Not sure why this should be the case, but I rather suspect it's a case of not getting the bevel into play in the narrow gap. I overcome the worst of it by narrowing the face of the cut, so I'm not taking anything more than wire shavings on the last passes. Strictly nose work with a fingernailed grind, more bevel steady and broader cut with a forged type.
As an idea, you can see the stepped work coming in from the edges, and the wire shavings as I get ready to turn toward the bottom. Notice the twisted mess at the zero fpm point. If I had treated the bark, you'd see more of it, but this is a demo where time counts!
Attachments
Michael:
I have two different species of Cherry sitting in my garage - one from Southern California (Mexican Cherry?) cut from a tree prior to the wildfire's this last fall; Elevation about 200 ft - the bark on it reminds me a lot of Pine Tree bark - just the way it looks very similar to the bark in your pictures. The stuff that I made this NEB out of came from a different type of cherry tree and was cut in late October from a tree at 4300 ft elevation. I always assumed cherry trees had the "Papery" bark. It is very pretty wood that is for sure.
The bowl has dried for two days now and although the piece has checked to heck, the section in question (cambium, phloem, Lignin?) has dried a bunch. I anticipate that if I were to turn it again I would get a lot less tearout than when I originally turned it.
Dave:
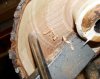
I'll need a picture at some point to be able to accurately visualize your technique. When I first enter the cut, I'm cutting with almost the tip of the gouge, after re-reading my first reply post I understand where the confusion comes from - after getting a good "ledge" to cut I then lower the tool handle slightly so that I'm cutting with the first 1/3 of the right side of the bevel (see attached pic) the flute is still pointed into the opening of the bowl and the butt of the tool handle is still pointing away from me quite a bit. As I move towards the bottom of the bowl, I begin pulling the handle towards me. Invariably I must begin to raise the butt of the handle so that I maintain my cut and also clear the ways (bed) of the lathe - but because I have a good ledge that I'm cutting, I'm still getting good thick (thicker than those in Michael's picture) ribbons at this point that sound smooth, and I'm still cutting with much of that first 1/3 of the side bevel. I continue until I reach the cone in the very center of the bowl which I typically take down as I work, my tool handle will be at about my hip once I have reached the bottom of the bowl. After getting close to my final wall thickness I take lighter cuts so that my ribbons turn stringy, but the tool use is still very much the same. I seem to get good results with regular bowls this way, and the sap and heart wood of my NE bowl looks pretty good - but it is that thick layer between the outer bark and the sap wood that looks terrible.
The way I understand your technique is once you get your ledge, you then twist your tool handle so that the flute is pointing up (or very close to that). You then slide your tool in as you work your way towards the bottom of the bowl. When you reach the curve, you pull your handle back towards yourself, but the whole length of the tool is pretty much parallel with the floor. As you ride your ledge toward the center of your bowl you continue to cut with the flute pointing up. I guess in my case the flute is pointing at almost 60 degrees with the tool handle being fairly low. I'll try and get a picture...
Thanks for the help!
I have two different species of Cherry sitting in my garage - one from Southern California (Mexican Cherry?) cut from a tree prior to the wildfire's this last fall; Elevation about 200 ft - the bark on it reminds me a lot of Pine Tree bark - just the way it looks very similar to the bark in your pictures. The stuff that I made this NEB out of came from a different type of cherry tree and was cut in late October from a tree at 4300 ft elevation. I always assumed cherry trees had the "Papery" bark. It is very pretty wood that is for sure.
The bowl has dried for two days now and although the piece has checked to heck, the section in question (cambium, phloem, Lignin?) has dried a bunch. I anticipate that if I were to turn it again I would get a lot less tearout than when I originally turned it.
Dave:
I'll need a picture at some point to be able to accurately visualize your technique. When I first enter the cut, I'm cutting with almost the tip of the gouge, after re-reading my first reply post I understand where the confusion comes from - after getting a good "ledge" to cut I then lower the tool handle slightly so that I'm cutting with the first 1/3 of the right side of the bevel (see attached pic) the flute is still pointed into the opening of the bowl and the butt of the tool handle is still pointing away from me quite a bit. As I move towards the bottom of the bowl, I begin pulling the handle towards me. Invariably I must begin to raise the butt of the handle so that I maintain my cut and also clear the ways (bed) of the lathe - but because I have a good ledge that I'm cutting, I'm still getting good thick (thicker than those in Michael's picture) ribbons at this point that sound smooth, and I'm still cutting with much of that first 1/3 of the side bevel. I continue until I reach the cone in the very center of the bowl which I typically take down as I work, my tool handle will be at about my hip once I have reached the bottom of the bowl. After getting close to my final wall thickness I take lighter cuts so that my ribbons turn stringy, but the tool use is still very much the same. I seem to get good results with regular bowls this way, and the sap and heart wood of my NE bowl looks pretty good - but it is that thick layer between the outer bark and the sap wood that looks terrible.
The way I understand your technique is once you get your ledge, you then twist your tool handle so that the flute is pointing up (or very close to that). You then slide your tool in as you work your way towards the bottom of the bowl. When you reach the curve, you pull your handle back towards yourself, but the whole length of the tool is pretty much parallel with the floor. As you ride your ledge toward the center of your bowl you continue to cut with the flute pointing up. I guess in my case the flute is pointing at almost 60 degrees with the tool handle being fairly low. I'll try and get a picture...
Thanks for the help!
Attachments
- Joined
- May 16, 2005
- Messages
- 3,540
- Likes
- 15
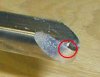
JimBob, I think you're describing the technique I use to hog on interrupted edges. Picture included. It's a fingernail grind, using the area of the tool and approximately the orientation you use. Makes for an aggressive hog with a bit of roughness, as in picture two. No Bark on the soft maple, but cutting characteristics are the same.
Here's a "yellow" birch as opposed to the "cherry" birch, for which I don't have any pictures.
Here's a "yellow" birch as opposed to the "cherry" birch, for which I don't have any pictures.
Attachments

Yeah - only I'm not getting the tearout on the heart and sap wood as I take lighter cuts. Only on the layer between the outer bark and the sap wood.
Is my technique off? Should I be using Thin CA glue to stiffen this area up before cutting?
Is my technique off? Should I be using Thin CA glue to stiffen this area up before cutting?
Jimbob,
Michael Mouse caught it right. Entering and maintaining a roughly 60 degree angle through the whole cut would be what I use for a roughing cut inside the bowl. The flute faces my right with the angle being roughly 10 oclock to 4 oclock. Hogging out if you will. My tool handle is horizontal, and from the bowl it goes off to my right, as in Michaels photo of hogging.
In order to get a finish cut and avoid the tear out I enter in that same position util I have gone inside the bowl perhaps an 1/8 inch or so, just enough to support the bevel. That is the beginning of the ledge I mentioned. The thickness of that ledge is very slight. Then I roll the tool counter clockwise until the flute is nearly straight up and continue arcing around the inside bowl. And as you mentioned, my tool handle is pretty much horizontal the whole time, but the handle is being swung from my right to left as I make the sweep. This keeps the bevel riding along in the direction of my cut. I get the thinnest little threads of wood this way beginning with the time I rotate the flute up to when I get to the bottom. This is probably too much info, but I also try to make sure I can sweep through the whole cut without shuffling my feet so the tool motion is as smooth as possible.
It may not be this evening, but I will try to sketch something out or photograph this for you.
Incidentally, I learned this approach from the DVD/VHS David Ellsworth puts out on using his gouge. He shows this beautifully in the video if you know someone who can loan it to you.
Last edited:
- Joined
- May 16, 2005
- Messages
- 3,540
- Likes
- 15
Yeah - only I'm not getting the tearout on the heart and sap wood as I take lighter cuts. Only on the layer between the outer bark and the sap wood.
Is my technique off? Should I be using Thin CA glue to stiffen this area up before cutting?
I do when the phloem/bast/underbark, or whatever it's going by this week starts to show tiny pecks. Doesn't take much, kills the bacteria that would eat the cambium and slough the bark, and reinforces it against prospective buyers as well. Note that the little light areas that look like peck out are normally peck in. Get them rewetted, and they'll spike up a bunch, waiting to be abraded.
Given the texture of the adjoining bark, I don't obsess over trying to match the strip of soft stuff to the slick of the wood underneath. I'd have to soak a bunch of finish into it to make it close anyway. But I count that as "style,"which makes it a personal thing. Yours may be different.
Oh, strip some of that bast from this and other woods, where it has different color, and make fill material for other pieces. Looks more like wood than sawdust does.
David, the profile of the forged gouge makes holding perpendicular to the rest possible while the edge parallels the work. Since it's such a gentle curve, the chances of an overfeed and recoil are greatly reduced.
- Joined
- Dec 8, 2006
- Messages
- 192
- Likes
- 0
The cherry in jimbob's post looks to me like it may have come from an ornamental cherry tree.