• April 2025 Turning Challenge: Turn an Egg! (click here for details)
  • Congratulations to Kelly Shaw winner of the March 2025 Turning Challenge (click here for details)
  • Congratulations to Ellen Starr for "Lotus Temple" being selected as Turning of the Week for 21 April, 2025 (click here for details)
  • Welcome new registering member. Your username must be your real First and Last name (for example: John Doe). "Screen names" and "handles" are not allowed and your registration will be deleted if you don't use your real name. Also, do not use all caps nor all lower case.

Strategies to reduce chatter marks?

Joined
Jan 14, 2013
Messages
59
Likes
124
Location
North Georgia
Website
hogmountainwoodworks.com
No matter what I do I seem to get chatter marks when I’m hollowing out dry bowls. Green bowls no problem. Outside profile no problem. Inside is where I get problems.

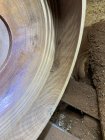
Today was some bone dry milo, from Hawaii. 12”x5” with the rim at about 3/8”. Freshly sharpened 1/2” dway gouge off a 600grit CBN wheel. 40/40 grind. 800ish rpm. 100mm tenon perfectly sized for my chuck jaws and Well seated. PM3520 lathe. I’ve left ‘meat’ inside the bowl to support the rim. A careful slow 1/16” final pass and I still get this the attached results.

The same tool left a flawless finish on the outside of the bowl.

Now- the plus side- it looks way worse in the photo than it was. I couldn’t feel the marks at all and right after I took the photo a few seconds with 180grit abranet with the lathe running and the marks are gone. So maybe I’m fretting over nothing. I’m definitely sanding less these days than I used to but I’d like to get the best cut off the tool possible.

I’ve tried different grinds. I’ve tried my Thompson gouges. I’ve tried supporting the outside rim with my hand.

Thoughts?
 

Attachments

  • 92E5CD81-3E85-4810-B54A-9A48F505DF69.jpeg
    92E5CD81-3E85-4810-B54A-9A48F505DF69.jpeg
    123.2 KB · Views: 180
Here are a few thoughts:
  • Are you cutting slightly above center on the inside?
  • The crack definitely is a contributing factor.
  • Use very light tool pressure.
  • Make sure that the cutting edge is razor sharp.
  • Slow the lathe down to about 400 RPM or less.
  • Using your hand to dampen the vibration is a good idea, but don't use a bare hand especially with that defect. I would suggest a leather work glove and very light hand pressure. Your hand is actually deflecting the wood slightly so that is the reason your hand pressure needs to be very light.
 
Looks like you have mass in the bottom of the bowl.
Crack may introduce some vibration if it isn’t glued tight.
If you did not true the tenon well that could introduce some vibration.

sharp tool, light cuts, float the bevel

my secret weapon on this portion of a bowl is a 1/4” bowl gouge (3/8” bar) - picked it up from Jimmy Clewes. I use a Michelson grind on it, jimmy uses a traditional.

you can see it in action in the mounting and turning a dried bowl demo video in the working with green wood video
https://aawforum.org/community/index.php?threads/working-with-green-wood.11626/

fast forward to 24:18 in the dry bowl demo you will see the finish cut with the Ellsworth grind.
the small shavings from the light cut with the Ellsworth grind sharpened on a 80 grit CBN

1BD754C6-6905-46B0-83DF-796660EBFC5D.jpeg


then at 24:40 you will see the 1/4” bowl gouge. I have a Michelson grind in mine from a 180 CBN. a traditional grind works fine here too.

The 1/4” bowl gouge and the finish from the Ellsworth gouge


91950870-9999-449F-A505-8AB221063C40.jpeg

the cut. Those are the shavings you want. Light cut can sand with 320

749C1881-4C3B-409A-9BB6-644113EEB7DE.jpeg
 
Last edited:
Take very light cuts, take a little pressure off the bevel, relax your grip (if you knuckles are white, you're not doing it right), use the Hannes grind (less bevel to rub and a higher shear angle)
 
MIlo is probably the softest wood that we have. It is by far my favorite to work with. I don't know about chatter marks, I see some even lines, looks to me like bevel marks, you can bruise the Milo very, very easily, you have to barely float the bevel, any contact and you will see it. Milo is so easy to cut, outside and inside that, you can leave a glossy surface.
 
Thanks for the replies.

@Bill Boehme
I do think I was putting too much pressure with my outside hand, maybe that should be a lighter touch. The crack was filled with black CA glue but I think next time I’ll go ahead and repair it with a pewa as well. I did that after the bowl was done. I didn’t try slowing down the lathe- I feel like I get cleaner cuts at higher speeds but I can see where that might cut down on vibration. I did have the cut above center.

@hockenbery
Doesn’t the 3/8” bowl gouge flex/vibrate on you? I have a Thompson 3/8” but never use it, I can feel it flexing. I use a 5/8” for most of my cuts but then change to the freshly sharpened 1/2”- but now that I think about it- part of that is because it’s easier to take a lighter cut with the smaller gouge. I’ll try the 3/8” I have on hand for an even lighter cut.

@Richard Coers
I tend to get more tense with these finishing cuts, I probably was white knuckling it.

@Emiliano Achaval
I LOVE working with the milo. I got this piece from a guy in Honolulu, Mike, when we were visiting two years ago. After I emailed their woodturning club, David Chung reached out to Mike to make sure I had a piece of milo in my haul. David sent me another piece of milo the week before he died, I have a roughed out umeke from it- I’m tempted to leave it as is. I haven’t decided yet. This may have been more bruising than chatter- it sanded out very easily but it looked terrible.
 
Well, as others have already said, that crack will contribute to vibration issues, which is what causes that type of ripple effect. That is a fairly thin wall, which is another thing that contributes to the ripple. Too much bevel pressure is another one, and this is probably the most difficult thing to learn when turning bowls. No ripples on the outside because the mass behind the outside wall keeps it from flexing. "The bevel should rub the wood, but the wood should not know it." That is what 'float the bevel' means. When turning the inside of the bowl, one hand holds the handle of the tool, and the other sits lightly on top of the tool shaft. Don't grab the shaft with that hand, don't put ANY pressure on that hand at all other than gravity. Learning the 1 handed push cut is essential because you learn to float the bevel that way. Kind of scary, but it is essential to get the feel you need for that finish cut. Make sure to grind off at least half of the bevel under the 40/40 grind. That grind is great for going down the outside of a bowl, and for down the wall of a bowl. You can't go across the bottom of a bowl with it, but you can go across the bottom of a platter with it.

Other than that, like my Kung Fu teacher said, "10,000 more times!"

robo hippy
 
@hockenbery
Doesn’t the 3/8” bowl gouge flex/vibrate on you? I have a Thompson 3/8” but never use it, I can feel it flexing. I use a 5/8” for most of my cuts but then change to the freshly sharpened 1/2”- but now that I think about it- part of that is because it’s easier to take a lighter cut with the smaller gouge. I’ll try the 3/8” I have on hand for an even lighter cut.


This is only for the first 1” of the inside wall and only for light finish cuts.
This is within its working range it won’t flex under this use.

if you take a big bite far over the tool rest it will flex.
But you can position the tool rest close and taking light cuts and have minimal extension over the tool rest.

Watch a few minutes of the video to see.
Cut the wall with the 1/2” bowl gouge( 5/8” dia bar) close to finish thickness. Get within 1/8” of what you want.
Then use the 1/4” bowl gouge to cut 1/16, 1/32, 1/64 off the surface ....
Float the bevel over the surface. Tool handle Locked against your side just lean forward to cut 1-2” from the rim.
Then it is back to the 1/2” bowl gouge.(5/8 diameter bar)
 
Last edited:
You might check your spindle end play if the problem is not resolved by the previous suggestions. Bend the tab of the lock washer to free the adjusting nut. I run the tailstock up to the spindle nose and apply some pressure with the handwheel to be sure all bearings are seated and then remove the pressure. Tighten the bearing lock nut finger tight and advance to the next closest locking tab position. The lock washer has some slop where it is keyed to the spindle so try to keep the lock washer counter clockwise to the locking nut advance. Test by running the unloaded spindle at max speed for 3-4 minutes and see if the spindle nose is warm. If warm back off the adjustment to the next closest notch position. It doesn't take much preload to cause the bearings to run warm or hot. Refer to the manual if this is not clear.
 
You might check your spindle end play if the problem is not resolved by the previous suggestions. Bend the tab of the lock washer to free the adjusting nut. I run the tailstock up to the spindle nose and apply some pressure with the handwheel to be sure all bearings are seated and then remove the pressure. Tighten the bearing lock nut finger tight and advance to the next closest locking tab position. The lock washer has some slop where it is keyed to the spindle so try to keep the lock washer counter clockwise to the locking nut advance. Test by running the unloaded spindle at max speed for 3-4 minutes and see if the spindle nose is warm. If warm back off the adjustment to the next closest notch position. It doesn't take much preload to cause the bearings to run warm or hot. Refer to the manual if this is not clear.
Thanks. That’s a good idea.
 
You might check your spindle end play if the problem is not resolved by the previous suggestions. Bend the tab of the lock washer to free the adjusting nut. I run the tailstock up to the spindle nose and apply some pressure with the handwheel to be sure all bearings are seated and then remove the pressure. Tighten the bearing lock nut finger tight and advance to the next closest locking tab position. The lock washer has some slop where it is keyed to the spindle so try to keep the lock washer counter clockwise to the locking nut advance. Test by running the unloaded spindle at max speed for 3-4 minutes and see if the spindle nose is warm. If warm back off the adjustment to the next closest notch position. It doesn't take much preload to cause the bearings to run warm or hot. Refer to the manual if this is not clear.

I think this helped a bunch actually, I had been getting some minor vibrations on the outside of pieces occasionally and those have gone away since I tightened the adjusting nut.

I've taken several of the tips to heart, and had a chance to finish turn several more bowls this week and while I can't say it's one specific tip that helped all of the bowls I've turned have been much better. I went back and watched some of the videos I bought last year from the wood whisper guild and went back to the basics- my stance, my grip on the tool, etc. I think I was getting a little lazy/sloppy with my technique- I spent almost all of last year roughing out bowls and very little finish turning.

Thanks to all.
 
Another thing to look for is paint on the underside of the bed ways. I had areas completely covered with paint to areas with no paint. The paint was fairly thick and was a pain to remove but the headstock clamping action was improved. I move the headstock frequently and had noted areas of the bed where the headstock seemed to vibrate or make noise.
 
Back
Top