• Beware of Counterfeit Woodturning Tools (click here for details)
  • Johnathan Silwones is starting a new AAW chapter, Southern Alleghenies Woodturners, in Johnstown, PA. (click here for details)
  • Congratulations to Jim Hills for "Journey II" being selected as Turning of the Week for May 6th, 2024 (click here for details)
  • Welcome new registering member. Your username must be your real First and Last name (for example: John Doe). "Screen names" and "handles" are not allowed and your registration will be deleted if you don't use your real name. Also, do not use all caps nor all lower case.

Steven Wright

Joined
Jan 28, 2020
Messages
20
Likes
6
Location
Scottsville, Kentucky
Hello, my name is Steven Wright.
Thank you for having me. I have been lurking and reading here for a couple weeks. I registered a few days ago. I have a Nova Comet II lathe, a full set of easywood easy start tools, a full set of woodpeckers full size tools, and dovetail scraper. I will learn to use HSS tools and sharpening when I can. I am having good success with the carbide tools, and I just don't have the skill yet to go further than they can.
I also make boxes with inlay.
I will keep reading and watching.
Also Robohippy I dig your videos. Keep up the good work.
I keep looking thru your galleries and I am just amazed at the skills you all have.
Thank you!
Steve

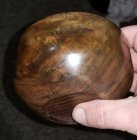
Here is a little bowl.
img1a.jpg

Warped red elm bowl. Learning how to dry them.

img2a.jpg

This is a little box I made.

img3a.jpg

This is called ring shake, right? It went all the way thru, after it started.

img4a.jpg

Another bowl.

img5a.jpg

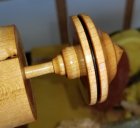
I love making little tops for the kids.
img6a.jpg

Laminate ice cream scoop handle.
Purple heart, ambrosia maple, and reclaimed walnut from a 1940s cabinet.

Correction cherry not ambrosia maple. That is a different blank I made.

img7a.jpg

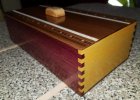
Little purpleheart, yellowheart, and walnut box I made for my sweet wife.
img8a.jpg
 
Last edited by a moderator:

hockenbery

Forum MVP
Beta Tester
TOTW Team
Joined
Apr 27, 2004
Messages
8,676
Likes
5,042
Location
Lakeland, Florida
Website
www.hockenberywoodturning.com
Welcome to the forum.
some nice work can be done with the carbides. You are making good progress.

If you have not already done so consider visiting the local chapters near you.
Great places to learn and share

regarding the ring shake question.
The wood looks like sycamore - sort of quarter sawn
Ring shakes generally follow a growth ring.

I can’t see from the picture if these are following growth rings or not.
If the crack were along the growth rings I drew in red that side of the bowl would likely have broken off.

it’s possible you have partial ring shakes in the growth rings along the bottom but I think they are more likely to case hardening cracks where the outside of the wood block dries first.
When the inside dries and shrinks the dried surfaces don’t move so the inside wood pulls itself apart moving toward the opposite surfaces making these cracks inside a block that shows no cracks until you cut into it.


B97D1C03-A4FF-498C-BFB8-F93D5867E24F.jpeg
 
Joined
Jan 28, 2020
Messages
20
Likes
6
Location
Scottsville, Kentucky
Welcome to the forum.
some nice work can be done with the carbides. You are making good progress.

If you have not already done so consider visiting the local chapters near you.
Great places to learn and share

regarding the ring shake question.
The wood looks like sycamore - sort of quarter sawn
Ring shakes generally follow a growth ring.

I can’t see from the picture if these are following growth rings or not.
If the crack were along the growth rings I drew in red that side of the bowl would likely have broken off.

it’s possible you have partial ring shakes in the growth rings along the bottom but I think they are more likely to case hardening cracks where the outside of the wood block dries first.
When the inside dries and shrinks the dried surfaces don’t move so the inside wood pulls itself apart moving toward the opposite surfaces making these cracks inside a block that shows no cracks until you cut into it.


View attachment 31876

Thank you!
It was a twice turned blank. It was advertised as lacewood. Here are some more pictures. I tried soaking in thin CA and using activator. I just kept going untill I turned all the way thru to the mortise.

20200130_140952.jpg


20200130_141037.jpg


20200130_140937.jpg
 
Joined
Jan 28, 2020
Messages
20
Likes
6
Location
Scottsville, Kentucky
Thank you Bill. Without following instructions I just sorta did what I thought would work. I have been reading alot more in here instead of watching videos on YouTube. I turned the bowl that cracked to approx 1" then dried over two days for 1.5 minutes in the microwave.
That is the problem, I should of saved shavings, paper bagged and been patient. I have one total failure above, one warped red elm bowl, and one drying in a paperbag with shavings. Small ones are fine, bigger diameters is where it gets difficult to dry? Thank you all again.
 

Bill Boehme

Administrator
Staff member
Beta Tester
TOTW Team
Joined
Jan 27, 2005
Messages
12,903
Likes
5,194
Location
Dalworthington Gardens, TX
Website
pbase.com
Thank you Bill. Without following instructions I just sorta did what I thought would work. I have been reading alot more in here instead of watching videos on YouTube. I turned the bowl that cracked to approx 1" then dried over two days for 1.5 minutes in the microwave.
That is the problem, I should of saved shavings, paper bagged and been patient. I have one total failure above, one warped red elm bowl, and one drying in a paperbag with shavings. Small ones are fine, bigger diameters is where it gets difficult to dry? Thank you all again.

Microwave drying is risky business because it will most certainly lead to case hardening (i.e., the outer surface becomes very dry while the interior is still very wet). Dry wood is very limited in how much it can move before it splits. With a hard dry exterior and a wet interior, it becomes more problematic for drying wood without cracking.

Microwave drying is best done on a thin turning because it is able to warp without cracking as it dries. Unlike microwave cooking, microwave drying of woodturnings done properly is a slow labor intensive procedure. It is so much easier to let turnings dry "naturally".

My preferred method of drying rough turnings is to coat the wood with Anchorseal and then let it dry for three or four months. I am not a fan of putting a turning in a bag of shavings. It might work in some local climates, but here in north Texas the shavings act as a desiccant rather than slowing down the drying process. The other problem with shavings in a humid climate is mold. I think that paper bagging works much better without the shavings.
 
Joined
Jul 26, 2016
Messages
2,326
Likes
1,106
Location
Nebraska
Steven,

There was a comedian named Steven Wright back in the 80's that did some dry humor on the late night tv shows, part of his comedy shtick was he had a Shetland pony named Nikkie.
 
Joined
Jul 26, 2016
Messages
2,326
Likes
1,106
Location
Nebraska
Steven,

The punch line was his pony suffered an electrolysis accident and lost the hair on his entire body except for his tail, he then started renting the pony out to Hare Krishna parties.
 
Joined
Mar 1, 2020
Messages
89
Likes
85
Location
Lebanon, TN
Come down to a Nashville meeting, we had one scheduled for tonight, but it was cancelled due to the tornado devastation last night, tornado missed us by a couple of miles.

Beyond woodworking/turning, looks like we have other similar interest.
 
Joined
Apr 19, 2018
Messages
84
Likes
88
Location
Chapel Hill, NC
Steven,

The punch line was his pony suffered an electrolysis accident and lost the hair on his entire body except for his tail, he then started renting the pony out to Hare Krishna parties.

One of my favorites: "I have a life-size map of the United States. I spent last week folding it."

Steven - I stopped worrying so much about cracks, holes etc when I discovered the joys of epoxy resin. Sometimes I actually look for wood with imperfections - it adds character.
 

hockenbery

Forum MVP
Beta Tester
TOTW Team
Joined
Apr 27, 2004
Messages
8,676
Likes
5,042
Location
Lakeland, Florida
Website
www.hockenberywoodturning.com
Thank you Bill. Without following instructions I just sorta did what I thought would work. I have been reading alot more in here instead of watching videos on YouTube. I turned the bowl that cracked to approx 1" then dried over two days for 1.5 minutes in the microwave.
That is the problem, I should of saved shavings, paper bagged and been patient. I have one total failure above, one warped red elm bowl, and one drying in a paperbag with shavings. Small ones are fine, bigger diameters is where it gets difficult to dry? Thank you all again.


microwave drying will work on s 1” thick bowl. It takes a lot repeat nuking and resting.

I used to teach classes that met once a week for 3 hours. One of the things we did was to rough turn a 10” diameter bowl to about an inch thick. The students would dry it during the 6 off days in the microwave.
3 minutes at 40% power, at least 30 minutes rest. Repeat. 8-10:cycles. It is dry.
Then the next class they had a dry bowl.
You might consider looking at the thread on working with green wood. It is slides and videos from a demo I do.
https://www.aawforum.org/community/index.php?threads/working-with-green-wood.11626/

The dried bowl I return In the last half of the demo Is sycamore.
It was dried in paper bags. Bowl warped a lot but did not crack.
I avoid using shavings in the paper bags. They promote mold
 
Back
Top